The term “thread” is used to define helical grooves having a constant cross-section and pitch, applied to the side surfaces of a cylindrical or conical shape. It is used for organizing threaded connections and screw (gear-screw) gears. Used in machines, engineering structures, etc.
It is characterized by such indicators as the unit of measurement of diameter, location, profile of the generatrix of the surface on which it is applied, purpose, direction, number of passes. It is these parameters that are decisive when choosing one type of thread or another.
Pipe thread
Pipe threads are a group of standards intended for connecting and sealing various types of structural elements using pipe threads. The quality of work when cutting grooves has a great influence on the reliability of the connection and the structure obtained in this way. Particular attention should be paid to the correlation of the thread with the axis of the pipe to which it is applied.
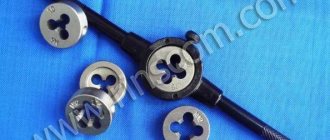
When cutting threads manually using a die, the alignment is far from ideal, which can affect the reliability and quality of the connection. As for the use of tools such as a lathe or electric threading machine, the use of threading heads with an accurate threading knife , here the indicators of the applied thread are comparable to theoretical values.
Our catalog contains thread-cutting machines, thread-cutting dies, heads, knives that ensure the performance of work with high precision. All equipment fully complies with international standards in this area.
What is pipe thread: concept and characteristics
In order to connect parts of water/gas pipelines, threaded type connections will be used in 2022. Grooves of a certain depth and with a fixed distance from each other are applied on the inner or outer part of the pipe. For high quality connections, it is required to use threaded profiles of equal parameters.
3 Instructions for Cold Welding Water Pipes
There are many areas of application for pipe threads, but the main ones in the economy are systems for the construction/repair of houses and apartments. Let's take a closer look at the nature of cutting + the algorithm for applying it.
1) Characteristics and definition of cutting
In international standards, the most widespread is pipe thread under the Whitworth patent, which was officially registered in 1841. The generally accepted designation for pipe threads when marking is “Tr”. If you do not take into account the formalities, the common people call such a thread cylindrical. More than 60% of products are accompanied by this type of cutting.
In second place is metric thread, although within the Russian Federation it is mainly used in industrial systems for transporting liquids and gases. The third common type of pipe connection based on threaded threads is conical. Connections of this type are capable of withstanding enormous mechanical loads, therefore they are used in the manufacture of oil and gas production systems or as part of an element of drilling rigs.
What indicators characterize the pipe thread:
- radius/diameter measurement;
- position;
- profile type;
- direction;
- number of threaded groove passes.
11 tables characterizing the diameter of steel pipes
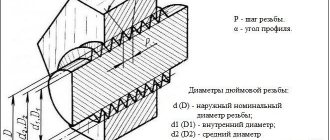
According to the classics, the designation of pipe diameter is in inches (1 inch = 2.54 centimeters). For small sizes, fractions of inches are used in the form of fractions (1/2, ¼, 1/8, and so on). The number of threads that can fit into 1 inch is the thread pitch. If we are talking about metric thread types, then millimeters are already used there. Each type of connection will be described in more detail below.
The characteristics of threads are close to those of pipes, because this element is an integral part of them. When choosing a fitting/fitting at a specialized retail outlet, a minimum set of data is required, which is presented in the table below.
| Parameter | Description |
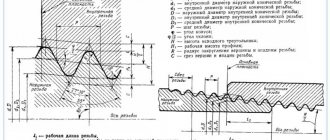
| Pitch (P) | Threaded pitch. In other words, this is the distance between the threads. |
| D | Nominal diameter of the outer part of the thread. |
| D1 | Diameter along the inside of the thread. |
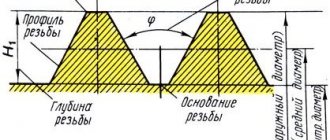
| D2 | The so-called “average diameter” of the thread. Essentially, it is the diameter in relation to an imaginary cylindrical figure with threads. Groove width = ½ nominal thread pitch. |
| Move | The value in millimeters/inches by which the fastening part will move when twisted one 360-degree turn. In the case of knurling in 1 pass = step, when knurling in many passes = step * number of passes. |
If you want to make thread cutting with your own hands, additional data will require the angle of inclination, material and other characteristics. The second integral part of quality work is the direct hands of the master.
Please note: there are 2 methods for determining a compatible threaded connection to the one you already have on hand - dimensional calibration and measurements with a caliper. Greater accuracy is ensured by the first method - the value tends to 98%. Measurements should be taken taking into account hundredths of a millimeter.
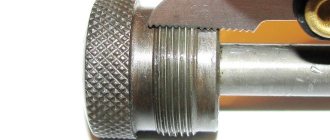
During measuring calibration, special combs of different diameters, on which there are size designations, are alternately inserted into the profile. When taking measurements with a caliper, there is a high risk of data inaccuracy within 1%-3%, and this is already enough to select the wrong diameter of the required profile using the reconciliation tables.
2) How cutting is done + household use
When talking about mass production of profiles, the issue of equipment comes first. The basic unit for the production of pipe threads in accordance with GOST is a milling or turning-screw machine. An alternative (more expensive) is thread rolling machines. The disadvantage of these lies in the narrow specialization of the equipment. If the idea of debugging production fails, selling the hardware will be more difficult than usual.
The table below will tell you about existing thread cutting methods.
| Way | Description | Popularity (out of 5 ★) |
| Screw lathe | The advantage is the high accuracy of the resulting thread, and the disadvantage is the low level of productivity. It is rational to use this cutting method in small businesses or for private use. | ★★★★ |
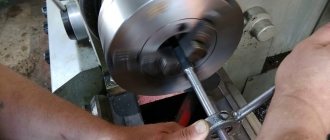
| Tap + die | Similar to the previous option - poor performance. The accuracy is lower than machine accuracy, but thanks to the savings on equipment, the popularity of the method at home is extremely high. | ★★★★★ |
| Knurling | A complete industrial method for forming pipe threads. The process is carried out through plastic deformation of workpieces using dies. The manufacturing process is 90% automated. | ★★★ |
| Milling | For work, milling machine units are used accordingly. Quality and performance are average. | ★★★ |
| Casting | Convenient and fast, but with the use of new technologies, which significantly affects the initial investment in equipment. | ★★★★ |
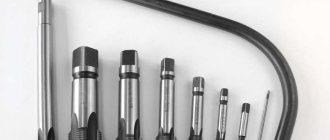
If you want to make pipe threads with your own hands, you can use a specialized tool - KLUPP. The design of the unit is extremely simple - 2 handles for the gate, comb cutters, and the body itself.
In the absence of such a unit, although buying it on Avito and other sites in 2022 will not be a problem, you can actually use a gate, a tap + a die. The last two elements are clamped by the collar with 3 centering bolts. The first pass is made with rough rolling, and subsequent passes with finishing dies and taps.
Important: when applying pipe threads with large diameters, it is rational to use a special bushing. The element will simplify the entry of the die + will reduce the physical costs of the process itself. The likelihood of distortion will be reduced, among other things.
Now a few words about the use of pipe threads. When repairing work at home or apartment, the greatest demand is for cylindrical pipes with inch threads. Less often used are round threads and Edison profiles.
Purpose of pipe thread by size:
- 1/2 - used for the construction of transport water supply systems in houses and apartments throughout the Russian Federation. The diameter allows you to efficiently withstand the pressure of both hot and cold liquids. The main household plumbing units are equipped with ½-inch threads - bathtubs, showers, faucets, and so on;
- 1/4 - similar applications, but only in relation to the extreme parts of the plumbing distribution, where the peak pressure is lower than the main one. The classic application is a faucet in a kitchen/bathroom sink;
- 3/4 – key elements of transportation systems. Typically, the profile connects the pipes at the inlet/outlet of the water supply to the house or when connecting to the distribution manifold.
If we talk about larger pipe thread profiles of 1 and 1.5 inches, then their scope is less wide. In the household sector, these are units in hotels, inns and other large industrial facilities, where compliance with average+ quality and an adequate price tag is required when forming a system.
Tapered pipe thread, R (BSPT)
Used for organizing pipe conical connections, as well as for connecting internal cylindrical and external conical threads (GOST 6357-81). Based on BSW, it is compatible with BSP.
The sealing function in connections using BSPT is performed by the thread itself (due to its compression at the connection point when the fitting is screwed in). Therefore, the use of BSPT must always be accompanied by the use of a sealant.
This type of thread is characterized by the following parameters:
- GOST 6211-81
—Basic standards of interchangeability. Conical pipe thread. - ISO R7
- DIN 2999
- BS 21
- JIS B 0203
designation based on the profile shape – inch thread with a taper (profile in the form of an isosceles triangle with an apex angle of 55 degrees, cone angle φ=3°34′48″).
When designating, a letter index of the thread type is used (R for external and Rc for internal) and a digital indicator of the nominal diameter (for example, R11/4 - conical pipe thread with a nominal diameter of 11/4). The index LH is used to designate left-hand threads.
Thread parameters
Inch thread with taper 1:16 (cone angle φ=3°34′48″). The profile angle at the apex is 55°.
Symbol: letter R for external threads and Rc for internal threads (GOST 6211-81 - Basic norms of interchangeability. Conical pipe threads), numerical value of the nominal thread diameter in inches (inch), letters LH for left-hand threads. For example, a thread with a nominal diameter of 1.1/4 is designated as R 1.1/4.
Table 3
Designation of thread size, steps and nominal values of the outer, middle and inner diameters of conical pipe threads (R), mm
| Thread size designation | Step P | Thread length | Thread diameter in the main plane | |||
| Working | From the end of the pipe to the main plane | Outer d=D | Average d2=D2 | Internal d1=D1 | ||
| 1/16″ | 0,907 | 6,5 | 4,0 | 7,723 | 7,142 | 6,561 |
| 1/8″ | 6,5 | 4,0 | 9,728 | 9,147 | 8,566 | |
| 1/4″ | 1,337 | 9,7 | 6,0 | 13,157 | 12,301 | 11,445 |
| 3/8″ | 10,1 | 6,4 | 16,662 | 15,806 | 14,950 | |
| 1/2″ | 1,814 | 13,2 | 8,2 | 20,955 | 19,793 | 18,631 |
| 3/4″ | 14,5 | 19,5 | 26,441 | 25,279 | 24,117 | |
| 1″ | 2,309 | 16,8 | 10,4 | 33,249 | 31,770 | 30,291 |
| 1.1/4″ | 19,1 | 12,7 | 41,910 | 40,431 | 38,952 | |
| 1.1/2″ | 19,1 | 12,7 | 47,803 | 46,324 | 44,845 | |
| 2″ | 23,4 | 15,9 | 59,614 | 58,135 | 56,565 | |
| 2.1/2″ | 26,7 | 17,5 | 75,184 | 73,705 | 72,226 | |
| 3″ | 29,8 | 20,6 | 87,884 | 86,405 | 84,926 | |
| 3.1/2″ | 31,4 | 22,2 | 100,330 | 98,851 | 97,372 | |
| 4″ | 35,8 | 25,4 | 113,030 | 111,551 | 110,072 | |
| 5″ | 40,1 | 28,6 | 138,430 | 136,951 | 135,472 | |
| 6″ | 40,1 | 28,6 | 163,830 | 162,351 | 160,872 | |
Metric tapered thread. GOST 25229 - 82
Parameter unit: mm
Produced on surfaces with a taper of 1:16
Used when connecting pipelines. The angle at the top of the turn is 60°. The main plane is shifted relative to the end ( see figure above
).
Symbol
The letters MK are followed by an indication of the diameter in the main plane and the thread pitch in mm: MK 30x2
size table
| Thread diameter d for row | Step P | Thread diameter in the main plane | ||||||
| 1 | 2 | d = D | d2=D2 | d1=D1 | l | l1 | l2 | |
| 6 | — | 1 | 6,000 | 5,350 | 4,917 | 8 | 2,5 | 3 |
| 8 | — | 8,000 | 7,350 | 6,917 | ||||
| 10 | — | 10,000 | 9,350 | 8,917 | ||||
| 12 | — | 1,5 | 12,000 | 11,026 | 10,376 | 11 | 3,5 | 4 |
| — | 14 | 14,000 | 13,026 | 12,376 | ||||
| 16 | — | 16,000 | 15,026 | 14,376 | ||||
| — | 18 | 18,000 | 17,026 | 16,376 | ||||
| 20 | — | 20,000 | 19,026 | 18,376 | ||||
| — | 22 | 22,000 | 21,026 | 20,376 | ||||
| 24 | — | 24,000 | 23,026 | 22,376 | ||||
| — | 27 | 2 | 27,000 | 25,701 | 24,835 | 16 | 5 | 6 |
| 30 | — | 30,000 | 28,701 | 27,835 | ||||
| — | 33 | 33,000 | 31,701 | 30,835 | ||||
| 36 | — | 36,000 | 34,701 | 33,835 | ||||
NPSM (National pipe thread) thread
Complies with American standard NSI/ASME B1.20.1.
This type of thread is characterized by the following parameters:
- designation according to the profile shape - inch cylindrical pipe thread (profile in the form of an isosceles triangle with an apex angle of 60 degrees);
- theoretical profile height (H) - 0.866025Р;
- Thread size range: 1/16" to 24" (in accordance with NSI/ASME B36.10M, BS 1600, BS EN 10255 and ISO 65).
Table 4
Designation of thread size NP, steps and nominal values of outer, middle and inner thread diameters, mm
| Thread size designation | Threads per inch | Thread length | Thread diameter in the main plane | |||
| Working | From the end of the pipe to the main plane | Outer d=D | Average d2=D2 | Internal d1=D1 | ||
| 1/16″ | 27 | 6,5 | 4,064 | 7,895 | 7,142 | 6,389 |
| 1/8″ | 7,0 | 4,572 | 10,272 | 9,519 | 8,766 | |
| 1/8″ | 18 | 9,5 | 5,080 | 13,572 | 12,443 | 11,314 |
| 3/8″ | 10,5 | 6,096 | 17,055 | 15,926 | 14,797 | |
| 1/2″ | 14 | 13,5 | 8,128 | 21,223 | 19,772 | 18,321 |
| 3/4″ | 14,0 | 8,611 | 26,568 | 25,117 | 23,666 | |
| 1″ | 11½ | 17,5 | 10,160 | 33,228 | 31,461 | 29,694 |
| 1.1/4″ | 18,0 | 10,668 | 41,985 | 40,218 | 38,451 | |
| 1.1/2″ | 18,5 | 10,668 | 48,054 | 46,287 | 44,520 | |
| 2″ | 19,0 | 11,074 | 60,092 | 58,325 | 56,558 | |
| 2.1/2″ | 8 | 72,699 | ||||
| 3″ | 88,608 | |||||
| 3.1/2″ | 101,316 | |||||
| 4″ | 113,973 | |||||
| 5″ | 141,300 | |||||
| 6″ | 168,275 | |||||
| 8″ | 219,075 | |||||
| 10″ | 273,050 | |||||
| 12″ | 323,850 | |||||
Purpose of thread and its elements
The thread is the main element of the screw drive and threaded connection. It consists of a series of bulges and depressions on the torsion bodies, which provides a fastening that can withstand high loads. Cutting is used as a method of combining or compacting structural links.
The thread provides a fastening that can withstand high loads.
Its main elements are:
- internal, external and middle diameters;
- profile is a cross section of a cut with a plane passing through the main axis of the part under consideration;
- profile angle - the angle formed by the sides of the profile;
- profile height is the length of the segment between the minimum and maximum cutting points in the cross-sectional plane of the axis in the direction orthogonal to the cutting guide;
- pitch - the length of the gap between two points of adjacent identical turns, measured parallel to the axis of the thread.
NPT thread (National pipe thread)
NPT is an American standard used for inch pipe threads. It is used, as a rule, in connections for which it is important to ensure increased tightness of pipes under conditions of exposure to high pressures (gas or liquid). The NPT thread meets the requirements established by the domestic standard GOST 6111-52 (classified as an inch conical pipe thread with a profile angle of 60 degrees).
This type of thread is characterized by the following parameters:
- designation according to profile shape:
- inch pipe cone (angle φ=3°34′48″, taper 1:16) - American standard;
- pipe inch tapered thread with a profile angle of 60 degrees - domestic standard;
- theoretical profile height (H) – 0.866025Р.
Also, in accordance with ANSI/ASME B1.20.1, cylindrical threads (NPS) also belong to this type. Within this standard there is also NPTF. Its peculiarity is the formation of a seal due to the compression of the thread at the connection point.
Inch pipe thread (American standard) (NPT) with a taper of 1:16 (cone angle φ=3°34′48″) or cylindrical (NPS) thread according to ANSI/ASME B1.20.1. The profile angle at the apex is 60°, the theoretical profile height is Н=0.866025Р. NPT thread corresponds to GOST 6111-52 - Conical inch thread with a profile angle of 60 degrees. There is also an NPTF thread - compaction occurs due to thread compression.
Applications and features of inch threads for pipes
Pipe threads are used on pipes and other elements of the pipeline system: fittings, shut-off and control valves, flanges.
Standardized by international specifications. Products with threads are widely used on the following systems:
- where the use of welding is undesirable or impossible;
- where it is necessary to form a dismountable connection;
- which are not subject to pressure or temperature surges, etc.
Previously, each manufacturer applied its own thread, which corresponded to paired parts manufactured in the same production. The need for unification arose when a discrepancy between various parts with threads from different manufacturers was discovered and, as a result, it became impossible to sell or exchange threaded metal products.
The thread differs in such parameters as
- profile angle (55°, 60°);
- shape of protrusions and depressions (sharp, flat, round);
- step (large, small);
- shape (conical, cylindrical);
- number of threads per inch.
In order to satisfy the needs of all industries, there are several types of threads. Moreover, the USA and Europe have their own standard pipe threads, which were created independently of each other. Despite some similarities in parameters, dimensions, and scope of application, threaded pipe fittings of different types cannot be used, since the only result of such a combination is damage to the products and poor quality of connections of pipeline elements.
Designation of thrust thread (GOST 10177-82)
The definition of a thrust thread must contain the letter S, the pitch and the value of the diameter. Example: S90-10. For left-sided cuts, additionally LH is indicated. If multi-pass cutting is considered, then its definition is made up of the symbol S, diameter, stroke and in brackets the letter P, the value of the step. Example: S80-20(P20).
Thrust thread (GOST 10177-82).
Symbol for metric thread (GOST 8724-2002)
The definition of a thread includes the letter M (from the English metric system), the size of the gauge and the pitch of the thread, delimited by the sign “x”. Example: M8x1.25. It is possible not to specify a large step. Example: M8. If the thread is left-handed, then the letters LH are added. Example: M8x1-LH. The definition of a multi-start cut consists of the symbol M, the diameter, the sign “x”, the combination of Ph, the stroke, the symbol P and the pitch. For certainty, you can specify the number of visits.
Metric thread (GOST 8724-2002).
Designation of persistent reinforced thread (GOST 13535-87)
The definition of persistent reinforced cutting contains the letters S, as well as an angle of 45, caliber and pitch. Example: S45200-13. If the thread is left-handed, the letters LH are additionally indicated. If it is necessary to define a multi-start thread, then indicate the letter S, the angle 45, the diameter, the stroke and the symbol P along with the pitch value, highlighted in brackets. Example: S4520024(P12) - two-start, stroke value 24 mm, pitch - 12 mm. For left-sided cuts, additionally LH is indicated.
Reinforced thrust thread (GOST 13535-87).
Symbol for trapezoidal thread (GOST 9484-81)
The definition of a single-cut trapezoidal cutting contains the abbreviation Tr, the value of the outer gauge and the pitch. Example: Tr16x4. For a multi-start trapezoidal cut, the definition includes: the combination of Tr, the external diameter, as well as the pitch and stroke. Example: Tr16x8(P4)LH.
Trapezoidal thread (GOST 9484-81).
