Most of the structures produced by modern industry, made of wood, plastic, metal and other materials, are fastened together using threaded connections. The combination of factors such as reliability and simplicity, without sacrificing efficiency, has led to their widespread use in industrial production, ranging from the construction sector, including mechanical and automotive industry, and ending with the laying of pipelines. Threaded connections, in addition, are actively used for domestic purposes. In general, the thread appears in the form of ridges and valleys of a uniform cross-section in a spiral configuration. The coils can be rolled onto the outer surface of the cylinder, or onto the inner surface of a previously made hole. Let's take a closer look at the existing types of threads.
Metric thread
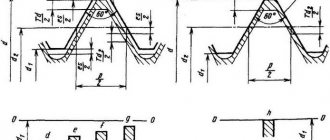
In the mechanical engineering industry, this type of thread is most often used. It got its name – “metric” – because its technical characteristics are measured in millimeters. The thread profile is made in the form of a triangle. The angles at its vertices are 60°.
Peculiarities
Metric threads are manufactured with both fine and wide/coarse pitch. In the figure below, this parameter is indicated by the letter “P”. Let us note the main features of the use of threaded steps of both types.
- Small is used in diameters varying in the range 1.0 mm ≤d≤ 600.0 mm, and large is used in diameters 1.0 mm ≤d≤ 68.0 mm.
- Fine cutting is important for forming connections with increased tightness.
- Large threads are suitable for connections subject to impact loads.
- Most adjustment connections are made using finely rolled threads. The reason is that the small distance separating adjacent turns facilitates the procedure for modifying parameters
Let's name the main ones.
- The ridges of inch joints are characterized by greater length, but they are less wide. The shape of metric thread turns is more balanced - their length is shorter and they are wider.
- The difference in profile does not allow the connection of parts on the surface of which inch and metric threads are rolled. The fastening will be fragile and, no less critically, leaky. This may cause liquids to leak during transport.
Classification and main features
The classification of threads is quite diverse, for example, according to their purpose they are divided into:
- Fastening, used in fixed units or perform a sealing function.
- Chassis or kinematic are used in moving structures.
Classification by surface shape includes:
- Cylindrical.
- Conical.
At the place of application it happens:
- Internal thread.
- External thread.
By profile shape:
- Triangular.
- Trapezoidal.
- Rectangular.
- Round.
- Special.
By direction they are divided into:
- Left.
- Right.
Cylindrical pipe thread
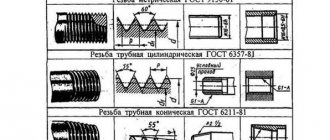
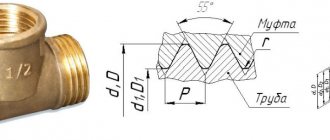
According to the provisions of GOST 6357-81, the profile of a cylindrical pipe thread coincides with the profile of the previously considered inch thread. It is used not only in the pipes themselves, but also in mating pipe-type elements (tees, couplings, bends, etc.). In this case, you need to know one important point. It consists of the following: thread cutting is carried out on pipes with a diameter of no more than 6″. Products larger than 6 inches in diameter are typically welded, providing a higher level of sealing and reliability.
Peculiarities
One of the features of cylindrical pipe threads is the requirement that they be made with rounded ends. This is explained by the type of substances most frequently transported – usually liquids. The rounding of the ridges and valleys is intended to make sealing the joints easier. On sharp peaks, all the most popular sealing materials - both flax and even sealant tape - are cut when tightened tightly. And if you create threaded connections without using paint, they usually leak.
However, GOST 6357-81 has one caveat regarding this. It sounds like this: making internal cylindrical pipe threads with flat cuts is allowed when the possibility of mating with a conical external thread is excluded.
Image of thread on drawings
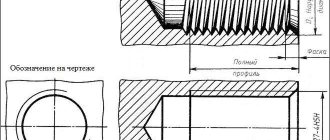
According to GOST 2.311-68, threads of all types are depicted conventionally.
On the rod
The thread on the rod is depicted by solid main lines (s) along the outer diameter and solid thin lines
In the hole
When making a cut, the thread in the hole is depicted with solid main lines along the internal diameter of the thread and solid thin lines along the outer diameter (Fig. 5). In the images obtained by projection onto a plane perpendicular to the axis of the hole, an arc is drawn along the outer diameter of the thread, approximately equal to 3/4 of the circle, open at any place.
The thread boundary in the hole is shown with a solid main line, drawing it to the lines of the outer diameter of the thread.
Hatching lines in sections and sections are drawn to the lines of the outer diameter of the thread on the rod and to the lines of the internal diameter in the hole, i.e. in both cases to the solid main lines.
In connection
On sections of a threaded connection, when depicted on a plane parallel to its axis, only that part of the thread that is not covered by the thread of the rod is shown in the hole (Fig. 6).
Conical pipe thread
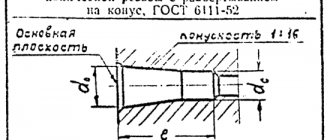
The profile of a conical pipe thread is the same as in the previous version, but the difference lies in the decrease in diameter as you move from the beginning of the thread to the end of the pipe element. The above GOST clearly states that threads of this type are used when it is necessary to ensure the tightness of a pipeline operating under high pressure.
Peculiarities
One of the key features is the requirement for the angle of deviation of the pipe axis from the framing surface of the cone.
Regardless of the diameter, it should form a slope in the proportion of 1:16. This means that the angle φ (see figure) should be 1 degree, 47 minutes and 24 seconds. Other features of conical pipe threads include:
- the number of turns per inch depends on the diameter of the product. In particular, on a segment of 25.4 mm, a minimum of 11 turns can be rolled, and a maximum of 28;
- thread pitch is within 0.907 mm ≤Р≤ 2.309 mm;
- length of the common threaded section on the surfaces of the mating elements after screwing one into the other (parameter l2 in the figure): with a minimum thread of 1/16″ - 4.0 mm; when the thread diameter is maximum 6″ – 28.6 mm.
How to determine thread type
The need to determine the cut thread arises when selecting a part that needs to be attached to an existing threaded connection. There are several ways to do this.
Thread gauge
This is a special device designed to determine the pitch of a cut thread. The device of the instrument is built on the principle of a body to which several probes (thin plates with a comb) are attached. The shape of each of them is similar to the specific size of the cut step.
Metric thread gauge with open inserts Source tdchiz.ru
There are several types of thread gauges:
- Metric. Used to measure the thread pitch of products with a metric type of cutting. Applicable to corresponding diameters: from 1 to 600 mm. The device has 20 different plates that allow you to independently calculate the thread pitch in the range from 0.4 to 7 mm. Metric thread gauges are marked by applying the letter “M” to the body and packaging.
- Inch. Used to determine threads cut on metal pipes and elements mating to them. To determine the thread pitch of the appropriate nature, the number of turns per inch of thread is calculated. The kit of such a tool includes 17 measuring plates with different numbers of turns (from 1 to 28). Denoted by the abbreviation “D55”.
- Universal. Their name speaks for itself - such devices are used to determine threads in both cases. This tool is the most popular, as it allows you to work with all types of threaded connections.
Measuring threads using an electronic caliper Source stroyday.ru
Important! Before you start working with a thread gauge, you will need to measure the diameter of the product with a caliper.
other methods
You can get the exact value in other ways. The specific technique is selected depending on the type of value being sought (internal or external thread), as well as the available means and devices. Depending on the chosen method, this may require a caliper with inch markings, a metal ruler, blank paper, a marker or other devices.
Table for self-determination of threads Source trubomet.ru
Healthy! Another way is to use standard tables. However, the disadvantage of this technique is the need to carry out the most accurate measurements (up to tenths of a millimeter).
Measuring thread pitch Source moy-metall.ru
Trapezoidal thread
Trapezoidal thread is one of the varieties of metric thread. It is distinguished by a profile that has a non-standard configuration, the cross-section of which resembles a trapezoid. Widely used in mechanisms that transform rotational motion into reciprocating motion.
Peculiarities
The trapezoidal thread with a lead angle of 30° is self-locking. The presence of this property prevents the workpiece from deforming when exposed to significant loads. Compared to pipe threads, it has better wear resistance. The ability to provide moderate axial movement of the workpiece is characterized by trapezoidal threads made with an average pitch.
The standards of GOST 9484-81 establish the following range of changes in the main operating parameters of the thread in question:
- pitch: minimum 1.5 mm; maximum 48 mm;
- the height of an imaginary triangle, the vertices of which are the intersection points of the visual continuation of adjacent faces of adjacent ridges: from 1.4 mm to 44.784 mm;
- distance between adjacent protrusions along the internal threaded diameter: min 0.549 mm; max 17.568 mm.
Determination of thread pitch by diameter
The thread pitch can be determined using standard tables. First you need to measure the thread diameter of the bolt or nut. To do this, you need to use a caliper, which allows you to determine the size with high accuracy. The measurement accuracy should be tenths of a millimeter. After this, using the obtained value, you can find the thread pitch corresponding to the diameter in the table.
Example table for threads with outer diameter from 9.3 mm to 63.4 mm:
Thread persistent
The persistent thread is characterized by a profile made in the form of an unequal trapezoid. Its working side is inclined relative to the vertical axis at an angle of 3 degrees, and the angle between the other side and the vertical is 30 degrees. A persistent thread is used to interface elements that during operation are exposed to significant one-sided loads. The most obvious example is a jack.
Peculiarities
The technical characteristics of single-start thrust threads are established by GOST 10177-82. The ranges of changes for the main parameters shown in the figure look like this:
- distance between the longitudinal axis of the thread and the outer edge of the ridge (designation d): minimum 10.0 mm; maximum 100.0 mm. This parameter is nothing more than the outer diameter of the thread:
- distance between the bottom of the spiral knurling and the longitudinal axis of the thread (designation d1): from 7.0 mm to 70.0 mm.
Advantages and disadvantages of threaded connections
The advantage of using a threaded connection is that if the need arises to replace the fasteners, this can be easily done without damaging the housing.
The downside is the stress concentration points that arise at the fastening holes.
But there are still more advantages. These include:
High level of strength and reliability of connections.
Easy to maintain; if necessary, the connection can be disassembled and reassembled.
General international standards for threaded fasteners.
Ease of installation of the structure.
Round thread
The thread profile of this type is formed by arcs connected by straight line segments. The numerical value of the angle at the apex of intersection of the extensions of the sides of the turns is 30°. The use of round threads is limited. In particular, it is equipped with water fittings, including mixer valve spindles.
Peculiarities
Requirements for round threads are established by GOST 13536-68.
The features of the round profile ensure a long service life of the knurling due to significant resistance to external loads. The coils do not wear out even with frequent tightening/unscrewing procedures. Round threads are successfully used in structures that are exposed to the negative factors of a polluted environment. For example, it is used when coupling railway cars.
The above GOST approved only one value for the nominal diameter of a thread of this type - 12.0 mm. As for its pitch (designated in the figure by the letter “P”), this standard also provides for one size - 2.540 mm.
Why is this important to know?
Every car owner who repairs a car with his own hands has at least once encountered a situation where a nut of the same size does not fit onto a bolt of a suitable diameter. The reason lies in the fact that the thread applied to the “problem” part differs from the one cut on the product being screwed on.
This confirms that the carvings on them are different from each other. Therefore, for trouble-free tightening, you will need to select a screw or nut with the same thread.
Rectangular thread
Rectangular threads are included in the category of kinematic type threads. Used to perform a function related to motion transmission. High efficiency is the main advantage of this thread. The disadvantage is the complex manufacturing process and low strength.
Peculiarities
As of the beginning of 2022, there is no current State Standard establishing the values of the main technical characteristics of rectangular threads. To assign tolerances, pitch sizes and diameters, the corresponding GOST scales for trapezoidal threads are used.
In most cases, the tooth profile of a rectangular thread has a square configuration, as shown in the figure. But a number of manufacturers use an extended shelf of a horizontal fragment. This design solution helps to improve the strength characteristics of the threaded connection. The most commonly realized range of changes in the outer diameter of the knurling is from 8.0 mm to 40.0 mm. Thread pitch varies within:
- large: min 2.0 mm; max 10.0 mm;
- fine: minimum 0.75 mm; maximum 7.0 mm.
State standards, certification
Description of the profile, main dimensions and tolerances of conical threads and tolerances for internal pipe cylindrical connections with a set of external conical ones are regulated by GOST 6211-81. Standards regarding interchangeability are described in GOST 6357-81.
Interchangeability standards for metric tapered threads are prescribed in GOST 5229-82. In turn, the basic standards of interchangeability regarding the diameter and pitch of threaded connections are regulated by state standard 8724-2002.
Purpose and scope of application
A thread, according to the provisions of GOST No. 2.331-68, is defined as a surface formed by a set of alternating depressions and protrusions of a certain profile, located on the internal or external walls of a body of rotation.
The functional purpose of the thread is:
- keeping parts at the required distance in relation to each other;
- fixing parts and limiting the possibility of their displacement;
- ensuring the tightness of the connection of abutting structures.
The basis of any thread is a helical line, depending on the configuration of which the following types of thread are distinguished:
- cylindrical - thread formed on a cylindrical surface;
- conical - on a conical-shaped surface;
- right - thread, the helix of which is directed clockwise;
- left - with a helical line counterclockwise.
A threaded connection is a joining of two parts by means of a thread, ensuring their immobility or a given spatial movement relative to each other. Such compounds are classified into two main categories:
- connections made using special connecting elements - screws, studs, nuts and washers (this includes all types of flange mounting);
- connections formed by screwing together two abutting structures without third-party fasteners (in plumbing - a coupling connection of pipes).
Pipe coupling diagram
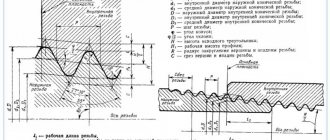
Current GOSTs define the following basic thread parameters:
- d – nominal outer diameter of the screw or bolt, indicated in millimeters;
- d1 – internal diameter of the nuts, the size of which must coincide with the value d of the mating fastener;
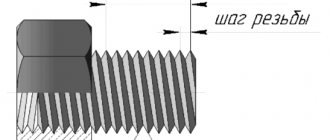
- p – thread pitch, indicating the distance between two adjacent helix ridges;
- a - profile angle, indicates the angle between adjacent protrusions of the helix in the axial plane.
The thread pitch determines which class it belongs to - main or small. In practice, the differences between them are that small threaded connections (all fasteners with a diameter of 20 mm or more are made in this configuration), due to the minimum distance between the ridges of the helical line, are more resistant to self-unscrewing.
Advantages and disadvantages
The wide distribution of threaded connections is due to the presence of many operational advantages in this fastening method, which include:
- reliability and durability;
- the ability to control the compression force;
- fixation in a given position due to the self-braking effect;
- the ability to assemble and dismantle using widely used tools;
- comparative simplicity of design;
- a wide range and standard sizes of fasteners, their low cost;
- minimum dimensions of fasteners in comparison with the dimensions of the parts to be connected.
The disadvantages of these connections include uneven distribution of load along the helical thread line (about 50% of the pressure falls on the first turn ), accelerated wear and weakening of the joint during frequent disassembly of the fastener, and its tendency to self-unscrew under the influence of vibration loads.
