Level device
Let's look at what a regular optical level consists of and how it works.
The main part of the device is an optical tube with a lens system capable of zooming in on observed objects with a magnification of twenty times or more. The pipe is mounted on a special rotating frame, necessary for the following functions:
- tripod mounts;
- setting the optical axis of the level to a strictly horizontal position, for which the frame has three height-adjustable “legs” and one or two (in models without automatic adjustment) bubble levels;
- precise horizontal aiming, which is carried out with paired or single handwheels.
In some models, the bed has a special dial, a scale that allows you to measure or construct horizontal angles.
On the right side of the pipe there is a handwheel designed to adjust image sharpness.
Adjustment to the operator's vision is made by rotating the adjustment ring on the eyepiece.
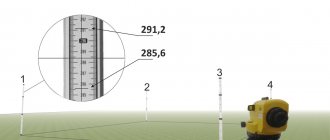
When looking through the eyepiece of a level telescope, we will see that in addition to bringing the object observed through the device closer, the level superimposes a system of thin lines on its image, called a reticle or reticle. It forms a cross-shaped pattern of vertical and horizontal lines (see Figure 1).
Additional devices and equipment
In addition to the device itself, for work we will need the already mentioned tripod, as well as a special measuring rod with divisions and numbers printed on it. The divisions are stripes of alternating black or red stripes 10 mm wide.
The numbers on the rod are marked in increments of ten cm, and the value from zero to the end of the rod is in decimeters, with the numbers expressed in two digits. So, 50 cm is designated as 05, the number 09 indicates 90 cm, the number 12 indicates 120 cm, etc.
For convenience, the five centimeter marks of each decimeter are also united by a vertical strip, so that the entire strip is marked with signs in the form of the letter “E”, straight and mirrored.
Older models of instruments give an inverted image, and they require a special rack with inverted numbers.
Auxiliary devices for the level
A passport is attached to the level, which must indicate the date of its last check and adjustment, or, as surveyors say, “verification”. Levels are checked at least once every three years, in special workshops, about which another entry is made in the passport.
In addition to the passport, the level kit includes a key for maintenance and a soft flannel for wiping the lenses and, of course, a protective case where it is stored. Models with a horizontal dial - protractor - are equipped with a plumb line for installation exactly at the desired point.
Protect the level from shocks and shocks, even when it is in its case. Modern devices are equipped with a special device that performs precise horizontal adjustment; a strong push, which does not leave the slightest trace outwardly, can damage its delicate mechanism.
The operating principle of the level. Installation of the device
The principle of operation of the level is extremely simple: the optical axis of the device is located strictly horizontally and does not deviate when the device is rotated, being constantly in the same horizontal plane.
Let's take a closer look at how this quality can be used in practice.
We begin work by installing the device. We extend it and install the tripod. When working on soft soil, we press the points that end the “legs” of the tripod into it.
By adjusting the length of the “legs”, we set the tripod to a convenient height for work, trying to ensure that its upper platform, where the level is placed, is horizontal.
We remove the level from the protective case and install it on a tripod, securing it with the tripod screw.
Now you need to align the level so that its optical axis is strictly horizontal. For this purpose, the tool is equipped with a round bubble level located on the frame. By rotating the verniers on the legs of the device, we position the air bubble strictly in the center of the level (see Fig. 1).
Now, no matter how we rotate the device tube, the optical axis will be located horizontally.
Working with a level at a construction site
Instructions for use when laying tiles and tiles
When laying tiles on a wall, a laser level is used to ensure that the tiles are positioned strictly at right angles. This depends on the interior design of the room. When laying tiles, the device must be switched to the cross-plane construction mode. At the same time, the level builds two planes - horizontal and vertical, which allows you to immediately install the tiles at a right angle.
Work can be carried out in two ways: with the level turned on, which directs projection rays onto the wall, and also by marking with a mark or pencil. Points are marked along the projection planes of the laser beam with a marker or pencil, and then the tiles are laid on their basis. In a similar way, you can lay tiles not only on the wall, but also on the floor. After turning on the device, it must be aligned parallel to the wall. The center of the cross should be aligned with the seams of the tiles, and the sides of the tiles should be aligned along the guide lines created by the rays.
Determination of excess points
We have figured out how to install the tool, now we will look at how to determine the difference in heights of two or more points using a level. To do this, we need a rail and an assistant who will hold the rail and move it to where it is needed.
We select the first measuring point (let’s denote it “a”), on which the assistant places the staff as vertically as possible. Verticality can be adjusted according to the vertical line of the reticle, giving appropriate signals to the assistant.
We aim the device at the staff, first approximately, using the “sight” on top of the pipe. We look into the eyepiece and, by rotating the handwheel, achieve a clear view of the staff.
We take readings. To do this, we look at which values of the staff the horizontal line of the reticle is located between, add to the lower value the number of centimeter divisions between the value line and the line of the device’s sight (or, if it is more convenient, subtract it from the upper value).
So let's assume we have:
What we need:
In a general sense, any action with a level is a transfer of elevation marks. Using a point with a known height, we determine the instrument horizon (HI) - the height of the instrument’s sighting beam (the horizontal line along which our gaze goes when we look into the instrument) above the conditional “zero”.
GI = the ground mark known to you in advance at a certain point (benchmark, finished floor mark, etc.) + counting on the leveling rod (if anything, both black strokes and red strokes, and the spaces between them on the leveling rod have the same height 1 cm)
If we want to determine a mark at any other point with an unknown height, we place a staff on it (of course, maintaining its vertical position), and subtract the reading on the staff from the horizon value of the instrument. Voila! The altitude is now known to us.
Move a mark
Let's figure out how to move the elevation mark using a level. For example, we need to make a benchmark, based on which the excavator operator will dig a pit, two meters deep below the floor level of the building. The value of the floor height is what we need to indicate to the excavator operator.
We install the rail at the reference design point, the height of which corresponds to the design height of the building’s floor, that is, zero, and take a reference. When independently developing a project or when → linking an existing project to the area, the height of this point is set using a peg or a mark is set on some fixed surface (brick fence, tree, pole, etc.). Or such benchmarks (marks) are set by a surveyor accompanying the construction site. Let, for example, it turn out to be 162.
Directly at the site of the future pit, we drive in a peg and, placing the rail close to it, again take the value, let it be equal to 179. The difference will be 17 centimeters. We set aside 17 cm from the bottom of the batten up the peg, mark the value with a marker or pencil. By driving another peg nearby so that its top coincides with the notch, we get a clearly visible landmark, after which the peg with the notch can be removed.
Common Mistakes
Cleaning the bottom of the pit must be carried out in compliance with building codes with constant monitoring of elevations. Actual deviations from the design elevations of excavations lead to an increase in the cost of the project. It is necessary to re-order expensive excavation construction equipment to remove uncollected soil or add sand or crushed stone instead of excessively cut soil.
The most common mistakes are:
Incorrectly transmitted elevation of the bottom of the pit leads to huge operational problems of the constructed building
You will find all the most important and useful information about the pit and its development in this section.
Ground leveling methods
Levels are a large group of devices that are used to determine and record the exact height position of various objects. Moreover, objects can be completely arbitrary points and sections of the earth’s surface, and not specific landmarks.
The task of any leveling is to measure the difference in heights between the marks (levels) of the future building (structure) . In practice, the overall quality of construction depends on the magnitude of such excess and its proper measurement. For example, from the planned “zero” level of the first floor of a house, the depth of the foundation, groundwater flow, drainage system design, type of blind area insulation, etc. are calculated.
Existing leveling techniques are quite diverse:
- Hydrostatic method based on the property of the same position of liquid in communicating vessels. It is highly accurate and allows for non-line-of-sight measurements between individual points. Hydrostatic measurements involve the need to lay and fill long hoses and tubes with liquid, which is not always convenient;
- Barometric method - used in planning and marking out extensive architectural complexes; it requires high-precision barometers and special computer programs. In personal residential construction, barometric measurements are not used;
- Trigonometric measurements using a rotary theodolite are good because they do not require assistants with additional slats. Theodolite measurements are carried out both in horizontal and vertical angles, however, this device is more difficult to master than an ordinary level, and the cost of a theodolite is several times higher;
- Geometric measurements of elevation angles using standard levels are performed only in one plane and require the installation of auxiliary marks (the same slats), their movement from place to place and entries in the measurement log
The simplicity and reliability of measurements with an ordinary level, its good compatibility with the needs of private and residential construction make it most popular in the design and planning of many works - from pouring the foundation to checking the accuracy of a gable roof.
Typical device and classification of modern levels
The design of the level is simple. The main optical-mechanical unit with a built-in lens system is located on a durable tripod. This unit must ensure strict horizontality of the sighting beam, with minimal deviation. Lenses can produce both direct and reverse (inverted) images. In the latter case, the measuring rods should also be turned upside down when installed on the ground.
Level sensors are built into the upper part of the body of each level. Robust and accurate installation of the device on the ground determines the quality of all subsequent measurements. An experienced operator constantly checks the readings of these sensors, adjusting them if necessary using the tilt handles of the optical-mechanical unit. This allows you to notice in time the random deviation of the device from the exact position on the ground and not repeat the measurements again.
Before using a level and a staff, it is necessary to describe the main types of instruments for geometric measurements of excess height. The simplest and most economical levels are those with cylindrical levels (one or several), which are located directly on the sighting pipe. Significantly more expensive and significantly more accurate are meters with automatic compensation for installation “flaws”; they are convenient when working on problematic soils - crushed stone, sand, etc. Levels with an electronic measurement system are used in the professional design of large objects and are quite difficult to set up and operate.
How to use a level - step-by-step diagram
Step 1: Set up a tripod
The mounting screws on all three legs of the tripod must be loosened, after which each support is extended to the required length (this length may vary, because the level often has to be installed on rough terrain). The top of the tripod should be set to a horizontal position, after which the fixing screws on all three supports should be tightened. Most devices are equipped with smooth adjusting mounts on each “tripod leg”; they are used to fine-tune the horizontality of the upper platform.
Step 2: Installation of the level
The leveling pipe itself is installed on a tripod using several mounting screws, after which you have to work with the level sensors. By rotating the adjusting screws, it is necessary to achieve an accurate, central position of the bubble levels relative to the lines marked on them. For convenience, first place the bubble in one “window”, without paying attention to the other. Then they set up the second level, already tracking the position of the first, observing how it changes as it is installed. By gradually adjusting the position of the device, we achieve its exact horizontal position on the installation site.
Step 3: Focusing the optical-mechanical unit
Before working with an optical level, it is necessary to adjust the eyepiece of the aligned telescope according to the operator’s vision. As you know, eye acuity varies from person to person, even if all of them do not wear glasses. Focusing a standard level is performed as follows. The device is pointed at a well-lit and fairly large object and the settings are adjusted until the thread mesh is displayed on this object as clearly as possible. Then this operation is repeated on slats installed in other, less illuminated places. Experimenting with focusing adjustments on objects with different lighting conditions will help with further measurements.
Step 4: Measure and record observations
When the device is installed horizontally accurately, leveled and focused, we begin engineering surveys. Two slats should be placed in front and behind our device. The front one will show the value of the measured height, the back one will serve for calibrating the values. First, the level is aimed at the black side of the rear staff; after focusing, the value is recorded along the middle and rangefinder lines. Then they focus on the front (main) staff, and the average value on its red side is recorded. This method is called centerline leveling and is characterized by high accuracy of results and ease of repeated measurements.
Hello everyone, in the article on how to use a level, we will look at why this device is needed at a construction site and how to work with it.
A level is a device for setting out or determining elevations, checking the evenness of a surface by determining one point above another with a horizontal beam. Levels are divided into laser and optical and, according to measurement accuracy, into precise and high-precision.
Throughout my entire work experience, I rarely used laser levels, and then only indoors. At the construction site they work mainly only with optical levels.
The advantage of a laser level over an optical level is that it can be operated by one person. Two people work with an optical level, one takes readings, the other places a staff at the shooting points.
The optical level consists of a telescope, a cylindrical level, a stand for the telescope with three lifting screws - a trigger.
At a construction site, the level is the main device for measuring elevations, starting with the production of earthen, concrete and some types of finishing work. Work with the level begins from the very beginning of construction of the facility.
Leveling survey during the construction of a mini-football field
The construction of objects on the site begins with surveyors. If you are building your own house, you start with a geodetic layout, setting out the building axes and elevation marks. The next step is to calculate the depth of the pit, for the manufacture of foundations, and here you cannot do without a level.
Or you need to make smooth concrete floors or screed. Layout of floors begins with leveling the base, which can be made of crushed stone or sand, depending on the project.
One cubic meter of concrete on the market today costs approximately 5,000 rubles, and if the base is poorly planned with sand and the concrete slab is poured with an overrun of 2-3 centimeters, then it will be financially costly.
For 500 square meters, the excess consumption of concrete is 500 m2 x 0.03 m = 15 m3, these will be unaccounted expenses. To avoid such losses, it is imperative to do leveling surveys at all stages of foundation preparation.
Auxiliary options for laser levels
Levels are classified into two types: household and professional. Professional ones are also called construction ones, since they are mainly used in construction, electrical installation and geodesy. When carrying out repair work, household laser levels are used, which differ from their professional counterparts not only in price, but also in additional capabilities. As a rule, household levels have a primitive set of functions that allows them to satisfy the needs of the master when carrying out interior finishing repairs. To expand the functionality of the tool, additional equipment is used:
- A laser beam receiver is a special device that allows you to increase the range of the beam (increase its visibility over long distances). This equipment is very convenient when there is a need to use it outdoors. The receiver allows you to observe the projection of the beam not only over long distances, but also in sunlight. The receiver allows you to double the beam distance. When choosing such equipment, you need to take into account that they work clearly in conjunction with only one manufacturer, for example, Bosch. You also need to know that not all models of laser levels can work with receivers. If this is not possible, then you can increase the beam range using a reflective plate
- The target is another additional accessory that comes with many level models. The target is a plate on which markings are applied. Using such an auxiliary device, you can set the accuracy of measurements. An example of using a target is quite simple - instead of an inconspicuous point on the wall, you need to hang this plate, which is much easier and easier to navigate, especially when the distance is 20-30 meters
- The optical sight is another accessory that allows you to track the range of the beam even at a distance of up to 100 meters
- Rail - used in cases where several parallel lines must be drawn on the surface of a wall or other object, while maintaining the same distance. The staff also measures the height of the level attached to the tripod.
All these auxiliary devices make it easier to manipulate the operating device. Professional models of devices have the option of rotating the laser at an angle of 360 degrees. Such devices are especially valuable, since with their help you can make a projection not only on one wall, but throughout the entire room, which simplifies marking work. When all the nuances are known, it is necessary to move on to direct training in using laser levels.
How to use the level, installation.
The level kit consists of a tripod, a staff with divisions in millimeters on one side and centimeters on the other, and the level itself. We choose a place for installation; it is best to place the device in the middle of the measured area.
Steps to install the level:
- We set up the tripod: loosen the clamps, extend the legs to a comfortable height and tighten them with screws. Place the tripod head exactly horizontally.
- install the level on a tripod, secure it with the screw located on the tripod
- We give the level an even horizontal position using three lifting screws, rotating them simultaneously (by rotating the screws, I shift the bubble in the middle and adjust it to the center of the level with the third screw), ultimately the bubble of the level should be in the “zero-point” position.
The level is set up, all that remains is to adjust the sharpness in the telescope. Focusing, we point the telescope at the staff and by rotating the focusing screw we achieve a clear image, the reticle is adjusted with the eyepiece ring.
Centering, install the level above the point, hang the plumb line from the fixing screw at the bottom of the tripod. We move the level along the head of the tripod so that the plumb line is above the point, and secure it. This operation is needed if you are going to measure the distance from one point to another or, using the optical beam of a level, for example, to locate the axes of a building.
How to use a level when making floors.
Without knowing how to use a level, it is not possible to make smooth floors from concrete or cement-sand screed over a large area.
Working as a foreman in companies specializing in concrete floors, the first thing I did at a new facility was a leveling survey of the foundation. According to the survey data, it is clear whether sand should be added or, on the contrary, it was poured.
How to check the evenness of the base with a level? Let's say we have an object with an area of 540 square meters and we know the zero level of the finished floor.
After setting up the level, we begin shooting. I took base marks every six meters, both along and across the building; if you do it every three meters, it will be a more accurate picture of the evenness of the surface.
Let’s say, based on the survey results, we obtained 18 elevations with elevation differences from 1.57 m to 1.72 meters. We sum up all 18 elevations, we get the sum of 30.51 m, divide by 18 equals 1.695 m, this is the arithmetic average elevation of the base from the horizon level of the instrument.
Next, we calculate the thickness of our floor, from 1.695 m we subtract the level mark of the finished floor 1.20 m equals 0.495 m. According to my measurements, it turned out that the base was lowered from the level of the finished floor by 49.5 centimeters.
Why do you need to clean the bottom?
Cleaning the bottom of the pit is necessary to level the earthen surface to create a flat and solid platform on which the foundation structures will be placed. At this stage, elevation differences in the earthen foundation and places of excessively loose soil, where deep subsidence of the soil is possible during compaction, are eliminated.
Mechanized excavation by earthmoving machines is constantly monitored by levels . When 100 - 200 mm remains to the design mark, soil excavation by machinery is stopped. Subsequently, the foundation is prepared by reworking the soil and cleaning the bottom to the design mark, manually or mechanized with the use of special construction equipment.
In some cases, mechanized leveling is carried out slightly below the design level. The difference between the actual and design elevations is filled with sand and thoroughly compacted.
What technologies can be used to produce?
Cleaning of the excavation pit is carried out manually or mechanized: with bulldozers, levelers, excavators or scraper machines. The choice of method for planning the bottom of the excavation depends on the following factors:
In this case, they begin to finish cleaning the foundations along one of the main axes, gradually moving along the pit. During work, it is important to focus on the control mark marked on the wooden peg.
For the simplest control of stripping the base to the design horizon, it is recommended to stretch a steel wire or a strong polyester thread between two opposite pegs. Using a construction tape measure, the stripping depth is measured every 1–2 meters. In this way, the bottom is cleaned manually by one person.
Wide trenches prepared for strip foundations are cleaned manually or with an excavator, constantly monitoring the level of soil cutting to the design level. Excavations for columnar foundations are usually cleared manually; the mechanized method is practically not used.
The selected soil is immediately transported to a dump or placed on the construction site at a distance of more than 1 meter from the outer edge.
How to use a level when laying foundations
How to use a level if you need to determine the depth of the foundation indicated in the project. After installing the device, we calculate the horizon of the instrument. In my case, the geodetic mark is placed on the column and is equal to 96.645 m.
We place the staff clearly on the mark and obtain data on the staff of 0.850m. We calculate the horizon of the instrument, add the mark from the staff 0.850m to the geodetic mark 96.645, we get 96.645+0.850=97.495m.
Design elevation 93.80 (bottom of the foundation) from the resulting tool horizon we subtract the design elevation 97.495-93.800 = 3.695 m. It turns out that our foundation elevation from the horizontal beam of the level should be equal to 3.695 m.
If the level of the ground surface according to the leveling survey is 1,250 m, then it turns out that it is necessary to remove the soil to a depth of 3,695 m - 1,250 m = 2,445 m.
Executive photography
Upon completion of the planning work, clearing the unfinished soil directly to the construction of the foundations, the processing and compilation of schematic data on the actual state of the bottom of the construction pit is carried out, on which the real height elevations from the design elevations are plotted. The permissible deviation from the design mark is 50 mm.
As-built survey is carried out by leveling the site . In practice, a horizontal surface is divided into squares with sides of 3–5 meters and a leveling rod is installed in each corner of the finished surface, along which reports are taken through the sighting leveling pipe and recorded on the diagram. The device itself is installed at one point and all measurements are taken from this location.
As-built photography is performed in the form of text, table or graphic diagram. An as-built diagram with actual marks helps to identify errors and monitor the implementation of the design solution.
An example of an as-built survey of the bottom of a pit:
How I learned to use a level
The first time I became acquainted with a level was at the institute, in which subject I no longer remember. This theoretical knowledge was forgotten by the time it had to be applied at a construction site and did not want to be remembered.
So I had to learn new things and ask stupid questions to my colleagues about how to use the level.
I remember that I was constantly confused with the resulting values. On the slats, large values mean that it is a hole, and if small, it means a mound, and my brain did not want to perceive this.
Example: I’m shooting a floor and I get two numbers: 1.870 m and 1.820 m. It turns out that the first point is 5 centimeters lower than the second. It didn’t fit into my head that the value of the number meant more of a hole on the surface.
I have made it a rule, and I advise you, to check and recalculate your leveling survey data several times so that there are no doubts.
Read what you need to do before leveling HERE. Here I told you how I poured concrete floors in a garage without a level.
You will also be interested in how to draw up acts of hidden work, ks2, ks 3, if so, then this is for you.
I will be glad to see your comments on the topic of how to use the level.
Articles on similar topics:
Your gratitude for my article is to click on any button below. Thank you!