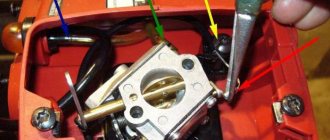
Angle grinder Fiolent MSHU2-9-125E with speed control. Photo VseInstruments.ru
There is always a use for an angle grinder at home, in the country, in the garage or as a professional tool in production workshops. The use of various working tools increases the functionality of the work performed . Compliance with operating rules increases the service life of the power tool. However, as with any mechanism, sooner or later malfunctions occur . Easy assembly/disassembly, availability of diagnostic and repair tools allow you to fix breakdowns yourself.
Design and electrical circuit of the grinder
Over the many years of existence of such a tool as an angle grinder, its appearance, as well as its internal structure, have remained virtually unchanged. To repair an angle grinder with your own hands, you need to know the structure of its mechanical part, as well as its electrical part.
If you look at the figure below, you can see what parts the angle grinder consists of.
- Wheel for adjusting the spindle speed of the unit.
- An electric motor consisting of a rotor and a stator.
- Start button. Sometimes a soft start system is connected to it.
- Housing made of impact-resistant plastic.
- Button for fixing the spindle (used when changing tools).
- Safety coupling. Protects the engine from overload when the tool jams.
- Protective cover. Covers the tool and protects the user from flying particles of the material being processed, and also prevents injury to a person when the tool, for example, an abrasive disc, is destroyed.
- Nut that clamps the tool. It is unscrewed using a special key that comes with the power tool. There are also quick-release nuts that can be unscrewed without a key.
- The gearbox housing and the gearbox itself. It consists of a block of gears that transmit rotational movements from the rotor to the spindle with the tool.
The figure below shows the electrical circuit of the angle grinder.
The electrical part of the angle grinder has the following elements:
- electrical cable with plug for connecting to the mains;
- start button;
- stator;
- electric brushes (carbon or graphite);
- collector;
- armature (rotor).
The following figure shows the connection diagram for the angle grinder, namely its engine.
All components of an electric motor perform specific functions.
- The rotor is the shaft on which the coils and commutator are located. The rotor, rotating in the magnetic field of the stator, transmits rotational motion to the angle grinder gearbox.
- Collector. It is the part of the rotor to which all control cables are connected. Electrical signals from the control unit to the engine pass through the collector. It is to the collector that the electric brushes are connected.
- Electric brushes. Their main task is to transmit electric current from the power cable to the collector.
- Stator. It is a coil with a certain number of turns. The task of the stator is to create a magnetic field, which, interacting with the armature, sets the latter in motion.
The parts that make up the grinder
Let's try to understand what elements the tool consists of:
- Gear housing;
- Carbon brushes;
- lever;
- Soft start system;
- Ball bearings;
- Electric motor;
- grinder switch.
grinder does NOT gain speed, grinder Bort, Bort bws 905, How to repair an angle grinder, Tool repair
Now we will try to identify the most common tool malfunctions and causes of breakdowns. The cause of premature wear of spare parts is careless and incorrect operation of the product.
- NOT following safety precautions;
- Violation of operating recommendations;
- Storing the instrument in an inappropriate form or place;
- Use of non-original consumables.
The main malfunctions of an angle grinder and their causes
According to statistics, most cases of angle grinder failure are associated with the electrical part of the device. Some damage may be minor, which allows you to repair the angle grinder yourself. But, for example, if the motor windings burn out, only a specialist can repair an angle grinder.
Grinder won't turn on
The reasons that the angle grinder does not turn on may be the following:
- the electrical plug is faulty;
- the electrical cable is faulty;
- the start button is broken;
- the contact between the power cable and the button is broken;
- break in the contact wire of the electric brush;
- severe wear of electric brushes;
- failure of the rotor or stator windings.
The angle grinder does not develop speed
The reasons why the angle grinder does not gain momentum can be different.
- Damage to the speed control unit. To check this version, you need to connect the device’s motor directly, bypassing the regulator, and check the operation of the device.
- Failure of the electrical cable due to constant kinks or mechanical damage. Because of this, the damaged wire begins to heat up under load, and engine speed drops.
- Collector contamination with dust. Contaminants must be removed with alcohol.
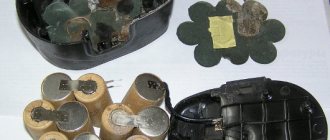
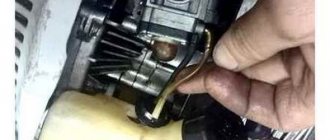
- Problems with brushes. They may be worn out or have a short contact wire as shown in the following photo.
Although the brush is half worn out, it is still fully functional. In this case, a short contact wire prevents the spring from pressing the electrode to the collector. This situation may also be the reason why the angle grinder stopped working normally.
The electric motor is heating up
The reasons why the angle grinder is heating up may be the following.
- Incorrect operating mode of the device. As a result of overloads, the electric motor can become very hot, which often leads to burnout of the windings.
- Destruction of bearings located on the armature. As a result, the rotor clings to the stator, engine operation becomes difficult, and the windings overheat. The problem is solved by replacing the bearings.
- Clogged ventilation ducts through which air flows to cool the engine. The ventilation openings must be cleared of dust.
- Damage to the impeller used to cool the engine. It is installed on the rotor, on the side opposite to the collector. If the impeller is broken, it must be replaced with a new one.
- Interturn short circuits of stator and rotor windings. It will be necessary to rewind the reels or replace these parts with new ones.
Bulgarian sparkles
If you notice strong sparking when you turn on the angle grinder in the place where the collector is located, then the reasons for this trouble may be the following.
- Damage to the armature winding: break of one or more sections of the winding, interturn short circuit. With such breakdowns, increased noise appears, engine speed drops and brushes burn.
- The contact between the collector plates and the winding is broken.
- Weak brush pressure. During long-term operation of the angle grinder, the springs overheat and can “anneal”, thereby losing their elasticity.
- Engine rotor imbalance.
- Damage to the cylindrical surface of the collector. This sometimes happens after rewinding, if the armature is not turned on a lathe, but is immediately installed in the machine. In this case, you can also observe that the brushes spark excessively.
- The insulation between the collector lamellas is broken. There may also be clogging of the track grooves with graphite or a breakdown between the lamellas.
- Bearing wear, which causes the rotor to run out, also causes the brushes to spark heavily.
- Violation of the geometry of the armature shaft. This usually happens when the electric motor is disassembled carelessly and the shaft bends.
- Wrong brand of graphite brushes installed. Brushes are selected based on the expected speed and voltage.
- Raising one or more lamellas causes the brushes to quickly burn out. This happens due to engine overheating during prolonged operation. As a result, the glass melt, which serves as the basis of the collector, softens and the lamellas begin to rise. Due to the fact that the slats are raised, the brushes wear out very quickly.
Why does the grinder get warm?
The electric motor overheats in the following cases:
- The operating mode is incorrect. As a result of too high loads, the motor windings burn out.
- Destruction of armature bearings. The result is difficulty operating the engine and, as a result, overheating.
- Clogged ventilation ducts through which air flows to the electric motor and performs the functions of a cooler.
- Closing the turns of the stator and rotor windings.
The angle grinder gearbox overheats due to lack of lubrication or its poor quality.
Diagnosis of grinder. The revs dropped and the smell started.
Main malfunctions of angle grinders
An angle grinder (“ grinder ”, angle grinder) is an electric tool necessary for manual cutting, cleaning and grinding of various materials. Depending on the type of wheel used, it is used to work with metal, stone, and concrete. There are models for domestic and professional use. The range of circle diameters is 115-230 mm. Like any other tool, grinders do not work, get very hot or make noise for various reasons - due to non-compliance with operating rules, too intense loads, and natural wear of parts of components.
How to disassemble an angle grinder for diagnostics
In order to diagnose the electrical part of the angle grinder, as well as eliminate mechanical breakdowns of the device, you will need to disassemble it. Disassembly is carried out according to the following algorithm.
- Using a wrench, remove the disk or other attachment from the spindle of the unit.
- Unscrew the handle.
- Remove the protective cover.
- Open the special windows located on the sides of the angle grinder casing and remove the electric brushes, having first disconnected the terminals.
- Unscrew the gear housing from the angle grinder motor housing.
- Pull the gear housing lightly and remove it from the housing. In this case, the gear unit will be removed along with the rotor.
- After removing the armature, the motor stator will remain in the casing, which can also be easily removed for diagnostics after unscrewing the fasteners.
- To disassemble the gearbox, unscrew the screws holding the cover. After removing the cover, you will see the gears of the gearbox.
- To remove the anchor from the angle grinder, you will need to unscrew the nut located inside the gearbox.
- In order to remove the bearing from the armature, it is recommended to use a special puller. Otherwise, the shaft may be damaged.
we repair it ourselves
The first thing to do is disassemble the tool. The tool does NOT contain a suspension from models:
- Armature - responsible for the rotating part of the engine.
- The commutator is part of the armature. The windings are connected to the collector. A collector is a collection of insulated copper plates that are insulated from each other.
- The stator is the part of the engine that is NOT moving.
- Brushes - used to supply current to the commutator. There are carbon or graphite brushes.
- A gearbox is a device that transmits rotation from an armature to a wheel (the wheel can be cutting or grinding).
Diagnostics of the electrical part of an angle grinder
As mentioned above, most often an angle grinder refuses to work due to breakdowns of the electrical part of the unit. To correctly diagnose the electrical circuits of a tool, electrical equipment repair technicians use a special device - a tester.
If you press the start button of the unit and it does not work, then in 90% of cases the cause of the breakdown is not so serious that you cannot repair the angle grinder yourself.
Experts advise adhering to the basic rule of repairing power tools: moving from simple to complex.
The first step is to check the electrical cable and the plug at its end. If it is collapsible, then unscrew it and check the reliability of the contacts. Otherwise, you will have to disassemble the angle grinder (remove the casing of the device) and “ring” the cable with a tester, and also make sure that the current is suitable for the contacts of the “Start” button. If the device shows a break, the cable should be replaced with a new one.
The situation when current flows to the button, but does not pass further (when in the on position), indicates a malfunction of the switch. The button cannot be repaired. It needs to be replaced with a new one, but first mark the contacts you are removing so that you can connect them correctly in the future. If the contacts are connected incorrectly, the motor winding may burn out.
If during the check it turns out that both the cable and the start button are in good condition, but no current is supplied to the brushes, then it is necessary to clean the contact plates of the brush holders. If this procedure is ineffective, it is recommended to replace the brushes. Next, if everything is fine with the brushes and current is flowing to them, you should check the rotor and stator for shorts and breaks.
Checking the motor armature
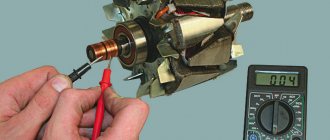
The electric motor rotor may have the following malfunctions: interturn short circuit and broken conductors at the lamella contacts. You can check the armature of an angle grinder with a multimeter: the device is switched to the resistance change mode, the value is set to 200 Ohms, and the resistance between two adjacent lamellas is measured using probes. Thus, it is necessary to check all pairs of lamellas. If the resistance values are the same, then the rotor winding is not damaged. Detection of other resistance values during “ringing”, as well as detection of an open circuit, indicates a malfunction in this coil. In this case, the angle grinder's anchor will need to be repaired.
Typically, conductor rupture occurs at the junction with the winding. Inspect the places where the coils are connected to the lamellas, make sure that the contacts are soldered securely.
If you do not have a measuring device, you can check the rotor using a 12 V light bulb and a battery for this purpose. The power should be between 30-40 W. The test is done as follows: apply 12 V voltage from the battery to the plug of the angle grinder, connect a light bulb to the gap in one wire, and start rotating the angle grinder spindle. If the winding is in good condition, the light will burn evenly, without blinking. With an interturn short circuit, the degree of incandescence of the light bulb filament will change. In this case, repairing the angle grinder's anchor with your own hands will be difficult, since the armature winding scheme is quite complex, and the process itself requires special equipment and knowledge. Therefore, it is recommended to entrust this operation to specialists. But the best way out of the situation would be to replace the anchor on the angle grinder with a new one.
If the light does not light up when testing the rotor, this indicates a break in the stator or a short circuit in its windings, as well as problems with the electric brushes.
Checking the motor stator
To check the stator of the angle grinder, use a multimeter, as in the previous case. The values need to be set to 20-200 Ohms and do the following. Touch one probe to the contact of the stator winding, and the second to the body of the part. If the device shows resistance, this means that a breakdown has occurred to the housing. Touch the probes to the contacts of one winding, and then to the contacts of the other. If the resistance is the same, then the coils are working. If the device shows an open circuit on one winding, it means that the stator will need to be rewinded or the part replaced with a new one.
Rewinding the stator at home without special knowledge, skills and equipment will be problematic. It is better to contact specialists who professionally rewind motors.
Tools and materials for grinder repair
In order to repair a tool, you need to prepare materials that may be needed during repairs:
- screwdriver;
- wrench;
- rags;
- alcohol
- knife;
- grease;
- insulating tape;
- sandpaper.
Before starting repairs, remember how the breakdown occurred, what kind of work was performed and, depending on this, you can draw a conclusion - this is a violation of operation or simply the process of long-term use led to this result. After all, even if you follow all the operating rules, grinders still break down very often. This is due to the fact that the work performed by this tool is carried out in dirty rooms with a large amount of dust, which penetrates literally everywhere.
Mechanical breakdowns and their elimination
Mechanical failures of angle grinders include the following.
- Worn motor armature bearings. Typically, when the bearings wear out, you may experience strong vibration while the machine is operating. In addition, grinding and other noises may be heard. Sooner or later, the bearing will collapse, and the spilled balls will fall on the gears of the gearbox. If this happens, then in addition to the bearing, the gears will also have to be replaced. Of course, it is better not to wait for this problem, but to replace it at the first sign of bearing failure. How to get to this part of the angle grinder was described above.
- Worn ball bearing or plain bearing of the gearbox. As in the previous case, when you turn on the device, vibration will be felt and noise will be heard that is unusual for the normal operation of an angle grinder. To prevent further damage to the gearbox, it is necessary to replace the faulty part.
- Reducer gear wear. Gears wear out quickly due to insufficient lubrication. For the same reason, the gearbox heats up. It is necessary to monitor the condition of the lubricant inside the gearbox and change it if necessary. How to disassemble the gearbox was described above. You need to use lubricant specially designed for angle grinder gearboxes, and you can buy it at points where this tool is sold. If for any reason the teeth of at least one gear are broken, then the entire set of gears (a pair) needs to be replaced.
Mechanical faults can also include a broken shaft lock. In order to replace the retainer, you will need to disassemble the gearbox and remove the large gear.
causes
The first thing you should pay attention to is how the power tool works in the first seconds. If you hear grinding noises, it is better to turn off the tool immediately.
Then you need to clean all the parts, since dust can interfere with normal operation.
One of the diseases of the grinder is that it cannot reach the required maximum speed, and immediately stalls. It seems that the power is supplied for a split second and then turns off.
- the tool has a malfunction in the rotation of the electric shaft, which is located in the control unit;
- or there was a short circuit on the board. In this case, you should replace the old board with a new one.
- Bearings can also affect the speed of the grinder. Bearing wear occurs due to the fact that the tool is used in dust. The process of replacing bearings is NOT very difficult.
READ How to Make a Stand for a Grinder Yourself
Sometimes the rotation speed of the angle grinder may be accompanied by a spark. In this case, the armature insulation is broken. That is, you should simply isolate the anchor again. If the anchor burns out, repairing it will be expensive, so this part is not cheap.
I. In order for a power tool to last longer, you need to watch the tool and also take breaks during the work process so that the tool can “rest” for five minutes.
Repair recommendations
When identifying faults and carrying out repairs, it is necessary to adhere to the recommendations, thanks to which the work will be performed more efficiently and quickly. The device is disconnected from the power supply, and it is strictly prohibited to turn it on during repair, assembly and disassembly. It is best to carry out repairs on a clean, tidy table in good lighting. It is imperative to follow the order of disassembling and assembling the mechanism. When carrying out mechanical repairs, you need to be careful not to damage the electrical parts and windings of the angle grinder. Read more about repairing the Interskol angle grinder in this article.
Many people are familiar with the situation when a favorite tool stops working for no apparent reason. And if the grinder does not turn on, then, often, the reason for this is a simple breakdown that can be quickly fixed without special knowledge and tools. Next, we will consider simple methods for diagnosing and repairing power tools using an angle grinder as an example. Initial state – the grinder does not start when the power button is pressed.
To complete the work, we will need a multimeter with a ringing function and a screwdriver. The first thing to check is the wire, or more precisely, the plug and the place where the wire enters the housing. We press the button and “massage” the suspicious areas. Most often, problems arise in the body. If this does not help and the grinder still does not work, move on to the next stage.
Let's disassemble the body. To be sure, you can turn our tester into ringing mode and check the integrity of the wires from the plug to the entrance to the button.
Next in the electrical circuit is a button. Often it is the malfunction of this unit that is the reason that the angle grinder does not start. In order to check this node, you need to turn it to the ON position and “ring”, as shown in the following photo:
In this case, the button “ringed”, which indicates its serviceability, so we move on. This grinder uses a speed controller, so it’s also worth “ringing” it, having previously set it to maximum power.
The next thing you should pay attention to if the angle grinder does not turn on is the brushes. In large angle grinders, the brush holders are located outside, in our case - inside the body. We remove the brushes and inspect them. You need to make sure that the contacts on the brush itself are intact. The main criterion for the performance of a brush is its degree of wear or size. In this grinder, it was their wear that caused its failure. Therefore, replacing the grinder brushes will help eliminate the problem. For clarity, a comparison is given of new brushes and completely worn ones.
If in your case all this turned out to be in good order, but the angle grinder does not work, then the last thing you can check without a special tool is the anchor. To begin with, we “ring” between the iron parts of the armature and the lamellas of the collector. If it rings, it means that there is an insulation breakdown and the armature must be replaced.
Next, you need to measure the resistance between adjacent lamellas on the collector. It should be the same on all pairs. If at any point of measurement the resistance is several times higher, then we can talk about a winding break. It is worth noting that such a malfunction rarely leads to a complete stop of the engine.
If, after carrying out the above diagnostics, it was not possible to identify the malfunction and the angle grinder does not turn on, then it seems that you will have to contact a specialist.
57, total, today
Electrical equipment for angle grinders
Over several decades, the external parameters of the angle grinder have remained almost unchanged, with the exception of improved models that use a battery as a battery. The basis of the tool is a housing with a built-in asynchronous motor and gearbox, and a handle with a protective housing is screwed on.
The power tool can be used with cutting and sanding discs, and there are also discs with sanding pads for sanding. Like all tools, a sander can fail to work, but most often it’s not that difficult to fix the problem. This may require disassembling the case and minor repairs of parts. However, it is necessary to understand the structure of the angle grinder, the circuit of which contains the following elements:
- Collector;
- Anchor;
- Brushes;
- Gearbox;
- Stator;
- Handle holder;
- Plug and power cord.
The performance of all elements is very important for the normal functioning of the entire system.
The area polished with brushes can be seen when disassembling the case. Through the power cable, current flows to the brushes, which transmit voltage to the commutator. Most often, brushes make themselves known by glowing, and depending on the glow, the degree of performance of the brushes or armature can be determined
An equally important part is the gearbox. The main task of the gearbox is to transmit movement from the armature to the working shaft on which a disk or other device is installed
The power of a power tool depends on the design of the gearbox, since this parameter is determined by the number of teeth of the main gear of the gearbox.
The stator is considered a very complex technical component of the electrical circuit of an angle grinder. The stator contains a winding that determines the rotation of the rotor. If a winding fails, rewinding it independently is rarely done and even less often can be successful. In case of such malfunctions, there is no need to take risks - to troubleshoot problems, you need to contact experienced specialists.
Possible electrical faults
Malfunctions of the electrical part of a Bosch angle grinder can be divided into simple and complex.
Simple malfunctions of the electrical part of the Bosch angle grinder
If you turn on the angle grinder and it refuses to work, start looking for the problem with a broken power supply wire. Most often, a wire break appears at the entry point into the angle grinder or into the plug. Avoid twisting, as this will cause a short circuit in the tool.
To determine such a malfunction, it is necessary to open the covers of the grinder handle. In Bosch angle grinders up to 1000 W, the lid is secured with one screw at the end. For Bosch angle grinders over 1000 W, the handle cover is secured with several screws.
Using a tester, test the power circuit from the input plug pos. 5 to the switch. If the circuit is intact, proceed to check the operation of the switch. Bosch angle grinders use simple switches controlled by a power lever.
But the electrical contacts of the switch burn out and cause the grinder to fail. It is not practical to restore the contacts of the plastic switch; it must be replaced with a new one.
If the switch is intact, use a tester to check the presence of a circuit from each pin of the plug to each carbon brush. If the circuits are intact, the angle grinder should turn on. If it does not rotate, then there is a mechanical fault. Gears may jam or bearings may be damaged.
Checking the electric motor
If your Bosch grinder picks up speed regardless of you, starts to get very hot and sparks, you need to pay attention to the integrity of the rotor and stator windings. An involuntary increase in engine speed indicates a malfunction of the stator windings. The integrity of the windings is checked with a tester, and a short circuit between the turns is checked with a special device. An involuntary increase in engine speed indicates a malfunction of the stator windings. The integrity of the windings is checked with a tester, and a short circuit between the turns is checked with a special device
An involuntary increase in engine speed indicates a malfunction of the stator windings. The integrity of the windings is checked with a tester, and a short circuit between the turns is checked with a special device.
How to determine whether a rotor is faulty
Rotor repair is a complex technological process accessible to skilled craftsmen.
A rotor malfunction is indicated by a drop in engine speed and the appearance of a long sparkling trail on one of the brushes. This is the first sign of a short circuit in the armature winding turns.
It is preferable to carry out rotor repairs in special workshops. Or you can rewind it yourself if you decide to repair the Bosch angle grinder yourself.
The dark color of the rotor winding and burnt commutator lamellas indicate a short circuit in the rotor circuits. The malfunction can only be eliminated by replacing it with a new rotor.
Stator repair
Repair of a Bosch angle grinder includes restoration of the stator. The main sign of stator failure is a spontaneous increase in the speed of a working angle grinder, which cannot be reduced by adjustments. The burnt stator winding changes color and becomes darker. The stator core also darkens due to high temperature.
It is easier to rewind the stator, although here you must follow certain rules and sequence.
If you have removed the stator housing cover, carefully inspect the condition of the carbon brushes and lamellas of the rotor commutator.
The length of carbon brushes should not be less than 8 mm. By the way, Bosch angle grinders use carbon brushes with a “shot”, a device that stops the operation of the angle grinder when the carbon brush is at a minimum length.
The collector lamellas should not show signs of carbon deposits or wear. Carbon deposits are easily removed with cotton wool soaked in alcohol.
Speed controller malfunctions
Bosch series angle grinders, especially low-power ones, have speed controllers. Access to the speed controller is achieved by opening the handle of the stator housing, which is held on by one end screw.
The speed range of the regulator can be set using a potentiometer hidden in the handle panel.
The faulty regulator is quite easy to remove, since it is attached only to the guide.
Repairing an angle grinder speed controller is a complex process, the implementation of which requires not only special knowledge, but also tools and equipment.
If the speed controller is faulty and there is no new one, then disconnect the supply wires and install a jumper.
The jumper that is installed when the speed controller fails is shown in red.
What are parking sensors?
Before moving on to the causes of breakdowns, let’s briefly consider what the device is.
Parktronics or parking radar is a system of contactless sensors, ultrasonic or electromagnetic, that scans the space within the radius of its sensitivity zone for the presence of foreign objects. When the latter are detected, a sound indicator starts to work, and, if the kit includes a graphic display, the distance to the obstacle is displayed on a colored segmented scale. Thus, parking sensors allow the driver to safely maneuver the car in confined spaces, including when reversing.
READ How to Check the Stator of an Grinder
The device is simple in configuration. There are several types of sensors: they are ultrasonic or electromagnetic. The second ones are attached to a magnetic tape that acts as an antenna, the first ones are mounted, each separately. By the way, electromagnetic sensors can be placed on the inside of the body, but ultrasonic sensors must be located on the outside, so they require drilling holes in the bumper.
The sensors are placed on the front or rear bumper of the car (or in combination), and the wires from them are pulled into the cabin to the control unit. An indicator is also installed there - a buzzer (sound emitter), an LED display (with a graphic scale) or an LCD monitor. The electronic unit is connected by a cable to the reversing lights (for connecting rear parking sensors) and brake light or turn signal lamps (for front sensors).
That's all. The parking radar operates automatically as soon as the gearbox lever is switched to reverse mode or the vehicle speed drops below 20 km/h.
Next, let's look at the main reasons why such a simple mechanism as parking sensors stopped working.
Sensors don't work
- The ultrasonic sensor may be dirty. It is attached from the outside, so dirt, dust, ice, and snow could easily stick to it. The sensitivity of the gadget may have decreased. Also, ice on the sensor is a common cause of false alarms or situations when the parking sensors do not turn off. The system recognizes ice as a potential collision object, located dangerously close, and therefore screams heart-rendingly, honestly performing its task.
- Water or moisture could get into the places where the sensors are inserted due to a violation of tightness and insulation. The cause may be wear, careless operation, or even too intensive body washing. Water could cause a short circuit in the wiring or complete failure of the device.
- Remember if you hit the body of the car in the places where the parking sensors are located. They may not work due to mechanical damage, distortion, or falling inside the insertion point.
- A problem with parking sensors may arise due to unstable mounting, when the sensors dangle in the housing.
- Also, do not exclude the possibility of a manufacturing defect. It's good if the problem showed up right away. It’s worse if the parking radar was working, but suddenly stopped. In this case, it will be extremely difficult to establish a manufacturing defect as the cause.
Also, a “dead” sensor may be indicated by a message on the indicator screen “Parking sensor error E1”. For error codes, look in the owner's manual for your car, in the parking assistant section (it's called differently for different brands, but it's similar). For example, on a Volvo the message “Park Assist Service Requ 106” appears.
Grinder stator repair
The reason for the failure of the grinder stator can be determined
To do this, you need to pay attention to interruptions in work. The rotor can develop speeds exceeding the permissible ones, which will indicate an interturn short circuit in the winding
Many breakdowns can only be repaired in service centers, but for uninterrupted operation, timely cleaning, lubrication, and replacement of brushes and bearings can be carried out.
Failure of the stator of a Makita angle grinder rarely occurs, and the cause may be constant overheating of the angle grinder. In this case, the case becomes very hot, and a burning smell appears in the ventilation ducts. There may be a short circuit or break in the stator winding, so it is difficult to determine the malfunction and repair the device without special instruments. To repair an angle grinder with your own hands or replace the stator, you must carry out the following steps:
- Dismantling the angle grinder gearbox;
- Dismantling the rotor after removing the fastening bar;
- Removing the stator protection;
- Unscrewing the stator mounting screws in the housing;
- Removing the handle cover and disconnecting the power wires;
- Removing the stator.
The stator is tightly installed in the housing, so the removal process may be accompanied by light blows of the mallet on the housing. Most often, the stator must be replaced, but sometimes hobbyists can do the rewinding themselves.
The most common breakdowns
The most common part of a grinder that breaks is the electric one. These breakdowns can occur from overheating of the tool, from water getting on the angle grinder, or from unstable voltage.
The mechanical part becomes unusable due to frequent falls of the instrument and poor care for it. Bearings and gear elements suffer from this first of all.
The reason why the grinder does NOT pick up speed may be due to wear on the brushes. In this case, you will see that it “sparks” when starting, this may be damage to the armature insulation. If you have knowledge and experience, you can replace it yourself by purchasing spare parts for grinders at ToolParts, but you should remember that the anchor is an expensive spare part, so there is no reason to always change it. Sometimes it is more cost effective to purchase a new sander.
the angle grinder when plugged into the outlet , then there may be a problem with the mechanical part. Try it by unplugging the tool cord from the network and returning the disk by hand. If it turns slightly, the culprit of the breakdown is the brushes of the electric motor of the angle grinder, since they are not supplied with electricity. This may require replacing the cord or trigger button.
Remember, if you have the skills to work with power tools, you can always turn to specialists for help.
Sources:
https://www.interskol.ru/wiki/Wiki_51.html https://aparthome.org/sovety-stroitelju/pochemu-bolgarka-ne-nabiraet-oboroty-prichiny-i-metody-remonta.html https:// teplica-parnik.net/prichiny-po-kotorym-shlifmashina-ne-nabiraet-oboroty.html
The drill sparks on the brushes - what to do
So, your drill sparks on the brushes and you don’t know what to do in this situation. This article will tell you why this happens, whether it needs to be fixed, and if so, how.
It is immediately worth noting that the presence of the specified sparking during operation is a completely acceptable phenomenon. This is true only if the sparks are small and there are not so many of them. If they just fall out, this may indicate a malfunction.
Note that on a new, working power tool, the brushes may also spark strongly at first, since they need to first get used to. Grinding in usually takes 10-15 minutes of work. If after this everything remains as it was, then it is better to take the instrument back to the store with a claim.
If your drill is no longer under warranty, you can try to fix it yourself.
But first we will describe the reasons for this phenomenon.
Why do brushes spark in an electric motor?
Sparks, including on a working engine, appear due to mechanical action between the brushes and the commutator. The brush, moving along the commutator from one of its contacts to another, alternately forms and breaks a connection with each of them. Now remember what happens if you unplug any working electrical appliance from the socket - usually at such a moment a spark jumps between the plug and the socket. In the case of a brushed motor, this is the same phenomenon.
Therefore, a small spark even on a working electric motor is acceptable, since connections and ruptures constantly occur here.
Causes of severe sparking and how to eliminate them
Now let's move on to strong sparking. It occurs mainly for the following reasons:
- contamination of collector contacts with carbon deposits
- graphite dust getting between the collector contacts
- interturn short circuit in the armature winding
Let's go through each point separately.
1) Soot contamination occurs as a result of engine overheating. The presence of carbon deposits leads to even more friction, which leads to even faster overheating and even more carbon deposits. Which very quickly leads to breakdown.
Excessive sparking here results from the fact that carbon deposits form additional resistance, which causes the spark to break when it breaks, becoming larger and more powerful.
In general, carbon deposits should be removed immediately.
This is done with zero grade sandpaper. That is, you need to remove the collector along with the armature and carefully clean it. Ideally, it is advisable to carry out the grinding on a lathe so as not to disturb the correctness of the circle. But, as a rule, this is not possible, so you can get by with manual stripping. The main thing is not to overdo it.
2) When using a drill, the brushes wear out, which causes the formation of graphite dust. It can easily accumulate between the collector contacts and lead to short circuits between them, since it is a conductor of electricity and has its own resistance. Because of this, the current is distributed unevenly, which leads to large sparks in some places.
In a working drill, wear occurs quite slowly, so graphite dust hardly accumulates. Accordingly, its accumulation signals that the brushes are in the wrong position during operation. This usually happens when they do not stand tightly in their groove, but, on the contrary, have some play.
This often happens when replacing brushes, when they are selected to be not quite suitable in size.
Therefore, when replacing this point, you should pay close attention.
Repair of such a malfunction is carried out by removing dust with some pointed tool and replacing the brushes with more suitable ones.
3) In the event of an interturn short circuit in the armature, the current flows in a larger value to some contacts and a smaller value to others. Because of this, more current flows in some places than necessary, resulting in large sparks.
Identifying such a short circuit should be done when the two previous points did not give much effect. It is produced using a special device that creates an alternating magnetic field. When an armature is placed in this field, it begins to rattle, as induced currents appear in it.
Some people make such a device themselves from a power transformer, in the core of which a cutout is made where the armature is placed.
If the reason turns out to be an interturn short circuit, then you need to rewind the winding or completely replace the armature.
These are the causes of excessive sparking on the drill brushes. Remember, if you don't do anything about it, the engine will most likely break down soon. Therefore, do not be lazy and follow the recommendations indicated in the article.
instrument-tehnika.ru