The easiest way is to plug another electrical appliance into the same extension cord and the same outlet and thereby check their working condition. How to replace brushes: work in a couple of minutes But the drill may not work due to trivial faults - for example, due to brushes inside the motor. If there are no “bright” signs, you can use an ohmmeter. Brushes move along the plates during the operation of the installation.
The clamp terminals in the button body itself are set at an angle of 45 degrees, and are made of hardened steel. Smooth start, adjustment and protection of the commutator. engine
The most common breakdowns are: Problems with engine operation; Brush wear; Problems with the button operation. The rest are stuck into self-clamping contacts.
Hammer drills are equipped with a return spring. The drill chuck. And then bam!
Drill button equipped with reverse. Do-it-yourself electric drill repair Diagram for connecting a drill button - we repair the tool ourselves!
For example, the start button of a drill often flies and at the same moment you wonder what flew this time? Repairing a drill button is a rather complex process and requires certain skills.
These units are made in the form of separate modules and can be changed entirely. At some point, the movement of the key may be blocked and the contacts will not close.
How to check the drill button
How to reverse a power tool
An electric drill is an irreplaceable thing that almost every man has. People who regularly use this tool periodically encounter it breaking down.
If it is not possible to take the device to a workshop, you will have to do the repairs yourself. In this case, you need to familiarize yourself with what the electric drill circuit looks like and understand the repair tips.
An electric drill is a device that is found in almost every home.
Possible tool malfunctions
First, you need to familiarize yourself with the main types of electric drill faults. They can be:
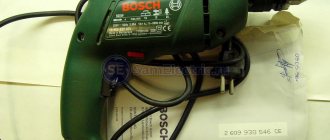
- Electric. Most often, breakdowns are related to electronics. There are times when the tool begins to spark due to overload. Some Bosch PSB models stop functioning due to the brushes grinding down.
- Mechanical. Sometimes bearings or gear mechanisms fail. In such situations, only complete replacement of broken parts will help.
Additional Information! The main signs of mechanical malfunctions include humming and a decrease in rotation speed.
Algorithm for finding and eliminating electrical failures
When searching for a breakdown, it is recommended to follow a certain algorithm that will help you quickly find the fault:
- If the device does not turn on completely, you need to open the case and check the cable connections. Perhaps one of them has become detached from the electrical circuit and therefore the device does not turn on.
- If everything is fine with the wires, you need to check the switch toggle switch. In some devices from Bosch and Makita, traces of oxidation appear over time and the device stops working.
- When inspecting the device, special attention should be paid to the brushes. They must press securely against the rotor.
Important! During inspection of the electric drill, do not connect it to the electrical network. Especially if the wire contacts are being checked.
Necessary tool
An ohmmeter is an indispensable tool for determining the causes of malfunctions.
Before you begin repairing an impact drill, you need to familiarize yourself with the list of tools that may be needed:
- pliers;
- ohmmeter;
- grinding sandpaper;
- vice;
- straight and Phillips screwdriver;
- spanners.
A vise may also be useful for securing some parts.
Types of drill button connection diagrams
There are two types of electric drill connection diagram. It is necessary to familiarize yourself with the features of each of them.
Wiring diagram for a shovel drill switch
The switch diagram will help you correctly connect the button to the tool.
As a rule, this scheme is used by craftsmen when repairing a broken tool. With its help, you can check all the functional features of the switch. It also allows you to carry out repairs after determining the cause of the breakdown.
Most manufacturers supply a circuit diagram for connecting the switch along with the instructions for the product. However, there are times when it is not there. In such situations, people have to search on the Internet on their own. To find it, you will have to find out the exact model of the device in advance.
Circuit with reverse and speed controller
The connection diagram for a switch with reverse is used to connect a reverse button
Some models from manufacturers such as Sparky or Interskol are equipped with switches with built-in speed control and reverse. It is quite difficult to understand such structures and therefore it is not always possible to determine the exact cause of their breakdown.
If such a button fails, it is recommended to simply buy a new one and connect it by referring to the diagram.
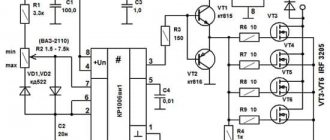
Let's get to the action - setting up the reverse
The two halves of the field winding of the electric motor are located on the stator. One wire goes from them to the brushes. Let's cut these wires.
It should be noted that the brushes vibrate during operation, so wires with increased flexibility were used to connect them. If you cut the wires close to the brushes, the flexible part will be short, and it may break due to vibration.
To prevent this from happening, we cut the wires closer to the field windings. We solder the wires to them that go to the moving contacts of switch S1.
We connect the terminals of the fixed contacts in accordance with the diagram and solder to them two wires going to the soft wires of the brushes.
Before soldering, the wires going to the toggle switch on one side (of the toggle switch or the electric motor) are inserted into the rubber bushing in advance. The task will be complicated by the fact that the tool’s power cord already passes through it.
Experienced executioners advise using a soap solution in such cases.
Don't have a drill yet? This article will help you choose the best model!
How to connect a button yourself
Many people are interested in how to properly connect the power button, since it is impossible to connect a drill without a button. This is done as follows:
- Disconnecting the switch.
- Cleaning darkened and rusty terminals from carbon deposits using sandpaper or alcohol.
- Replacing the speed controller if it is faulty.
- Assembling the button and its connection, according to the diagram of an electric drill with reverse and speed control.
Important! Before removing and connecting the button, you need to make sure that the electric drill is not connected to the outlet.
For example, if the power of your drill is W, then the regulator should easily operate at a current of 3.4 A. Electrical diagram for connecting wires and drill buttons. It is important to remember that the speed controller and the reverse control device are different parts.
Most often they are installed in different housings. As a rule, inexpensive models that are not intended for intensive use are purchased for household purposes.
How to detach the old button?
Unlike professional power tools, they have a short service life and often fail. One of the weakest points of a household drill is the start button. During operation, the contacts of the main control element often oxidize or burn out.
One of the main homemade tools is an electric drill, and the speed of work and quality depend on its design and convenience. I have a Soviet-made electric drill, which has served faithfully for many years. The metal gearbox housing and bearings in the gearbox made it almost indestructible!
If at one point the drill stops responding to pressing the start button or starts working every once in a while, do not rush to take the tool to a service center. Replacing the button on a drill is a fairly simple procedure that even a novice master can handle.
And so that no questions arise during the repair process, we have prepared simple and understandable instructions for you.
How to replace brushes and cartridge
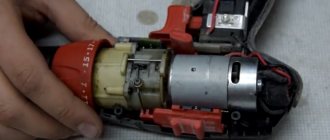
Let us note in advance that any electric drill, regardless of manufacturer and model, consists of the same elements, so the instructions below are universal. The device of the drill button is very simple: when pressed, the button slides in a special block along the guides and the pusher closes the contacts, starting the electric motor.
During long-term operation under repair conditions, dust, moisture, etc. Therefore, before buying a new button, you should try to clean it. This defect can be eliminated very easily - you just need to open the block and remove dirt from it with a brush.
Checking the electric motor: causes of breakdowns and repairs
Drills, like many rotary hammers, often stop working due to motor failure. There are two reasons why it may fail:
- Incorrect use. Some people often overload the devices and therefore the motor stops working. In this case, it is easier to purchase a new drill.
- Bad coil wire. Most often, this problem occurs when using budget models. It is better not to replace the wire yourself. This is a job for professionals.
Replacing the Button on a Drill
Connection diagram Drilling buttons - repair the tool without the help of others!
Repairing the drill may not be possible, the main thing is to know the causes of failures and not their methods of “healing”. Now you will learn about the connection diagram of the buttons, we are here, we will not ignore other errors, because of which you will be the happy owner of a working tool.
Possible tool malfunctions - we carry out repairs ourselves
If your tool has become worse, as it is also called, and has completely stopped doing its direct duties, it’s time to diagnose errors and try to cope with it. That's it, we check the wire for any damage or voltage in the socket, for which you can turn on any other device - a TV set, in other words, a kettle.
If you are testing battery-powered devices, they should be inspected using a tester - in such circumstances, the voltage indicated on the case must be the same value as the battery voltage.
If the voltage is less, you will have to replace the batteries with new ones. If the battery is working normally, the power supply is normal, look for problems with the equipment. More common mistakes are:
How to replace brushes: work in a couple of minutes
But the drill may not work due to trivial faults - for example, due to brushes inside the motor. This means that you can’t do without repairing brushes, and this work is quite simple - you don’t even need to have special knowledge and tools. To do this, we disassemble the device, remove the brush holders from it and replace parts that are broken. By the way, there are models whose body does not need to be disassembled - you just need to remove special plugs through the installation window, after which we change the brushes.
You can purchase these parts at any hardware store; there are also some models that are sold along with a set of additional brushes. It is important that you do not wait until the brushes are completely worn out - check them from time to time. And all due to the fact that there is a risk of a gap forming between the bristles and the collector. As a result, this part will begin to overheat and eventually fall off - which means you will have to change the entire anchor, which will be much more expensive and more difficult, and it is not a fact that you will be able to solve this issue yourself.
As you can see, there are a variety of breakdowns, many of which will be within your control, others will only be possible for specialists in service centers. And to reduce the risk of such breakdowns, you need to take care of your tool, clean it after work, check the condition of the parts and brushes in order to replace them with new ones in time. However, if you see that you can’t handle it yourself, take the device to a workshop.
There is a reverse gear: how to make reverse for an electric drill with your own hands
Many electric drills do not have reverse. And often it is needed. It is not difficult to integrate reverse not only into a drill, but also into another tool with a commutator motor. But there is one exception to the rule. In some electric drills, the chuck is not pressed onto the conical end of the shaft, but is screwed onto the thread.
By turning on the reverse, you simply roll the cartridge off the shaft. Sometimes this is necessary - there are all sorts of cases. In addition, there is a well-known principle: “If you can’t, but really want to, then you can.” Provided that by clicking the switch to the “reverse” position, you will not strain the tool with heavy loads. Then the cartridge will remain in place.
Just one detail
To solve the problem you will need a double switch - the so-called toggle switch, and several pieces of wire. The switch body indicates its limiting data: voltage and current. The switch current must be equal to or greater than the current draw of the tool. The current is not always indicated on the tool nameplate. Then we remember our school physics lessons and calculate the current using the formula:
I = P/V
The dimensions of the quantities are as follows:
- current I in Amperes;
- power P in Watts;
- voltage V in Volts.
Don't be tempted by modern miniature toggle switches. Their contacts are often tightly welded the first time they are turned on, despite not exceeding the maximum permissible current value.
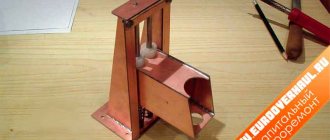
For electrical safety and beauty
It is not always possible to find free space inside the instrument body to place a toggle switch. Then we'll have to hang him like Kaltenbrunner. Ernst Gugovich was taken out of the loop after five minutes, that was enough for him.
The toggle switch should hang happily ever after. Therefore, the wires on which the switch hangs must be selected with increased mechanical strength.
I used “field” (often called sapper) - it combines copper conductors with steel.
You will have to make a housing for the toggle switch. It will protect you from touching the switch terminals with your fingers and causing electrical injury.
Another option is to turn the body out of wood on a lathe. Or play around with chisels, creating an egg-shaped box à la Faberge. Artistic wood carving may not be your strengths. Then you'll have to rummage through your wife's cosmetics shelf. There are a lot of plastic jars with erysipelas skin cream. And among them there will surely be a suitable one.
Ioanna Khmelevskaya’s book “How to Survive with a Modern Woman” will help you in resolving the subsequent conflict. Just don’t touch the Chanel lubricants that cost your wife’s monthly salary. Otherwise, Mrs. Joanna’s advice will be in vain.
Key to start: checking reverse
We assemble the electric drill and check it. In case you accidentally reproduced the circuit “in hardware” with errors, it is better to make the first connection through a circuit breaker with a rated current equal to or slightly greater than that consumed by the electric drill.
In the absence of a machine, you can turn on the tool through a fuse for the same current. There may not be a fuse at hand, and your wife, toad or laziness will not let you into the store. Then use a piece of winding copper wire with a diameter of 0.26 mm.
In fuses, this diameter corresponds to a rated current of 10A.
The rated current of overcurrent protection is the current at which the circuit breaker does not yet turn off and the fuse does not blow yet.
You can take a thinner wire. 0.15 mm will withstand a current of 4.5 A.
And another reminder: the circuit breaker or fuse is switched on in series with the load (electric drill), and not in parallel with it! The advice may seem idiotic, but there were precedents.
And switches were turned on in parallel, and ammeters. And then they were surprised: “Why is it knocking out the plugs in the apartment electrical panel?” As mothers tell their children: “Don’t be like that!”
Likes: 17 Dislikes: 1
Sergey Baranov
I worked at the station for young technicians and as the head of the student design bureau at the university - I would like to share my accumulated knowledge. If they are useful for the homemade brothers, then it’s not in vain that they stomped on the keyboard. I hope to learn from my opponents myself, because truth is born in a dispute.
Necessary tool
An ohmmeter is an indispensable tool for determining the causes of malfunctions.
Before you begin repairing an impact drill, you need to familiarize yourself with the list of tools that may be needed:
- pliers;
- ohmmeter;
- grinding sandpaper;
- vice;
- straight and Phillips screwdriver;
- spanners.
A vise may also be useful for securing some parts.
How to make reverse on a drill with your own hands
To solve the problem you will need a double switch - the so-called toggle switch, and several pieces of wire. The switch body indicates its limiting data: voltage and current. The switch current must be equal to or greater than the current draw of the tool. The current is not always indicated on the tool nameplate. Then we remember our school physics lessons and calculate the current using the formula:
I = P/V
The dimensions of the quantities are as follows:
Don't be tempted by modern miniature toggle switches. Their contacts are often tightly welded the first time they are turned on, despite not exceeding the maximum permissible current value.
How to connect a drill directly without a video button
When an electrified tool fails, do not rush to throw it away. After familiarizing yourself with the device and understanding the key mechanisms, you can personally replace the damaged unit or part.
Disassembly and assembly requires attention and accuracy. However, if this simple condition is met, there is no need to purchase a new, very expensive tool. Knowledge is power.
Extending the life of your au pair is very simple, as it may seem at first glance.
Diagram of the device and connection of an electric drill
An electric drill is an irreplaceable thing that almost every man has. People who regularly use this tool periodically encounter it breaking down. If it is not possible to take the device to a workshop, you will have to do the repairs yourself. In this case, you need to familiarize yourself with what the electric drill circuit looks like and understand the repair tips.
An electric drill is a device that is found in almost every home.
How to make reverse on a drill with your own hands?
Many electric drills do not have reverse. And often it is needed. It is not difficult to integrate reverse not only into a drill, but also into another tool with a commutator motor. But there is one exception to the rule. In some electric drills, the chuck is not pressed onto the conical end of the shaft, but is screwed onto the thread.
By turning on the reverse, you simply roll the cartridge off the shaft. Sometimes this is necessary - there are all sorts of cases. In addition, there is a well-known principle: “If you can’t, but really want to, then you can.” Provided that by clicking the switch to the “reverse” position, you will not strain the tool with heavy loads. Then the cartridge will remain in place.
How to make reverse on a drill with your own hands
You can repair a drill yourself, the main thing is to know the causes of breakdowns and methods of “treating” them. Today we will talk about what the drill button connection diagram looks like, and we will not ignore other faults, thanks to which you will be the proud owner of a working tool.
Possible tool malfunctions - we carry out repairs ourselves
If your tool begins to work worse, or even stops performing its direct duties, it’s time to diagnose the problems and try to deal with them. First, we check the wire for damage and the voltage in the outlet, for which you can plug in any other device - a TV or a kettle.
If you are inspecting battery-powered devices, they should be checked using a tester - in this case, the voltage indicated on the case should have a similar value to the battery voltage.
If the voltage is less, you will have to replace the batteries with new ones. If the battery is working normally, the power supply is normal, look for hardware problems. The most common breakdowns are:
- Problems with engine operation;
- Brush wear;
- Problems with the button operation.
Knowing how the electric drill button is connected, you can quickly solve the problem. In addition, a problem with the operation of the drill can also arise due to the dustiness of the tool, because the drill “takes” wood, brick, and other materials.
This means that you should take care to clean the device after each use - this is the only way to reduce the risk of malfunctions due to contamination of the tool.
That is why, after you have carried out renovations in your apartment, immediately clean the drill.
Drill button connection diagram - how to fix the problem?
Unfortunately, to check the functionality of the tool, a tester will not be enough for you, which is due to the fact that most of the device’s buttons are equipped with smooth speed control, and therefore a regular tester may give you incorrect data.
In this case, you will need a special connection diagram for the drill button. Often in instruments one wire is connected to a terminal, and therefore pressing the button simultaneously leads to ringing of the terminals.
If the light comes on, everything is fine with the button, but if you notice a malfunction, it’s time to replace the button.
When making a replacement, keep in mind that the circuit can be either simple or with reverse. Due to this, all work on replacing the button must be carried out exclusively according to the diagram, without adding anything “on your own”.
So, the part must be suitable in size and match the power of the tool. At the same time, calculating power is a fairly simple task. We use the formula P=U*I (taking into account that the drill power is 650 W), I = 2.
94 A (650/220), which means the button should be rated at 2.95 A.
Drill button diagram
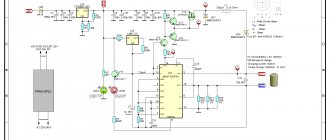
Picture 1. Reverse button connection diagram
Drill button connection diagram
The drill button shown in photo -1 is equipped with a built-in electric motor speed controller as well as a built-in rotor rotation direction controller - reverse.
The button is a very complex structure and therefore it should be disassembled very carefully, since usually after disassembly all its parts scatter in all directions and its further use becomes impossible.
After disassembly, they usually clean the terminals of carbon deposits and put it back together, but if this does not help, then buy a new one. Photo-2. Regular drill button without reverse
Drill button without reverse
It should be said that the buttons are different, just like electric drills, so you need to know that not all buttons are equipped with reverse and engine speed control.
However, such buttons are also complex structures and, as a rule, if they fail for some reason, they are no longer restored to working condition. When purchasing a new button, you should take the old one with you so as not to confuse it with another model.
There are many cases when the parameters of the buttons match, but when installed in the drill case they simply do not fit. Figure -2. Ordinary connection
Drawing diagram for connecting a drill button without reverse
Connecting a drill button does not require special knowledge or skills. To do this, you just need to remember that the new button must match the power of the drill and its size. If you are going to buy a new drill button, pay attention to the size and power of your drill.
The button must match not only the power of the electric motor of your drill, but also its size. For example, if a drill has a power P = 650 W, then from physics we know that P = U· I , from where I = P/U = 650/220 and 2.95 A.
This means we need to buy a BUE-3 ~220V 3.0A button.
Drill button device
Well, at the end of this article, I would like to address the issue that many of you will encounter in the process of dismantling the old drill button. In order to perform high-quality dismantling of the button, you will need minimal knowledge of the design of modern drill start buttons.
The video above shows how the button works when you press it. If the reverse lever is set to tighten bolts, nuts, and so on, then both lower terminals are closed.
If you turn the reverse on in the opposite direction, then only one lower terminal is connected to the network, while the second one does not work.
As a rule, in all modern drill buttons, the wire clamping devices are designed from durable steel and are not very convenient for dismantling.
The fact is that button manufacturers are concerned about increasing productivity when assembling their products. They design buttons in such a way that it is as convenient, easy and quick as possible to install electrical equipment, but at the same time the convenience of replacing and repairing buttons suffers.
Photo-3. The design of electrical wiring clamp terminals in modern drill buttons
In other words, the prepared wire of a winding or other drill part for installation can easily be inserted into the hole provided for it in the button body, but pulling it back out is problematic - this requires skill and ingenuity. The clamp terminals in the button body itself are installed at an angle of 45 degrees, and made of hardened steel.
If you look carefully at photo 3 presented in this article, you will agree with me that in order to pull out the wire you just need to push out the clip inside the button body and release the mounting cable.
To do this, you will need a thin large needle or a thin strong awl, which you need to insert into the hole reserved for mounting the wire and push the clamp inside, thereby freeing the wire from the grip. That’s all, in conclusion I can say that the method I told you works very well (I checked it myself more than once).
You can safely get to work and replace the drill button yourself with your own hands. That’s all for today, I’m waiting for your comments below, bye, see you next time!
What you need to know about electric drill repair: drill design
Before you start repairing an electric drill with your own hands, you must determine the cause of its breakdown. There may be several of them:
An electric drill is a necessary tool in everyday life.
- Brush wear.
- Damage to electric motor elements.
- Insufficient clamping in the drill chuck.
- Failure of the regulator or switch.
- Bearing failure.
Repairing a drill should start with diagnosing the brushes and chucks.
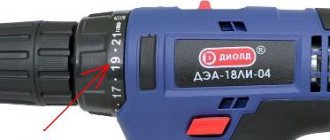
Electric drill brushes can be carbon or graphite. They are part of the circuit through which current flows to the tool's motor. As a rule, the lifespan of brushes ranges from 70 to 120 hours. To determine the wear of a part, you can use special indicators. Brush wear is perhaps the most common problem with electric drills.
It is easy to replace this part with your own hands. This can be done even without dismantling the tool body. In some models, to remove worn parts, it is enough to unscrew the plugs.
The first sign of brush wear is increased spark production, which can be seen in the ventilation slots. It is worth noting that it is better to replace 2 brushes at once, even if one is worn out.
Replacing these parts must be accompanied by cleaning the collector from carbon deposits. This is best done with ethyl alcohol.
Diagram of the external device of the drill.
In order to reduce sparking when working with a drill, you should carefully apply the brush to the commutator and secure it with sandpaper. In addition, it is worth paying attention to the condition of the spring of the brush holder assembly. If it does not fit well, then it is better to replace it. The cartridge most often fails due to abrasive wear.
Clamp the inner race and rotate the outer one. If you hear a characteristic “rustle” or notice that the cage is “slipping”, it is better to replace the bearings, otherwise they may lead to jamming of the armature.
How to determine breakdowns in an electric motor
The second common cause of drill failure is a malfunction of the electric motor elements. Most often the armature and stator break. This happens for two reasons:
- Incorrect use of the tool.
- Poor drive quality.
Connection diagram for a button in an electric drill.
Before replacing the rotor or stator, disassemble the housing and carefully remove the wires. It wouldn't hurt to remove the brushes and remove the drive gear. Then remove the motor and support bearings.
After this, proceed to replacing the faulty parts. A broken anchor is easy to determine. Most often, a malfunction of this element is accompanied by a characteristic burning smell and increased sparking. In addition, upon careful inspection, you can easily detect burnt parts of the winding. However, if you notice that the power of the drill motor has dropped, use an ohmmeter and megger.
Windings, both stator and armature, are susceptible to interturn breakdown and winding breakage. Sometimes a breakdown occurs on the magnetic circuit. The latter is easy to determine if you use a megger.
When the megger probes come into contact with the winding output, you need to measure the resistance. If it is more than 500 mOhm, most likely there is no breakdown. For accurate measurements, take a megger with a measuring voltage of at least 100 V.
Interturn breakdown of the armature is more difficult to detect.
To determine the breakdown, use a transformer that has only a primary winding, and its break is made in the form of a trench. When measuring, the armature core should become the secondary winding of the transformer.
When turning the armature, attach a thin plate to its core. If it starts to vibrate, the winding is short-circuited. A winding break can be determined by connecting a milliammeter to the adjacent armature plate.
If the winding is intact, the current will be the same. A break in the stator windings can be determined by connecting an ohmmeter to the broken ends of the winding. If there is no resistance, the probability of a break is 100%.
Checking the electric motor: causes of breakdowns and repairs
There are several reasons for damage to the armature or stator of a drill. First of all, this is illiterate operation of the device. For example, many users simply overload the tool, working without interruption. This leads to the fact that the drill motor does not have time to “rest”. The second reason lies in poor coil wire, which is often found in cheap models. That is why breakdowns of cheap tools are much more common. In this case, repairs must be carried out using specialized tools. And it will be better if you entrust this work to professional specialists.
However, if you decided to carry out the repairs on your own, you will definitely have a question - how to do everything right? As you already understand, an electric drill “suffers” from damage to the armature and stator, and this can be checked with several signs, for example, when the tool suddenly sparks during operation. If there are no “bright” signs, you can use an ohmmeter.
The stator is changed like this:
- First, carefully disassemble the device body;
- Remove the wires and all internal parts;
- After finding out the causes of the breakdown, we replace the spare part with a new one and close the housing again.
Drill types
Today, the industry produces universal drills that can be used for drilling wood, metal and hard plastic. But sometimes you need to have special drill bits for a drill to quickly drill holes in concrete, ceramic tiles, metal, to make large holes in wood, for example, to carefully insert a new lock into a door.
There are twist and flat drills for this. Impact drills for brick and concrete, diamond drills for drilling in ceramics, and a large-diameter circular drill for making holes in tiles to install water pipes have proven to work well.
Disassembling an electric drill
In order to find a malfunction and repair the device, you often have to disassemble the tool. Since all devices are similar in appearance, their disassembly can be represented as follows:
- The screws around the perimeter of the device are unscrewed; to do this you will need to use a Phillips screwdriver.
- After unscrewing the screws, the halves of the housing are separated.
- The power and reverse buttons are carefully removed from the grooves.
- The gearbox is removed from one half. In order to remove it, you will need to turn it in the seat.
- Assembly occurs in reverse order. When doing this, it is necessary to ensure that all removed elements and wires are located in specially made recesses for them.
Chuck types
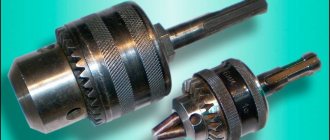
In practice, you can find only two main types of this simple mechanism for fixing a cutting tool.
- Drills are fixed manually - there are single-sleeve chucks, where the drill is clamped with one hand, and there are double-sleeve chucks, where both hands are already involved.
- The cartridge is tightened using a special key of complex design. This is considered the most common type of chuck - used on all models of modern drills, especially on powerful versions.