The chuck in a drill is considered one of the most used elements, which is why it wears out its life very quickly. As a result, this part often fails. To cope with a breakdown, you need to know how to disassemble a drill chuck. The procedure is considered simple, so it can be done independently. However, it is important to take into account some nuances.
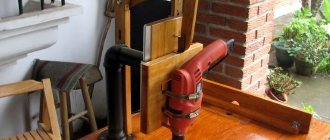
Disassembling a drill chuck has certain features
The structure of a drill and types of cartridges for it
The cartridge is a seat. He holds the main working element of the tool - a drill, a drill, a screwdriver. There are special attachments for grinding or cleaning surfaces. They are fixed on a round or multifaceted pin, which is also placed in the device.
Depending on the design features, the following types of products are distinguished:
- conical;
- gear-crown;
- quick-clamping
Why do you need to disassemble the cartridge?
The clamping fixture must provide high precision hole drilling. However, after some time the seats wear out. This causes the cartridge to start hitting.
This means that the working area of the drill shifts in different directions during operation. In this case, the formation of the hole has certain deviations in location and diameter. Wear of the cams makes it impossible to properly fix the drills, which causes them to stop under load. The solution is to replace the worn element with a new one.
How to remove a cartridge with a threaded connection
The question of how to remove the chuck from a drill, which is fixed to it using a threaded connection, arises among home craftsmen quite often. Such a clamp must be removed taking into account the fact that it is installed using a non-standard left-hand thread.
The threaded element of the clamping device is located in its internal part, so you must first move the clamping jaws as far apart as possible, which will provide access to the fixing screw, which can be unscrewed using a regular Phillips screwdriver. In drills without such a screw, the chuck is simply twisted off the shaft without carrying out the above-described preparatory work.
The head of the fixing screw can be Phillips, slotted, hexagonal or even star-shaped.
The left-hand thread screw that secures the threaded chuck to the drill can wear out over time. To restore the reliability of such a connection, you can do the following:
- insert a Phillips screwdriver into the head of the chuck screw on the drill;
- Lightly tap the hammer to deepen the screw into the threaded hole.
Such actions will not harm the drill’s mounting unit, but will allow the clamping device to be fixed to it more accurately and reliably.
Replacing a threaded chuck on a drill can also be done using a 14mm wrench, which greatly simplifies this process. In order to avoid making mistakes when you decide to disassemble a cartridge of this type, you can first familiarize yourself with theoretical material on this topic and watch the corresponding video.
How to properly disassemble a drill chuck: step-by-step instructions
Today, drills are produced by many manufacturers. The most famous include Bosch (Bosch), Dewalt, Interskol. There are hand and electric drills. They can also be percussive. Disassembly depends on the type of device.
Disassembling the key chuck
This type of product can be disassembled using a puncher or hammer. Each method has certain features.
Perforator method
Many people are interested in how to properly disassemble a drill chuck using this method. Experts advise doing the following:
- Spread the metal cams so that they are hidden in the housing.
- Secure a metal plug or blunt insert into the device.
- Place the product on a strong surface. It is first necessary to place a rubber plate in this area for shock absorption. A metal plate, table, or floor can act as a support.
- Turn on the hammer drill. After a few seconds, the sleeve can be knocked off the cartridge.
- Remove the wire cutters from the housing.
Note! When knocking down the clip, individual elements may fly apart in different directions. It will be difficult for a beginner to put all the pieces together.
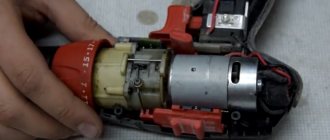
Using a hammer
This method is similar to the previous one, however, not all craftsmen have a hammer drill. It is quite acceptable to replace it with a hammer. To do this, it is recommended to do the following:
- Hide the metal cams inside, spreading them to the desired position.
- Place the cartridge in a vertical position. This is done using an open bench vice. In this case, the body should pass between the holding lips of the vice, and the sleeve should rest against them.
- Warm your sleeve. This can be done with a hair dryer or a blowtorch.
- Place a shock absorber on the chuck. It should be made of soft metal.
- Use a hammer to knock the body out of the sleeve.
- Clean and lubricate parts. After which you can assemble the structure.
Note! The disadvantage of this method is the risk of damage to the elements. In addition, heating should be used only in cases of extreme necessity, when other methods do not produce results.
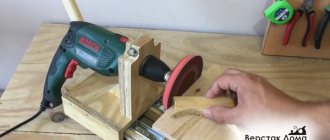
A vice may be required to disassemble the drill.
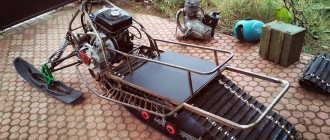
Disassembling the keyless chuck
The self-clamping chuck has a more complex design. To make the process reversible, it cannot be completely disassembled. To obtain the required results, it is recommended to do the following:
- Pull apart and pry the coupling in a circle. This should be done with a screwdriver. All actions must be careful to avoid damage to the plastic.
- After sliding the coupling, remove it by hand.
- Open the jaws as far as possible, place the rod in the chuck and knock out the body with a hammer.
It is recommended to stop at this stage. All areas that can be lubricated have already been discovered. Upon subsequent disassembly it will become irreversible.
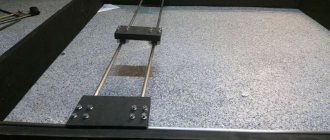
The quick-release chuck must be disassembled very carefully
Disassembling a Soviet cartridge
Soviet-made drills have chucks that are held on a Morse taper. They are tightened with a screw. To remove a cartridge made in the USSR, you can use a bearing puller. It is also permissible to knock down the structure with a hammer.
Design and features of the toothed chuck
The classic drill chuck is a collet or cam type clamping device. They can hold not only various tools with a round shank, but also cylindrical workpieces for further processing. The main design elements of jaw chucks are:
- cylindrical body;
- an adjusting ring or sleeve rotating on the outer surface of the housing;
- a cam mechanism or collet installed in the inside of the device body.
Design of a jaw (gear-ring) chuck with a key
In turn, the collet mechanism, the elements of which are made of hardened steel, consists of three absolutely identical cams, which, when rotating the adjusting ring or sleeve, simultaneously approach each other, thereby ensuring reliable clamping of the tool shank. In the first models of chucks for mechanical drills, the collet jaws converged due to the rotation of the adjusting wheel; now an adjusting sleeve is used for this.
On one side, the drill chucks are installed on the shaft of the equipment used, and on the other, the tool with which the processing will be performed is inserted into them. Jaw chucks are primarily used to hold the following tools:
- drill;
- cutters;
- taps with small diameter shanks.
The drill chuck is designed to clamp bits with a cylindrical or hex shank
The cartridge is disassembled: what to do next
After disassembling the structure, it is important to study all fragments of the device. If they are not seriously damaged, repairs will be fairly simple. As a rule, malfunctions are associated with debris getting into adjacent elements. In such a situation, it is enough to blow them well and rinse them using oil.
If the failure is caused by damage to the threads or teeth, it is worth taking more serious measures. For minor problems, you can try sanding the affected fragments. In more serious situations, a complete replacement of the structure is required. At the same time, putting the part back together will not be difficult.
To ensure that your drill lasts as long as possible, it is important to use it correctly. The tool cannot be used for turning and milling work, as it can quickly break. The correct choice of drill and its sharpening is of no small importance. This has a significant impact on the cartridge itself.
Note! When using a drill frequently, it is important to protect the drill bits from contamination. This will help avoid jamming of elements.
After disassembling the device, it can be repaired
Which drill chuck for a drill is better according to the clamping method?
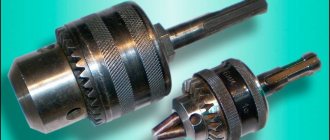
In household drills and screwdrivers, one type of chuck is usually installed according to the method of clamping the working tool: using a key and quick-clamping. Key jaw chucks have been around for a long time and are well known to any home craftsman. Keyless chucks have only recently come into use, and they quickly gained great popularity.
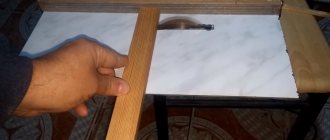
In the photo on the left you see a quick-release chuck, and on the right you see a key chuck with a key. There is an opinion that a key chuck clamps drills better, but from many years of experience in using both a key chuck and a quick-release chuck, I dare say that there is no difference. Both types of cartridges are clamped with equal success. Only the convenience and speed of changing drills in a drill with a keyless chuck are undeniable. There is no need for a key, which is always lost during work, unless it is secured to the drill or tied to it with a rope; you need to use two hands to clamp the drill.
The method of clamping the chuck is not related to the method of attaching it to the drill shaft, so if you change the chuck with a key clamping method, I advise you to install a chuck with a quick-release method of fixing drills instead.
Possible problems with the chuck when operating a drill: causes, descriptions and ways to solve them
Any tool can wear out, and drill chucks are no exception. In most cases, the cause of the problem is wear of the blades that secure the drills. Their edges wear out and break, which leads to backlash in the working fragments.
There is also a risk of the drill turning when pressed against the surface. This indicates wear of the mounting thread. Another reason may be the development of a tool cone. It all depends on the mechanism.
At the first signs of problems, it is necessary to exclude the use of the tool and establish their causes. Otherwise, there is a risk of more serious problems that cannot be eliminated.
You can disassemble the cartridge in different ways. It is important to take into account the design features of the device and the rules of its operation.
Options for attaching to the screwdriver shaft
The chuck is attached to the tool shaft by:
- thread. To do this, the threads of the cylinder and shaft must match. A metal cylinder is screwed onto a shaft.
- fixing screw. The fastening also requires tightening, and the screw itself only strengthens the contact between the cartridge sleeve and the shaft. It has notches for a Phillips screwdriver and a left-hand thread.
- Morse cone. One of the oldest fastening methods. The screwdriver shaft has a cone shape, and the same groove is made inside the sleeve. When the outer and inner cones fit together, the head is securely seated on the shaft.
Morse taper devices
Chuck malfunctions
After the cartridge is disassembled, you should carefully inspect all the parts. Repairs are easy to make if the parts are not damaged and the jamming is caused by metal shavings getting into adjacent parts. In this case, it is sufficient to rinse all parts thoroughly with oil or kerosene. You can use a soft brush for this. After cleaning the parts, you can reassemble in the reverse order, but manually, without much effort.
Most often, the malfunction is caused by wear or damage to the threaded and toothed surfaces. If these damages are small and local in nature, then you can try to eliminate them by grinding with a needle file or sandpaper. If grinding does not help, the cartridge should be replaced completely.
Standard sizes and markings
Before disassembling the screwdriver, it is necessary to determine the type of cylinder mounting. The marking will tell you this. An inscription of the form 1-6В14 indicates the type of fixation Morse taper, where the numbers before the letter are the diameter of the bit shank in millimeters, and after that the size of the conical hole. There are 9 articles – from B7 to B45.
For cartridges with threaded fastening, markings of the form 1.5-13 M12x1.25 are provided. Here the numbers before the letter also show the permissible diameter of the tail of the bit, and after the letter there are thread sizes in millimeters.
Important! Foreign screwdrivers use markings in inches - it looks like this: 2-13 1/2 - 20 UNF. 1/2 means inch, and 20 means the number of threads per inch.
Threaded cylinder
Necessary tool
If you need to remove and disassemble the electric drill chuck, you should prepare the following tool:
- vice;
- pliers;
- screwdriver;
- hammer;
- mallet;
- chisel;
- needle file;
- sanding paper;
- brush;
- oiler;
- gas key;
- Adjustable wrench;
- set of wrenches;
- awl;
- file;
- calipers.
The issue of disassembling the cartridge is solved in different ways. Sometimes this is very easy to do, but sometimes complications arise. In any case, you can disassemble the cartridge, and you can do it yourself.