Engraving on metal always attracts the eye. This trade has fed artisans since ancient times. And today it has not lost its relevance. Craftsmen can turn everyday objects into real works of high art by decorating them with fancy miniatures. Sometimes you can see entire paintings of considerable size, made by engraving artists. And few people know that absolutely anyone can do this business.
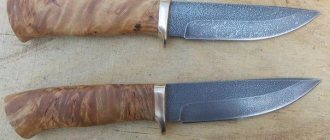
Photo 1. Souvenir engraved hunting knife, an ideal gift that can be given to hunters.
Do-it-yourself engraving can become a profitable and interesting business if you really want it.
You can decorate small metal objects using engraving yourself at home. This activity will arouse the respect and envy of friends and acquaintances. In Zlatoust, thousands of craftsmen practice this craft at home. Engraved items are expensive. A saber costs approximately 300 thousand rubles, a hunting knife costs up to 100 thousand (photo No. 1). Agree, this is good money. How to make engraving on metal at home with your own hands? For this lesson you need to prepare the simplest equipment that can be found in any house, in any apartment.
What are the ways to engrave metal?
There are several types of metal engraving. Let's look at each of them.
Manual cutting
This method involves applying an image to the surface of an object using a steel cutting tool. This creates lines and indentation points on the material. In other words, hand cutting is called artistic engraving. This is a very long and labor-intensive process. But there are faster ways to engrave.
Sandblasting
Its essence lies in the fact that the surface of the material is damaged by sand or other powdery substance, which is sprayed with a strong air flow. When sand hits the surface of the metal, a matte is formed. The granularity of the sand allows you to create various effects and apply designs using a stencil. The advantages of sandblasting are versatility, high speed and smooth engraving edges.
Mechanical engraving
It is carried out with a sharpened milling cutter. There are two types of mechanical engraving equipment - pantograph and computerized. Jewelry and family decorations are engraved on the pantograph. Using a computerized method, you can engrave any metal product.
Mechanically, you can create three-dimensional images, but the disadvantage is low productivity.
Laser sublimation
This is the application of color images using a printer or sublimation cartridge. First you need to make a transfer - print an image that is placed on top of the product. And when exposed to high temperatures, the paint transfers to the material, leaving an image on it.
Laser sublimation is used to engrave many metal products - bracelets, pendants, watches and coasters.
Laser engraving
This is the most common method of engraving on metal. The design is applied to the product using a focused laser beam. Engraving occurs due to the evaporation of material particles.
Unlike other methods, laser engraving can be done on an industrial scale due to its high speed.
There are several types of laser engraving equipment, but we will talk about this later.
Laser, engraver or electrolyte: which is better to choose?
With all the abundance of techniques, most often for do-it-yourself engraving they use a mechanical machine - an engraver. It is perfect for signing a Parker pen, making a beautiful frame for a mirror, or making a dedicatory inscription on a knife. To do this, it is enough to know which attachment can be used for a particular material. For example, to engrave a knife with your own hands, you should use a special metal bur. You determine in advance what kind of inscription will be on your knife using a stencil or transfer it from a sheet of paper.
In addition to mechanical action, you can use chemical etching to decorate a knife. But you won’t be able to engrave a lighter using this method - the object must be completely immersed in the electrolyte. And during the reaction, there is no guarantee that the contents of this item will not explode (rather the opposite). Therefore, when choosing which engraving to do, choose a mechanical or laser model.
Why is laser engraving better?
- High accuracy and detail of the image.
- Aesthetics of the drawing.
- Durability. Engraving made using other methods will wear off over time.
- No risk of item deformation.
- Possibility to fulfill mass orders thanks to production automation.
- Versatility, because laser can engrave not only metal.
How does raster engraving differ from contour engraving?
Contour engraving is suitable for applying printed text and numbers to products at high speed.
The speed of raster engraving is lower, but it gives a better quality drawing when applying images.
How to make color engraving?
Color engraving has a more complex technological process, and it is only possible on metals prone to oxidation, such as
- titanium,
- stainless steel,
- zirconium,
- aluminum,
- nickel,
- brass,
- silver.
The color appears as a result of tarnish, which occurs due to the interference of light in the oxide film. The hue and color saturation depend on several factors:
- duration of exposure to the laser beam,
- metal thickness,
- thermophysical parameters of the material,
- radiation power,
- thickness of the oxide film.
For example, on a titanium plate with a pulse duration of 80 nanoseconds, a beam speed of 24 mm/s, a pulse frequency of 95-100 kHz and a radiation power of 4.5 W, a purple engraving was obtained.
Instructions - how to properly engrave on metal - MozgoChins
In this material I want to tell you about engraving on metal. The stages of engraving on metal are almost no different from those on plexiglass, but there are still some nuances.
Tips before engraving
- First, clear your work area and choose a surface that is large enough to wrap the workpiece without any problems. When engraving metal, you don't need directional light—just regular lighting will suffice.
- The second most important thing is comfort . Sit so that your hand can freely reach the top of the workpiece. Also lay the workpiece and check it for deflection. It may happen that at the most important moment the metal will bend and the cutter will lead in the wrong direction, ruining the whole job.
- Wipe the surface well, remove all dust and get rid of grease.
- Fasten it well . If you have a tripod, great, great. But there are cases when the Dremel lies without fixation, therefore there are two options: either engrave with one eye and look at the tool with the other, or simply tie it to the table with something. For example, I hold the Dremel on my knee - it’s most convenient for me.
So let's get started with the process.
First, we select a design and print one on self-adhesive paper, and the second on plain paper. I'll tell you why the second one later.
Printed design for engraving
On top of everything else, I also had to trace all the lines additionally, from which I learned a useful trick. Next we will figure out the location of the drawing, and after that we will glue it. It is advisable to glue starting from the corner and continuing diagonally. No blistering of the paper directly on the drawing is allowed.
To begin, take a cone-shaped nozzle. The photo shows how it has become frayed during use, but the tip itself is still capable of producing a straight line.
Cone-shaped nozzle on a flexible shaft
We sit down to work, cross ourselves three times and begin. While working, do not get distracted, get irritated or overthink . The most optimal movement of the nozzle will be if you position it at a degree and move it towards a more acute angle. In the figure below, it needs to be moved to the lower right corner.
The process of engraving on metal.
Here are some intermediate photos of the work.
The last photo shows how the paper has come off. I usually remove it under hot water, but this time there wasn't a drop of liquid in the garage, so I was impatient and just tore it off.
Anyone who can be more careful should experiment with this matter. You can, for example, paint over all this, getting an original effect.
As a result, we have a good, but unfinished picture, which itself looks lonely against a black background.
The first version of engraving on metal
But now we take that same unused drawing and outline on it with a pencil the places where we will “fill in”. After this, we take a spherical nozzle and begin to fill. The result is this:
Engraving on metal with filling
Metal Engraving Tips
- If you need to engrave a long line, start at the bottom and move the Dremel away from you. Somehow the line turns out very smooth. As I say: “With soul.”
- When you first start engraving, take a pen and draw the main lines directly on the drawing, excluding unnecessary ones.
- Very often, paper gets under the cutter and gets chewed, after which the cutter can go in the wrong direction purely mechanically. To avoid this, you should start the line a little further and end a little earlier. Then, during the final revision, you will adjust it.
- If it happens that the entire section is very difficult, then simply put dots on the lines and connect them at the end.
- During pouring, do not randomly scrape off the paint. If the fill line is very large, then you should not fill it progressively. It is best to go from start to finish without stopping the cutter in a separate area.
- Again - don't make very small details. The consequence may be peeling of the paint.
(Source)
Review of equipment for laser engraving of metal
Laser engraving is possible either using a fiber optic marker or a CO2 engraver. Let's look at each of these methods.
Fiber optic marker
A laser marker is considered a universal equipment for engraving and marking metal.
It has several advantages over other methods:
- No consumables.
- High quality.
- Easy to operate.
- Low energy costs.
- High speed.
- No special knowledge required for setup.
- Contactless engraving on the product.
- Possibility of installing a rotating device.
- Small dimensions.
- Lack of heat treatment in the cutting area.
- Various materials can be engraved.
What products can be engraved?
A laser marker can be used to engrave both piece items and be used for mass production. Let's list the main ones:
- decorations,
- barcodes,
- application of logos,
- serial numbers,
- nameplates,
- branding of souvenir products,
- signs,
- business cards and more.
What industries are fiber markers used in?
- advertising,
- jewelry production,
- medicine,
- defense production,
- dentistry,
- trade,
- shipbuilding,
- Automotive industry,
- tool production,
- production of electrical equipment.
How to choose a laser marker?
In order to decide on the choice of a laser marker, you first need to consider its main technical characteristics.
Emitter power
The main thing is the emitter, because a laser beam appears in it. Lasercut offers three types of laser emitters - Raycus, Max Photonics, IPG.
Max Photonics is the most budget-friendly, but is only suitable for applying simple images.
In contrast, Raycus holds power better and provides uniform pouring. A marker with a Raycus emitter can be used to engrave complex and three-dimensional designs and geometric shapes. Some may require filling.
And the IPG emitter allows you to make color images on metals. In addition, it can perform tasks at high speeds and has built-in anti-reflection protection.
When choosing an emitter, you need to decide on the tasks.
For example, with Max Photonics it is much more difficult to obtain a black tint on stainless steel than with IPG. But it's possible.
Working field size
The size of the working field of laser markers on average ranges from 75/75 to 300/300 mm. Its choice depends on the size of the product being processed.
There are markers with a lifting table, for example, Wattsan FL LT, with a removable handle and focus stop, such as Wattsan FL HH, with a stationary table - Wattsan FL ST.
Each of them has its own functional features. For example, the FL TT marker is suitable for engraving large items.
Setup and maintenance
Before purchasing a machine, Lasercut can provide commissioning. It includes installation of equipment, configuration of the control system, testing of electronics and mechanics, connecting security systems and much more. Our qualified engineers can provide training to your staff.
In addition, service, diagnostics, adjustment, warranty, post-warranty service and repair are possible.
Price
As standard, fiber optic markers cost on average from 300 to 700 thousand rubles, depending on the emitter power and functionality. But it is also possible to modernize the machine, for example, increasing power or installing a rotary device.
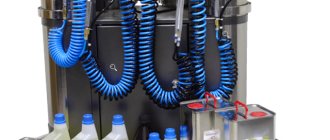
LASER MARKER WATTSAN FL HH
Is the CO2 machine suitable for metal engraving?
CO2 laser machines are designed to engrave many materials other than metal.
It is very difficult to apply high-quality engraving on metal using an engraver, but it is only possible if it is coated with a special spray or paste KTP-8. And not every metal can be worked with on a CO2 machine, but only ferrous ones - steel and ferroalloys, stainless steel.
If you specialize in making metal products, then, of course, you need to focus on a fiber marker.
But if working with metals is not your main focus or you use the machine for amateur purposes, then it is possible to engrave on a CO2 machine.
WATTSAN 0503
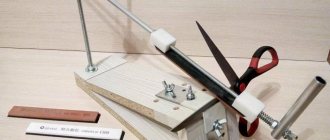
How to work as a metal engraver
To ensure that the product, on which the craftsman has to work painstakingly, is not spoiled by an accidental mistake, it is necessary to know the intricacies of using an engraver, be able to accurately copy drawings and follow safety rules. Difficult? Not at all! We will tell you in more detail about all the secrets of working with the tool later in the article.
Stage No. 1. Workplace organization
First of all, you need to properly prepare everything you will need for engraving.
For working with tools, a table with a high-power lamp is best suited - this way all the smallest details will be clearly visible. To avoid damaging the furniture, it must be covered with paper or cloth.
Thanks to this, chips and dust generated during cutting and grinding will remain on the material and not on the surface of the table.
For rough drawing, you should stock up on a pencil or felt-tip pen and adhesive tape - it will come in handy if the pattern has already been drawn on paper.
In this case, the tape will help firmly secure the “draft” to the surface so that it does not move and the pattern is even.
If you intend to depict something directly on glass, plastic or wood, the surface should be “degreased”, that is, wiped with alcohol. This way the felt-tip pen will not wash off, and the drawing will be better visible.
Stage No. 2. Tool preparation
In order not to be distracted by searching for the necessary attachments during the engraving process, it is better to immediately lay them out in the order in which they will be needed during work. At the same time, it is worth understanding the purpose of each part.
For example, a cone-shaped bur bit is designed for cutting outlines and is not suitable for making fine strokes, while a cylindrical bur bit will do the job perfectly.
The engraver always comes with instructions, so you can quickly find out in what case to use the attachments.
Sometimes a special suspension is sold along with the instrument. It is needed not only to give the engraver the correct position during storage.
Thanks to it, it is possible to avoid vibrations that occur during operation, and, consequently, some errors when applying the pattern.
Before you start using the tool, you must install the suspension so that the flexible shaft cord does not get in the way and does not create interference.
Stage No. 3. Drawing
To ensure better hand glide over the surface, you should wear gloves. Thanks to them, the brush will not remain in the same place for a long time. In addition, this will help avoid the appearance of stains on degreased wood or plastic.
For those who are just starting to work with an engraver, experts advise choosing the minimum speed. This way you can simultaneously solve 3 problems: cut the pattern evenly, make strokes of the same depth and not damage the material.
You need to start by drawing the outline itself and only then move on to “drawing” the details - small lines, dots, etc. In order to give the image a finished look, you should use the roller with a soft felt surface included with the engraver. Using this part, you can remove all roughness and “burrs” left by the carver.
When working with an engraver, you should always remember that every 10-15 minutes you will have to stop and turn off the tool (if its design does not include a cooling system). This way you can avoid engine overheating and premature breakdown. More precise times for each model can be found separately in the attached instructions.
Stage No. 4. Equipment care
In order for the engraver to serve properly for many years, you need to constantly monitor the condition of the working elements.
If, upon inspection of diamond wheels, brushes or attachments, cracks, roughness or other damage are found on them, these parts must be replaced with others.
It is worth remembering that new consumables must be of the same brand as the tool itself. Only in this case the manufacturer guarantees the efficiency of the engraver and its long service life.
The second thing you need to do every time you finish painting is to clean the ventilation holes. They serve for additional cooling of the engine, but over time they become clogged with dust generated when cutting wood, plastic or glass. Contamination reduces the productivity of the engraver and often causes its failure.
To prevent this from happening, you need to carefully remove the abrasive using a piece of cloth soaked in warm water or soapy water. It is not recommended to use alcohol-containing products, solvents and gasoline, as they can damage the body of the instrument.
It is typically made from ABS plastic or polystyrene, which are susceptible to chemical attack.
Based on this information, you can organize your work with the engraver step by step so that it is effective, reliable and enjoyable. However, this only applies to those cases when the tool is used to apply patterns. Otherwise, when cutting various materials, grinding surfaces, or drilling holes, you should follow the safety rules:
- before turning on the engraver, you must make sure that the power cord is in good condition and check the operating parts for damage;
- To protect your eyes from dust and random sparks, you must use glasses;
- during heavy work (drilling, milling), the engraver must be held firmly with the fingers of the entire hand - this eliminates the risk of arbitrary movements that can lead to failure of the equipment;
- If the cutting disc suddenly jams, do not try to immediately remove it from the hole. In such cases, you need to turn off the power supply, wait until the nozzle stops rotating, and carefully pull the engraver out of the cut;
- After completion of work, all used nozzles must be cleaned of accumulated dust. By servicing the engraver on time, you can not only extend its service life, but also improve the quality of work with it;
- consumables purchased separately (wire brushes, diamond discs, etc.) must exactly match the technical characteristics of the tool, have the appropriate shank dimensions, thickness and speed.
Apply these simple tips when completing orders and you will get excellent results. And if you don’t already have one, you can always choose a suitable engraver in the catalog on the website of our online store.
How to make metal engraving with your own hands?
Artistic metal engraving can add special value to an item.
Firstly, most often, such work is performed individually, you become the owner of an exclusive item.
Secondly, the artistic engraving looks very beautiful.
Thirdly, you can do it yourself, at home. Engraving is the application (transfer) of a design onto a metal object.
How to make engraving on metal at home, what tool or machine is needed? What is the price of engraving tools? You will learn about this in our article.
General technology
The technique can be manual or mechanical (various equipment is used).
It is also divided into line and armor:
- The line engraving technique is performed by applying contour lines and strokes to an object. Metal carvings are not deep, affecting only the surface of the object;
- Defensive, otherwise called three-dimensional, mechanical deep technique allows you to achieve a three-dimensional pattern. See photo.
Incisive engraving is performed with a special tool – a graver.
If you ask yourself how to make it yourself and where to buy these tools, then the answer is simple: this tool is sold in the same stores where you can find various art supplies.
The finest lines are made with a Messer-Stichel. If you need to make parallel lines, they are made with a rap pen.
To perform high-quality work, this tool must be sharpened; for this, a fine-grained whetstone is used, which is pre-moistened with water or oil.
Manual processing of small items at home requires the presence of a special pillow; you can easily make it yourself: take two pieces of fabric of the same size (round or square), sew them together along the edge, stepping back from it a little, but you need to leave a small gap in order to so you can pour sand inside.
The prepared form is turned inside out, dried sand is poured in, and the remaining hole is sewn up.
The cushion engraving tool is ready.
How to properly hold the instrument in your hand?
This should be done as if you were holding a regular ballpoint pen: the index finger should be on top of the blade (that’s what the metal part of the cutter is called), and the thumb should hold it on the side.
Work must be done on your own.
In the case when you need to change the direction of the pattern, unfold the pillow with the object on which the element is being applied, but do not change the direction of movement of the hand.
What else is useful to know about incisors?
To do your own engraving at home, it is advisable to first practice so that the carving turns out beautiful in the end.
It is better to purchase a set of tools: it is better to apply rounded lines with a square section of cutters, and it is better to make straight lines with a round section.
During work, burrs very often appear, which cannot be avoided, but they can be removed with the help of a scraper.
You can make the scraper yourself. To do this, you will need a file, from the edges of which you need to grind off the notch.
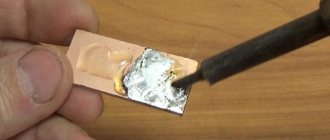
Before application, the surface must be cleaned with fine sandpaper and polished. A special polishing paste is used for polishing.
The paste can be easily replaced with chromium oxide (oil paint). The surface of the object must be thoroughly and vigorously rubbed. The paste is ground with a thick piece of leather.
Is it possible to do engraving at home?
If we are talking about mechanical or manual engraving, then, of course, yes. It is enough to purchase only cutters and a drill.
But if you are planning to engage in laser engraving, then it is worth considering that the equipment for it is much more expensive, so it will only pay off if the craft becomes your business. Of course, for mass production it is better to allocate a special room, at least for safety reasons. After all, to work on laser equipment you will need voltage stabilization and grounding.
But we have several clients who use fiber markers at home for small production. Desktop markers with small dimensions are suitable for this.
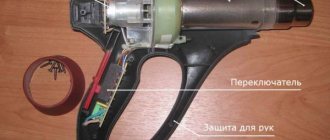
How to choose the right drill
Regardless of what you are purchasing the device for - for small jobs in the home workshop or for professional use - it is very important to choose this mini-equipment correctly. The parameters of such a device that you should pay special attention to are:
- rotation speed that the drill spindle is capable of developing;
- device power;
- force, or torque created by the drill.
A set with two drills: a full-fledged mains one for basic work and a miniature low-voltage one for “small things”
Many of those who purchase a drill to perform simple work in the home workshop opt for high-speed models, which is not entirely correct. For most of such work (and for solving most professional problems associated with drills), models capable of spindle rotation speeds of up to 35–40 thousand rpm are quite suitable. In particular, the tool used to process ceramics must rotate at this speed, but for work on softer wood, more modest parameters are sufficient. It should also be borne in mind that a drill capable of operating at very high speeds is significantly more expensive than its slower-speed counterparts. Therefore, you need to think carefully about whether you will need options on an expensive device that you will use very rarely or not at all.
A more important practically important characteristic of any drill is the torque that such a device is capable of developing.
There is a direct relationship between torque and power of the drill, so special attention should be paid to this parameter. Compact drills, which are often called micromotors, have the lowest power of the models on the market today. Such mini-devices, the working attachment of which is combined in one housing with a drive electric motor, cope quite well with the finishing of products made of various materials. Working attachments for this equipment (both straight and angular) are small-diameter drills, mini-mills, grinding and polishing heads. It should be borne in mind that micromotors, like pneumatic engraving tools, are not intended for use in conjunction with massive working attachments and for performing rough work.
A jaw or collet chuck can be used to secure attachments in drills.
Technical drills have higher torque and, accordingly, power. Such devices, the straight or angular working nozzle of which is driven by a flexible shaft, are equipped with a powerful electric motor that can successfully cope even with fairly high loads. The working attachments themselves, which are equipped with such drills, also have a reinforced design, which allows them to be used in conjunction with large and heavy tools and with their help to perform rough processing of products made from various materials.
Technical drills, which have high power and operate mainly at medium speeds, are not very suitable for performing delicate work. This is also explained as follows. The working attachment (straight or angular) installed on such equipment is driven by a flexible shaft, which puts a lot of strain on the hand, and this can cause defects when performing delicate work.
Even taking into account the high saturation of the modern market with drills of various models and types, it is difficult to find a device that would combine high power and the ability to operate at high speeds. That is why specialists who constantly work with such equipment immediately purchase high-speed hand tools and more powerful technical drills.
Much attention should also be paid to the selection of working attachments for completing the drill. This can be either a straight or an angular nozzle, which is equipped with clamping mechanisms of various types and sizes. The straight nozzle is more universal, while the angular nozzle is used mainly in cases where it is necessary to process hard-to-reach areas.
You can save on purchasing a branded drill if you make a similar device yourself. As a drive motor for such a device, for which you will still have to purchase a flexible shaft and working attachments, you can use an electric motor from an old washing machine or other household appliance that can develop a sufficient number of revolutions.
It is recommended to make a drill yourself if you plan to use it to perform simple work in your home workshop. Such a device may not be able to cope with professional tasks.
Engraving examples
Engraving on different objects has its own characteristics. Let's look at a few product examples.
Engraving on wedding rings
Usually they are engraved with words and inscriptions, but it is important that it is easy to read. But for this you need a suitable size of the product, because it will not be possible to apply such an inscription on a ring that is too narrow.
At the same time, engraving can be applied to any metal - gold, silver, platinum or titanium.
But we recommend using soft metal, as the letters will be easier to read on it.
Engraving can be applied to the front, inner side of the ring and its side edges.
Engraving in production
It is usually used in the manufacture of nameplates, plates, serial numbers, license plates and many other products.
Let's look at the example of nameplates and plates. For their production, as a rule, brass or aluminum is used. In the first case they have a golden tint, and in the second - silver. Both materials can be laser engraved.
But most importantly, do not forget that when producing industrial nameplates you must comply with the requirements established by law. Using markings, information about the product and manufacturer is applied to the nameplate. It includes technical characteristics of the device, manufacturer data, Rostest data, device serial number and a description of safety when working with the item.
The inscriptions are very thin and clear, so the nameplate itself is small. In addition, when applying inscriptions to a nameplate, their durability is important, so production uses exclusively laser marking methods. And thanks to the high speed of work, their production has no restrictions on circulation.
Engraving on a thermal mug
Metal thermal mugs are especially popular now. And they are used not only on hikes, but also, for example, in bars and restaurants. Engraving a thermal mug using a fiber optic marker is not at all difficult. One caveat - you will need a rotating device.
General technology
Carrying out engraving processes involves many types of techniques. The main methods are manual and mechanical, the latter is divided into the categories of defensive and line.
- A three-dimensional design can be obtained by using defense engraving; deeper processing involves three-dimensional engraving.
- When performing surface actions, the line technique is used. The process is carried out in several steps, the lines of the processing contour are drawn, and part of the metal is removed from the surface using dashed movements.
Defense technology engraving
Line engraving
Do-it-yourself incisive engraving is done with a serviche. A special tool can be purchased at art stores. Accessories for the manual process are divided into types:
- Messer - a graver is necessary for making fine lines.
- Engraving with parallel lines is done with a pen marker.
Tools for metal engraving cannot be used without high-quality sharpening of the gravel. For high-quality work, you need to sharpen the tool with a fine-grained whetstone, and then wipe it with a leather cloth.
When working with small objects, you will need a special pillow. You can make this tool with your own hands; material of the same size is connected with a thread along the edges. It is necessary to leave an intermediate space for filling with bulk material or sand. The workpiece is turned inside out, sand is poured into the hole formed, after which the rest of the pillow is sewn up with a stitch.
Using the tool will require careful handling and preliminary skills. You need to use the tool like a regular pen when writing, holding the tool to the side with the thumb of your working hand.
Metal engraving is done by yourself; in cases where the direction of the design or inscription changes, the best option is to turn the pillow in the desired directions.
It is possible to apply a design to metal using laser engraving. A unique piece can be used as a gift or as a signature fitting. Changes in design and inscriptions on metal products are available using technology such as laser engraving.
Do-it-yourself engraving on leather
You can apply a beautiful ornate inscription to a diary, passport cover or belt in a special workshop or do it yourself. However, for beginners, making a complex pattern will be extremely difficult - the technique of engraving on leather requires precise movements and a huge amount of patience. Therefore, before starting complex multifaceted work, it is worth paying attention to training. This way you can master the skill of operating special tools - knives of different sizes and different degrees of sharpening.
You can combine skillful engraving on leather with stamping and embossing - it looks very impressive and looks organic. However, it is worth considering that all these techniques are only suitable for working on natural leather - the substitute has a more fragile and delicate structure.
Features of the method
Preparing a drawing (lettering)
Everything you need can be easily found on the Internet and copied. For those who know computer graphics, this is not a problem at all. The main thing is to have a printer at hand for printing.
- You will have to do a mirror image conversion. For this technology, only a laser printer can be used. Any other type of device is not suitable. You will need not ordinary paper, but thin glossy paper. As an option - self-adhesive film. In this case, you need to refill so that the print falls on the substrate. You can also attach it to standard (office) paper with pieces of this film. The printer “brightness” mode is set to maximum.
Do-it-yourself stone engraving
Making an engraving on stone is a very painstaking and difficult task. This is usually done using a TPU (milling and engraving machine). A special cutter is inserted into it, which continuously rotates and makes the desired pattern in the stone.
Most often, this stone processing technique is used on granite. This is explained by the peculiarity of this stone - a smooth and even surface. However, it is completely unsuitable for beginners, as all the irregular and uneven lines will be visible on it. Sea pebbles with a flat, smooth surface are best suited for training. These are usually stones made from soft sedimentary rocks that can be easily machined.
In addition to the cutter and stencil, you must use special safety glasses when working with this material, as stone fragments can damage your eyes.