The main malfunctions of a rotary hammer and their external signs
All unit malfunctions can be divided into 2 groups: mechanical and electrical.
Mechanical breakdowns
If any mechanical malfunction appears in the hammer drill, its presence can be determined by ear (noise increases, a grinding sound appears).
You may also experience increased vibration or an unpleasant odor emanating from the unit body.
So, mechanical failures include the following:
- failure of the device operating mode switch;
- worn rubber bands of the striker and striker;
- failure of the impact mechanism;
- failure of the unit barrel due to wear;
- breakage of gear teeth;
- the chuck breaks, causing the drill to fly out.
Electrical faults
Malfunctions associated with the electrical part of the hammer drill may also be accompanied by an unpleasant odor from the device body and sparking. You may also notice that the engine gets hot and hums quickly without turning over, or that it emits smoke.
Electrical failures of the device include the following:
- the device does not turn on;
- breakage of the start button;
- brush wear;
- collector clogged;
- violation of electrical contacts;
- burnout of the stator or rotor winding of an electric motor.
Why do hammer drill elements need lubrication?
many moving parts inside the hammer drill that experience heavy loads. After applying lubricant, friction is reduced, mechanisms and components last much longer. Why else do you need lubrication? When friction occurs, parts heat up, and lubricants help remove heat. The compositions retain metal dust and particles that are formed as a result of friction, and also protect mechanisms from moisture and dust entering from outside. After the procedure, efficiency increases . The efficiency of work depends on how to lubricate the Makita hammer drill and other models, and with what frequency.
Algorithm for disassembling a hammer drill
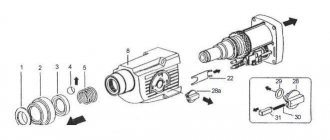
To eliminate mechanical and electrical faults (with the exception of a broken electrical plug), disassembling the unit body is indispensable. The most popular brands among craftsmen, both home and professional, are Bosch, Makita, Interskol, and Energomash hammer drills. The design of units from different manufacturers is approximately the same, therefore the methods for disassembling the devices will be similar. But you should not completely disassemble the device, since it will be difficult to put it back together. The photo below shows what a completely disassembled hammer drill looks like.
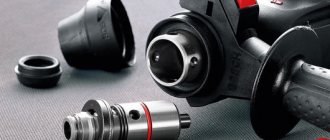
Removing the cartridge
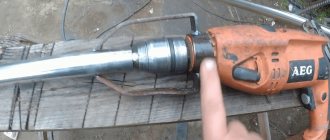
Disassembling the unit for troubleshooting should be carried out carefully, inspecting each removed part. To make assembly easier, it is better to photograph the disassembly process. If you do not find any external defects on the device, then it is recommended to start disassembling it with the cartridge.
- First, remove the boot (1), made of rubber.
- Carefully, so as not to lose it, use a screwdriver to remove the retaining ring (2) and then the plastic boot (3).
- At the next stage, it is important not to lose the small ball that is located under the washer (4). Remove the washer (4), plate (5) and spring (6), as well as the ball (7). It is when these parts wear out that the drill falls out of the chuck. Some cartridge models may have additional balls and washers.
We disassemble the case
If disassembling the unit housing is required, you must first remove the operating mode switch.
- Place the switch in the “Blow” position. Usually a hammer is drawn in this place on the body. If this mode is not available, set the switch to the “Punch + Drilling” position.
- Next, you should press the button located on the switch handle and turn it slightly below the hammer icon until a characteristic click is heard.
- After this, you need to pry the switch with a screwdriver and, pulling it towards yourself, remove it. In some models of units, this switch can be screwed to the housing.
Disassembling the electrical part of the hammer drill
To get to the electrical part of the device, if you suspect that this is where there may be a breakdown, you must perform the following steps.
- Unscrew the screws holding the back cover and remove it.
- Unscrew the fasteners holding the network cable.
- Next, you should remove the wires from the fastenings and remove the start button.
- Remove all wires attached to the stator.
- Remove the brushes by unscrewing the mounting bolts.
- Separate the housings of the electrical and mechanical parts of the device by unscrewing the corresponding bolts. Use a flathead screwdriver to separate.
- Remove the rotor from the gearbox. If you need to replace bearings, use a special puller.
- Remove the air intake located in the housing of the electric part of the hammer drill.
- Disconnect the stator from the housing. To make it easier to come out of the casing, it is recommended to pull the stator by lightly tapping the casing with a wooden object.
If you need to disassemble a barrel perforator with a vertical electric drive, first remove the handle, and then unscrew the bolts holding the motor.
Rotary hammer Einhell Bbh 1500 Repair
Hammer repair
Angel
1500 yourself
Reviews Rotary hammer Einhell BBH 1500
Great power, busy} is completely enough for repairs.
I just couldn't find them.
They brought a hammer drill 5 weeks ago from Poland for 100 enemy dollars.
Exactly in the midst of renovations in the apartment, which was only during this period that I did to them: I dug, and moved all the sockets with a crown, and pierced the walls.
Well, the hammer drill is fire, previously there was an impact drill, also from the same company, but it is not for chiselling, if it doesn’t compare with the hammer drill. Well, I really liked it.
power, drills included
you can't drill with one hand
I bought this perf two years ago. No complaints. One and a half kilowatts smash concrete into pieces. The set includes three drills and two chisels! When working in the bumper mode, it hits so hard that the walls shake throughout the whole house. When drilling, if you press the button a little, of course you can look through the hole to your neighbors. So, the power is not weak and the build quality is normal.
Similar reviews
Rotary hammer einhell bbh 1500
Self-clamping chuck. 12 month warranty Extended warranty up to 5 years. Download the instruction manual for the einhell bbh 1500 rotary hammer. Mechanical components “ROHS” Electric motor “YANMAR”. Electric adjustment "TOSHIBA". Yesterday the neighbor's spaniel killed a skunk in the yard.
Alarm with auto start abstract tomahawk – . Fixation of the power button Rubberized handle Ergonomic body Modern design. SUPER PRICE. Electric engine speed control device "TOSHIBA". Speed adjustment Limiting starting current Locking the power button Reverse Spare brushes. Reverse. Electronics "Inagawa Electric Industrial".
Professional model with a “soft” ratchet. A special bracket for fixing the tool on the belt. Real photos. The same model is found in a case with a set of accessories. 10 mm quick-release chuck Ergonomic housing Impact-resistant plastic Forced ventilation Speed control Locking the power button Reverse 12-month warranty - PROFESSIONAL. Small-sized universal corner nozzle.
Ergonomic handle. For vehicles with a turbocharged engine, the Tomahawk TW-9010 has a nbsp function. Electric button / reverse LED backlight Ergonomics "" Reinforced self-clamping chuck Spare brushes.
Reinforced self-clamping chuck Anti-vibration pad Spare brushes 12 month warranty - PROFESSIONAL. Quick-release chuck 10 mm.
Ergonomics "" Centered handle Reinforced self-clamping chuck Rubber-coated shockproof design Spare brushes 12 month warranty Extended warranty up to 5 years.
Repair of rotary hammer Einhell BBH 850/1
You can repair the Einhell BBH 850/1 hammer drill yourself. Repair of the Einhell BBH 850/1 rotary hammer is very necessary.
Rotary hammer BOCHKA 2601 MISSING IMPACT, complete disassembly and lubrication of the barrel part
The video discusses the repair
hammer drill
design , disassembling the barrel, - raster bushing.
- Germany. Bit included. Electric button. Bit included. Electric motor "YANMAR". LED lighting on the handle Ergonomics "" Reinforced self-clamping chuck Spare brushes 12 month warranty. The richest contents of the case - 42 items.
Reinforced self-clamping chuck. Anti vibration pads. 12 month warranty Adjustment 0-800 rpm Reinforced self-clamping chuck. Reverse and engine speed control device "TOSHIBA". Long-term operating mode according to GOST.
Spare brushes. For drills, corded and cordless screwdrivers. Centered handle.
Pdf: 1050850 - Charger BT-BC 10 E. Number of users looking at this common rumor forum: 0. Abstract of the tomohawk 9010 car alarm - . Speed adjustment Limiting starting current Locking the power button Reverse Spare brushes 2.4 bits included 12 month warranty. / Ratchet 51 / 1.5 kg. 220 V / 150 W / 16 Nm / 1.
Watch a video about the einhell bbh 1500 rotary hammer
/ Ratchet 161 / Reverse Adjustment 0
Self-repair of Einhell rotary hammer. Mastercity Forum
Mazur wrote. So I’m thinking I can exchange it for the promotion for interskol.
If he is even faster dead than alive, then there is nothing to think about, it needs to be changed. Although I’m not ecstatic about interskol.
From a similar pricing policy, I recommend Encor Voronezh for you. But this, IMHO, is personal, not like Voronezh.
weatherly wrote. worked a lot?
There is no specific answer for Einhell directly. What remains for our client to do depends on the goals and frequency of use. If you look on the Internet, the reviews for Einhell Global 726 are somewhat contradictory. However, the overall picture is similar to our automobile industry; if it doesn’t break down right away, it will work for a long time. Here's his overall rating.
Speaking directly for myself, my father had this type of instrument, being a purely non-professional equipment, which worked for three years only for professional purposes. This is because the father’s boshis (like a professional tool) burned out in 18 months.
And the Einhell Global 726 became unusable in the electronic part (anchor) initially only after three years of operation in circumstances for which it was not intended. Therefore, for purely non-professional purposes, I got it additionally from the parameters of the applicable cost/quality ratio.
My hammer drill died on concrete walls three years later when I was doing renovations in my apartment. The disadvantage is mechanical. barrel wear.
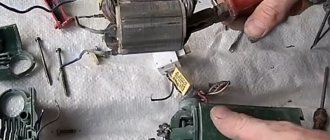
Replacing motor brushes
The main sign that it is time to change the brushes is the formation of increased sparking in the area of the electric motor commutator, rapid heating of the brush holders, and a burning smell. When the brushes are not worn out, the spark can only be seen under them. Otherwise, the spark is visible throughout the entire circle of the collector.
The presence of a spark around the commutator circle with unworn brushes is a sign of bearing wear, rotor or stator insulation failure, commutator plate burnout, stator or rotor burnout.
Another sign that the stator has burned out is the presence of sparks under only one electrode. If you have a tester, you can use it to check the stator and rotor: measure the resistance on the rotor and stator one by one. If it is the same on both windings, then everything is fine with the stator. If you notice clear signs of problems with the rotor or stator in your hammer drill, you will have to take the device to a service center for repair. As for the brushes, you can change them yourself.
To get to the place where the brushes are installed, you will need to disassemble the housing in which the motor is installed, or simply remove the back cover. Opening the lid, you will see brushes secured in special holders. The photo below shows what these parts look like.
Brushes that are installed on rotary hammer motors come in 3 types.
- Graphite ones are durable, but since they are very hard, their rubbing into the collector is not ideal, which negatively affects the latter.
- Carbon - easily rubs into the commutator, providing good contact, but wears out quickly.
- Carbon-graphite is an ideal option, since they are a mixture of 2 components that complement each other.
It is very important not to wait until the engine sparks and then change the brushes. Replacement is needed after they are worn to 1/3 of the nominal value (8 mm). Even if one brush is worn less than the other, both still need to be replaced.
Pay attention to the condition of the spring in new brushes and the fastening of the contact. If the spring falls off while the engine is running, it will suffer significant damage. Also, if the spring is weak, then it will not be able to provide good contact.
Before changing the brushes, be sure to thoroughly clean the rotor and stator from any remaining graphite or coal dust. These parts can be cleaned using technical or medical alcohol.
Next, you should secure the electrodes in the holders and rub them into the collector. To do this, place a piece of fine-grained sandpaper on the commutator and grind the electrode in with rotational movements in different directions. The grinding continues until the contact area of the electrode is slightly rounded. This will ensure a better fit to the collector plates and, accordingly, better contact.
Diagram of the impact mechanism, its malfunctions and repairs
The impact mechanisms of rotary hammers differ in their design, depending on which family the devices belong to. Therefore, the repair of these mechanisms will take place according to different principles.
Barrel perforators
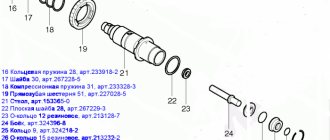
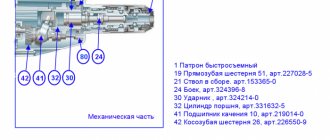
Rotary hammers with a vertical engine usually have an impact unit based on a crank mechanism (CSM). Below is a diagram of this type of impact mechanism.
The following photo shows a section of the device, where you can see the location of the crankshaft.
The impact mechanism of a unit with a vertical motor may have the following malfunctions. The connecting rod mechanism has a separate bearing that is mounted on the cam of the wheel with an eccentric, but sometimes it can be located at the base of the connecting rod. In some models of rotary hammers, a plain bearing (instead of a rolling bearing) may be installed at this location, which requires constant lubrication. If it is not there, or it is already old, then this unit will wear out. During repairs, you will have to completely replace the connecting rod and eccentric barrel.
Another common problem is the firing pin breaking. This malfunction can be calculated if you notice that there is no longer any impact on your hammer drill. To get to the firing pin, you will need to completely disassemble the barrel of the device. It is done as follows.
- Disconnect the barrel from the hammer body, remove the cartridge (see description above). Tap the barrel on the table so that the piston falls out. Take a rubber mallet and knock the barrel out of the housing.
- Remove the retaining ring holding the bearing.
- Remove the bearing itself and lightly tap the table to remove the balls.
- After removing the 3 balls, you can pull out the raster sleeve.
- Also, as in the previous case, remove the balls located on the bushing, just do not confuse them with those that were removed earlier (these balls are smaller in diameter). After removing the balls, you need to insert a screwdriver into the sleeve and push out the firing pin.
In this case, the firing pin is intact. But if it is broken, then replace it with a new one. You should also pay attention to the rubber seals and seals in the barrel body. If they are worn out, they must be replaced.
Pistol type hammer drills
The design of the impact mechanism in a pistol-type unit is slightly different from the same-purpose mechanism installed in a barrel-type unit.
Its main difference is that the piston is driven not by a connecting rod, but by a swinging (“drunk”) bearing. Therefore, the most common breakdown of this unit is the wear of a “drunk” bearing that needs to be replaced.
The next photo shows a destroyed “drunk” bearing, which is the reason why the hammer drill stopped hammering.
The swing bearing is removed using a flat screwdriver, which you need to pick up the bracket and remove it. After this, the bearing is easily separated from the gearbox housing.
When replacing a collapsed bearing, you should thoroughly rinse the gearbox, since it is in its housing that fragments of the broken part may remain.
After cleaning and installing a new bearing, apply a thick layer of lubricant to this block.
Also, the reason that the device does not hit can be a broken firing pin. To get it out, you need to remove the retaining ring that is visible in the hole.
Take a small screwdriver, pick up the ring with it, and move it to the right (towards the gear).
Do the same steps on the other side of the part. Next, insert a screwdriver into the hole in the part and push through the removed internal parts of the mechanism.
After this action, you can easily get the locking ring and the housing in which the broken striker is located.
If you disassemble this case, you will see the “culprit” of the malfunction, due to which the hammer drill does not hammer.
When assembling the impact mechanism, be sure to generously apply lubricant to all parts.
Do-it-yourself hammer drill maintenance
Lubricant for a rotary hammer allows you to extend its service life and make its use more efficient.
In order for the effect of a lubricant to bring the expected results, when choosing it, you should take into account not only the characteristics of the lubricant, but also the technical parameters of the device for which it is planned to be used.
When choosing how to lubricate a hammer drill, you must also keep in mind the fact that different parts of such equipment require different types of lubricant.
Proper lubrication of the hammer drill gearbox
There is an opinion that the presence of lubricant on the moving elements of the hammer allows you to postpone its replacement for a long time.
Meanwhile, this opinion is fundamentally wrong, and in order to change it, it is enough to get acquainted with the principle by which lubricants work.
Why do hammer drill elements need lubrication?
Lubricant, including that used for a hammer drill, is a viscous substance, the use of which is necessary to reduce the coefficient of friction between structural elements of a mechanical device moving relative to each other. Thus, lubricant only reduces friction, but does not eliminate it completely, so the lubricating composition is gradually saturated with wear products of rubbing parts - metal dust. As a result, not only does the viscosity of the lubricant change, but it itself becomes the cause of more intensive wear of the equipment.
It should be immediately noted that viscosity is the most important parameter that one must focus on when choosing a lubricant composition of a certain type.
Over time, the lubricant becomes dirty and loses its properties.
How to choose the right lubricant for a specific hammer drill model? First of all, you need to take into account the recommendations of the equipment manufacturer, who must indicate both the required type of lubricant and the frequency of its replacement. It is especially important to focus on such recommendations while the warranty period for the hammer drill has not yet expired. Otherwise, if the device breaks down, you will not be able to take advantage of the manufacturer’s warranty.
Many owners of rotary hammers, after the warranty period has expired, begin to use not branded compounds for lubrication, but their cheaper analogues - litol or grease.
Of course, such lubricants are not capable of harming the structural elements of the hammer drill, but when using them, you should keep in mind that they should be replaced much more often.
Gearbox lubrication
The hammer drill gearbox is the most complex component of the device in terms of design, so it requires special attention.
Lubricating the rotary hammer gearbox is not so difficult, but self-assembly of a previously disassembled unit can cause serious difficulties.
If the hammer drill is still under warranty, then with questions about lubrication of its gearbox, it is best to contact a specialized workshop that provides warranty service for such equipment.
A detailed diagram of your hammer drill will help you understand the mechanism and correctly assemble the tool
If the hammer drill you own is not covered by any warranty or the warranty period for your equipment has already expired, and the authorized service center is located far enough away, you can lubricate the gearbox yourself, observing maximum care and attention. For this you will need:
- a set of plumbing tools with which you will assemble and disassemble the hammer drill gearbox;
- clean rags;
- the composition itself for lubrication.
“Native” lubricant for the Makita P-08361 gearbox. Refilled during initial assembly of the tool and recommended for maintenance
It is better if the lubricant is a branded product specifically designed for equipment of a certain brand.
So, it can be lubricant for a Makita hammer drill or lubricant for a Bosch hammer drill.
If you don’t have a branded lubricant and you can’t buy it, you can use inexpensive domestic lubricants.
It is very important that you have instructions for the hammer drill that you are going to lubricate. Naturally, if you own a Makita or Bosch rotary hammer, this should be an instruction manual for the equipment of these particular brands.
All gearbox parts should be completely cleaned of old grease.
After carefully studying the instructions for the hammer drill, you can begin the procedure for lubricating its gearbox.
- Before disassembling, the hammer drill should be thoroughly cleaned of dust.
- When disassembling the gearbox, it is advisable to immediately remember how its structural elements are located in it. It should be borne in mind that it is not recommended to disassemble and lubricate the gearbox immediately after finishing using the hammer drill. This is explained by the fact that still hot gearbox parts, when exposed to a cold lubricant, may lose their physical characteristics.
- After all components of the gearbox are removed from its housing, they should be thoroughly washed with gasoline or spindle oil and wiped dry.
- The inside of the gear housing must also be washed, wiped (as far as possible) and allowed to dry completely.
- When disassembling the hammer drill gearbox, you can pay attention to the fact that there is no lubrication on some elements of its design. This only means that such parts do not require lubrication and there is no need to apply it to them.
- As mentioned above, it is better to use a branded lubricant for the gearbox of a drill or hammer drill, which has a number of advantages. In particular, branded lubricants retain their original characteristics much longer, so they can be used much less frequently. In addition, the proprietary lubricating composition has such an important quality as water resistance, so it effectively protects the metal parts of the hammer drill from moisture and, accordingly, from corrosion. As a good alternative to branded lubricants for the gearbox of a rotary hammer or drill, you can use Metabo oil, the cost of which is quite affordable.
- After lubricating all elements, the gearbox must be carefully reassembled, observing the reverse sequence.
Caring for a hammer drill includes not only lubricating its gearbox, but also applying a lubricating compound to the shank of the drill used.
Before performing this procedure, the tool shank should be thoroughly cleaned. After this, a special lubricant for hammer drills or regular lithol is usually used.
In addition, if an open type chuck is installed on rotary hammers, it is advisable to first wipe and treat its seal, which will provide more reliable protection of the inside of the device from dust getting into it.
Hammer drill lubrication
Causes of equipment overheating
Many home craftsmen have a question about how to use a hammer drill so that its gear housing does not overheat.
First of all, you should find out the reason for the excessive heating.
One of these reasons may be too much lubricant in the internal part of the gearbox, which also negatively affects the performance of the device.
Other mechanical breakdowns and their elimination
In addition to breakdowns associated with the impact mechanism, other mechanical breakdowns may also occur in the hammer drill.
Mode switch
There are times when the unit mode switch fails. Basically, this occurs due to dust clogging of this unit. To repair the switch, you will need to disconnect it from the body (see how to do this above) and clean it from dirt. If you find any damage to the plastic parts of the switch, it will have to be replaced.
Helical gears
The reason that the device stopped working normally, namely, stopped drilling and chiseling, may lie in worn-out teeth on the rotor shaft.
If this happens, the teeth on the intermediate helical gear will also be worn.
This problem occurs when the tool is jammed or the clutch is malfunctioning. The breakdown is eliminated by replacing the intermediate gear and engine rotor.
The drill does not stay in the chuck
The reason that the hammer drill does not hold the drill lies in the breakage of the chuck and the wear of its constituent parts:
- deformation of the balls occurred;
- the restrictor ring is worn out;
- The retaining spring gave way.
You will need to disassemble the cartridge and replace problematic parts.
Drill stuck in hammer drill
The reasons that the drill is stuck in the chuck of the device may be the following.
- Before installing the equipment, you did not apply lubricant to its shank. You will need to move the sealing rubber of the cartridge and inject WD-40 into the place where the tool fits.
- Dust got under the balls. Perform the same operation as in the paragraph above.
- If you used a regular drill inserted into an adapter in a hammer drill, then also treat it with WD-40 liquid, wait a couple of minutes, and, lightly tapping the clamp surface with a hammer, loosen the equipment in different directions. Typically, after these steps, the clamping jaws open and allow the drill to be removed.
- The tool shank came loose. You will need to first add WD-40 and try to remove the drill. If nothing works, then you need to disassemble the cartridge and knock out the equipment. You can also use tips on how to remove a tool stuck in the device from this video.