The assembly of any mechanism should begin after careful preparation. It is necessary to prepare not only the parts, but also the tools, location, and lubricant.
Tools you can't do without pliers, screwdrivers, a hammer, and a brush for applying lubricant.
What is the assembly diagram for the Makita 2450 and 2470 rotary hammer?
Assembling a Makita rotary hammer with your own hands can only be done if you follow the included instructions.
The task of the assembly process is to replace failed parts with suitable ones and ensure the interchangeability and operability of the tool.
Assembly procedure for the Makita 2450 rotary hammer
Impact mechanism assembly
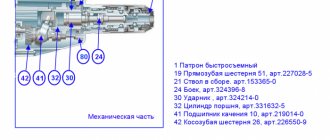
How to assemble the impact mechanism of a Makita rotary hammer? The impact mechanism is assembled from two units: a barrel shaft with a spur gear and an intermediate shaft with a rolling bearing.
A). A spur gear, pos. 19, is put on the barrel, pos. 21, and pressed by a compression spring, pos. 18. To fix the spring, it is pressed with washer 30, pos. 17, and secured with retaining ring 28, pos. 16.
B). To assemble the striker, you need to put ring 9, pos. 25, on the striker shaft, tighten the rubber ring, pos. 26, and press it with the metal ring, pos. 27.
Now we move to the opposite side of the barrel, pos. 21. On the other hand, the inner surface of the barrel must be lubricated with grease and the assembled firing pin, pos. 24, must be inserted inside.
Intermediate shaft and piston assembly
Assembling the intermediate shaft assembly
To assemble the intermediate shaft, you need to put the rolling bearing pos. 41 on the shaft pos. 40 with the teeth to the shaft splines, and put the coupling pos. 39 on the shaft splines.
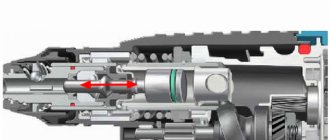
Translation of translational motion
On the opposite side of the shaft, a helical gear 26 pos. 42, a flat washer 8 pos. 45, a bearing 608zz pos. 46 and a retaining ring 8 pos. 47 are put on. The intermediate shaft is assembled.
Assembly of the gearbox assembly
The gearbox unit is mounted on the internal housing, pos. 49.
Inner housing
By the way, there are cases when the axles jump out of the internal aluminum housing. Both axles are pressed into the housing.
The assembled intermediate shaft is inserted into the housing, pos. 49, the rolling bearing arm of which must fit into the hole in the cylinder hinge.
In this case, the rolling bearing lever, pos. 41, of the intermediate shaft must fit into the cylinder hinge, pos. 32, and the lower bearing of the intermediate shaft into the seat in the housing. This procedure is usually performed by rocking the structure until the parts completely fall into the indicated places.
Rotary hammer equipment
To get a more complete picture of the wide capabilities of a rotary hammer, let’s take a brief excursion into the world of attachments that are used in the operation of this power tool. Main types of nozzles:
- Boers. “Drills” intended for drilling work on stone and concrete. The end is reinforced with a carbide head. The main purpose is to carry out installation work, fastening, wiring of communications.
- Crowns (tsifenbors). Device for cutting large diameter holes. If it is necessary to make a hole of great depth, special adapters are used with the crowns to allow the equipment to be extended to the required length. They are successfully used for processing ceramic tiles and in the installation of electrical equipment.
- Chisels. The most diverse category of hammer drill attachments. They vary in size, shape, length and width of the working surface. There are chisels in the shape of a peak, in the shape of a flat blade, as well as channel chisels (strobes), designed for gouging out channels in concrete or brick walls. An indispensable assistant during dismantling work (removing old tiles, dismantling screeds, adjusting and leveling brickwork before plastering).
Photo gallery: drills, crowns and chisels
Drills for drilling stone and concrete
Cores drill large holes Chisels cut concrete and chisel grooves
All types of attachments are installed in the SDS+ chuck in the same way; the principle of movable clamping balls is used for fixation. When installed correctly, the equipment can move freely along the longitudinal axis without falling out of the socket.
Installing the mode switch lever
The mode switch is designed to move the clutch, pos. 39, to various positions and transmit translational motion to the shaft of the impact mechanism through the rolling bearing, pos. 41, to the cylinder, pos. 32.
Assembly of the mode switch lever for the Makita 2450 rotary hammer
On the axis of the inner housing you need to put the mode switch lever pos. 82 on top, press the pressure spring pos. 88 on top, and press it with a flat washer pos. 87. Install the locking ring pos.86. and fix it.
The retaining ring must be carefully secured. When turning the intermediate shaft, you must carefully check the correct operation and free movement of the cylinder in the housing. This must be done now so that it does not become clear at the end of assembly that the assembly was assembled incorrectly.
Actions in different modes
For drilling, the toggle switch moves to the appropriate position. After starting the engine at idle, attach the injector to the location where the hole is to be drilled. Use a special trigger to control the speed of the drill and bit. Drilling occurs when the hammer switches to another mode. This is usually indicated by a drawing showing a hammer and drill. Speed control during drilling is rare.
This nozzle is fixed at the required angle relative to the surface being treated. To establish the required number of strikes, as well as their strength, the trigger is pressed with different force. This job, which is important, requires specific skills and may not work out right away.
Individual hammer drills can be used as a screwdriver. The required information is always indicated in the instructions for the device. To tighten screws or loosen them, you need a special socket. There may not be a special screwdriver mode, usually a drilling program is used.
Impact shaft assembly
First you need to lubricate the inside of the cylinder, pos. 32, and insert the hammer, pos. 30, into it.
All that remains is to put the lubricated barrel assembly, pos. 21, into place in the inner housing, pos. 49, putting it on the lubricated cylinder, pos. 32. As lubricants, it is recommended to use a special lubricant designed for Makita rotary hammers. Lubricants are available in several types: Makita P-08361 and Makita 183477-5 SDS-PLUS. Makita 183477-5 SDS-PLUS lubricant is recommended for the gearbox. For drill shanks, Makita 196804-7 lubricant is used.
Lubricants vary in color, but have exactly the same characteristics. What other lubricants are used in the Makita 2450 and 2470 hammer drills?
And here we have an assembled mechanical unit.
Video of general disassembly and assembly of the Makita 2450 rotary hammer
Check its performance by rotating the intermediate shaft and monitoring the movement of the piston in the impact mechanism. All!
Now let's lubricate all parts of the mechanical unit with the recommended lubricant. Here is an example of how to properly apply lubricant to rotating surfaces.
Here is another example of generous lubrication of a mechanical unit.
You can't spoil porridge with oil
This way it is also possible to apply lubricant. You can't spoil porridge with oil!
The lubricated mechanical unit must be covered with a black plastic case, pos. 14. Having placed the housing on top of the assembly, press down the housing until the assembly is completely fixed in it. Backwardness Insert four bolts, pos. 10, into the body and tighten.
Now it’s time to attach the electric motor rotor to the mechanical part.
Rotor installation
The helical rotor gear is tightly inserted into the body of the mechanical unit and pressed.
It remains to insert four self-tapping screws m4x60 pos.57. and screw them into the electrical unit housing.
Signs of a fake
Due to the great popularity of the equipment presented, cases of counterfeiting are not uncommon. There are corresponding features that define a fake HR 2450 hammer drill. These include a small cord (about 0.5 m). The letters on the dark clasps of the suitcase are matte on the fake, but on the original. shiny.
In the photo of the hammer drill in the annotation, the background of the real product is gray, almost snow-white. The copy will have a black, dull background color to the image.
If the model HR two thousand four hundred 50 case shows Japan as the manufacturer, it is not a real instrument. The original says: “Made in PRC”, i.e. “made in China”.
"Makita 2450" contains a rubberized handle on which the serial number is indicated. All parts of the suitcase must also each contain its own designation. The fake handle is made not of rubber, but of plastic. This should also be a signal about the need to abandon the purchase of such an instrument.
Installation of electric brushes
Remove dirt from the grooves of the brush holder and install the brushes in place, securing them with the latches.
Now is the time to check the performance of the hammer drill. Connect the plug of the hammer drill to the socket, turn on the hammer briefly in the “drilling” mode. Once you are sure the tool is working, turn it off. Set the mode switch to the “impact” position. Do not insert the tool. Check the functionality of the hammer drill in this position. At the same time, you checked the operation of the mode switch.
All that remains is to check the placement of the speed control button, make sure the contact connections are secure, and you can begin installing the cover.
Installing the cover
The cover is secured with three M×4 self-tapping screws of different lengths.
Connect the hammer drill to the 220Β network and check in all modes. The Makita 2450 or 2470 rotary hammer is assembled and working properly!
Makita 2450 hammer drill diagram
Signs of a fake
Due to the great popularity of the equipment presented, cases of counterfeiting are not uncommon. There are characteristic features that define a fake HR 2450 rotary hammer. This situation includes a short cord (about 0.5 m). The letters on the black clasps of the suitcase are matte on the fake, but on the original. shiny.
In the photo of the hammer drill in the instructions for this product, the background is light gray, almost white. The copy will have a dark, dull color in the background of the image.
If the model HR two thousand four hundred fifty case indicates the manufacturer is Japan, it is not a real instrument. The original says: “Made in PRC”, i.e. “made in China”.
“Makita 2450” contains a rubberized handle, the serial number is indicated on the busy>. remains the details of the suitcase are also made to contain who own> craftsmanship designation. The fake handle is made not of rubber, but of plastic. This should also be a signal that you need to refuse to purchase such a tool.
Do-it-yourself repair instructions for a Makita 2450 rotary hammer
Hammers are impact drilling devices designed for drilling and chiseling holes in particularly strong materials. The hammer drill implements two ideas: the working tool rotates and immediately moves longitudinally, creating a shock impulse.
Rotary hammers always operate under extreme conditions. The operating life of rotary hammers depends not only on the correct operating conditions, but also on the reliability of the parts included in the product.
But no matter how hard you try, over time the hammer drills begin to fail.
In order to properly repair a rotary hammer, you need to study its structure. Repair of the Makita 2470 and 2450 rotary hammer can be carried out independently by a person who has the skills of a mechanic and understands the basics of electrical engineering.
Remember! Follow safety rules and disconnect the hammer drill from the mains when disassembling.
The Makita 2450 and 2470 rotary hammers are assembled according to virtually a similar design and from the same parts. Repairing them is no different. For ease of repair, below is an assembly diagram and a catalog of parts for Makita rotary hammers.
The Makita 2450 and 2470 rotary hammer circuit consists of a mechanical and electronic part.
Read also: Regulator relay diagram 1213702
The mechanical part ensures the transmission of torque to the drill bit, immediately creating a translational movement that creates an impact. The mechanical part consists of a rotation drive and an impact mechanism.
The electronic circuit of the Makita rotary hammer ensures the conversion of electronic energy into kinetic energy through the rotation of the rotor. The electronic part includes an electric motor, a power button with a speed controller, a reverse switch, and connecting wires. The main malfunctions of a makita rotary hammer. Malfunctions of rotary hammers are divided into electronic and mechanical.
Next, we will look at our client’s problem with the electronic part of the Makita 2470 and 2450 rotary hammers and methods for eliminating them:
Electronic malfunctions of the Makita 2450 and Makita 2470 rotary hammers Electronic malfunctions appear in such a way that when the rotary hammer is connected to the mains voltage, the tool does not turn on. The connection diagram for a Makita hammer drill to the network is ordinary.
The electronic circuit of the Makita 2450 rotary hammer is essentially a serial connection of an electric motor, a start button and wires. The Makita 2470 rotary hammer circuit is similar.
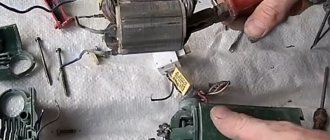
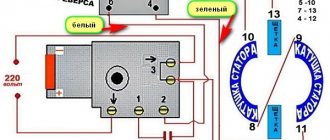
Through the connecting cord pos. 72, the 220 V supply voltage is supplied through the switch pos. 68 and the electronic brushes through the brush holder pos. 66 to the lamellas of the electric motor rotor pos. 54, and through the contacts of the reverse switch pos. 60 to the stator winding pos. 59. The most common malfunction is the lack of contacts in the connections.
How to disassemble a hammer drill button if it is broken - repair review
Professional construction tools always work in extreme conditions, therefore both the mechanical and electrical parts of the hammer drill have an increased working life.
As practice shows, tools from brands such as Makita, Bosch or Interskol rarely fail during the warranty period, but sooner or later everything breaks.
One of the most vulnerable places of any rotary hammer is the power button with speed control and reverse switch.
There are three types of button failure:
- Mechanical failure. As a rule, it occurs when a tool falls from a height or other impacts on the body of the hammer drill. Since plastic is practically impossible to glue, the only reliable repair option is to completely replace the button;
- The contacts on the button are burnt out. In this case, replacement is also indispensable;
- Carbon deposits have formed on the contacts of the start button. If the plastic trigger body itself is not damaged, cleaning the contacts will help solve the problem.
How to check the start button of a hammer drill?
To do this, you can use an electric multimeter (tester): you need to connect to the ends of the hammer drill fork and press the start button.
At the same time, you need to understand that the problem may not only be in the switch button. You should also check the electrical cable for kinks, wear on the carbon brushes and reverse switch contacts.
This is the only way to be sure that the reason lies in the switch.
Procedure for identifying electrical faults
Video: Makita HR 2470 disease The rotary hammer 2470 has finished cutting in. Maintenance tool contacts have burnt
Determining the integrity of the electronic part of a Makita hammer drill. If you set a goal to repair a Makita 2450 or Makita 2470 hammer drill yourself, you need to arm yourself with devices and equipment. Any tester, a set of screwdrivers, keys, a hammer, or a wooden adapter will do. It's great to have a screwdriver with an integrated phase indicator.
You need to take a tester, connect to the ends of the hammer drill plug and press the hammer drill switch. If the tester indicates some resistance, then the power supply circuit of the hammer drill is intact.
If the tester indicates infinity, then the integrity of the circuit is broken and it is necessary to remove the back cover to check the connecting cable and electric brushes of the hammer drill.
The back cover (usually dark in color) of the hammer drill is easily removed; you just need to remove three screws using a screwdriver or a screwdriver.
Remove the cover and use a screwdriver to disconnect the ends of the wires from the electric brushes. Using a tester or a homemade device, also called a “hopper,” determine the integrity of the supply wires and the correct operation of the switch.
A few words about an ordinary control device called “arkashka”. The device consists of an LED or a light bulb from a flashlight, a AA battery and two pieces of wire. The entire electronic circuit of the control device is alternately connected parts. Connect the battery to one end of the LED, or light bulb, and connect the wires to the free ends of the LED and battery. You will get a universal device for checking the integrity of electronic circuits.
Corresponding malfunctions of the Makita 2450 and 2470 rotary hammers Common malfunctions in the electronic part of the Makita 2450 and Makita 2470 rotary hammers:
- fracture of the supply cable at the entry point into the hammer drill;
- breakage of the switch button TG813TLB-1, art. 650508-0, pos. 68.;
- wear of electronic carbon brushes SV-419, art. 191962-4, pos. 65;
- wear of reverse switch contacts;
- wear of rotor bearings: bearing 609LLU, art. 210060-6, pos. 51; bearing 607LLU, art. 211021-9, pos. 56;
- short rotor closure 220-240 V, art. 515668-8, pos. 54;
- breakdown of the stator winding 220-240 V for HR2450, art. 633488-5, pos. 59.
For the start button, use the TG813TLB-1 switch, art. 650508-0; pos. 68.
Replacement of brushes is done when they are completely worn out or have poor contact. This malfunction is detected by strong heating of the points where the electric brushes are installed.
The failure to turn on the hammer drill is caused by abrasion of the contacts on the reverse switch. This type of problem is painfully easy to fix.
Repair of Makita rotary hammer reverse switch
When repairing the reverse switch, you need to disconnect the back cover. Carefully disconnect the wires from the button. Take a close look at the switch.
The upcoming disassembly involves removing the brush holder, having previously freed the brushes themselves. By removing the brush holder, you will get to the reverse switch contacts.
Determine its condition, change contacts if desired.
An additional, often encountered electronic malfunction is poor contact between the stator and the lower contacts of the reverse switch.
Repair of contact between stator and reverse switch
To remove the stator, you need to disconnect the gear housing (dark color) from the stator housing (greenish color).
Remember! In the mechanical part of the rotor, the bearing is pressed by a special ring. Don't lose it when disassembling.
The stator is located in the greenish housing. Having visited the middle, you will see two self-tapping screws 4x60, art. 266334-3, pos. 57, securing the stator to the housing. Unscrew them, remove the plastic stator protection for HR2450, art. 419201-3, pos. 58., release the stator. When you remove the stator, you will see the contacts on the stator and the reverse switch panel.
Carefully clean the contacts with sandpaper and treat with solvent or alcohol.
Before assembly, bend the contacts so that they fit tightly into each other. Lubricate the contacts with a thin layer of technical Vaseline.
Assembling the electronic part of the hammer drill is done in reverse order.
Connection Diagram of Hammer Button
For many users of electric drills, the moment may begin to become interested in the question at what level the drill button is connected to the tool wiring. This question usually arises when there are defects in the old button, which requires connecting a new one. Next, I will tell you how it should be connected - what goes where.
I will not outline here how to disassemble the body of an electric drill to get to the insides, because I assume that since you have already asked yourself the question of replacement, then disassembling the body will be easy for you. I think that anyone who does not know how to disassemble the case will not even think about replacing anything in the instrument on their own.
What you will need, you should first purchase the newest button. It should match the previous one in size and power characteristics, so when you go shopping, grab it personally for reference and write down the exact model of your instrument.
To disconnect it, you will need a narrow slotted (flat) screwdriver and a pin. Using a screwdriver, unscrew the existing bolts that clamp the cables coming from the power plug.
Other wires are secured with a spring clip. To disconnect them, you need to insert the tip of a pin into the recess where the terminal is located. Thanks to this action, the terminal is decompressed and the wire is removed together with the pin.
An actually nice wiring diagram is shown in the image below.
- The picture shows a common type of spare part in question. The electrical wires from the power plug are fastened to bolted terminals. Others are stuck into self-clamping contacts. If your button is not like this, then it is better to make notes on an old copy of what is attached where. Also on the body itself there is possibly a diagram drawn, so you can also find your way around.
- If you connected the capacitor as described above, then after connecting the wires from the plug, you will only have two contacts at the bottom of the case, where you need to insert two cables from the stator. They usually have the same position on the stator as in the picture. Their length is desirable not just than that of the other two, so that they can reach their own clamps. With all this, it doesn’t matter which wire is plugged into which of the two contacts.
- The remaining two electrical wires from the stator are connected to the reverse terminals, and additionally cables from the brushes. In all this, the connection is made obliquely: the wires from the stator are stuck on different sides into diagonally located contacts; and from brushes too. At the same time, how correctly you can choose the studio where the wires will be inserted directly depends only on which direction the cartridge will spin at a certain position of the reverse trigger. The main thing is to connect diagonally.
Let's restore the button from the grinder
This is the connection diagram. I hope that you succeed, our client just needs to connect correctly and the drill works as it should.
Instructions for disassembling the Makita 2450 rotary hammer
A hammer drill is an impact drilling tool that simultaneously performs the function of impact and drilling equipment when working with particularly strong materials.
The device uses two ideas at once: the tool rotates and moves longitudinally, transmitting the impact impulse to a hard surface.
Rotary hammers always operate in extreme environments with the highest degree of dust.
The duration of trouble-free operation is influenced not so much by the operating conditions, but by the quality of the components included in the tool.
Makita 2450, 2470 rotary hammers are reliable tools for high-quality work. Even the most reliable tool requires proper care and timely maintenance.
To perform maintenance of Makita 2450, 2470 rotary hammers, you must become familiar with the internal contents of the tools included in the components. A real summary will help you find out the weak points of the Makita rotary hammer.
To repair a Makita 2450, 2470 rotary hammer in a home-made environment, a person with plumbing skills and knowledge of electrical engineering is allowed.
Remember! When repairing a rotary hammer, you must follow safety rules when working with electrical appliances.
The Makita 2450 and 2470 rotary hammers are assembled according to virtually a similar design and, in fact, from similar, interchangeable parts. Repairing them is no different.
View of the Makita 2450 rotary hammer
For ease of repair, below is an assembly diagram and a catalog of parts for Makita rotary hammers.
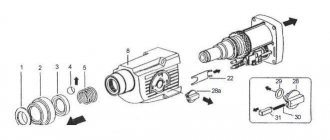
Makita 2450 rotary hammer assembly diagram
We disassemble the gearbox
To get to the mechanical part, you will need to remove the plastic housing.
The procedure for disassembling the mechanical part of a Makita rotary hammer: First, remove the black protective plastic case. The case is removed after you unscrew the four screws securing the case from the end. By pressing on the end of the shaft you will press the gearbox out of the housing.
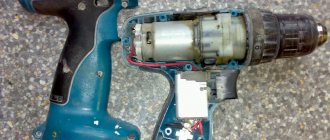
After removing the housing, you need to separate the rotor from the gearbox. The gearbox is the general mechanical part. The rotor is separated from the mechanical part (gearbox) simply. You need to clamp the gearbox with your right hand, and clamp the rotor with your left hand. While rocking, pull both parts in opposite directions. The rotor is held in the gearbox by friction of helical gears. The main malfunctions of the Makita rotary hammer occur in the mechanical part of the tool.
The most typical malfunction for the mechanical part is the failure of the impact mechanism.
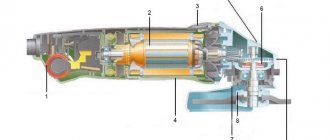
Disassembling the impact mechanism The impact mechanism is assembled on the inner housing and consists of a gearbox shaft and an intermediate shaft. The rotational motion is transmitted through helical gears to the intermediate shaft.
The gearbox shaft is a hollow shaft in which the cylinder moves freely.
A small spur gear mounted on the intermediate shaft transmits rotation to the large spur gear of the gearbox shaft, in which the impact mechanism is mounted. And translational movements are simultaneously transmitted to the gearbox shaft of the impact mechanism due to transmission from the rolling bearing of the intermediate shaft to the cylinder moving in the gearbox barrel.
Let's move on to disassembling the intermediate shaft.
Disassembling the intermediate shaft
Mounted on the shaft pos.40 is a helical gear pos.42, to which rotation is transmitted from the rotor gear, a rolling bearing 608zz pos.41, which transmits translational motion to the hinge pos.34 of the piston pos.32
On the other side of the shaft, a clutch coupling is installed, pos. 39, spur gear 10, pos. 80, compression spring, pos. 38, retaining ring S-7, pos. 37, bearing 606zz, pos. 36. Particular attention should be paid to the condition of the rolling bearings. The hammer drill has imported bearings
Installation of domestic bearings is allowed. Bearing 606zz can be replaced with 80016, bearing 609zz can be replaced with 80019.
Let's move on to disassembling the impact mechanic shaft
Dismantling the impact shaft
Disassembling the barrel of a Makita 2470 hammer drill is a simple process if you use the Makita hammer drill design diagram. The shaft is a barrel, pos. 21, in which the impact mechanism is assembled. A gear, pos. 19, is attached to the barrel, which is pressed by a spring, pos. 18, through a washer, pos. 17, and secured with a retaining ring, pos. 16. The cylinder pos. 32 moves in the barrel, acting on the firing pin pos. 24. On the reverse side of the striker there is a metal ring, position 27, which transmits the blow to the drill. When is it necessary to replace the hammer drill barrel?
Most often the metal ring fails.
Striker
Cylinder with striker
We've sorted out the disassembly. We replace the parts with serviceable ones and get ready to assemble. Learn more about lubrication and assembly of the hammer drill.
Video of quick disassembly of a Makita rotary hammer
A hammer drill is an impact drilling tool that simultaneously performs the function of impact and drilling equipment when working with particularly durable materials.
The device uses two ideas simultaneously: the tool rotates and moves in the longitudinal direction, transmitting the impact impulse to a hard surface.
Rotary hammers always operate in extreme environments with a high degree of dust.
The duration of trouble-free operation is influenced not only by operating conditions, but also by the quality of the components included in the tool.
Makita 2450, 2470 rotary hammers are reliable, high-quality tools. But even the most reliable tool requires proper care and timely maintenance.
To carry out maintenance of Makita 2450, 2470 rotary hammers, it is necessary to familiarize yourself with the internal contents of the tools and the components included in them. These instructions will help you find out the weak points of the Makita rotary hammer.
Design of Makita 2450 and 2470 rotary hammers
The Makita rotary hammer conventionally consists of electronic and mechanical parts. At the same time, the mechanical unit of the hammer drill is housed in a dark-colored plastic case, and the electronic part of the hammer drill is hidden under the greenish plastic case.
The procedure for disassembling the mechanical part of the hammer drill
The mechanical unit is designed to transmit the rotational moment of the shaft to the tool, creating not so much a torque and a translational impact impulse.
The task of the mechanical unit is to transmit rotation from the rotor to the tool, simultaneously providing the tool with longitudinal movement.
Disassembling the hammer drill begins with removing the quick-release chuck.
Even very reliable Makita rotary hammers break down over time. Any breakdown can be eliminated, you just need to have straight arms and perseverance. In addition to electrical faults, rotary hammers are also susceptible to mechanical breakdowns.
Content:
Operating rotary hammers with hard materials in a dusty environment shortens their service life and requires user intervention for repairs.
General characteristics
Makita 2450 is known among builders and repairmen as a fairly functional professional tool. It is simple and reliable in operation, lightweight and well balanced. Thanks to this, the Makita 2450 will last for quite a long time. It has a good dust protection system, which makes the equipment durable.
Read also: Symbol of galvanic cell
Its popularity is explained by the possibility of repairing the Makita 2450 rotary hammer at home. You won't need to spend a lot of money on its maintenance. However, before assembling the Makita 2450 rotary hammer, you should familiarize yourself with the technology for disassembling and repairing it.
Repair of the mechanical part of the Makita 2450 and 2470 rotary hammer
Any tool repair begins with determining the nature of the malfunction and disassembling it.
The Makita 2450 and 2470 rotary hammer can be repaired by a user who has basic plumbing skills and is familiar with electrical safety requirements.
This article discusses the mechanical part of the Makita rotary hammer, the main faults and how to eliminate them.
Read also: LED strip power table
Disassembling the mechanical part of the Makita 2470 rotary hammer
To get to the mechanical part of the hammer drill, you need to remove or disassemble the cartridge.
Disassembling the quick-release chuck Place the hammer drill on the back cover of the case on a table surface covered with a clean cloth or paper.
Using tweezers or a screwdriver, remove the rubber tip 35, item 1.
Carefully release the ring spring pos. 2, coupling casing pos. 3, steel ring pos. 4. You will reach a steel ball with a diameter of 7 mm, pos. 20.
Now you can remove the housing of the mechanical part. It is black. Using a screwdriver, unscrew the four screws at the end of the housing.
Holding the black body with your right hand, press your thumb on the end of the shaft from which the cartridge was disassembled. The plastic case can be easily removed.
Next you need to remove the gearbox shaft.
To disconnect the mechanical part from the electrical part, you must first remove the electric brushes. Remember! The rotor is held in the lower part of the housing by electric brushes, which must be removed.
After checking that the electric brushes are disconnected from the rotor slats, use a screwdriver to pry the metal housing of the hammer drill at the border of the green plastic housing.
Now we move on to disconnecting the rotor from the mechanical part of the perforator
ra. The rotor is held in the mechanical part by helical gears of the gearbox. If you take the rotor housing in one hand and the mechanical part housing in the other and pull in different directions, rocking, you will separate these two assemblies.
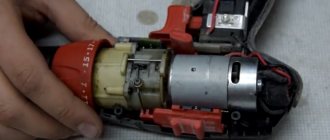
You will get a knot like this in the old grease.
Next, use a hexagon to unscrew two M4×12 bolts, item 43, art. 266273-7 with an internal hex head. Pull out the shaft with intermediate spur gear 10 pos. 80, art. 226399-7. from the inner housing pos. 49, art. 153687-8.
Disassembly diagram
In the process of repairing the presented equipment, the user must be able to disassemble the tool. The assembly diagram of the Makita 2450 rotary hammer has many components and elements. To carry out repairs, you do not need to know all of them. Here are the most basic elements that the diagram represents (“Makita 2450” is a very complex device).
The first is the retaining ring. It is involved in the process of dismantling the cartridge cover. Next comes the ring locking device. It holds the ball to secure the drill. It is guided by a washer and a conical spring.
The gearbox is connected to the motor by 4 screws. The circuit contains many rubber parts, which, when worn out, become a common cause of breakdown.
This knowledge is enough to carry out repairs at home. Next, you should familiarize yourself with the technique of its implementation.
Mechanical malfunctions of makita 2450 and makita 2470 rotary hammers
Common mechanical malfunctions of Makita rotary hammers include:
- destruction of the quick release chuck;
- bearing failure;
- damage to the impact mechanism;
- wear of the hammer drill barrel;
- wear of the rubber striker and striker;
- gear failure.
Repair of a hammer drill chuck is carried out to replace the boot and rubber ring, as well as a conical spring and a steel ball that clamps the working tool (drill). This is indicated by the fact that the working tool? namely the drill, is poorly held in the chuck.
The main reason is wear of the steel ball 7.0 pos. 20, art. 216022-2. Ball wear occurs from contamination of the cartridge bore due to dust and dirt getting inside.
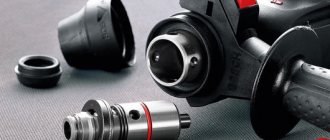
The general view and design of the Makita hammer drill chuck is shown in the photo below.
Repairing a makita 2450 hammer drill chuck with your own hands is easy. The cartridge must be disassembled, freed from old grease, discarded rubber parts, and replaced defective ones.
More complex faults require knowledge of the mechanical structure of the Makita 2450 rotary hammer.
Having determined the nature of the malfunction of the Makita rotary hammer, proceed to disassembling the mechanical part, called the gearbox.
Disassemble the mechanical part according to the attached video. Free it from old grease. Carefully inspect all parts, their integrity, and level of wear. All rubber products require replacement during any disassembly.
Let's consider repairing a hammer drill barrel. Let's analyze the mechanism completely. Video of disassembling, lubricating and assembling a Makita hammer drill
Video: Overhauling the Makita 2450 rotary hammer
Repair of parts of the Makita 2450 hammer drill barrel
Remember! The rotor is held in the lower part of the housing by electric brushes, which must be removed.
At the next stage, the rotor must be disconnected from the removed mechanism. The rotor is detached from the mechanism simply by pulling it out, since it is held in place by the friction of two helical gears.
It turned out to be such a dirty knot.
Now we need to separate the impact mechanism shaft.
Most often, the rubber rings and the firing pin, pos. 24, compressor spring pos. 18. and cylinder parts.
This is how barrel parts wear out and break down when the tool is used incorrectly.
Let's consider the most complex malfunction - failure of the impact mechanism. Characteristic signs of failure of the impact mechanism are the absence of impact and the unpleasant noise of the rotary hammer operating in the “Impact” mode.
Video: A minute of vandalism) (21) Hammer hammer Makita HR 2450 Strong recoil in impact mode
This malfunction is typical for those rotary hammers that, during operation, were strongly pressed against the surface being processed. Having disassembled the gearbox, we remove debris and pieces of foreign objects. We find the faulty part and clean everything of old grease.
Very often the firing pin, item 24, art. 324396-8, included in the barrel.
metal ring pos. 27. art. 324216-6.
Discard damaged parts, replace with new ones, and cover with a thin layer of lubricant. The parts are ready for assembly. But more on that in the next article.
How to repair a Makita HR 2450 rotary hammer if the shock mode has disappeared
Makita power tools have long established themselves as professional, reliable and easy to maintain. In addition, it has good maintainability and a relatively low price.
Of all the lines of hammer drills, I would like to focus on the Makita HR 2450 model. The tool is very easy to use, has three operating modes and can withstand very long loads. The author of these lines worked faithfully and faithfully for more than six years without any breakdowns. Moreover, it was used under intense loads.
But as you know, nothing lasts forever. And reliable equipment breaks down. Somehow, in the midst of work, he stopped hammering. The machine was working in rotation mode, but the shock suddenly disappeared.
The gearbox was disassembled and the cause of the breakdown was identified. The bushing in the barrel body, in which the firing pin directly carries out the impact work, was broken.
Malfunction of stopping the drill when drilling with impact
The reasons why a Makita hammer drills with an impact and the drill rotates is due to wear on the teeth of the safety gear and the teeth of the barrel.
Often this malfunction occurs when using a rotary hammer as a mixer for mixing mixtures. During operation, the safety clutch slips, and if you take into account the spring load, the load is large. A visual inspection will not allow diagnosis. You can remove the barrel and secure it in a vice and turn the gear with a wrench, but this can be understood if there is severe wear; in most cases, only disassembling the barrel for diagnostics will help.
Even slight wear of the coupling edges leads to the drill turning and triggering when drilling with impact
Advice on what to do in this case. If it is not possible to remove a suitable part or replace it, then evaluate the wear of the barrel. This is done this way: insert a new drill and move it to the sides; if the play is large, it is better to replace the barrel completely.
It is worth noting that the reason for the drill turning when drilling with impact can be:
- wear of the shaft bearings;
- the gear near the drunken bearing can be licked.
Video:
On sale, if you search, you can buy a gearbox assembly for a hammer drill and its cost is about 2000 rubles.
The reliability of some sellers is questionable, and if you consider that these are often spare parts taken from analogue tools that are sold, for example, on Avito. How to distinguish a fake hammer drill from an original one.
For example, there are many Chinese hammer drills similar to Makita. An example is a network hammer drill FAVOURITE RH 950 and its cost in the aisle is 3000 rubles. which is profitable to sell for spare parts.
The Favorit hammer drill is an analogue of the Makita 2450
We replace the parts with serviceable ones and get ready to assemble. Learn more about lubrication and assembly of the hammer drill.
Read if there are problems with the electrical part of the hammer drill.
How to repair a Makita HR 2450 rotary hammer if the shock mode has disappeared
As a result, the striker became jammed in the fragments of the collapsed bushing.
The service center advised to replace the barrel completely. It turned out that the bushing is pressed into the barrel at the manufacturer and is not supplied separately. I had to buy a whole new barrel.
In this article, the author will tell you how to get the hammer drill into working condition yourself after this, in general, simple breakdown. If you have the skills to repair power tools and the desire not to pay someone your hard-earned money, then we take the tool and start disassembling the machine.
Tools
You will need two ordinary flathead screwdrivers and one Phillips head screwdriver. One of the flat-head screwdrivers should be thin and narrow, no more than 4 mm wide. You will also need a wire hook to remove the retaining ring. It can be made from a bicycle spoke, the main thing is that the wire is rigid and does not bend easily. You will also need a rubber mallet or wooden mallet.
Work process
Disassembling the hammer drill should begin by removing the protective rubber cap - boot. It can be easily removed, just grab it with your fingers and pull it off the barrel.
Then, by pressing on the plastic cover and squeezing the spring of the SDS + mechanism, remove the retaining ring with a screwdriver.
Using a screwdriver, remove the stopper
The cover is removed from the barrel, and behind it, compressing the spring again, we pull out the retaining ball along with the spring and the figured washer.
Disassembling the SDS mechanism
After which the operating mode switch is disassembled. Under the cover that holds the red locking button, there is a special slot for a screwdriver. By inserting a screwdriver into this groove and prying the cover slightly, first from one edge and then from the other, carefully remove it. You should not apply significant effort here; the cover is still plastic and can break. The red button along with the spring is removed from the switch body, and it is moved to the left all the way, a little beyond the drilling mode. It is from this position that it is removed from the gearbox. For this operation, the switch must be lightly picked up with thin screwdrivers on both sides and removed along with the rubber o-ring.
Read also: The blow on the hammer drill has disappeared
Removing the rotary hammer mode switch
Now the gear box is removed. Using a Phillips screwdriver, unscrew the four bolts connecting the box to the stator housing. Then, holding it with your hand, you need to lightly hit the end of the barrel with a mallet so that the box comes off the gearbox.
Removing the gearbox
After removing the box, remove the barrel from the gearbox. It comes off easily.
Pull the barrel out of the gearbox
Use a rag to remove old grease, wash the barrel with gasoline or kerosene and wipe dry.
So, as mentioned above, it was necessary to completely change the entire barrel. However, this item purchased at the service center turned out to be “as naked as a falcon.” That is, there was absolutely nothing on it and all the parts from the old barrel had to be moved to a new “blank”.
The most difficult operation was removing the firing pin from the barrel body. There are special holes in the barrel body through which the locking ring can be seen. This ring holds the firing pin with rings and rubber dampers in the body seat. Inserting a thin screwdriver into the hole, bend the ring slightly. We do this first on one side and then on the other. The stopper should come out of the groove.
Using two screwdrivers, compress the stopper
Then, from the inside, using a homemade wire hook, we pull the stopper out into the light of day.
Using a wire hook, remove the stopper from the inside.
Next, remove the striker with washers and rubber rings. For assembly, it is necessary to remember or sketch the location of all rings and washers. If something goes wrong, photographs and drawings from the article will help.
Now you need to remove the gear from the shaft. After pressing on the washer and compressing the spring, use a thin screwdriver to remove the retaining ring from the groove. After removing it, remove the washer, spring and gear from the barrel.
Removing the gear wheel
The gear wheel is put on the new barrel and engaged with the splines. Next, a spring with a washer and a stopper are installed on it. You need to insert the locking ring and fix the mechanism in the working position.
To do this, take the barrel in both hands and, resting it in your palms, forcefully compress the spring with your fingers, while simultaneously moving the washer and stopper down. You need to squeeze until the stopper fits into the groove.
Then a firing pin with washers and rubber rings is installed inside the barrel in the order in which it was disassembled. But first you need to pay attention to the condition of the drummer, his appearance.
If the firing pin has gouges and pits after a long period of work or because it was scratched by a broken bushing, then it should be sanded a little.
To do this, it is clamped into the drill chuck and processed with fine-grained emery cloth. But if the irregularities are too large, then the striker will be easier to replace.
Assemble the impact mechanism
It is necessary to lubricate the striker with a special lubricant before installation and then use the lubricant during operation. When inserting a drill into a hammer drill, you need to apply a little lubricant to its shank. This extends the service life of the machine.
Having installed the firing pin mechanism into the barrel, we fix it with a locking ring. Using a screwdriver, we try to move the firing pin on both sides inside the barrel. It should move easily in the channel and not jam.
Assembling a new trunk
We install the assembled barrel into the gearbox housing. Putting it on the cylinder with the piston, we engage it with the drive gear and insert it into the body. All parts should be well lubricated during assembly.
Installing the barrel into the gearbox
Then we install the gearbox, having previously lubricated the needle bearing. Using four bolts, we tighten the box to the stator housing and install the operating mode switch in place. To do this, set it in a position slightly to the left of the drilling mode. We insert the red locking button with a spring and move the switch to the drilling mode. We snap the plastic cover and check the operation of the switch.
Reinstalling the mode switch
Snap the cover of the rotary hammer mode switch
Then, as a final touch, the SDS+ mechanism is assembled. Having installed the mechanism spring, put on the figured washer and insert the ball. Then use a plastic cover to compress the spring of the mechanism and insert the retaining ring. Putting on the rubber boot is no longer difficult.
Compressing the spring with the washer, install the retaining ball
Installing the SDS mechanism
Let's try the hammer drill under load. When the machine is operating, there should be no extraneous noise in the gearbox; the operating mode switch should move easily without jamming. In general, everything should work as before the breakdown.
The author of this article hopes that it will help dear readers understand the repair of a rotary hammer. Any breakdown can be simple if you find its cause. And then everything depends on your skill and diligence.
2 comments on How to repair a Makita HR 2450 hammer drill if the impact mode is lost
In the construction industry, the use of Makita rotary hammers is simply necessary. The importance of this technique is difficult to overestimate; it is indispensable when working with concrete, stone or brick. All particularly durable materials are susceptible to the pressure of this universal tool. In everyday life, Makita rotary hammers are used for drilling holes in concrete and stone, for making openings, recesses, and cable channels in walls and floors.
Device
The Makita rotary hammer has double protective insulation of the motor. Mandatory design elements include a release clutch, which prevents jerking when the drill jams, and electronic speed control. An indicator of corporate style - the tool is equipped with a convenient suitcase for storing the tool.
Most models are equipped with a dust extraction system and are available with a soft rubber pad on the handle. The assortment includes Makita rotary hammers, both with direct and vertical engine.
Principle of operation
It can perform 3 functions: drilling, hammer drilling, chiselling.
Possible malfunctions, causes of their occurrence and solutions
To repair a rotary hammer with your own hands, you must first determine the external manifestations of malfunctions.
The hammer drill does not hit
If the hammer stops hitting when switching to impact mode, but the drill rotates, it is most likely that the floating bearing is damaged. The solution to the problem is to replace it with a new one.
The second possible reason is a malfunction of the striking mechanism. Often, when overloaded in work, the steel striker splits, this leads first to a weakening of the impact, and then to its complete absence. The firing pin needs to be replaced.
The third probable reason is wear or breakage of the piston group of the hammer drill. The liner and piston should be replaced.
The hammer drill does not spin and does not drill
If the chuck does not rotate when you press the start button in drilling mode, the cause can first be determined by the sound. If the electric motor hums but does not turn the chuck, most likely something is preventing the rotor from rotating inside the gearbox. What happened to the engine will have to be found out by disassembling the mechanical part of the tool.
If the engine does not hum when turned on, it is more likely that the motor has failed. Having opened the lid of the device, it is necessary to determine what exactly led to this phenomenon. This could be an open circuit, a broken start button, or a short circuit in the coil windings. Using the tester, the specific cause is determined and appropriate repairs are made.
The drill does not stay in the chuck and flies out
Incontinence of the hammer drill equipment can occur during long-term use. The drill or chisel inserted into the chuck does not hold and flies out during operation. It is not only impossible to continue chiseling with such a tool, it is also very dangerous - a flying chisel can cause injury.
The reason for equipment incontinence lies in wear or breakage of the cartridge. The cartridge needs to be disassembled and determined what the problem is. Perhaps the balls have become deformed, wear has appeared on the restrictor ring, or the retaining spring has sagged. Usually, after replacing the damaged part, the cartridge begins to function normally again.
Video: why drills fly out of a hammer drill
The brushes sparkle
Sparking brushes is a fairly common phenomenon when working with tools in dusty conditions. As a rule, sparking is a consequence of the deterioration of the material of the brushes themselves. Replacing the latter with new ones will help correct the situation; sparks will no longer fly out.
If not, the reason must be sought in the stator or rotor windings. It is possible that the large amount of dust entering the motor has caused the protective varnish covering the copper conductors to wear away. And this entails a short circuit. The presence of an interturn short circuit is checked using electrical instruments (multimeter).
The resistance between the lamellas is measured with a multimeter
In addition, it should be taken into account that dust may adhere to the lubricant of the bearing located next to the commutator. To prevent this, the collector is degreased using a swab soaked in alcohol or solvent.
The hammer drill gets very hot
If the hammer drill gets excessively hot during operation, this is a clear sign of a malfunction of the electric motor. First of all, to prevent overheating, you must observe the operating mode of the device:
- take breaks at certain intervals;
- After loading, give the tool the opportunity to idle.
When drilling, it is recommended to use a periodic mode: apply maximum power for no more than 1 minute, then turn on idle for 3-4 seconds.
If the housing temperature does not decrease, then you need to inspect the electric motor. If you notice a characteristic odor coming from under the tool casing, you must immediately stop working and disconnect the device from the network. You can disassemble it only after it has completely cooled down.
The hammer drill does not hold the chuck
Sometimes there is a situation when the cartridge flies off along with the equipment while the hammer drill is running. This occurs due to wear of the chuck body mount at the end of the raster sleeve, which is a retaining ring. If it breaks, the fixation is broken and during the push the rubber boot flies off, followed by the spring and balls.
You can restore normal operation of the cartridge by installing a new locking ring. This is done quickly and does not require any additional equipment other than a regular screwdriver.
Transmission
To remove the housing from the transmission, lift the tool panel up. The hammer drill should be pressed to the work table by pulling the body. In this situation, all the details remain in place.
Once they have been checked, inspected and replaced, the transmission housing is in place. All its elements must be located in their original form. Necessary elements must be lubricated.
During assembly, the gearbox housing must be cleaned with kerosene or gasoline. The shell is then placed in its original location. The mode switch should not be in it.
Repair
Makita 2450 are repaired with their own hands with certain knowledge and skills. The technology for checking and replacing parts on the HR 2450 is quite simple. It includes disassembling the tool, after which all old grease, dust, and dirt are removed. Damaged nodes are replaced with new ones. Then all parts of the hammer drill are assembled together. It is necessary to familiarize yourself with each point of such work. They can be manufactured in the area of cartridge, mode switch, hammer body.
To carry out repairs, first remove the cartridge, then change the speed. After this, repairs are made inside the case. Lubricant and worn rubber elements are replaced.
Malfunctions in the gearbox housing
The case of the HR 2450 model is characterized by high strength; breaks in this unit are quite rare. But it happens that there are certain problems here. If the body comes together with the needle bearing, this means that its seat is poorly worn. When this part is extremely thin, replace the housing.
Sometimes the intermediate shaft seat is destroyed. It is assumed that the repair is similar to the first case.
The gear housing housing has an oil removal ring. If it is damaged by dust collection (this happens very rarely) or careless action by a repairman, it is changed along with the body.
The same procedure is performed in case of failure of the mode switching holes. The types of failures listed are typical for counterfeit copies.
Cartridge
Using a flat-head screwdriver, the cartridge is disassembled. Repairing a Makita 2450 rotary hammer with your own hands begins with this element. Squeeze the cartridge cover and remove the rubber boot. The retaining ring is removed. Then the cartridge cover and metal ring are removed. It locks the drill fixation ball in the barrel. It is removed, and the metal washer and conical spring are removed without effort.
The cause of the breakdown may be wear and tear of parts. It is detected if the drill does not lock automatically without releasing the lid. After checking all the details, the cause of the breakdown is identified. Old elements are cleaned of dirt and old grease. The ball is thickly treated with new oil. The conical spring is installed with the narrow side facing the resistor.
The guide washer should press it so that it is below the hole in the barrel. Repairing the Makita 2450 rotary hammer from the chuck area requires fixing the ball in the hole. All parts are assembled in reverse order.