What breaks in a rotary hammer most often and for what reasons - you need to know this first of all in order to have as few breakdowns as possible and, if possible, prevent them. The rotary hammer operates in very difficult conditions, accompanied by vibration, shock and a lot of dust.
A rotary hammer is a complex electro-mechanical tool
Therefore, the first thing that can be done to reduce the load on the tool is to protect it from dust entering through the ventilation grilles, which leads to increased wear of rubbing and rotating parts. This is especially true for work performed on the ceiling or overhead. In this case, it will be useful to use a vacuum cleaner or build an improvised shield that will serve as a protective screen against dust getting inside the tool.
By type, all faults can be divided into mechanical and electrical, complex and simple. In general, mechanical damage does not pose any particular difficulties for repair and often, having identified it, you can eliminate it yourself by establishing the cause of the breakdown and replacing the damaged part.
Faults can be divided into mechanical and electrical
As for the electrical part, such troubles as a broken network cable or replacing a plug can be easily eliminated, but rewinding the armature of an electric motor or repairing the stator winding is carried out only in special workshops where the appropriate equipment is available.
The most important thing when determining a breakdown is to be able to disassemble and then reassemble a hammer drill. If you do not have at least basic skills in this matter, then it is better to contact a workshop. Basic skills mean the ability to understand any mechanisms, and not necessarily a hammer drill.
What is a hammer drill and how does it work?
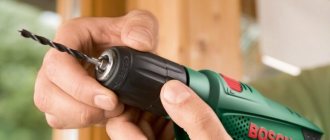
This tool is used for impact work, when removing old hard but brittle materials: brickwork, concrete, tiles. Before you disassemble the hammer drill Makita, Sturm, Elitech, Enkor, Whirlwind, Dexter, Wert, AEG, etc., you need to know what it consists of.
Different models of tools differ from each other in power and functions , but all have the required basic systems and components.
Each hammer drill contains:
- electric motor with armature and stator;
- gearbox;
- cartridge;
- impact mechanism;
- power button;
- safety clutch.
In the process of improvement additional functions that make it easier to use:
- operating mode switch;
- vibration suppression system;
- a mechanism that secures the tool in a position convenient for the operator;
- limiter for the depth of penetration of equipment into the working surface;
- cleaning the device from dust.
The equipment consists of special chisels and impact drills, which are installed in the chuck.
The hammer drill works due to the fact that the rotation of the engine turns into a shock-rotational movement of the nozzle. The motor powers the rest of the tool's mechanism. The safety of the user during operation is ensured by the safety clutch. The piston drives the drunken bearing. It creates impact force. A hammer drill cannot last forever, and its parts and components break.
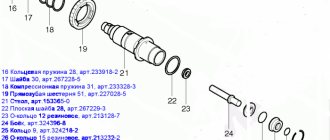
Hammer parts
General characteristics
| Nutrition | from the network |
| Chuck type | SDS-Plus |
| Number of operating speeds | 1 |
| Power consumption | 800 W |
| Max. idle speed | 1300 rpm |
| Max. beat frequency | 4800 beats/min |
| Max. impact energy | 3 J |
| Max. drilling diameter (wood) | 30 mm |
| Max. drilling diameter (metal) | 13 mm |
| Max. drilling diameter (concrete drill) | 26 mm |
What could be the reason for disassembling the hammer drill?
Tool failures are divided into mechanical and electrical . Repair is impossible without disassembly and subsequent reassembly.
Mechanical failures
The presence of problems in the mechanical part can be judged by the following:
- grinding;
- increased noise;
- strong vibration;
- strange smell from the case.
Such problems include:
- breakage of gear teeth or chuck;
- wear of the unit barrel, as well as the rubber striker and firing pin;
- failure of the impact mechanism, operating mode switch.
Electrical faults
If an electrical fault occurs, the motor hums, heats up quickly, does not rotate, and smoke appears. You may notice an unpleasant odor and sparking.
Electrical breakdowns:
- burnout of the rotor winding, motor stator;
- collector clogged;
- broken power button;
- violation of electrical contacts;
- brush wear;
- inability to turn on the tool.
For faults that appear in the electrical part of the electric motor, a professional is involved.
Elimination of mechanical breakdowns
If the tool does not perform its function and does not chisel, this may be due to several reasons. Most often this is damage to any of the parts that are inside the hammer drill.
It needs to be disassembled and inspected. The following options may also be the cause of such a breakdown:
- The gasket is damaged and needs to be replaced.
- Dust gets inside the hammer drill; the tool must be thoroughly cleaned.
- If the lubricant has frozen, it needs to be changed.
- The gears of the gearbox are broken, they are being replaced
- When bearings break, they are also replaced
Detailed instructions for repairing hammer drills also include eliminating unnecessary sounds in the tool. If the hammer drill cracks or a grinding noise is heard, the following problems may be the cause:
- Low quality lubricant. It is better to replace it with a good lubricant
- The bearings or gears are defective and need to be replaced
- The mode switch has worn out and must also be replaced with a new one.
If the modes switch by themselves during operation, the latch may have broken. It is best to replace it.
Step-by-step instructions for disassembling a rotary hammer
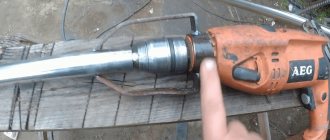
To eliminate any malfunction, except when the socket breaks, the device must be disassembled. The design of rotary hammers from manufacturers of different brands, including Energomash PE, Diold, Hammer, Stanley, Fatmax, Caliber, is similar, and therefore the disassembly schemes are similar. Experts do not recommend disassembling it completely; it will be difficult to reassemble. The process requires following step-by-step instructions.
Removing the cartridge
When disassembling the hammer drill, carefully inspect each removed part. To avoid problems later on how to properly assemble the hammer drill, it is recommended to photograph . If no external defects are found, they begin to dismantle the cartridge. First, remove the rubber boot, remove the retaining ring using a screwdriver, then remove the plastic boot.
Next they pull out:
- washer;
- plate;
- spring;
- ball.
If these parts are worn out, the drill will not hold in the chuck. Some cartridge models may have additional washers and balls .
Disassembling the hammer drill chuck
Disassembling the case
Before disassembling the case, first remove the mode switch . It is put in “Strike” mode. If there is none, go to the “Blow + Drilling” position. Press the button, which is located on the switch handle, turn it just below the icon where the hammer is depicted. There should be a kind of clicking sound. Using a screwdriver, pull the switch towards you and remove it. In some models of hammer drills, it is screwed to the body using screws .
Disassembling the electrical part
If you suspect a breakdown related to electrical components and elements, the tool will also have to be disassembled. Remove the back cover by unscrewing the screws that hold it in place. Unscrew the fasteners holding the wire. The wires, the start button, and the wires attached to the stator are pulled out of the fastenings. Unscrew the mounting bolts and take out the brushes. The housing is separated using a flathead screwdriver . The rotor is removed from the gearbox. If it is necessary to replace bearings, use a special puller.
In the body of the electrical part of the tool there is an air intake , which is also removed. Disconnect the stator. It is easier to pull it out if you tap the body with something wooden.
When disassembling a barrel hammer drill, in which the electric drive is located vertically, first remove the handle, then the bolts that hold the motor.
Diagram of the impact mechanism, its malfunctions and repairs
The impact mechanisms of rotary hammers differ in their design, depending on which family the devices belong to. Therefore, the repair of these mechanisms will take place according to different principles.
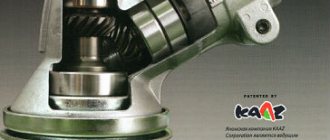
Barrel perforators
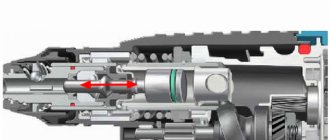
Rotary hammers with a vertical engine usually have an impact unit based on a crank mechanism (CSM). Below is a diagram of this type of impact mechanism.
The following photo shows a section of the device, where you can see the location of the crankshaft.
The impact mechanism of a unit with a vertical motor may have the following malfunctions. The connecting rod mechanism has a separate bearing that is mounted on the cam of the wheel with an eccentric, but sometimes it can be located at the base of the connecting rod. In some models of rotary hammers, a plain bearing (instead of a rolling bearing) may be installed at this location, which requires constant lubrication. If it is not there, or it is already old, then this unit will wear out. During repairs, you will have to completely replace the connecting rod and eccentric barrel.
Another common problem is the firing pin breaking. This malfunction can be calculated if you notice that there is no longer any impact on your hammer drill. To get to the firing pin, you will need to completely disassemble the barrel of the device. It is done as follows.
- Disconnect the barrel from the hammer body, remove the cartridge (see description above). Tap the barrel on the table so that the piston falls out. Take a rubber mallet and knock the barrel out of the housing.
- Remove the retaining ring holding the bearing.
- Remove the bearing itself and lightly tap the table to remove the balls.
- After removing the 3 balls, you can pull out the raster sleeve.
- Also, as in the previous case, remove the balls located on the bushing, just do not confuse them with those that were removed earlier (these balls are smaller in diameter). After removing the balls, you need to insert a screwdriver into the sleeve and push out the firing pin.
In this case, the firing pin is intact. But if it is broken, then replace it with a new one. You should also pay attention to the rubber seals and seals in the barrel body. If they are worn out, they must be replaced.
Pistol type hammer drills
The design of the impact mechanism in a pistol-type unit is slightly different from the same-purpose mechanism installed in a barrel-type unit.
Its main difference is that the piston is driven not by a connecting rod, but by a swinging (“drunk”) bearing. Therefore, the most common breakdown of this unit is the wear of a “drunk” bearing that needs to be replaced.
The next photo shows a destroyed “drunk” bearing, which is the reason why the hammer drill stopped hammering.
The swing bearing is removed using a flat screwdriver, which you need to pick up the bracket and remove it. After this, the bearing is easily separated from the gearbox housing.
When replacing a collapsed bearing, you should thoroughly rinse the gearbox, since it is in its housing that fragments of the broken part may remain.
After cleaning and installing a new bearing, apply a thick layer of lubricant to this block.
Also, the reason that the device does not hit can be a broken firing pin. To get it out, you need to remove the retaining ring that is visible in the hole.
Take a small screwdriver, pick up the ring with it, and move it to the right (towards the gear).
Do the same steps on the other side of the part. Next, insert a screwdriver into the hole in the part and push through the removed internal parts of the mechanism.
After this action, you can easily get the locking ring and the housing in which the broken striker is located.
If you disassemble this case, you will see the “culprit” of the malfunction, due to which the hammer drill does not hammer.
When assembling the impact mechanism, be sure to generously apply lubricant to all parts.
Replacing the main components of a rotary hammer
the main parts and components before they fail. Otherwise, repairs will take more money and time.
Most often worn out:
- brushes;
- bearings;
- start button;
- cartridge.
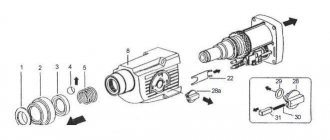
Hammer design
Replacing and repairing a cartridge
visually assess the condition of the cartridge after disassembling it. Using a screwdriver, remove the rubber boot, which is tightly seated on the cartridge. Dismantle the locking ring with the washer, carefully releasing the spring so that the locking balls that are located under it do not jump out and roll somewhere. After removing the spring, remove the rear boot. The cylinder is secured with 4 inserts . They pass through the walls of the tool shaft. To remove them, it is advisable to use a screwdriver with a magnetized tip or a magnet. The cartridge is pulled out, the components and the cartridge itself are inspected. Then they decide to replace a single part or the entire mechanism. Assemble the clamping device of the hammer drill strictly in the reverse order.
One of the most common cartridge malfunctions is abrasion and cracking of rubber boots during operation. As a result, dust penetrates into the mechanism. It contaminates the lubricant, causing the internal elements to wear out quickly. Due to the weakening of the locking ring, the spring is released, the locking balls fall out of the grooves, and the drill is not secured.
There are also other malfunctions, this is wear:
- Guide cylinder grooves . Which leads to inadequate fastening of the attachments.
- Springs . Because of this, depreciation deteriorates.
As a result of wear of the locking balls, their diameter decreases and they will not be able to hold the equipment. Springs, retaining rings, balls can be taken from other devices. If you need to change the guide cylinder or anthers, you must purchase original parts .
If the hammer drill malfunctions during operation, the drill is rotated and the clamping element . To do this, it is important to determine its type; the method of fastening the element depends on this. The device can be mounted on a screw rod or spindle. If the part is firmly fixed, tap the screw head with a hammer, the fixation will loosen. Using a screwdriver, unscrew the screw rod. The part fixed to the spindle is clamped with a key, rotated and the chuck is removed from the hammer drill.
Bearing replacement
The bearing should be changed if, upon inspection, lubricant stains , and when turned by hand it makes a cracking and crunching noise . To dismantle it you will need a special puller. It consists of a screw part, as well as a device that grips the bearing sleeve housing. By tightening the thread, a force is created that allows the bearing to be removed from the shaft.
A new bearing is installed on the workplace by hammering it with a wooden or rubber hammer. It is important that the bearing axis is not skewed relative to the shaft axis. After installation, it is necessary to apply a lubricant .
Replacing the start button
To replace the start button, remove the cover that covers the electrical parts of the tool. Disconnect the contacts of the wires that are connected to it. The button body is pulled out from the seat. Instead of the non-working one, they put the purchased one, connect the contacts and assemble it in the reverse order.
Replacing rotary hammer brushes
Replacing brushes
You can tell that it’s time to change the brushes if their holders heat up quickly , a lot of sparks form in the area of the motor commutator, and a burning smell appears. When the brushes are not yet worn out, sparks are visible only under them.
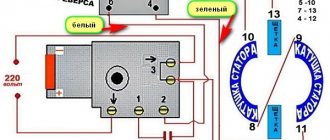
Sparking around the commutator indicates:
- burnout of the rotor or stator or failure of their insulation;
- bearing wear;
- burnout of the collector plates.
If the stator burns out, sparks will appear only under one electrode . The rotor and stator are checked with a tester, measuring the resistance on them in turn. Identical values on 2 windings indicate that the stator is working. If the stator or rotor fails, the hammer drill can only be repaired by experienced specialists. They know exactly how to assemble a hammer drill gearbox.
change the brushes yourself. To get to them, disassemble the case or simply remove the cover located at the back. Underneath you can see the brushes, which are fixed in holders specially designed for this purpose.
Different types of brushes can be installed on rotary hammer motors:
- Coal . They wear out quickly. But they easily rub against the commutator and provide good contact.
- Graphite . These are durable, but very hard elements, so they do not rub in so well.
- Carbon-graphite . The best option for parts. They mix two components that complement each other.
Experts do not advise escalating the situation to such an extent that the electric motor sparks. It is necessary to change the brushes when their wear level is 8 mm ( 1/3 of the nominal value ). Even if only one part is severely worn out, two are replaced at once.
When installing new elements, you need to look at the condition of the spring and the contact fastening . A spring that flies off during operation of a hammer drill will significantly damage the motor. A weak spring is unable to provide good contact.
Before you start replacing the brushes, the stator and rotor must be cleaned; no carbon or graphite dust . For this purpose, medical or industrial alcohol is used. The electrodes are fixed in holders, they are ground to the commutator by placing fine-grained sandpaper on the commutator. Then, by rotating in different directions, the electrode is ground in. Do this until the contact pad becomes slightly round. Then the electrode will better rub against the collector plates.
How to properly use and care for a hammer drill so as not to have to repair it often
In order for the tool to work as long as possible without breakdowns, you should not press hard on it during operation; it is undesirable to do the work at once. Equipment should be selected based on the features of the hammer drill and the type of future work. Try not to overheat the instrument and avoid mechanical damage .
Periodically lubricate components and parts with high-quality compounds. Especially if the device is used when working with concrete. At the end of the work, wipe with a soft cloth. Be sure to keep the ventilation holes on the case clean.
The storage location for the rotary hammer should be in a room with low humidity . Moisture negatively affects the service life; the mechanisms and parts inside the device will begin to rust. And when you plug in a power tool, a short circuit may occur due to elements covered with condensate.
Manufacturers equip rotary hammers with special devices. They prevent debris, dust and moisture from getting inside. But it is impossible to completely protect the instrument from this. In order to prevent unexpected breakdowns, diagnostics must be carried out regularly.