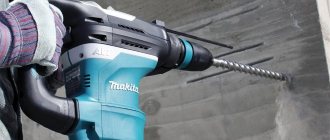
Why do you need a hammer drill?
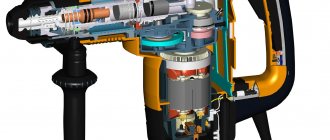
From Latin the word perforo is translated as piercing. This is where the name of the instrument, designed for delivering short blows to a surface, comes from. The hammer drill is mainly used for operations with materials of increased hardness: concrete, reinforced concrete or brick. Such a tool can be equipped with a drilling function and work like a regular drill. With its help, you can demolish a partition or cut a channel for laying cables, cut out a niche or dismantle tiles.
Rotary hammers are single-mode, performing one action - a blow during rotation. Dual-mode tools add shockless rotation or the jackhammer method. A three-way tool brings them all together. In this case, an adapter for a hammer drill is required.
Purpose of a special clamp
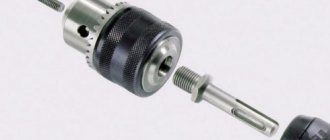
The capabilities of such equipment depend on the type of chuck, which is an important component of the hammer drill. It connects the device drive with equipment in the form of a drill or any attachment. Its main parameter is the diameter of the shank and drill.
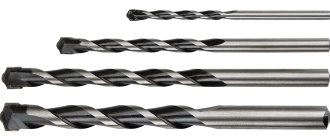
Shanks, as a rule, range in size from 10 to 18 millimeters, which allows them to be used in equipment of any size. The drills used in them have a cross-section of 4-80 millimeters with slight deviations in both directions, depending on the chuck model.
Its weight also depends on its size : approximately 200−600 grams.
A regular clamp is suitable for a drill, which is quite enough to hold a rotating drill, since in this device only the direction of movement of the chuck and the number of revolutions change.
With a hammer drill, unlike a drill, the transformation of torque occurs not only into rotation, but also into simultaneous reciprocating movement. Therefore, the chuck must withstand both torsion itself and axial load. That’s why a regular collet head is not used here, but a special universal clamp is needed.
Types of products
Key and keyless chucks
Regardless of the size of the chuck, they are all divided into two types: quick-change and key. Initially, tetrahedral, hexagonal and cylindrical jaw configurations were used to clamp replaceable equipment. They are still used on some models. These are mainly professional devices with high power. Clamping of the replaceable part in such units is carried out with a specialized key. This makes it possible to achieve a high degree of fixation.
More than 10 years ago, SDS clamps replaced traditional devices. The SDS system units are equipped with a quick clamping system without the use of special tools. The operator can install the replacement element into the SDS quickly, which in turn increases productivity.
The drill chuck for a hammer drill, manufactured using the SDS system, has high strength. It is unpretentious in operation, easy to maintain and repair. Thanks to this, SDS hammer drill chucks are very popular among novice builders and professionals.
Important: during operation, a large amount of construction dust enters the mechanism, so it is necessary to regularly clean and lubricate the device manufactured using the SDS system.
Depending on the diameter of the seat and drill, SDS clamps are divided into several types. The most common of them are presented below.
SDS chuck on a rotary hammer - diagram
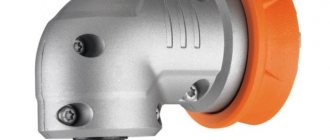
SDS-plus
SDS-plus clamp
The multifunctional hammer drill chuck is the most common type of SDS device. This type of clamp has a 10mm shank for fastening. The diameter of the replacement parts varies from 4 to 26 millimeters. The depth to which the equipment enters the chuck is 40 mm. This prevents it from falling out during operation.
SDS-plus drill chucks for hammer drills are designed for installation on light and medium-class power tools. This type of clamp can withstand a load of up to 5 J. They have a quick-release mechanism and are widely used in domestic conditions.
SDS-max
Like the previous type, the SDS-max has a four-segment gripper. The locking mechanism has four grooves that are necessary to securely hold replaceable equipment. Two of them accommodate the guides of the removable element. The other two have locking balls for retention.
The characteristics of the SDS-max cartridge are as follows:
Characteristics of the SDS-max drill
- shank thickness – 18 millimeters;
- working diameter of the tool – up to 60 mm;
- maximum impact force – about 30 J;
- grip depth – 90 millimeters.
This type of SDS is widely used on high power tools. These are professional models that allow you to perform a wide range of drilling and drilling work. Basically, such models are equipped with special stands and stops for safe use.
SDS-top
According to the principle of operation, this type is no different from the ones described above. The product is equipped with a four-segment gripper. Its only difference is that the diameter of the shanks is 14 millimeters.
SDS-top drill
Today, the chuck for a hammer drill for an SDS-top drill is used quite rarely. This is due to the fact that SDS-plus manufacturers have improved the quality of the alloys from which the product is made, and this type is almost universal today.
In addition to these types, there are others. Such products are installed for specific purposes. They may differ in their characteristics and strength properties. Their low popularity is due to more difficult conditions for replacing consumables.
Makita products
Components produced by the Japanese manufacturer are in high demand among users. They have a number of advantages:
- Versatility. Makita hammer drill chucks are suitable for tools from manufacturers from around the world.
- Variety of sizes. Makita produces quick-release and key clamps of various sizes. This allows you to use a variety of consumables.
- Quality. High-strength metal alloys are used in production. The clamps can withstand high loads.
Makita rotary hammer with chucks and drills
Bosch products
Bosch products are lightweight and durable. They are compatible not only with the company's products, but also with power tools from many other manufacturers. The company divides its products for specific purposes, such as: drilling concrete, wood, metal, etc. For ease of use, each type has its own standard sizes and design features. Bosch clamps are in great demand among craftsmen.
From the above it follows that today there is a large selection of chucks for hammer drills. Quick-release mechanisms are especially popular for domestic and professional purposes.
Bosch rotary hammer with chucks and drills
Video on the topic: How to fix a drill in a hammer drill
Publications on the topic
Hammer for home use - how to choose
Using concrete drill bits for drills
Review of the technical capabilities of the Interskol P-26/800ER rotary hammer
SDS head design
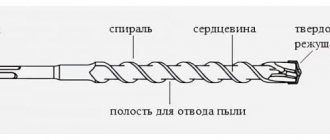
In order to understand the structure of the SDS type hammer drill chuck, you need to look at the drill designed for it. Its open grooves align with the slots of the cartridge and slide inside with a sliding motion. Reliable engagement and transmission of torque is carried out through this connection. Tool dropout prevents interaction between closed slots and ball retainers. During operation, the main load of this mechanism does not touch. A cartridge designed in this way is reliable and easy to use.
Possible faults
If you notice any stopping, biting, turning, buzzing or knocking noises in the operation of the hammer drill, as well as a decrease in the rotation speed or impact force, it is necessary to inspect the chuck. The reasons may be the following:
- The rubber gasket wears out, resulting in construction dust getting inside the cartridge. It can be solved by cleaning the mechanism and replacing the boot.
- The circlip or ball is worn or loose. Replacing them with pre-lubrication will help.
- The conical spring may have become bent. You can try turning it over to the other side or replacing it.
- However, most often malfunctions require the installation of a new cartridge.
Chuck reassembly process
After repairs and replacement of the relevant parts of the cartridge, new lubricant will be applied. The reassembly process is carried out in the following sequence:
- A spring is placed on the central axis.
- The next step is to lay the plate (if a defect is found, the plate should be replaced).
- The locking ball is pre-coated with lubricant, and only then is it installed in the sleeve hole.
- The thrust ring is reinstalled.
After installing the protective cover, it is additionally secured with a locking ring. The last step is to install the boot.
Replacing the clamping fixture
Periodic disassembly is necessary to extend its service life. In order to do this, you must:
- After removing the protective cover on the end of the cartridge, move the ring using a screwdriver.
- Remove the second ring and the protective cover.
- Disassembly begins with the washer, which moves down along with the spring. Again, use a screwdriver to remove the ball.
- By releasing the spring, you can remove the cartridge.
- To replace the latch, you will have to disassemble the cartridge. This must be done carefully so as not to lose details. The first step is to unscrew the stopper that serves to hold the bushing on the spindle. To do this, you need to clamp it in a vice and unscrew it along the threads. Installation occurs in reverse order.
There is no need to disassemble the cartridge for cleaning. Lubrication can be achieved using a VD type fluid.
How to disassemble and assemble a cartridge yourself
To perform maintenance and repair of a hammer drill chuck with your own hands, it is important to properly remove and disassemble this device. Knowing how to disassemble a hammer drill chuck (or how to disassemble a drill chuck), you will be able to independently inspect, clean and even make minor repairs to its internal elements, which will allow you to always maintain your tool in good technical condition. The simple design of SDS cartridges allows them to be removed and disassembled even by people who are not comfortable with technology.
So, disassembling the classic SDS hammer drill chuck is performed in the following sequence.
Step one:
Move the plastic part away from the cartridge and remove the rubber seal.
Removing the hammer drill chuck.
Photo 1 Step two
Using a screwdriver, remove the fixing ring, and then the fixing washer.
Removing the hammer drill chuck.
Photo 2 Step Three
When the locking washer is removed, you can see a second ring underneath it, which also needs to be removed using a screwdriver.
Removing the hammer drill chuck.
Photo 3 Step Four
After all the rings and washers have been removed, you can begin to disassemble the SDS mechanism, which consists of a washer, a ball and a spring. First of all, it is necessary to remove the ball from such a mechanism, then the washer and only then the spring.
Removing the hammer drill chuck. Photo 4
All parts of the cartridge mechanism, if you perform maintenance, must be cleaned of dirt and dust, lubricated, and then reassembled in the reverse order.
To get to know in even more detail the question of how to remove a chuck from a rotary hammer or drill, how to properly disassemble it, perform maintenance or minor repairs, you can study not only theoretical information, but also watch the corresponding video.
Extending service life
Extending the operating life of the cartridge directly depends on the correct use of the hammer drill itself. Some useful tips:
- Do not press too hard on the tool.
- Long-term idle operation of the hammer drill leads to premature wear of the chuck mechanism.
- When working with soft surfaces, it would be correct to use the shockless operating mode.
- For drilling particularly hard materials, the use of special lubricants or emulsions is recommended.
- It is more practical to work with drills of shorter length.
- Drill shanks need to be lubricated after every hundred holes, after cleaning them first.
- During long-term operation, the tool must be given a break, during which you can cool the drills in oil and inspect the hammer drill.
- The device requires care both before and after work.
To prevent dust from entering, special devices can be used. Even a cut-off plastic bottle placed on a drill will help achieve this goal.
If you meet these minimum requirements, the tool will work for many years and will not let the master down at the right time.
Originally posted 2018-07-04 07:36:46.