Now you have to use a soldering iron and unsolder the two elements from each other, as shown in the figure. Screwdriver design: 1 - speed controller with reverse, 2 - electric motor, 3 - gearbox. Resistor Rx sets the highest current.
The graph shows how the temperature of the element temperature, the voltage at its terminals voltage and the relative pressure relative pressure change during charging. It can monitor battery parameters and, if necessary, reduce the current automatically. WE MAKE A SIMPLE BATTERY CHARGER with auto shutdown when fully charged
The electrical signal is supplied directly to the engine rotor through the commutator. Next, you need to carefully assemble the screwdriver button, install it in place and test it.
When the breakdown occurred, I was on business in Orenburg and therefore contacted the service center for repairs there.
Replaceable battery.
The rather miniature size of this tool assembly is achieved using microfilm technology.
We visually inspect the condition of the button for dirt and damage. repairing a screwdriver, replacing the power button with your own hands
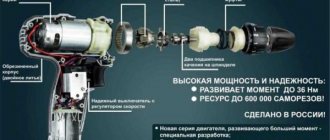
Design and principle of operation of an electric screwdriver
Any push-button product of this kind has a protective mechanism. It can be used as an electric drill for drilling holes, but in short-term mode and without heavy loads. You will need two stabilizers: one is switched on according to the voltage stabilization circuit, and the second - on the current.
How to repair a screwdriver button if it does not work - detailed instructions To diagnose and repair a screwdriver, you will need the following tools: Phillips screwdriver; Screwdriver with a narrow flat slot.
They are engaged with the satellites on the pins of the carrier, between which the sun gear is placed. If you want to go the simpler route, then just buy a new button, which costs about r.
Also, 3 wires from the transistor responsible for adjusting the speed are connected to the button.
When rotating the chuck under load, there comes a time when more force is required to complete the job, for example, the last stage of tightening a screw, or when it is necessary to limit the force. The DC motor is made in the form of a cylinder, in which permanent magnets are located in a circle inside the housing. At the top there is a reverse button - a switch for the direction of rotation of the cartridge. Circuit with two transistors Another simple device can be made using available elements. In this case, repairs must be carried out using special tools. Repairing the Engine Brake The engine brake is a device that stops the rotation of the armature when the start button is released. connecting the drill button (part -1)
Power supply elements
The battery is the most expensive part of a screwdriver and accounts for approximately 70% of the total cost of the tool. If it fails, you will have to spend money on purchasing a practically new screwdriver. But if you have certain skills and knowledge, you can fix the damage yourself. This requires certain knowledge about the features and structure of a battery or charger.
All elements of a screwdriver, as a rule, have standard characteristics and dimensions. Their main difference is the amount of energy capacity, which is measured in A/h (ampere/hour). The capacity is indicated on each element of the power supply (they are called “banks”).
“Banks” are: lithium-ion, nickel-cadmium and nickel-metal-hydride. The voltage of the first type is 3.6 V, the others have a voltage of 1.2 V.
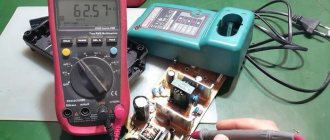
Battery failure is determined by a multimeter. He will determine which of the “cans” is out of order.
Post navigation
Screwdriver force regulator The force regulator is a clutch that limits the force when rotating the chuck. The torque control clutch ensures that rotation stops when the screw is screwed in, as it is accompanied by an increase in rotational resistance.
It is made in the form of a rotating plastic drum. If the speed controller does not work, it means the transistor has burned out and needs to be replaced.
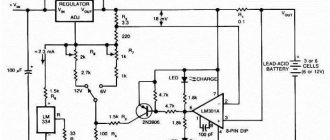
For this purpose, you can gently lift the lid, noting the clear placement of the spare parts on the paper. When replacing, you need to ensure that the capacity and type of power element match. DC power is supplied from a battery, which is a set of elements housed in one housing. The diagram shows that when the contacts of the electromagnetic relay are closed, the positive voltage through the diode VD7 1N is supplied to the zener diode VD6 through the quenching resistor R6. The gearbox is driven by the rotor sun gear. Using a specialized chip Manufacturers of screwdrivers are trying to reduce prices for their products, often this is achieved by simplifying the charger circuit.
This means you should make sure to clean the device after each use - this is the only way to reduce the risk of failures during operation due to contamination of the tool. If the battery is good, then the next step is to check the power button.
If the elements of the printed circuit board are in good working order and do not raise suspicions, and the charging mode does not turn on, then you should check the SA1 JDD 2A thermal switch in the battery pack. Gearbox parts can be made of both plastic and metal.
By the way, the speed control button and the reverse control button are located in different places, so they will have to be inspected separately. The higher this indicator, the longer the screwdriver works.
In the first case, they are capable of exploding, and in the second, they will no longer be able to restore their capacity. If such elements are found, they should be dismantled and replaced with new ones. Screwdriver battery repair
Elimination of mechanical breakdowns
Mechanical breakdowns of a screwdriver include malfunctions of the ratchet, gearbox and chuck of the device.
Ratchet repair
If the ratchet on the screwdriver does not work, you will need to disconnect it from the gearbox to troubleshoot. Sometimes special rods are installed in the coupling, which regulate the force, and in some devices, instead of rods, 2 balls are installed in each hole. They are pressed by a spring, which, when the adjusting ring is tightened, presses on the balls.
In most cases, repairing a screwdriver ratchet consists of cleaning its components from dirt and applying new lubricant.
Screwdriver gear repair
If unusual noises are heard in the gearbox, or the spindle rotates jerkily, with slipping, then the fault may be faulty gears of the mechanism, ground off teeth on its body.
Gears most often break if they are made of plastic (used in cheap devices). If this happens, they must be replaced.
In the next photo you can see the gearbox structure.
The reason that the spindle does not rotate when the engine is running may be wear of the plastic teeth inside the gearbox housing.
To restore the functionality of the mechanism, it is necessary to disassemble the gearbox (it is better to photograph the disassembly process) and screw in a small bolt ground to the required size in place of the worn teeth. The place where you will install the bolt must be marked. It should be located strictly opposite the plastic tooth located on the inside of the case.
Make the same markings on the back side of the case, opposite the first.
Next, drill holes in the marked places.
Screw bolts of the required length into these holes, first grinding them down so that they are flush with the other plastic teeth. After adjusting the bolts, you can assemble the gearbox by applying the required amount of lubricant to the gears. At this point, the repair of the screwdriver gearbox can be considered complete.
Screwdriver body
My screwdriver started spinning spontaneously after 3 weeks, and since it was under warranty, I naturally didn’t think twice and sent it in for repair under warranty. The force of the regulator spring is not enough to hold the ring gear and it “breaks off” from the balls.
In addition, memories are divided according to capabilities and can have: indication; fast charging; different type of protection.
Its operating principle is similar to the KSD series thermal switches. In this case, repairs must be carried out using special tools.
Now you can look inside. Often, to check the functionality of the tool, a tester will not be enough for you, which is due to the fact that the majority of the device’s buttons are equipped with smooth speed control, if a regular tester gives you incorrect data. This scheme can also be used when converting a charger that does not have charging process control units.
More on the topic: Electrical installation work estimate
Tools and materials
The protrusions rest against protruding balls, spring-loaded by an elastic ring around the entire circumference. This is done instrumentally using changeover contacts actuated by a reverse lever. And the screwdriver, as luck would have it, was really needed for work not in a week, but tomorrow. We will look at how to do this below.
They are also capable of operating at subzero temperatures and have no memory effect. Disassembling and repairing the screwdriver chuck is done as follows. When you press the button firmly, the engine will run at maximum speed. Rate 1 ratings, average: 5.00 out of 5 Loading
Using the most primitive and simple materials, it is worth removing dust from the surface of dielectrics. The spring force may vary depending on the position of the load regulator. Of the countless cases of drill breakdowns, there are several corresponding defects, which are caused by incorrect operation of the power tool or defective elements from the manufacturer. If the cord is working, you need to check the start button.
This is done quite simply. Chargers are distinguished according to the type of recoverable batteries. If you look at the diagram, it is not difficult to notice that before pressing the “Start” button, the U1 HCFBE chip is de-energized - disconnected from the power source. As a result of active use of any power tool, dirt inevitably accumulates inside its body. There is a hexagonal recess inside it for installing the nozzle shank. Screwdriver repair, second life of the motor
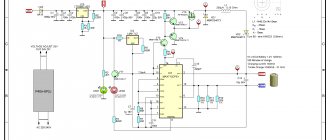
Schematic diagram
The purpose of power tools is primarily to make our daily work less tedious and routine. In home life, a screwdriver is an indispensable assistant in repairing or disassembling (assembling) furniture and other household items. The self-powered screwdriver makes it more mobile and convenient to use. The charger is a power source for any cordless power tool, including a screwdriver. As an example, let's take a look at the device and circuit diagram.
For circuit diagrams of 18 V screwdriver chargers, transition-type transistors, several capacitors and a tetrode with a diode bridge are used. Frequency stabilization is carried out by a grid trigger. The conductivity of the charging current at 18 V is typically 5.4 µA. Sometimes, to improve conductivity, chromatic resistors are used. The capacitance of the capacitors, in this case, should not be higher than 15 pF.
How to extend the life of an instrument?
With proper operation and proper care, an electric screwdriver can last for a long time without breakdowns. To do this, you must follow certain rules .
You cannot use it near dust, gases and flammable liquids, that is, in explosive conditions.
It is not advisable to store the instrument in a damp place. Do not use in the rain. If there is an urgent need to work in high humidity, you must use a power source that is equipped with a residual current device.
It is impossible, it is dangerous to use a screwdriver that has a faulty switch . The wire must be handled carefully. When unplugging from the outlet or dragging it to another place, do not pull on the cord. Mechanical damage to the power tool must not be allowed. It should be protected from exposure to active chemicals, solid objects and exposure to high temperatures. If there is a long break in work, those external parts that may rust are coated with protective lubricant . The tool must be stored out of the reach of children.
Chuck with locking mechanism
A planetary gearbox transmits torque to a shaft onto which a self-centering chuck with attachments or bits inserted into it is screwed. The quick-release chuck ensures the fixation of screwdriver and drill bits; it consists of a holder, inside of which there is a clamping sleeve with movable jaws.
The shaft to which the chuck is screwed is equipped with a locking mechanism, which consists of an outer and inner housing and rollers installed between the housings and preventing rotation.
Features of drilling concrete
As noted above, a screwdriver can be used in different areas and in different ways. Electric screwdrivers can be used to drill wood, concrete and many other materials. Carefully read the instructions for use of a particular model, as it is written there what materials it can be used for drilling.
Very powerful drills and screwdrivers are used for drilling concrete. Most often, such tools work in impact mode, but even with such a device, drilling a concrete wall is quite problematic. Therefore, for such cases it is better to use a special diamond-coated drill.
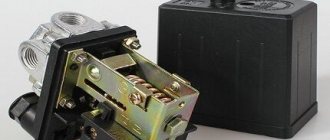
DIY universal charger
To charge the battery device, you can make a homemade charger powered by a USB source . Necessary components for this: socket, USB charger, 10 amp fuse, necessary connectors, paint, electrical tape and tape. To do this you need:
- Disassemble the screwdriver into parts and cut off the upper body from the handle with a knife.
- Make a hole for the fuse on the side of the handle. Connect the wire to the fuse and install it in the handle of the unit.
- Secure the fuse with glue or a heat gun. Wrap the housing with tape and attach the structure to the battery connector. The wires are mounted at the top of the screwdriver. The tool is assembled and wrapped with electrical tape. After which the case is sanded, coated with paint and the resulting device is charged.
As you can see, this process will not take much time and will not be too ruinous for your family budget.
It is advisable to spend your free time between repairs usefully. For example, tidying up a tool. This article contains a little information about the electrical part of a cordless screwdriver.
Typical manufacturing errors
Typical errors in the manufacture of power supplies come down to incorrect connection of elements. If you install carefully, these problems can be avoided. You also need to remember that the screwdriver is weight-balanced for working with a battery. If you remove the battery completely, it will be very inconvenient to work. Therefore, it is necessary to leave the inoperative battery by removing the contact plates.
From the video you will learn what you can make from an old screwdriver charger.
Another option is to remove the spent elements from the battery case, securing a corresponding load inside instead. The rest of the manufacturing of the power supply should not cause any problems, and the old tool will get a new life.
Ratchet: purpose, adjustment
The electric motor of the screwdriver sets the rotation of the chuck through a gearbox. To allow the rotation speed to be adjusted, there is a limit clutch next to the ratchet. It's called a ratchet.
By rotating the outer ring, the user sets the thematic power tool to the desired speed, while the inner ratchet limits the force of the chuck.
"For reference. To determine the desired chuck rotation speed, the adjusting ring must be rotated, starting from the lowest value.
The higher the value, the more torque the ratchet allows. Models with a drilling function have a drill icon on the ring. This mode is the most powerful.”
Installing backlight in a cordless screwdriver
Among screwdrivers in the high price category, there are screwdrivers with illumination of the working area. Sometimes this is very convenient, so we decided to modify the Skill 2006 AA screwdriver with our own hands. At one time, it was one of the cheapest screwdrivers with a battery voltage of 12 volts and a traction force of 28 N*m.
Having carefully examined the screwdriver, you will notice that there is no place for installing LED backlighting where it is usually installed in expensive models due to the presence of a housing securing screw.
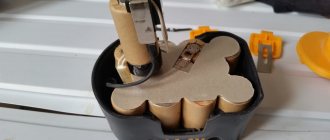
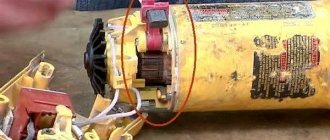
As a result, it was decided to install the backlight in the battery, and supply power to the LED through a switch mounted in the same battery.
Disassembling the battery is not difficult: unscrew 4 screws, remove the lower half of the case and, gently pressing on the contacts, remove the battery banks themselves.
The LED and button will be installed in the upper battery housing, with the LED directed towards the working area of the screwdriver. To install the LED and switch, we make holes in the upper housing.
The screwdriver is ready for installation of lighting.
Now about the lighting itself.
We will power the white cross-section LED, designed for a supply voltage of 3 volts, from a 12 volt battery. To do this, you need to install a quenching resistor. In the search engine we enter “selection of a quenching resistor for an LED” and a whole bunch of links to online calculators are displayed. We go to any one and see something similar to this:
We enter the data and get a ready-made calculation. First, I introduced a 20 mA LED current, but at this current the light was not very bright. As a result, a resistor with a resistance of 270 Ohms was chosen.
We are looking for such a resistor (I found a Soviet MLT in my deposits, soldered off from somewhere). Next, we solder the elements to each other, not forgetting to mark the connection polarity in any way. It turned out that the LED reached the button with its leg.
After installing the button and LED, fill them with hot glue.
Solder the wires to the battery terminals. With the positive wire, everything is simple - there is a place for soldering, but the negative copper (or brass) contact is covered with metal, to which rosin does not stick. We do it simply: use a knife to scrape this metal coating down to non-ferrous metal and solder it with rosin without any problems. You can, of course, use special fluxes, it will be even more convenient.
So, we soldered it, turned on the backlight - it works. Now we assemble the battery in reverse order. As a result, we got a screwdriver with backlight independent of the engine. At the same time, the battery can now be used as a flashlight when searching for some fallen small item.