Unfortunately, not everyone knows how to work with an electric planer correctly. Behind the appearance of ease of use there are several important nuances.
Selecting and getting started with an electric planer + (Video)
First of all, you need to determine how often and for what purposes you will use the tool. Its power and design will depend on this. The power of an electrically driven planer ranges from 0.5 to 2.2 kW; the design may differ in the number of knives. Mostly on the market there are models with two blades.
- For household purposes, it is better to buy a tool at an average price. This series includes models for short-term work, but of good quality. The approximate weight of the device will be 3-4 kg, motor power – 1 kW
- The passport of an electric planer indicates not one power, but two. The first is maximum, the second is effective. To work with hard rocks, the effective power should not fall below 400 W.
- The electric motor speed of the tool for small volumes may not exceed 10 thousand revolutions per minute.
- If you need an electric planer with more power, a professional level, then the power will not be lower than 1.5 kW. And his weight will reach 10 kg
So, you have chosen the unit you need. It would be a good idea to check the cutting edges of the knives for flaws - they should not be chipped or uneven, and the sole of the plane should be as smooth as possible. As a result, these factors will affect the quality of the treated surfaces.
Before processing the main product, make several training cuts on unnecessary bars. This will allow you to get used to the tool, master the planing depth switch and, in general, evaluate the capabilities of your tool. During trial work, it is possible to identify functional shortcomings of the new “assistant”. They are removed by adjusting the plane.
How to properly configure the instrument + (Video)
It is best, of course, to seek help from a service workshop, where professionals will quickly and efficiently help you set up the plane. When this is not possible, you will have to cope on your own. Following the instructions, use a hex wrench to loosen the blades on the drum. Next, to place the knives in the exact position, use a bench ruler.
Beginning carpenters should remember that the shallower the cutting depth, the higher the quality of processing and the easier it is to move along the surface of the board. The more the knife protrudes beyond the sole of the plane, the greater the layer of wood it removes. After adjusting the blades, you need to thoroughly tighten all the fasteners. To make sure that everything is done correctly and the cutting surface does not come into contact with the body, you need to rotate the drum several times by hand. All setup work must be carried out with the instrument disconnected from the network.
Working with wood - wide board + (Video)
Before starting work with a wood surface, you should determine the mode that is convenient for you - manual or stationary. For example, consider processing a wide board.
For better safety of the worker and his environment, it is necessary to properly secure the future product. If there is even minimal play, the quality of work deteriorates. Afterwards, you need to check the freedom of movement along the board. No foreign objects should interfere with the operation of the tool. It is very important to hold the electric planer firmly and with both hands.
Before turning on the tool, the knives should not come into contact with the surface being processed. You can carefully bring the power tool from the end of the wooden blade immediately after starting and move forward. Keep the sole of the plane level, parallel to the board. The pressure of both hands should be equal.
Different forces are applied only at the beginning of the passage through the wood, where more emphasis is placed on the front handle, and on the back - at the end. During work, it is necessary to avoid jerking, stopping or acceleration. With experience, correctly completing passes on the back of the workpiece and adjusting the cutting depth of the knives will become more accurate. The direction of movement of the plane for processing lumber is carried out along the fibers. In the case of a prefabricated product consisting of several bars or boards with high unevenness in the joints, movements with an electric planer are performed diagonally.
Read also: DIY high pressure compressor 300 bar
Planing smoothly + (Video)
In order to plan evenly, it is necessary to move the plane only forward without turning or distorting. The thickness of the product determines the speed of movement along it. On average, it reaches from one and a half to two meters per minute. Do not use too much force as this will cause the tool to stop and cause unevenness. At the end of the straight line, you need to turn off the engine and move the mechanism to the next section. Even when the tool is turned off, do not touch the knives, as this may result in accidental injury.
Be sure to ensure that chips do not fall under the sole of the tool. It is better to purchase an electric planer with a dust collector. Then the process will become much cleaner.
To avoid bevel on the edge, a miter gauge is required. It is attached to the side of the base of the plane, perpendicular to the axis. To prevent chips from forming on the edge, dull it a little by chamfering. The same procedure applies to parts coated with varnish. It will help ensure a smooth transition between a pair of surfaces.
In this case, the tool is attached to a rigid, stable support. The wide board is directed away from itself along the plane of the plane against the movement of the knives. When working in this mode, you need to advance the wood with the same speed and pressure at the point of contact with the knives.
At the end of the processing of lumber, sanding is performed. This procedure allows you to level the seams that are noticeable after different passes with a plane, and remove roughness. In this case, a sanding machine is used.
How to plan properly with a hand plane. Planing with a hand plane
Materials such as plywood or blockboard that do not require surface treatment have long become commonplace.
In other words, there is nothing to plan here. But if you need to make something from solid wood, then a plane is simply necessary to properly process the material. It gives a part or structure a finished look: it cuts off protruding edges in corner joints, adjusts wide planks or boards to the desired size. Less commonly, a plane is used today for processing wood blanks cut with mechanical saws, which previously took carpenters a lot of time. The boards and planks that have gone on sale in recent years, as a rule, have an impeccably smooth surface, and often it is enough to go over them with sandpaper to achieve the desired result. But, as before, you can’t do without a plane if, after gluing several boards or planks, you need to smooth out unevenness along the glue seams.
Some home craftsmen avoid working with a plane, preferring to work with materials that do not require surface treatment, such as plywood, millwork or particle board. However, these materials cannot always replace solid wood. Therefore, planes should be in every home workshop.
wooden plane device
Planer with double blade:
- (1) centering lever,
- (2) chipbreaker pad,
- (3) knife,
- (4) knife platform,
- (5) side lever,
- (6) clamp,
- (7-9) adjusting screws.
What is and what does a plane look like?
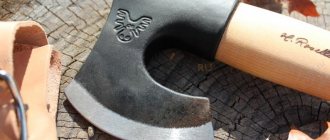
A plane is a very simple tool, consisting of a flat sole with a sharply sharpened knife and a block with two handles. During operation, the device is passed over a securely fixed wooden workpiece and neat layers are removed from it. The main grip falls on the front handle, while the rear handle helps make pushing movements more comfortable.
The block of a hand plane can be not only metal, but also wooden
Design features of planes
The classic example of the tool is made of a wooden body, with a securely fastened knife. In the lower part, that is, in the sole, there is a slot through which a sharp blade protrudes. For convenience, the front part of the structure has a horn. Due to the applied efforts, it ensures a tight fit of the sole to the surface being processed and gives the desired direction to the knife.
The structure of planes, like many other carpentry devices, has been improved. The wooden case in production is often replaced with a lighter plastic material, or a reliable metal one. And the process of manual planing, which requires great physical strength, is simplified with the advent of mechanized electric planers.
The principle of operation of a classic plane
The main structural elements that make up the tool are a knife and a base with a handle (horn). Therefore, the essence of working with this device consists of two concepts - the accuracy of adjusting the angle of inclination of the knife and the absolute adherence of the sole to the surface being processed.
The degree of contact of the working part with the surface of the product largely depends on the material from which the tool is made. The main condition that it must ensure is perfect smoothness and evenness of the plantar part. The wood from which the plane is made can become deformed and wear out over time. Especially when processing hard wood. The metal tool has a completely flat base, but is highly susceptible to corrosion. Therefore, when choosing a body material, it is worth considering the conditions in which the device will be used, as well as the variety of types of wood it processes.
How to use a plane correctly
Not everyone knows exactly how to plan correctly - regardless of the type of plane. Planing is performed in this order:
Selecting the future front side.
You need to visually determine the best side - the smoothest and with the fewest defects. The presence of curvature – initial – is also assessed. Additional can be added during processing - removing layers reduces the structural strength of the workpiece.
Securing the workpiece.
The workpiece must be installed in a fixed state - otherwise how to process it? With one end you can rest it against the stop. Clamp the other end or sides. Vices, clamps, and clamps will come in handy.
Processing with a plane.
Removal of the wood layer required in depth and geometry. Movements should not be done backhanded, but carefully and confidently. The pressure applied to the tool is constant along the entire trajectory of contact with the surface being processed. Only when leaving the chip removal zone does the pressure transfer slightly to the rear handle. The plane is not lifted from the surface until the blade leaves the workpiece. Otherwise, the target surface may be damaged.
Processing with a plane
Periodic check of flatness.
When processing any surface, it is necessary to regularly inspect the result. The point is a possible departure from the intended form and the appearance of excessive depth. You can always remove the excess, but you can’t build up the removed layer.
Periodic check of curvature.
In addition to flatness, you can pay attention to the state of curvature. If a thin workpiece is being processed, the curvature may become critical or unacceptable. To do this, standard surfaces (rulers, bars) are taken and applied to the resulting surface.
Checking perpendicularity.
The execution of the second and remaining faces is most often necessary perpendicular to the first. A square is used for control - pressing it tightly and high-quality lighting will indicate the need to adjust the angle.
Marking of treated sides.
Sometimes the master forgets what each side is intended for. An inconspicuous mark will help you not to forget even after a long time.
Obtaining the required thickness.
The thickness is marked with measuring instruments or a thicknesser on parallel edges (front and back). When processing, in addition to approaching the specified value, special attention should be paid to the parallelism of the edges.
Obtaining the required width.
The width is measured relative to the resulting front end. Marking is carried out using a surface thicknesser, a height gauge, or simply a ruler at small intervals. Planing is carried out with regular control of the resulting width.
Getting the required width
The closer the workpiece becomes to the required result, the more often it is necessary to check compliance. Otherwise, a moment will come when the layer will be removed unnecessarily and it will be difficult to restore the surface.
What is an electric planer
The electric planer is intended for leveling flat wooden surfaces after rough processing. When planing, a thin layer of wood is removed - roughness, unevenness and other defects are removed. The surface of the material after using a power tool becomes glossy and looks polished.
All electric planers consist of the following main parts and mechanisms:
- Front movable support with height adjustment
- Housing (usually aluminum) with removable belt gear housing
- Electric brushed motor
- Front handle for adjusting planing depth
- Rear handle
- Trigger with protection against accidental activation
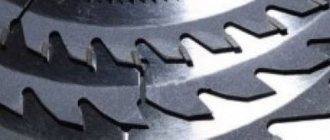
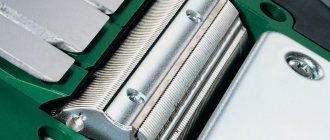
- Drum with cutting elements installed on it
- Fixed rear support
- Electrical wire with plug
Types of hand planes
The typical design of this carpentry device has many varieties. Even a classic manual professional plane, which has standard dimensions, can be classified according to its design features.
- Single plane. Suitable for leveling surfaces due to the design of the single straight blade of the knife. The cutting edges have the smallest radius of curvature, so they do not leave marks on the surface.
- Double plane. It is convenient because it is equipped with a chip breaker, which ensures clean planing. Therefore, the tool is indispensable in the final processing of the product.
With the development of the craft, the types of planes acquired many modifications, each of which meets a certain number of tasks.
- Jointer. This is a hand tool for finishing the product. It differs from a plane in a long block with a double or single knife, which allows for high-quality leveling of the surface.
- Sherhebel is a narrow plane designed for notches, similar in appearance to the classic model. But the sherhebel is more massive and is distinguished by a small rounded blade, which during operation is located at an angle of 45° to the surface. This feature allows you to plan wood along and across the grain, leaving deep hollows. The main significance of this device is the rough processing of the product and the removal of the rough top layer of wood.
For flat planing
Machining flat surfaces, such as bars or boards of regular geometric shape, must be done with high precision. Deviation from straightness entails a change in the overall dimensions of the product. For this type of processing, devices with characteristic design features are provided.
- Half jointer. Unlike a standard jointer, it has a smaller base and cutter. This allows you to process both large and small products with a straight and even surface, while achieving high levels of accuracy.
- Zinubel. Designed to provide roughness, which is necessary for better adhesion of products when attached with glue. The device is equipped with a serrated blade, which can be used to plan even twisted wood and the ends of workpieces.
For figure planing
Figurative wood processing is an entire art. To create unique samples with a profile section, it is important to use first-class timber - straight-grained, with a minimum number of knots. However, the use of varieties of special-purpose carpentry planes is no less important.
- Kalevka is a type of plane designed for shaped processing of products. It has a multi-level sole and special edges on the knife. Used in the manufacture of cornices, baguettes and doorways.
- Tongue and pile pile. It is used for making grooves, tongue-and-groove joints or holes in boards connected using a tongue-and-groove system. It consists of a guide and securing pads held in place by screws.
- Gruntubel. Suitable for cleaning trapezoidal grooves along wood grains.
- The quarters and grooves are selected with a zenzube, and then they are cleaned. The knives of this tool resemble spatulas, and there is a special hole in the body for the chips to escape.
- The rebate is used for selecting and stripping quarters and has a stepped sole.
- The humpback has a convex shape of the sole part, therefore it is convenient for processing semicircular, concave or cylindrical surfaces.
Types of electric planes
An electric plane is a universal tool that is in demand in roughing and finishing wood. Depending on the number of attachments, it can be used to perform rough planing of workpieces or grinding. It is customary to distinguish two types of devices based on power.
Domestic
Tools with a power of 500-1500 W are intended for home use and use in private workshops. They help to quickly cope with planing work in the countryside, are lightweight, have a comfortable grip and are low in cost.
Using a budget electric plane at home is much more practical than using a hand tool. However, such devices are not intended for long-term continuous use.
A household electric planer works well on soft wood
Professional
The professional category includes instruments with a power of 1000-2200 W. Such electric planes are used in furniture production, in the manufacture of window frames and doors.
Premium motorized tools support wide planing depth settings, ensure good wood smoothness after a pass, and cover a large area. The disadvantages of the models include high cost and large weight. Long-term use of the tool tires your hands.
Electric professional planes are equipped with precise adjustment and additional attachments
Tool selection
When choosing a quality plane, you should focus on:
- body material;
- the width of the knife blades and the size of the sole;
- weight and design features;
- application area.
To work with valuable types of wood, experienced craftsmen prefer hand tools. In large production environments, electric drive models are used. They are distinguished by their power, robust equipment and wide knives for processing large-sized products.
Safety regulations
To avoid injury when planing, you must follow a number of rules.
- Use a tool that is in working order and configured according to the requirements.
- The workpiece to be processed is securely fixed in the workbench.
- If there are knots, act carefully and release the knife blade as little as possible.
- Planing should be carried out longitudinally relative to the workbench.
- When planing, hold the handles firmly with both hands, do not be distracted.
- It is mandatory to disassemble and assemble the tool over a workbench. This also applies to settings.
- It is unacceptable to clear the slot from chips on the extreme side of the cutter, so as not to cut your hand.
- Use a tray to store the tool. Place the plane in it with the sole down so that the blade does not protrude outward.
- Dropping the plane knife is absolutely unacceptable.
- When passing the tool, keep the blade away from you.
- It is unacceptable to check the sharpness of a knife with your hand.
Setting up the plane
The rib, which is the working surface of the knife edge, has a slight radius of curvature. To reduce it, it is important to sharpen the knife blade in several stages using a sharpening wheel and a fine-grained grinding stone. A blade sharpening angle of 30° is considered optimal and universal for working with hard and soft wood.
Correct adjustment of the knife position will reduce the physical and time costs of processing the product. A slightly protruding tip will simply slide over the surface of the product. And if the blade is pushed far out of the block, it will grab fibers that are too thick and tear them. The cutting part should extend above the sole evenly and parallelly, protruding by 0.2-0.3 mm. These parameters can be observed using a ruler or by eye. Make adjustments with weak hammer blows, giving the blade the required position.
Proper knife sharpening
In order for the plane to process the surface well, its knife must be sharpened from time to time. It doesn’t matter what type of wood it is – soft or hard: a dull knife will not cut any wood well. But if you are processing hard or knotty wood, then the knife will have to be sharpened more often.
Before sharpening, disassemble the plane. This requires attention, because then you have to assemble it in the same sequence. First, unscrew the pressure plate with the centering lever, then remove the knife with the lining (chip breaker) attached to it. To separate both parts, you need to loosen the screw holding them together and turn the knife 90 degrees. To sharpen you will need a whetstone, onto which you should apply a thin layer of vegetable oil. If you are using a sanding template, set it to the correct angle for sharpening the knife, secure the knife in the template and move it along the block.
Sharpening angle
Sharpening the knife of a plane without a template requires a steady hand: it is not easy to move the knife with a bevel along the stone at an exact 30-degree angle. But only in this case, the chamfer - the lower beveled edge of the knife - will adhere to the block with its entire plane, which is necessary for proper sharpening.
The bevel of the knife should be moved along the stone until a burr appears along the entire length of the cutting edge. Then the knife is placed flat with its front edge on the block and moved along the block with straight or circular movements with light pressure until the burr disappears. As a result, the knife will be sharp again, and the angle between the chamfer and the front edge of the knife will remain unchanged.
To make grinding more precise, after processing the knife blade on a coarse-grained stone, the procedure is repeated on a fine-grained abrasive stone.
How to use?
Each master has his own style of work, but the general features are the same.
- You need to plan smoothly, avoiding jerking. You need to stand to the side of the workbench with one leg forward.
- You need to plan along the direction of the grain. If the workpiece is wide, it is better to first move the plane diagonally and then level it flat. To do this you need to use a special ruler.
- The workpiece must stand still. Vibrations are not allowed.
- If the tool is clogged with chips, then they need to be pushed down through the “mouth”. If this does not work, the chips are pushed upward with a sliver. You cannot use metal objects for this purpose, as they will damage the sharpening of the blade. For this reason, the plane cannot be placed with its sole on the workbench.
- Some craftsmen hold the plane at a slight angle in the direction of planing. This improves the quality of processing, but accelerates wear of the sole.
Wood planing. Safe work rules
5th grade
Lesson plan on technology
Lesson topic:
Planing wood. Safe work rules. Lesson objectives : educational
- familiarization with the process of planing with a plane and other tools for performing this operation;
educational
- instilling conscious discipline, accuracy and attentiveness when planing parts;
developmental
– development of skills and abilities to work with a plane.
Material and technical equipment:
for the teacher
: projector, laptop, multimedia presentation “Wood planing”, product samples, lesson plan, technological map
for students
: planes, hacksaws, wood blanks, notebooks, textbooks, sandpaper, squares, rulers.
Chalkboard design:
topic of the lesson, new words, homework.
Lesson plan:
1) organizational moment 1-2 minutes;
2) communicating the goals and objectives of the lesson to students for 2-3 minutes;
3) communication of new material while viewing a multimedia presentation for 20 minutes;
4) physical education minute
5) introductory briefing on safety and definition of the task 3-4 minutes;
6) independent work of students, ongoing instruction 45 minutes;
7) consolidation of the material being studied;
 summing up, final briefing 4-5 min.
Time spending:
80 minutes.
1. Organizational moment (2 min)
— Checking the attendance of students according to the magazine. — Checking readiness for the lesson (availability of teaching aids and writing materials). — Checking the appearance (of workwear).
2. Report the topic of the lesson
(
pre-written on the board). (2 min)
- Setting goals and production tasks for students. 3. Explanation of new material.
3. Explanation of new material (20 min)
Rules for safe work when planing:
A). Securely secure the workpiece on the workbench.
b). Use a plane with a well-sharpened knife.
V). Do not check the sharpness of the blade and the quality of the surface finish with your hands.
G). Clean planing tools from chips only with a wooden wedge.
d). Place planing tools on the workbench only on their sides with the knife blades facing away from you
Planing
wood
- processing a workpiece to the desired size and creating even and smooth surfaces on it.
Planing is carried out using various
plows
(planing tools).
Among the plows, the most common are sherhebels, planes
jointers.
These
The cutting edge of a Scherhebel knife is arched and convex, while that of a planer and jointer is straight.
The plane consists of a block,
knife
,
wedge
,
handle
.
The plane is designed for cutting thin shavings and obtaining smooth surfaces on wood, as well as cutting the workpiece to the desired size.
Plow blocks can be wooden, metal or a combination.
Planers are much longer than planers. They are convenient for obtaining smooth, flat surfaces.
The cutting part of all carpentry tools is wedge-shaped. For example, a plane knife in its cutting part is sharpened in the form of a sharp wedge. The two surfaces of the wedge at their intersection form a sharp cutting edge. This cutting edge cuts the wood fibers, and the front surface of the knife bends the cut layer in the form of chips.
Before planing, you should check whether the tool is adjusted correctly. In a correctly installed knife, the blade is located above the sole of the block without distortion and protrudes by 1...3 mm at the Scherhebel
or by
0.1 ... 0.3 mm at the plane.
The workpiece is mounted on a workbench, clamping or wedging between the stop and the wedge so that the side to be cut is directed upward. With your right hand, take the plane by the handle on the back side of the block, and with your left hand, by the block or handle on the front side. The plane is placed on the workpiece with the blade down and pushed forward. At the beginning of planing, apply pressure to the front part of the plane, and at the end - to the back, so that the surface being processed is flat.
When the plane moves back, it is lifted above the surface. So, moving back and forth, they gradually scrape off the surface being treated until it becomes even and smooth.
If the fibers on the surface being processed are lifted, then the part should be planed on the other side.
The plane must be held firmly so that your hands do not slip off it and hit the sharp side ribs of the workpiece. In this case, bruises and cuts to the hands are possible. The workpiece stops should not protrude above the surface to be machined.
Planing quality control is carried out using a ruler or square against the light.
Tools for hand planing.
After sawing, the workpieces have risks, roughness, and warping.
All these defects are eliminated by planing. In addition, when planing, the workpieces are given the desired shape. For manual planing, wooden planes are used.
A planer consists of a wooden body into which a knife is inserted, firmly secured with a wedge. The wedge rests on shoulders made from the sides of the tap hole. The plane of the tap hole surface to which the knife is attached should ensure a tight fit. Swinging of the knife is not allowed. In the sole of the plane, i.e. in the lower part of the body, there is a narrow slot (span) with a width of (5.7 ± 0.5 ... 1) mm, through which the knife blade protrudes beyond the sole.
For better operation of the plane and convenient movement of it through the material, there is a horn in the front part. The sole of the plane or jointer should be even and smooth. Due to the fact that the sole is subject to abrasion, it is glued from hornbeam, maple, white acacia, ash or beech wood. The horn, stop, wedge, and lining are made of wood intended for the manufacture of the base of the body, and of birch and elm wood. The handles are made from uncoated plywood board PF-A. Glue the sole of the plane and the overlay using waterproof adhesives. Wood for making a plane or jointer must not have cracks, rot, sprouts, wormholes, large knots, unfused knots, resin pockets, etc. The moisture content of the wood must be (10 ± 2)%. The surfaces of the parts of planes and jointers, with the exception of the sole of the bodies (pads) and the surface of the wedge adjacent to the knife, are coated with light waterproof varnish.
Sherhebel (1)
(GOST 14666-79) (Fig. 18,
b)
is intended for rough planing of wood along, across and at an angle to the grain. After planing with Sherhebel, the surface of the wood is uneven with traces of grooves in the form of grooves. This is because the knife blade has an oval shape with a radius of 35 mm. During operation, the knife is released up to 3 mm. When working with Sherhebel, the shavings are narrow and thick. The mass of the Scherhebel is 0.82 kg.
Planer with single blade
(GOST 14664-77) (Fig. 18,
c)
is used for leveling the surface after sawing or for planing it after processing with Sherhebel. The blade of a knife with a width of 40...50 mm is straight, it extends 1 mm. Since this plane does not have a chipbreaker (hump), the chips are formed without breaking, so the surface of the processed wood often gets burrs and sometimes chips. Planer weight 0.9 kg.
Planer with double blade
(GOST 14665-77) (Fig. 18,
d)
are used for fine planing of wood, cutting off the ends, as well as curled wood and wood with burrs. In addition to the knife, this plane has a counter-knife - a chipbreaker. The presence of a chipbreaker improves the quality of planing, since the chips, after separation, rise up the knife, bend and, falling on the chipbreaker, break. The fracture of the chips after separation prevents the possibility of them flake or splitting from the surface of the wood. Planer weight 0.97 kg.
The closer the chipbreaker is installed to the knife, the sooner it will break off the chips, therefore, for better processing of wood, the chipbreaker is placed closer to the knife. But at the same time, it should be taken into account that the chipbreaker cannot be placed very close (less than 2 mm), since the chips will get clogged under the blade and the planing process will be difficult.
In addition to wooden planes, metal sherhebels and planes with single and double knives are used for planing wood (Fig. 19). Planers are a metal body into which a knife is inserted, secured in the body with a screw. The horn and handle are made of wood. The amount of chips removed is controlled by the extension of the knife.
Jointer
(GOST 14670-77) is used for final finishing planing, as well as for jointing individual parts (Fig. 20). The jointer is almost three times longer than the plane, which allows you to plan long parts with it. In the front part of the jointer on the body there is a plug, with a hammer blow on which the knife is knocked out of the body from the tap hole. The knife blade should protrude 1 mm. When wood with a wavy surface is processed with a jointer, chips are obtained in the form of small pieces, and when repeated, continuous thin chips are formed, indicating that planing should be completed, since the surface is smooth. Planer weight 3.25 kg.
Shorter parts are processed with a semi-jointer
(GOST 14671-77), having a shorter body (530 instead of 650 mm).
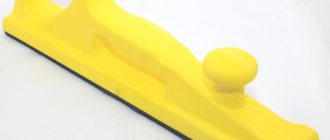
To clean wood that is scuffed and curled, use a plane with a shortened body - a sander. Sanding teak
It has a narrow slot (5 mm wide) and an increased angle of addition (60°), due to which, when working, it removes thin chips and the surface of the wood is processed cleaner. The knife blade extends by 0.5 mm.
Zinubel
(GOST 14667-79) (Fig. 21) serves to form small, barely noticeable grooves and hairiness on the surface of the wood for gluing (veneering). The knife has a serrated blade. When replacing a serrated knife in a tzinubela with a regular one, it is used as a grinder.
End plane
(Fig. 22) is used as a regular plane and for planing the ends, since the knife installed in it at an angle to the side surface facilitates the planing process and improves the quality of processing. When planing at an angle to the axis of the board, a regular plane can be used as an end plane.
Zenzubel
(GOST 14668-79) (Fig. 23) is used for manual selection and stripping of quarters in carpentry parts. The body of the zenzubel is high (80 mm) and narrow with a straight sole. The presence of a side hole in the body ensures free exit of chips during the planing process and improves the quality of processing. The zenzubel knife is sharpened on the side and bottom, thanks to which it forms a quarter when working. The weight of the zenzubel is 0.38 kg.
Falzgebel
(GOST
14669-79) (Fig. 24) is used for selecting quarters, unlike zenzubel, it has a knife-step sole.
Folding weight 0.5 kg. The tongue and groove pile
(Fig. 25, a) is intended for manual selection of tongue and groove grooves on the edges and faces of parts. It consists of two housings connected by screws, and a knife is attached to one of the housings. The housings are installed at the required distance of the groove (tongue) from the edge of the part. There is a set of knives for cutting grooves of different widths. The length of the tongue and groove is 250, width 20, height 80 mm; weight 1.1 kg.
Gruntubel
(Fig. 25,
b)
is used for removing the groove, as well as cleaning the trapezoidal groove selected by the reward.
Galtel
(Fig. 25,
c)
form grooves of different widths or depths with different radii of curvature. The fillet body has a convex sole. Fillet length 250, width 10...25, height 60...80 mm.
Shtap
(Fig. 25, d) is designed to form roundings on the edges of parts. The base of the body and the knife have a concave shape.
Kalevka
(Fig. 25,
d)
profile processing of the edges of the parts is carried out. The sole has a mirror (reverse) profile shape of the part. There is a set of molding tools for processing different profiles.
Gorbach
(Fig. 25,
f, g)
is used for planing concave and convex surfaces. The body of the humpback fish has a convex or concave shape along its entire length (with constant curvature), which must correspond to the profile (curvature) of the workpiece. The humpback's knife has a straight blade. The length of the humpback is 100..., width and height 60 mm.
Manual planing.
Wood planing work involves selecting material for planing, sharpening knives, setting up tools, planing, and checking the quality of work performed.
When selecting a material, the front side and direction of the fibers are determined, it is determined whether it has convexities or concavities that must be removed by planing, wood defects are identified and it is determined whether they are acceptable for parts made from this material.
The knives of planes and jointers are sharpened on a sharpener with a carborundum or sandstone wheel (Fig. 26). A sharpener for sharpening knives is a metal shaft on which a round sharpening stone with a diameter of about 500 mm is mounted. The shaft is located above a metal trough into which water is poured to wet the wheel during the sharpening process. The shaft is driven by an electric motor.
The sharpener should be equipped with a stop on which the knife will have a support that fixes its position in relation to the sharpening stone, and a protective visor.
When sharpening knives, the sharpening wheel rotates against the blade, while the knife is held with the right hand at the required angle straight, without distortions, evenly pressing it against the wheel, and the knife is supported with the left hand. Sharpen the knives on a wet sharpener until burrs form on the opposite side. If the burrs are insignificant and visible in the form of thin and even stripes, sharpening is considered satisfactory. Large, large burrs are formed when the knife is pressed hard during the sharpening process. Therefore, the knife is pressed tightly against the circle, but not tightly. During the sharpening process, the sharpening angle must be maintained at (25 ± 5)°. If the burrs are not removed from the knife, it cannot be used, as it will quickly become dull.
When sharpening knives on a sharpener, you should stand slightly away from the wheel and work with safety glasses, as the resulting sparks and flying small pieces of stone (abrasives) can get into your eyes.
Knives are also sharpened on fine-grained sharpening stones of the BP type, with the help of which burrs and notches are removed from the chamfer of the knives. The bars should be moistened with a few drops of kerosene or water.
When sharpening with straight-line movements, take the knife by the tail part with the right hand and place the chamfer tightly on the block, and press it against the block with the left hand. Then, with uniform movements, move the knife back and forth along the block while maintaining the sharpening angle (see Fig. 26, d).
When sharpening with circular movements, the knife is also taken by the tail part with the hands and, pressing the chamfer against the block, moves it along the surface of the stone with continuous and uniform circular movements (see Fig. 26,
e).
Scherhebel profile knives and fillets are sharpened on whetstones, and trimmed on whetstones or sharpened with files and trimmed with emery powder and oil (in the form of a paste). Correct sharpening of knives (Fig. 26, c)
checked using a template, a ruler and a square, with the sharpening angle using a template, and straightness using a ruler and a square. A properly sharpened knife should have a blade that fits tightly against the ruler, with no gaps. A knife blade is considered sharp when it can cut hair.
Knives are sharpened with a whetstone - a fine-grained whetstone. Before editing, the whetstone is moistened with mineral oil or kerosene. Since the whetstones become salted during the sharpening process, they are periodically washed with kerosene. The blade on the whetstone is adjusted in a circular motion, but it can be adjusted by moving the whetstone along the chamfer of a fixed knife. The worker applies the knife with a chamfer to the whetstone and moves along it in a circular motion, maintaining the sharpening angle, then he places the knife on the other side of the whetstone and also moves in a circular motion until the burrs are completely removed.
For sharpening carpentry tools (plane knives, chisels, chisels), an electric sharpener ET-1 is used (Fig. 27). The sharpener makes 45 (2700) s-1. The power of the electric motor for sharpening is 0.32 kW, voltage 220 V. A grinding (abrasive) wheel with a diameter of 100 mm is installed on the machine. Machine dimensions 310 X 166 X 205 mm, weight 7 kg.
Setting up planes and jointers consists of disassembling the tool to change knives, installing and fastening the knife.
The plane is disassembled as follows. Take it in your left hand and, lightly hitting the back end with a hammer, loosen the wedge, after which the wedge and knife are easily removed. Then a sharp knife and wedge are inserted into the tap hole and struck at the front end of the plane (on the frontal part) (Fig. 28). The wedge should fit tightly to the knife, the knife blade should evenly protrude from the sole of the plane by the required amount (without distortion). Reduce the amount of protrusion of the blade by hitting the back end of the plane with a hammer, and increase it with weak blows of the hammer on the tail (end) of the knife where the angle of the blade is more visible. The correct release of the blade is checked “by eye” by lifting the plane with the sole up to eye level. If at the same time the blade is visible in the form of a narrow strip - a thread, the knife is “seated” correctly. The knife is installed with the front edge in relation to the horizontal plane (the plane of the sole) at an angle of 45° - for the sherhebel, planes with a single and double knife, zenzubel and folded hebel, and at an angle of 80° - for the tsinubel.
Planing techniques.
Before planing with hand tools, you should carefully inspect the workpiece, determine the direction of the fibers and the front side. Wood should be planed along the grain, as this results in a smoother surface and less effort is spent on planing.
You need to plan by moving your arms to full swing, in a straight line with even pressure on the tool. In this case, the body body should be slightly tilted forward and remain motionless while planing. Planing should be done through the movement of the arms, and not the body, otherwise the worker will quickly get tired.
The workpiece to be processed is fixed on a workbench between a comb (stop) and a vice so that the direction of the fibers coincides with the direction of planing. The workpiece should lie tightly on the workbench without bending.
Take the tail part of the body with your right hand, and the horn with your left hand and install the plane
to the workpiece being processed.
At the beginning of planing (Fig. 29, a, 1)
, press with your left hand on the front of the plane, and with your right hand lightly on the back.
In the middle of planing (Fig. 29, a, 2)
press equally and evenly on the entire plane, and at the end of planing (Fig. 29,
a, 3),
when the plane leaves the workpiece being processed, the pressure on the right hand should be increased so as not to “fill up” the end of the workpiece being processed. If it is necessary to move the plane back, lift its rear part and move it.
First, plan the workpiece with a sherhebel at a certain (acute) angle in the direction of the grain, since if you plan with this tool along the grain, you can remove excess wood.
When processing twisted areas with Sherhebel, you should not remove thick shavings, as wood chipping may occur and the workpiece will become unsuitable for further processing.
After planing with Sherhebel, the surface of the part is leveled with a plane with a single knife. The part is finally cleaned with a plane with a double knife or a semi-joint, which smoothes the surface of the processed block.
Rectangular blanks begin to be planed from the front side, which has fewer defects. After processing the front side, check the quality of planing with a ruler along and across the grain, and if the workpiece is wide, then diagonally. If there are no gaps between the ruler and the edge of the processed workpiece, the processing should be considered satisfactory. After this, the edge of the workpiece is planed with a plane with a single or double knife. The squareness of the edge and face is checked with a square. Then the non-facial face and the second edge are planed, while maintaining the required dimensions.
The bars are planed as follows: they are laid on a workbench and secured; irregularities on the surface of the block are smoothed out with a sherhebel, a plane, and then the surface is smoothed with a jointer, after which the block is turned and the other sides are planed accordingly.
When working with a jointer
(Fig. 29,
b)
take the handle with your right hand, and support the body slightly behind the plug with your left. Having planed one section of the part in width, they move on to processing another section. The jointer planes in one step, without interrupting the chips. When processing very long workpieces, the worker must move forward along the workpiece.
When jointing for gluing, workpieces should be processed in pairs or even three pieces.
When working with a tool, stand at the workbench, tilting the body slightly forward and placing the left leg forward along the workbench, and the right leg in relation to the left at an angle of 70°.
When end planing, first plan one edge of the end away from you (Fig. 29, c)
to the middle of the part, and then with the other towards you (Fig. 29,
d).
With this method, planing of flakes and chips on the surface and edges does not work. To avoid the formation of flakes, it is recommended to process the ends before planing the sides of the bar.
Zenzubel
a quarter is selected (Fig. 29,
d, 4)
according to pre-made markings. The initial selection of the quarter is carried out as follows: take the back of the body with the right hand, and the sole behind the knife with the left, with the thumb placed on top of the body, as shown in the figure. Planing is carried out at a short distance from the marking line (marks) and chips are removed to the depth of a quarter (approximately 3...4 mm). After selecting parts of the quarter along the entire length of the block, use a chisel to work with the full span of the arms, making sure not to go beyond the limits
tags. After selecting the quarter, it is cleaned, for which the rear end of the zenzubel body is taken with the right hand, and its upper part with the left hand.
Falzgebel
(Fig. 29,
e, 5)
the quarters are selected in the same way as with a zenzubel, but without preliminary marking, since the stepped sole of the folding rabbet determines the size of the quarter.
The selection of a groove using a primer
is shown in Fig.
29, d, 6.
Tools for mechanized wood processing.
Manual electric planers (IE-5701A, IE-5708, IE-5707A) are designed for milling wood along the grain. The planer (Fig. 30) consists of a built-in electric motor, the rotor of which rotates in two ball bearings. At the end of the rotor shaft there is a drive pulley, which drives the V-wheel drive into rotation. The rotation of the knife drum (cutter) with two flat knives is carried out by means of a V-belt drive from the rotor shaft. The plane has front (movable) and rear (fixed) panels (skis), cast together with the body. A special mechanism lowers and raises the front ski, thereby adjusting the depth of milling (planing). The plane can be used as a semi-stationary machine by securing it to a table or workbench with the panels facing up and installing a removable safety guard that protects your hands from getting on the drum (mill) with knives.
.
Rules for working with a plane
You should use a hand plane taking into account the design characteristics of this tool. When planing, the force is transferred to the front of the tool body with the left hand, while the right hand holds the back. It is important to move the device along the fibers with long forward movements. The main nuance when finishing is not to reduce the force on the plane and not to remove it from the middle of the surface. During the roughing process, movements may be more frequent and finer. The main sign of high-quality work is a continuous ribbon of wood chips coming out from under the knife of the device.
Planing, at first glance, does not seem to be a difficult operation, but it requires some skills. Before finishing the product, it would be a good idea to practice on substandard scraps of material to get better at it. Otherwise, the appearance of the finished product may be spoiled by snags, breaks or deep cuts in the wood fibers.
When working with a plane, as with any hand tool, it is important to follow safety precautions: always check the serviceability and accuracy of the tool settings, store the device in a specially organized place, maintain a stable body position and a safe hand position. After use, it is recommended to clean the device with a brush and soft cloth.
How to put a plane on a workbench
How to properly put down a tool when not in use is a simple question, but not everyone knows the correct answer.
During the work itself, one somehow forgets that the most important part of the plane is the knife. It is a sharp part and, when of considerable length or width, is a valuable part. Preserving it is the main task.
Regardless of how you work and which option, the plane should be placed on its side. The cutting edge is located on the side, without contacting any surface.
How to properly place a plane on a workbench
When storing, ensure that the blade is preserved. It is optimal to store in a special box or tray made of wood or plastic.