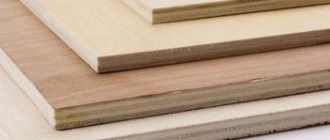
A couple of days ago I moved to a newly built dacha. I’ve already unpacked, set up the furniture, and as I walk around I feel like there’s not enough atmosphere. I decided to make several fakes using a hand jigsaw from plywood that was left over after construction. Therefore, next I’ll tell you a little about the cutting process itself and show you the drawings and stencils for cutting with a hand jigsaw that I used.
Source nestling.com.ua
Cutting plywood products with a hand jigsaw requires time, attention and patience. However, it is worth it - the result can be beautiful and, most importantly, practical products.
What can be made from plywood
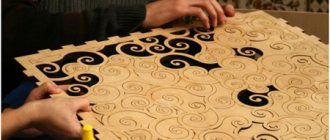
A hand saw is used to create decorative elements of plywood products. And as a result of this processing of wood, plywood or plastic, a variety of crafts are created that have aesthetic significance and practical application.
The process of figure sawing itself is a fascinating hobby, which brings both material and moral benefits to those who practice it.
Drawings, drawings, pictures and ideas of what can be made from plywood using a jigsaw:
Source pinimg.com
Source pinimg.com
Source pinimg.com
Source opilah.com
Source pussikbouquet.rf
Source miracle-lobzik.ru
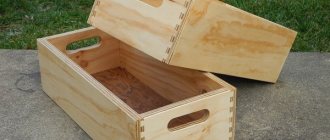
As you can see, from ordinary plywood or a wooden blank you can independently make a large number of products, which include a vase for sweets, a lamp, a basket, a photo frame, a stand for cards, a hanger in the corridor, a pincushion, a panel, a bread bin, a stand for eggs or hot dishes, a box, a candlestick and much more.
If you are just starting to carve, then first take simple drawings, diagrams, drawings or sketches for carving. Choose ideas for making wooden products using a hand jigsaw that will please you with their appearance.
Once you have mastered the cutting techniques, you can raise the bar and start cutting out jewelry models with openwork fragments.
You can also make platbands for home design using a jigsaw.
Using stencils for cutting, you can make homemade products much easier and faster from wooden blanks or plywood.
At the same time, handmade products will emphasize the style and complement the design of the room.
You will find free drawings for cutting with a jigsaw and much more only at saw-man.com
Dear friends,
We welcome you to a resource dedicated to such an interesting activity as cutting out products using a jigsaw. On the site you will find many drawings, books, diagrams, articles and videos on this topic.
For convenience, all drawings for cutting with a jigsaw are sorted into sections with similar topics. It is also worth noting their high quality and clarity. For composite products, the assembly process is presented in full and in detail.
At saw-man.com you can download free jigsaw cutting plans . Drawings are packaged in ZIP archives.
The jigsaw plans come in high-resolution JPG and GIF formats, and in some cases include vector images in DWG, SVG and EPS formats.
Most assembly drawings are presented in PDF format. Therefore, you will need AdobeReader or FoxitReader to view them.
On the site you can download free books on jigsaw cutting . Some of them are presented in DJVU format, so we recommend that you use DjVuReader to view them.
You should not ignore the section with articles, in which both beginners and masters will find a lot of interesting things for themselves. Here you will get acquainted with new technologies, nuances and features of work, secrets and tools.
Stop sitting in front of the computer and TV!
It's time to make something!
Characteristics of wood species
It will be no secret to anyone that when working with wood, the correct choice of wood type plays an important role. Let's look at the main characteristics of the trees most common in our latitudes.
Methods of applying stain
In this article we will try to describe the main application methods and techniques for working with stain.
Overview of stains
Stain is a special liquid designed to enhance the texture of wood or give it a more noble color of the wood species. Let's look at their types.
Creating cutting drawings in Photoshop
Description of a simple technique for creating drawings for cutting with a jigsaw in Photoshop. The video is in English, but everything is quite clear and easy to repeat.
It’s very nice that there are people who not only have good hands, but also good brains. The article presents two interesting ways to modernize a jigsaw; they should greatly facilitate and speed up the process of working with a jigsaw.
- Books on the site: 156
- Drawings: 919
- Galleries on the website: 13
- Articles: 13
- Visitors:
Procedure
In order to obtain high-quality products and minimize the number of defects during work, you need to do everything slowly and thoughtfully, and you should also focus on the process itself.
Before you start cutting, you should make sure that the thickness of the plywood or wood workpiece is equal to the height of the groove, which is located on the printed sketch.
Source 2proraba.com
Tool for making decorative and openwork crafts
Sawing with a jigsaw is a type of creative activity that most people are familiar with from childhood, from school. At least it wasn't that long ago. When labor lessons began at school and girls learned sewing and needlework, boys were introduced to such a tool as a jigsaw.
It is not difficult to use, and crafts made with a jigsaw from plywood carry not only artistic value, but also practical application. Manufactured products can act as souvenirs: various boxes and toys, and also have practical applications in everyday life. Decorated elements of the porch of a house, windows, stylish benches with carved legs, beautiful kitchen furniture and many other useful wood products can be made using this wonderful tool.
Ideal hobby tool
A hand jigsaw is a tool for cutting shapes out of plywood or some other material, for example, plastic. Its manual version is budget-friendly - its cost does not exceed several hundred rubles, and its scope is very wide. Figure cutting with a hand jigsaw is a very interesting activity. This is not only a pleasant pastime, but also practical benefits, not only financial, but also moral.
The design of this tool is very simple:
- U-shaped frame. It can be either tubular or lamellar.
- Saw handle.
- Two fastenings for a file. These mounts can rotate, thereby creating different planes, allowing you to perform cutting of varying complexity.
- Jigsaw blade. Sets of such files of 50 pieces are available for sale. The blades are distinguished by the thickness and size of the teeth. Thick blades are used for cutting out contours, and thin blades are used for openwork work with small elements of the workpiece.
Electromechanical jigsaws
The electric hand jigsaw has become an indispensable tool in the household. It can be used to cut various materials: plywood, wood, plastic, metal, ceramics, etc.
This tool operates from a 220 W electrical network and is a plastic case with working elements, equipped with a control handle. Its main component is the saw blade, which is mounted on a rod located in the front of the device.
The rod is driven by an electric motor. The movement of the cutting blade is reciprocating. To speed up the sawing process, some samples of this tool use the pendulum principle, that is, the file moves not only up and down, but also back and forth.
Cutting blades are consumables and need to be replaced from time to time. They are functionally different from each other - there are attachments for wood, metal, and ceramics. There are thicker blades, with more or less rigidity, with larger or finer teeth
An important characteristic of files is their shank. The most common ones nowadays are files with U-shaped and T-shaped shanks.
It is with such files that you need to purchase a jigsaw - then there will be no shortage of consumables.
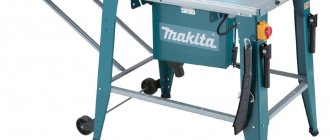
Electric tools differ in many respects, but in this article we will pay attention to only one important factor - the backlash of the saw. This characteristic affects the pull towards the cutting blade during figure cutting
Many brands of jigsaws cannot cope with the task of perpendicular cutting, this is especially sensitive when cutting thick wood - the error can be up to 5 mm.
Experiments on cutting wood to shape showed that the best jigsaw was a tool from Festool. The popular company Makita did not show its best side in this competition - the error of the perpendicular-shaped cut turned out to be quite large (up to 5 mm), and the jigsaw of this brand entered the tree with large chips.
An electric stationary jigsaw is already professional equipment for cutting. Its design is more complex than the equipment discussed above. The principle of its operation can be compared to a sewing machine, which has a jigsaw blade instead of a needle. The quality of the products obtained using this unit is incomparably better. The error of a perpendicular cut with a large workpiece thickness is zero.
The only disadvantage of this electromechanical device is its high price. But this is compensated by the comfort of working on it and high productivity with the highest quality of the resulting products.
Preparing the stencil
Keep in mind that drawings, diagrams and sketches for cutting come in different sizes.
For example, to make an interior item, say a shelf, you need to use whatman paper in A1 or A0 format, and to create some toys you can even use an ordinary sheet of cardboard.
Well, then the outline of the product is applied to the surface of the workpiece; during this process it is necessary to maintain the exact dimensions of the drawing.
You can find templates for cutting with a hand jigsaw on special resources, but it is easier to come up with your own ideas using a simple model as a basis and taking into account the type of workpiece.
An individual approach when developing a drawing, template or diagram of a future product is welcome, because it will emphasize the very texture of the wood.
Source pinimg.com
Simple flat crafts
Simple flat plywood figures can be easily made using a jigsaw. They are manufactured in the following order:
- A rectangular blank of the required size is formed from a plywood sheet using a hacksaw.
- A stencil (template) of the figure is prepared according to the size of the workpiece. It is made of cardboard or thick paper (Whatman paper). You can draw the figure yourself if you have artistic abilities, transfer it from a picture using carbon paper, or print it on a printer from the Internet. Then it is cut along the contour.
- The stencil is placed on a piece of plywood and outlined with a pencil or marker (felt-tip pen). All internal parts are transferred onto plywood using carbon paper.
- A figure is cut out using a jigsaw according to the markings.
- The edge is processed with files and all sawing errors are corrected. The surface is sanded with sandpaper.
- The figurine is given the desired appearance. You can apply all the necessary elements using a burning device. Another option is to paint with acrylic paint using a brush along the markings made from a stencil.
- Final finishing - Most often, varnishing.
Using this method you can make the following crafts:
- Figures of animals, birds, fish. Figure 1 shows a stencil for making a swan figurine. It can be enlarged to the desired size and printed on a printer.
- Figures of funny people, cartoon and fairy tale characters.
- Composition crafts. Figure 2 shows a dolphin on a sea wave.
A cute “Dog” craft can be made using a burning device. For it, you can cut a blank along the contour of the head or burn a design directly onto a plywood blank. You can offer a huge number of different ideas. Fantasy is not limited by anything.
How to transfer images to the surface of a workpiece
In order to apply a contour to the surface of your plywood or wood workpiece, print the template itself on fairly thick paper.
If you draw the pattern ornament with a pencil, then various hassles may arise when transferring the drawing from your A4 diagram.
Therefore, to apply complex patterns and the contours themselves, auxiliary methods should be used.
One of these methods uses carbon paper.
The first step when using this method is to place a carbon copy on the workpiece.
Afterwards the template itself is placed on top, and then the lines are simply drawn. The template can be glued to the workpiece using 2-sided tape.
But you can also use regular glue. However, you should thoroughly clean the entire surface with sandpaper.
The next method of applying a contour to a workpiece is more accessible. After all, it uses a stencil that is made using ordinary nail scissors.
First, preparation takes place, and then the template is applied to the surface of a plywood or wooden blank and simply outlined with a pencil.
For greater convenience and high-quality application, the sheet is secured with adhesive tape or tape. Also, if desired, the design can be applied using a thermal method instead of a pencil. An inkjet printer is used for this. It is used to print out the diagram.
After that, the printed drawing is applied with its front side to the surface of the material from which the craft is cut out, and processed with a preheated iron.
Source ytimg.com
From drawing to template
Template for platbands The template for platbands is made of cardboard, life-size. A separate template is made for each element, pattern and ornament. The resulting template is placed on the board and the outline is traced with a pencil. Making holes You can immediately mark the locations for the holes. Holes are drilled inside the pattern, in places where there will be a turn when carving. First, the internal patterns are cut out, and then the external ornament.
Platband carving
Sawing process technology
After applying the drawing to a piece of plywood or wood, the sawing process occurs.
The first step is to process and cut out the internal elements of the future product, after which they begin cutting along the outer contour.
This procedure allows you to get straight lines, neat cutting and provides convenient fastening of the material.
Holes for the blade for the internal contour should be drilled in sharp places. This process requires careful actions and attention, since chips may form on the back side of the workpiece.
To avoid this, it is recommended to make the holes incompletely. And you can limit the depth of the hole using electrical tape, wrapping it around the drill.
After drilling, the workpiece must be turned over and the holes processed using an awl. The last step is to polish the product with a file or needle file, and small elements are delicately processed so as not to break them.
For example, cut a thin strip from sandpaper, and then insert it into a jigsaw file instead of the blade itself.
During work, the workpiece should be secured at chest level - this will provide convenience during the process, and will also allow you to closely monitor it.
When using a jigsaw, be careful and practice smooth reciprocating movements, because the jigsaw blade is very fragile. It is recommended to avoid sudden movements, distortions and overheating of the canvas during the process.
If you use an electric jigsaw, then to work you need to securely fasten the workpiece to the workbench. When working with this tool, you can process material up to 5 centimeters thick.
Source stroy-podskazka.ru
I recommend the following video, in which the author talks about a trick for cutting out a product yourself with a hand jigsaw:
Gingerbread men
- The whimsical design of these New Year's wooden figurines in the form of a popular holiday treat will amuse and delight lovers of non-trivial design.
- Material: oak cuts, 5 mm thick. Finish: Clear oil finish
Sawing and processing wooden toys
Print the proposed sketch to the desired scale. Cut the pre-selected piece of wood to the required size.
Considering the many curved cuts and small shaped slots, it is better to choose workpieces of small thickness - 3-5 mm.
Transfer the template to a wooden base, then use a 1.5 mm drill to make a series of holes through which the blade will pass (don't forget to drill a hole for hanging the figurine).
Start by sawing out the internal elements, and then trim the figures around the perimeter, this will reduce the risk of breaking the fragile toy.
Given the amount of fine work involved, it is best to use #3 reverse tooth files for this project, which in addition to a more controlled cut will reduce the likelihood of chipping on the back of the piece.
Remove the paper template: If adhesive was used for transfer, sand off any remaining paper using P180 sandpaper. If you plan to apply a clear finish, add a final sanding with P280 grit.
How to choose plywood for sawing
A successful project begins with the right choice of materials. How to choose high-quality plywood for sawing - read our article.
New Year's decor set
The next set of templates is a series of New Year's decorations that can be used as Christmas tree decorations or as independent interior decor. The set includes several types of figurines, which are a kind of designer set: they can be combined in different combinations or used separately as full-fledged New Year's decorations.
The first set of figures are simple stylized Christmas trees in two design solutions: with straight and figured geometry. They can be hung on the Christmas tree or used as regular home decorations.
Stylish Christmas trees for hanging with straight and shaped geometry. Material: birch plywood, 4 mm thick. Finish: acrylic paint + glitter spray paint.
Complete your holiday decor set with figured spirals. These are stylish and truly multifunctional New Year's decorations.
By cutting out several figures of different sizes, you can use each spiral separately, make a pendant from several pieces, or combine them into a voluminous decoration, as in the photo.
Working with curved cuts will require certain skills. For best results, we recommend using #2 or #3 files and working with not very thick workpieces.
All finished figures can be combined into beautiful rotating pendants. To do this, you will need to additionally cut out decorative crossbars in the form of shooting stars, as well as individual stars. To keep the structure rigid and rotate better, thin wire is used for hanging.
Stencils for cutting
Set of decorations in Christmas style
A set of three ornaments inspired by traditional Christmas motifs. The set includes a pair of stylized angels and an openwork Christmas tree assembled from two halves. The latter can be used as a pendant or as a free-standing decoration.
Such toys look good in their natural form, with an open wooden texture. Therefore, linseed, mineral or any other non-tinted oil is best suited for finishing.
Stencils for cutting
The width of the central slot should correspond to the thickness of the workpiece used. To ensure a good fit between the two halves of the plywood Christmas tree, cut the groove a little smaller, then carefully file it with a file or sandpaper until it fits snugly.
Christmas decorations in stained glass style
- You can add a little variety to the standard cutting technology and make one of the proposed options for New Year's decor that imitates stained glass style.
- The decorations in the foreground are made using pseudo-stained glass technique.
The essence of this technique is quite simple: you need to cut out two stained glass frames and place a sheet of cardboard between them, painted on both sides. In order to avoid the tedious adjustment of two parts, it is better to immediately cut them in series, placing the blanks in a stack one on top of the other.
Of course, it is much more convenient to do such work on a jigsaw.
Cutting templates
Ornamental decorations with geometric patterns
A series of sketches for making simple, but at the same time very expressive New Year's decorations. The through openwork pattern gives these toys a characteristic visual lightness and endows them with grace; at the same time, this feature puts forward a number of requirements for manufacturing. The wooden blank must be thin, but at the same time strong enough so that the fragile pattern does not break.
For a series of these projects, it's best to use hardwood (under a clear finish), or even better, thin plywood if you plan to do an all-over stain that will hide unsightly plywood edges. To make such jewelry, it is most convenient to use spiral saws, which allow cutting in any direction without the need to rotate the workpiece.
Volumetric pendants in an openwork frame
The main feature of these New Year's decorations is a beautiful openwork frame with a slight three-dimensional effect. This simple effect is achieved in a simple way. The oval center of the pendant is carefully cut out according to the template, moved back and fixed with glue. Thus, the openwork frame protruding to the foreground gives additional volume and makes the ornament more interesting.
The rest of the project assumes a standard cutting algorithm.
Separately, we note that if you work on a machine, it is better to use #2 or #3 spiral files for this project; they will be easy to cut out not only the openwork frame, but also the main ornament of the decoration.
As for the finish, the frame and middle look more beautiful in a contrasting design, painted in different colors. For such decorations, it is best to use alkyd or oil paints, which provide good coverage and color saturation.
Christmas tree made of plywood with a themed openwork pattern
A voluminous New Year's decoration contains many small details and requires a certain perseverance from the performer, but the beauty of such a craft justifies all the effort expended. You can complete this project as a full tabletop decoration or small pendant by reducing the size of the original drawing.
The project is designed primarily for the use of a jigsaw. The parts are cut out serially, placing two wooden blanks in a stack.
Safety precautions
Basic safety precautions are required for all types of physical work.
- The workplace must be properly prepared. It should not be cluttered with unnecessary objects or tools.
- The work table or workbench must be well secured and set to the individually required height.
- The workplace should be well lit.
- When working, you should use personal protective equipment, such as gloves, safety glasses, etc.
- When using a power tool, make sure it is in good working order. For beginners, study the technical documentation of the tool they use.