A quality jigsaw is one of my favorite tools. Armed with the right blade, you can cut all kinds of materials into almost any two-dimensional shape you want. But the flexibility of a jigsaw blade requires increased attention to all actions, which can make the need for a round hole a challenging task.
Like a pencil in a person's hand, a jigsaw can go in any direction, but not perfectly straight. You probably won’t be able to draw a perfect circle by hand, so don’t expect the same from a jigsaw. At least not without a little help.
I recently needed to cut a hole in a project of mine. The circle was a non-standard size, so I couldn't use a ready-made saw or wood bit. In addition, the diameter was so large that I could not find anything similar on sale. Besides, it was one of those Saturday nights where I definitely wouldn't want to drive to the store even if it was open.
So, I thought to myself, “If I can use a compass to draw this circle, why can’t I use one to cut out a circle?”
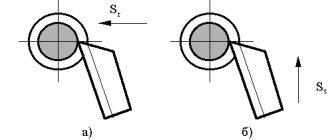
General tips for drilling wood
Wood is a relatively soft material that can be easily processed. Of course, there are hard varieties, and there are also exotic ones, which in their properties are not inferior to every metal, but still in Russia most often you have to work with fairly soft varieties. On the one hand, working with soft wood is easy, but on the other hand, you need to follow some rules.
- Before starting work, it is worth applying markings, especially if several holes are needed. The center of the hole is marked with a regular pencil, after which many make a recess there with an awl or a nail. This is necessary so that the drill does not move to the side at the very beginning of work. If the drill has a centering sharp tip, then you can do without it.
- If you have to work with a separate piece of wood, then it must be securely fastened. The ideal option is to use a vice; if you don’t have one, you can simply press it firmly against the wall. Working without fixing it would not be the best idea, since the hole may turn out to be of poor quality, and the wooden part itself may begin to rotate.
- If you need to make a through hole, then you need to place a piece of wood under the wooden part, which will prevent damage to the surface on which the drilling takes place. Surprisingly, many people forget about this. By the way, this will also prevent the fibers from breaking on the bottom of the workpiece (where the exit hole will be).
- For each type of drill (as well as diameter) there are recommendations for the maximum permissible speed. You definitely shouldn’t exceed them, and it’s even better to drill with a small margin, at slower speeds. What are the consequences of high revs? It's simple: chips and cracks. And if you need to make a large hole, then it would be correct to first use a drill of a smaller diameter, and then a larger one.
- Always select drills that are suitable for your task, especially when large diameter holes are needed. And when using very large diameter crowns, they often use an additional blank with an already drilled through hole, which will not allow the drill to go to the side (it is placed on top and the existing and future holes are combined, like a stencil).
- When drilling blind holes, the most important problem is depth. There are types of drills that have limiters in their design, but if they are not there, you can get by with marks that are attached to the drill. You don’t need to buy anything: rubber rings, adhesive tape or electrical tape will do.
- Do not allow the accumulation of chips and especially sawdust, this reduces work productivity and is fraught with jamming of the drill. This is true even when using screw drills, which, in theory, should remove chips, but this does not always happen.
Follow these simple recommendations and you won’t have any difficulties drilling wood. This process requires only accuracy, slowness and the right approach.
Electric hacksaw
If you need to cut a round-shaped part and saw a round hole in the workpiece, then an electric hacksaw is the most suitable tool. With its help, you will save effort and time, since such a saw has great advantages over a manual one. Thus, the blade of the electric hacksaw is narrower, which provides increased maneuverability. Further, it has replaceable blades with different teeth, which allows you to process workpieces of any type, that is, wood, plywood, chipboard (it is no coincidence that the tool is also called a jigsaw).
To cut a section inside the workpiece, a hole is first drilled for a hand saw. But if you have an electric hacksaw, then this is not necessary. The tool is brought to the workpiece with a slight tilt forward and turned on in this position. The saw will cut the hole itself. Just don’t put too much pressure on the body - this can lead to breakage of the saw blade.
Lead in a circle
This device, simple in design, makes cutting out round holes or arcs much easier. It is enough to mark the center of the circle on the workpiece, fasten the device along the mark and connect the rod coming from it with an electric hacksaw. The divisions on the rod help set the saw blade at the required distance from the center of the circle. As a result, without preliminary marking, you can cut a circle or saw an arc with a radius of 5 to 20 cm.
The device (more precisely, its “sole”) is attached to the surface of the workpiece with screws. They should be well tightened. If the fastening is not rigid and starts to wobble, then an even circle will not work.
Suitable for lefties too
Left-handers can also use the device, since the guide rod is attached to the movable unit both on the left and on the right. So cut at your own discretion - clockwise or counterclockwise.
Using such a device, you can cut a round hole with a diameter of 10 to 40 cm in the workpiece without preliminary marking.
When cutting holes or curves in small workpieces, sometimes you can’t do without a jigsaw. Replaceable blades with teeth of different shapes and locations allow you to work with wood of different densities. However, it should be taken into account that the depth of the cut is limited by the arc of the jigsaw, that is, the saw blade will not be able to move further than 30 cm from the edge of the workpiece.
Very thin, narrow saw blades can be easily damaged if the jigsaw is used incorrectly. The saw must be operated with careful, methodical movements. The main thing is to prevent the canvas from skewing. Otherwise, small and light workpieces will begin to move with the saw, which may ultimately lead to the blade bursting.
The thinnest jigsaw blade will “master” the narrowest curve, but only in small workpieces, since the advancement of the blade is limited by the arc of the jigsaw.
Drill bits for tiles and glass
It is extremely difficult to work with such materials - they are easily damaged. For example, ceramics and glass crack when the drill is misaligned or overheated. Therefore, only two types of drills are used for them: crowns and feathers. Crowns can have a diameter from 13 to 80 mm and, as a rule, are coated with diamond dust.
Feather drills. They are an ordinary metal rod with a sharp spear at the end (usually made of pobedit). They allow you to make holes with a diameter of 3 to 13 mm - ideal for dowels.
But keep in mind that after you have gone through the tiles, it is worth changing the drill. Otherwise, you will simply dull it on the concrete and get a crack in the tile the next time you use it.
What is a wood ballerina
A circular adjustable ballerina drill is a device that is designed for drilling round holes of large diameter. The tool has a simple design. It consists of a shank with a transverse rod on which movable carriages with cutters are attached. The rod has markings according to which you can set the required spread of the cutters relative to the center of the intended hole. A core drill is fixed in the middle of the shank. It serves as a centering element and support when drilling.
In addition to designs with two cutting elements located symmetrically, there are ballerinas with one cutter or even three. In the latter case, they are located on the base in the form of a disk with grooves.
Techniques for drilling holes in wood
Countersink hole for screw head
There are situations when you need to drill a “blind” hole for a tenon joint. To do this, you need to use a feather drill with a limiter, which is placed on the drill according to the size of the drilling depth
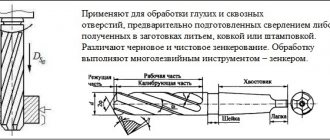
It is more difficult to make holes in large-diameter wood, since the use of conventional cylindrical drills chips the surface of the material, spoiling its appearance. To successfully cope with this task, feather drills and annular cutters are used.
Drilling with feather drills
For successful drilling with feather drills, secure the wood firmly in a vice and press the tip of the drill bit against the surface of the material. Then drill (at low speed) the hole until the tip of the drill appears at the bottom of the wood. Stop drilling and remove the feather bit from the hole, then turn the wood over, clamp it in a vice and drill the hole on the other side. This will prevent the block from splitting when drilling.
Drilling with an annular cutter
Wood annular cutter
An annular cutter is used for drilling holes in wood with a diameter greater than 38 mm. Drilling begins with a small-diameter guide drill, structurally connected to the cutter in one piece. This guide serves as a guide for the annular cutter.
Here are some tips from professionals that will surely help you when drilling holes in wood:
a) for vertical drilling, you can install a square parallel to the drill; b) if you often have to do carpentry work, purchase a special stand for the drill, which allows you to hold the tool strictly vertically and controls the depth of the holes; c) be sure to use a vice when drilling to avoid splitting the wood; d) to ensure that the exit hole does not have chips, place it under wooden part with an unnecessary block and drill them together. This is especially applicable when making holes in a thin board; e) if you do not have a drilling depth limiter, wrap the drill at the limit location with bright electrical tape or masking tape.
Useful DIY crafts
In order to make something useful, for example, a box, it is not necessary to have a whole arsenal of complex equipment and expensive tools. You can get by with a minimum of tools and mechanisms . To perform carpentry work you will need:
- milling cutter;
- electric jigsaw;
- Sander;
- several clamps;
- set of cutters
You can use absolutely anything as a material - for example, scraps of parquet boards, pieces of plywood and waste chipboards, but always at right angles. To simplify the work, you need to make a simple milling table. To process workpieces, you will need a large-diameter straight groove cutter. The process looks something like this. On a makeshift table, plan the ends of parquet board scraps. Mark the sides of the box and use a jigsaw to remove all excess.
The resulting blanks must be processed with a thicknesser to maintain the size of all sidewalls. If you don't have a surface planer, you can use a milling table. To do this, set the stop to the size of the workpiece and move the part between the stop and the rotating cutter towards you. The next operation to calibrate the sidewalls in length is performed with a jigsaw.
Tips for choosing
An instrument of any form has its own criteria and must meet them. You can determine the quality of the instrument you are purchasing by its appearance, color, and also by the material from which it is made.
- Material. It is impossible to visually determine the quality of the material. Therefore, before purchasing, you need to make sure that the product has a quality certificate. Chinese counterfeits are often sold without documents.
- Appearance. A high-quality product has a flat, smooth surface. Various cracks, scratches and damage are defective. The cutting area must be carefully sharpened. Long drills must be straight. It is very easy to check their quality; just roll them on a flat surface. All irregularities will be immediately visible.
- Color. To ensure that the tool has additional strength, it is manufactured using a special technology. You can find out which processing method was used by the color of the product. The steel color indicates that no additional processing was carried out. The yellow-gold spraying relieves metallic stress. A product treated with titanium nitride (a tool with a bright gold color) will have a long service life. The black drill has increased strength. Steam was used to process it.
- Package. Products from well-known manufacturers have good, high-quality packaging. All fakes are poorly packaged, and the text is sometimes written with errors.
- Price. The higher the price, the better the quality of the product. All budget tools have a short service life.
Caring about their reputation, well-known stores will not sell counterfeits. And no matter what kind of tool you buy, in order for it to be of high quality and last a long time, you should contact reliable and trusted suppliers.
For high-quality performance of even such a simple procedure as drilling holes in wood products, the correct mode and the appropriate tool are required. When choosing a wood drill, you should take into account the characteristics of both the material being processed and the hole that needs to be made. The modern market offers a wide variety of drills designed for making holes in wood, so choosing a tool to solve certain technological problems will not be any particular problem.
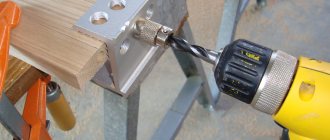
Drilling holes for socket boxes with a core drill in wood
Main types
The main parameter, depending on which wood drills are divided into different types, is the design of the working part. Based on this feature, wood drilling tools may fall into one of the following categories.
Drills of this type are used to make holes of medium diameter in wood - up to 25 mm. It is advisable to use such a tool in cases where the requirements for the accuracy of geometric parameters, as well as for the quality of the holes, are not too strict. Among the most significant advantages of pen drills, low cost and ease of maintenance should be noted.
Feather drills are considered the most affordable
Core type tools are designed for drilling large diameter holes. In terms of their design, wood crowns resemble a metal glass with a shank, the working end of which has cutting teeth. When such a drill rotates, its cutting teeth, interacting with the workpiece, cut out a circle of the required diameter on its surface.
Set of wood crowns
Spiral wood drills are also called screw drills. Their working part resembles a screw. They are used for drilling small diameter holes in wood. Due to the special design of screw-type drills, chips are effectively removed from the processing area when used. The twist drill also ensures high precision and extremely high quality machining.
Spiral wood drill with scoring bits
These are tools with the help of which, in products made of wood, they create not through, but blind holes with a perfectly flat bottom. In addition, if you use such a wood drill with additional accessories, you can drill a square hole in a wooden product.
There are many modifications of the Forstner drill available.
With the help of such tools, it is possible not only to drill wood, but also to make grooves of various configurations in wood products. Drills of this type are most often used in cases where it is necessary to perform complex processing of wooden parts, and in order to drill a regular hole, a twist drill, a feather or a core tool is used.
Milling drills are designed for drilling a round hole and then boring it to the desired shape. Used when working with wood and thin metal
The shank of drills designed for woodworking is usually cylindrical, but manufacturers also produce them with shanks of other configurations. So, on the modern market you can buy drills for woodworking, the shanks of which can be:
- triangular, optimally suited for fixation in a three-jaw chuck (tools with a triangular shank are ideally transmitted torque, and even very significant loads are not able to turn it in the chuck);
- hexagonal (tools with such shanks can be installed in both a standard and a three-jaw chuck, but there is a very high risk of the drill turning when subjected to heavy loads);
- conical (tools with shanks of this type are used primarily to equip production equipment);
- tetrahedral (a rarely used form of shanks, which, however, ensures high stability of the tool against rotation in the chuck).
Making grooves for cutting
Strengthen a block or strip on the surface of the workpiece, for example with pipes, and use it as a guide when cutting a groove on a wide board. The rail must be larger than the board and extend beyond it on both sides so that the router is securely pressed against the guide along the length of the entire passage groove.
Always make the first pass with the tool along the right guide, then move the router to pass along the left guide. With this method, the rotation of the cutter helps move the machine along the ruler when cutting a single-sided dovetail, after the first pass, replace the dovetail cutter with a straight cutter.
Monolithic panels and frames are often made with relief, rounding and other chamfers to decorate the appearance, add lightness and protect sharp edges. The fold is a more functional part; for example, it is used when attaching a panel to a frame.
You can cut folds with a straight cutter using a ruler, moving it along the edge of the workpiece. The same method can be used to create a bevel with a V-groove cutter or a concave chamfer with a round groove cutter.
Making chamfers
The creation of shaped chamfers or folded wide panels is carried out using chamfer cutters with guide tips. Practice on scraps of wood to learn how to guide the tool with the tip only lightly touching the edge of the board - this will reduce friction and prevent burning of the wood.
Bevel the edges of the faux panel by working counterclockwise one at a time. so that the rotation of the cutter helps to cut it into the workpiece. If the panel is solid wood, sand the end edges first. and then move on to the side ones. In this case, possible chips at the cutter exit from the far ends of the end edges can be corrected by passing the cutter along the side edges. When finishing only the end edges, press a piece of wood or lath against the far edge to reinforce it.
Sometimes it is more convenient to process the inner edges of the frame after it has been assembled. The outer edges are processed as described above, and the inner edges are processed using an inner edge router or a wooden block in the shape of a right triangle, attached at the hypotenuse to a straight edge. In this case, it is important that the geometric vertex of the right angle (in fact, it is cut) coincides with the center of the cutter.
Before turning on the router with a vertical movement mechanism, lower the cutter onto the surface of the workpiece and place it exactly at the beginning of the groove. Raise the cutter, turn on the motor, and slowly lower the cutter to the set maximum depth. Bring the cutter to the end of the intended groove and release the vertical movement mechanism and turn off the engine. Using a chisel, trim the ends of the groove. Making a groove parallel to the edge Most grooves are cut parallel to and close to the edge.
We suggest you read: Is it possible to change the temperature in the bathhouse?
Included with any router, manufacturers supply side rulers (stops) with bolted screw fastenings, which can be adjusted to set the router to the required distance from the edge. If you have them, then place the router on the workpiece and align the cutting edge along one side of the groove marked on the surface.
For more efficient processing, attach a wooden strip made of hardwood to the working edge of the ruler
Drills for concrete and blocks
Their main difference is the soldering of hard metals on the pointed surface of the drill: Pobedit or artificial diamond.
Drills for concrete are also different:
- spiral - suitable for making shallow holes (up to 100 mm), they are the most popular;
- drilling - similar to spiral, but usually with longer and wider grooves for dust to escape;
- crown - used when it is necessary to make a recess or hole of large diameter in concrete for a socket or junction box.
The same drills are also suitable for blocks, but when working with soft materials it is not recommended to use the impact mode (usually it is not needed).
Round corners of furniture
You can even get injured by hitting a sharp corner of the table. Therefore, we recommend cutting corners where possible. For homemade furniture, they need to be rounded from the very beginning.
Cutting circles and curves on a mowing line is no more difficult than making an absolutely straight cut on a workpiece, but under one condition: you have the right tool in your hands and you are good at it.
Sources:
https://ingener-pto.ru/2019/12/12/kak-vypilit-krug-bez-lobzika/ https://profistroy74.ru/masteru/kak-vyrezat-krug-iz-dereva.html
Color matters
Even by the appearance of the drill, you can determine its properties and qualities.
- The gray color indicates that this is an ordinary simple drill, without any additional processing.
- Cherny reports that the drill has been treated with hot steam and has increased wear resistance.
- Yellow means that the drill has been quenched and tempered (a procedure to relieve internal stress). Such products are even more wear-resistant, but are afraid of overheating.
- A bright golden color is usually characteristic of drills treated with titanium nitride, which reduces contact friction in the drilling area and perfectly hardens the surface of the tool.
Tool functionality
A high-quality ballerina is made of high-strength steel, which makes it possible to use the device in working with soft and hard wood.
This tool has an adjustable drilling diameter. This allows you to make holes of almost any diameter. The limitation of the drilling range depends on the size of the ballerina. Manufacturers produce devices with the following cutter spread limits:
- from 30 to 120 mm;
- from 40 to 200 mm;
- from 40 to 300 mm;
- from 40 to 400 mm.
The maximum drilling diameter is limited by the rod on which the cutters are mounted. The minimum is the thickness of the shank.
A ballerina drill can be used in any places where using a jigsaw or a hand router would be inconvenient. For example, this may be assembled and installed furniture, in the part of which it is necessary to drill a neat hole, given the limited space. Another example is an uneven (concave or curved) surface. It’s unlikely that you’ll be able to do everything smoothly and neatly with a jigsaw or milling cutter. It will be difficult to control the inclination of the tool relative to the surface. A ballerina can easily cope with this task.
Selecting a longitudinal groove with a router
To select a groove 6 mm wide and 4 mm deep at a distance of 10 mm from the edge of the board, do this. Attach the router to your workbench and install a 6mm router bit. Set the guide bar to 10mm. Adjust the height of the cutter so that it is 2mm above the table. Make a pass along the guide to create a 2mm deep groove. Turn off the router, raise the cutter another 2 mm and repeat the pass. You will get a groove 4 mm deep.
Selecting a longitudinal groove with a router
Areas of use and design features
As mentioned above, in order to drill a quality piece of wood, it is very important to choose the right drill bit. When making this choice, it is necessary to take into account both the characteristics of the material being processed (in particular, its hardness) and the type of hole that needs to be made. That is why it is very important for home craftsmen and specialists whose work involves processing wooden blanks to understand both the types and functionality of wood drills.
Twist (screw) drills
A twist or screw drill can be produced with two types of working tips: conical and with special scoring tips. If we compare both types according to the degree of their effectiveness, then it is almost at the same level. However, they differ in the load taken by the tool during wood processing. Thus, in the design of the working head of a drill with a scoring tool, there is a jumper, which causes significant loads to be transmitted to the entire body of the tool. Drills with a conical working head do not have this drawback, which, in addition, are much better centered on the surface of the workpiece. The conical head immediately enters the material, and the drill does not move to the side. Meanwhile, spiral drills with scoring tools, due to their design features, allow you to create holes in wood with higher precision.
Design of a twist drill for wood
Drilling wood using a spiral tool allows you to get precise and neat holes with straight edges and a smooth surface on the inner walls. Tools of this type can be used for drilling wood of any species and almost any hardness, as well as materials made on its basis (chipboard, MDF, plywood, etc.). If the drill is driven into the material being processed at a low speed, there will be no need to frequently remove the tool from the hole being created to remove accumulated chips.
How to choose and what to pay attention to
Choosing a high-quality circular drill is quite easy. The main thing is to know the main points that you should pay attention to first, but also not to lose sight of the little things.
The design is a very important point: a wood ballerina comes with one chisel or two or more. For frequent use, it is better to purchase an option with two or three cutting elements. It is easier to work with such devices and the quality of the processing performed will be at an acceptable level.
It would not be superfluous to be able to replace individual parts. Inexpensive circle drills can have a solid shank with a permanent center drill and rod.
Metal, its quality determines its strength and ability to withstand workloads. High-quality tools are made from high-strength steel or alloys. The shank and cutter holders are shaped using a machine tool. The rod is usually stamped and made of the same metal.
Cheap options often use soft metal or alloys, which can be brittle. Under load, parts may become deformed or break. Such a tool will not last long and it will also be difficult to achieve accuracy from it.
The quality of workmanship, the main feature is the absence of backlashes and distortions. All parts must fit together and be securely fastened with fixing screws.
The markings of a high-quality ballerina's barbell are stamped. Sometimes the divisions are highlighted with bright paint for better visibility.
Cutters and high-quality cutting elements are made from hardened tool steel. They are secured to the holders with rivets or soldering. Solid cutters with holders (made of the same metal) quickly become dull and are not durable.
Manufacturer, when choosing any tool and consumables, preference should be given to well-known and long-proven brands and brands. The most common are Topfix, Stayer, Irwin, Strum.
Purchasing an adjustable circular drill for use at home, or if you need to drill several holes, is completely worth it. This eliminates the need to purchase an expensive tool that may only be needed a few times.
When milling grooves and tongues by hand, use guides
To achieve the best results, you should consider the capabilities and limitations of your router and the cutters themselves. Removing a tongue with a cross-section of 19×10 mm in an oak board leads to overload of the electric motor and rapid dulling of the cutter, so this operation should be performed in two passes, each time immersing the cutter to half the required depth.
Downward helix cutters cut cleanly but guide the chips down rather than pushing them out. Remove debris with a compressor and make another pass.
Sometimes chips and dust accumulate in the depths of the hole or under the board, lifting it slightly, resulting in unevenness at the bottom. Once all passes have been made to the final depth, remove any chips and dust from the table and workpiece and make another pass to clean the sides and bottom of the sample without changing the settings.
Ascending helix cutters, on the other hand, are good at removing chips from deep in the tongue, but can tear off the edges of face veneer on plywood. Our advice is to use an upward helix cutter wherever a straight cutter can be used, and reserve the downward helix cutter for applications where the cut has an open edge or where the cutter is cutting right through the material.
For the first option, attach a straight cutter or a cutter with an ascending spiral into the collet and adjust the routing depth. Measure the distance from the edge of the router sole to the cutter blades. Fix the guide at the same distance from the marking lines, trying to align it as accurately as possible. With the router turned on, move it along the guide to select the tongue or groove.
In order for the tongue or groove to be straight, the sole of the router must move along the guide, touching it at the same point.
Since the cutter's cutter and bearing are the same diameter, you only need to align the guide with the marking line without measuring.
The second option (with a copying cutter) saves you from the error associated with measuring and setting the distance, since the cutter bearing located above the cutting part moves along the edge of the guide. You only need to secure the guide exactly along the marking line.
If the workpiece is too large to be processed on the router table, use a side stop to help make a groove or tongue parallel to the edge of the workpiece at a distance usually not exceeding 200 mm. For this operation, it is better to install a straight cutter or a cutter with an ascending spiral into the collet.
Drill sharpening
Drill bits may become dull with frequent use. You can sharpen the tool yourself or contact a specialist. If you decide to do this yourself and do not have the skills, it is better to practice on an old instrument. When sharpening, the main thing is not to violate the desired geometry and adhere to a certain degree. Sharpening can be done manually or on an electric machine.
- Metal analogues of drills are made of softer metal. They can be sharpened manually using a file.
- Using an electric machine, the drill overheats greatly. This can be avoided by constantly dipping it in water. Or organize a stream of water pouring onto the tip of the drill.
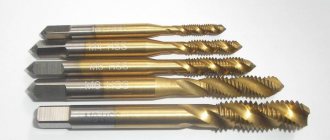
How to drill a log or thick beam? Of course with a screw drill
We continue to understand the equipment with which you can work on wood. In general, wood can be drilled with different drills; in the last article we analyzed the effectiveness of the Forstner drill, and figured out how and where it is recommended to use it.
There are a great many types of wood drills and it often happens that they are ideal for some jobs, but not suitable for others at all. Therefore, a home craftsman must understand what and how to drill into wood. Today's article will be about a screw drill, also called a twist drill.
It is for wood and will help out in cases where it is necessary to drill a deep hole. For example, you have a log house through which you need to stretch a water pipe or a bundle of cables. And only a twist drill can cope with thick wood. Of course, nothing prevents you from trying to use a regular perk, however, as I already said, drilling with it is inconvenient and it is not a guarantee that you will be able to complete the job.
Here is a photo:
As you can see, the tip is made in the form of a thin thread, which helps to screw in the drill perfectly at the initial stage of drilling. The ejection of chips occurs due to the screw edges (like any drill or brace), so drilling is easy. The shank is most often 6-sided, so the tool is securely mounted in the chuck of a drill or screwdriver.
It is necessary to work with such a drill at low speeds, so it is best to use a regular home drill with speed control or a powerful screwdriver with a high tightening torque.
But it is best, if possible, to use a low-speed drill with a speed of up to 800 (I recommend a rebir drill).
The most common use of such equipment is the fastening of logs. Workers who assemble log houses often come to our store and they buy “spirals” with a diameter of 25-28-30 mm and a length of 450-600 mm. As you know, in order to fasten the logs of a log house together, you need to drill them from above and insert iron reinforcement into the hole made. It is very important that the hole is drilled deeply, which is why a long drill is needed.
The standard range of lengths is as follows:
— 220 mm — 450 mm — 600 mm (the most popular).
To make holes with a diameter of 30 mm to a depth of 600 mm in wood, you need a very powerful power tool, so we recommend using a drill of at least 1000 Watt (and that is unlikely to be enough), as well as screwdrivers with a torque of at least 36 Nm. Of course, the most preferable option is a low-speed drill, which has a power of 1200 Watts; for such work you can’t imagine anything better. It is very powerful and easily pushes such a thick drill bit through solid wood.
The prices for such “consumables” are quite high, at least it is much more expensive than feather and Forstner drills. For example, 22*600 costs around 300 rubles. And the thickest ones come with a price tag of a piece of rubles. They are taken only when it is necessary to drill a hole in a log house for a sewer pipe, etc.
However, if you consider that the drill is powerful and heavy, and it is used to perform specific work, then you should not worry about the price. Because anyway, nothing else can drill through 3 logs at once.
Who drills 40-50 mm holes with what?
saw the shura. With Max Pef you can do anything.
Wood, in my opinion, is best done with feather drills, especially if the thickness is large. I make several holes for the pipes, drainage and cable, and then go through the brick with a drill. It’s true that I didn’t come across a pie like yours))
Ramiras wrote: Wood, in my opinion, is best done with feather drills, especially if the thickness is large.
when laying electrical wiring in log houses, etc. We use screw drills like these » >
They are also “Spiral”. I think that if you drill into a log house with Max, especially an old one, then the remains of the “insulation” will fall out of all the cracks. My opinion; You need to be gentle with the antiquity, carefully with the spiral.
Max overkill. Here sds+ is just right, little by little without fanaticism. And 30 cm and a drill passed, a big plus of the spiral ones themselves are pulled into the tree
Boriska66 wrote: huge rarity
Boriska66 wrote: Absolutely not, the larger the diameter of the hole, the more feathers bend and break.
Well, why so categorically? I haven’t bent or broken a single feather yet, the largest I used to drill was 35mm. Maybe you came across these feathers?
We installed condos in a log house, drilled with a drill and a 40*450 twist drill. but there were no bricks or iron there. It’s probably easier for you to take SDS-plus and punch three 18-gauge holes if you don’t want to destroy anything with the max.
2Vova-Tambov I created a similar topic, only I had to drill drywall-wood-slag-wood-plasterboard in Stalin. The problem, as I understand it, is that the twist drills get dull on the plaster. I drilled it myself with a re-sharpened carbide-tipped drill. I sharpened the corner sharper. Diameter 19 mm and length 23 mm. The thinner one is generally 23 worse, but it also managed. I drilled about 20 holes per day. You're probably better off using two types of drills. First I drill wood, then drill brick. And with metal it’s generally okay. Just dull the drills.
Boriska66 wrote: the winner is burning on the tree,
Can you talk about this in more detail?
Alex___dr wrote: Can you tell me more about this?
The hard alloy has low thermal conductivity. In combination with the low thermal conductivity of wood, the instrument overheats. Under equal conditions, a quick cutter can provide greater productivity and durability in wood than carbide.
Valery22 wrote: the instrument is overheating
overheating of what exactly? Power tools? TS soldering or soldering? Usually it is the soldering that is critical to heating.
Boriska66 wrote: the winner is on fire on the tree
Apparently we are talking about a blunt tool (for drilling wood), which is usually a concrete drill. That's why it burns because it doesn't cut. The thermal conductivity of the vehicle has no side effects here.
2n-pn The cutting edge is lit.
2 Valery22 what temperature should be for tungsten carbide to burn? If the edge is sharp, it won't burn. It's burning because it's stupid, I think.
npn wrote: apparently we are talking about a blunt tool (for drilling wood), which is usually a drill for concrete. That's why it burns because it doesn't cut. The thermal conductivity of the vehicle has no side effects here.
+1! The cutters are soldered with carbide.
Valery22 wrote: I drilled myself with a re-sharpened carbide-tipped drill. I sharpened the corner sharper.
IMHO, you can try universal drills with carbide tips. Almost the same as concrete drills, but the sharpening angle is sharp, not obtuse. » >
The task is to drill a large hole in the tree. The solution is wood crowns.
I welcome all visitors to my website, where I talk about various types of tools, give advice and recommendations on choosing and working with one or another tool. Today we will look at a tool with which you can easily drill a large-diameter hole in thin wood, most often plywood, fiberboard and chipboard.
The tool is a hole saw for wood, most often sold in sets with different saw diameters. This is very convenient - I bought one such set and you can drill holes of any large diameter, of course, if the saws that come in the set are of the diameter you need. Photo of this set:
For use at home, the Stayer set is quite suitable; it is optimal in terms of price and quality, moderately expensive, and comes with many saws of various diameters. It is worth noting that there are several variations of diameters, there are more complete sets with a large number of crowns, the diameters start from the smallest to the very large.
The most popular and best-selling set is 19-127 mm, this set contains 12 hole saws for wood of various diameters, it can be said to be universal, since it is almost always possible to select a crown for the desired diameter. However, its cost is 480 rubles. If you take sets with fewer attachments, then it will cost less.
So, let's look at the pros and cons of such a tool.
First the pros))
- Versatility - the ability to choose a crown for almost any diameter.
- Convenient suitcase, everything is stored in one place.
- Quick drilling of fiberboard, chipboard, plywood.
Minuses:
- The cut is not clean, unlike the holes drilled with a forstner drill.
- Sometimes it is not possible to choose the right diameter, for example, for some spotlights.
- Drilling depth is only 30 mm. Of course, you can drill deeper, but you will have to knock out the wood every time when the crown rests on the tree, because it is not deep.
All in all, a hole saw is a must-have tool for the home. For example, I recently pulled a 110 mm pipe through a thin partition (double layer of chipboard with a 50 mm block between them). How to drill 110mm holes in plywood?
There are several options - you can use a jigsaw, using a thin file for a figured cut. It is quite possible to drill a round hole, but you still won’t get a perfect circle.
But take a set of circular saws, choose the diameter of the bit closest to 110 mm, assemble it and drill a smooth, beautiful hole in a few minutes.
How to cut a circle with a hand jigsaw
A hand jigsaw for cutting in a circle is of limited use, since the holding frame does not allow the jigsaw to be moved relative to the workpiece. If you start cutting from the edge of the workpiece, you will only be able to cut a few cm before the holding frame rests on the edge of the workpiece. Therefore, they cut with a hand jigsaw without moving the tool along the workpiece, but vice versa. The jigsaw file remains almost in place, and the workpiece is moved towards it. Example in the picture:
Metal drills
Externally, these drills are the simplest, without carbide tips. Although there are also specialized ones. The list is something like this:
- spiral - an analogue of a concrete drill, only made of HSS, P18 or P6M5 steel;
- conical - they are made in the form of a cone, they can be used for drilling large-diameter holes without reinstalling the drill;
- crown - needed for holes larger than 30 mm, made of hard alloys and HSS steel, and can also be diamond-coated;
- stepped - the tool is a cone with steps of cutting edges of different diameters. With just one such drill, you can make holes of different diameters.
OPERATING THE DEVICE
Marking the grooves is very simple. Determine the shoulder line for each groove by making a pencil mark on the face of the piece. You can put two side walls together and mark all the grooves at once, or mark the second side wall after routing the first.
Once the fasteners are aligned and the cuts are marked, line up the stationary straight edge with the mark (Photo C), lightly tighten the clamps and make the cut with a router, then move the fasteners to the next mark. A well-chosen groove should fit the Tenon without gaps or play (photo D).
How to make large holes in walls? Choosing the optimal tool
Drilling large holes requires large nozzles, and they are different for wood and concrete. We will tell you which attachments to use for which tasks and recommend reliable drills.
To drill holes for air conditioner mounts, cable pulling, installation of a soldered pipe for water supply or connecting furniture structures, you will need a large drill. Although large nozzles for wood and concrete are somewhat similar, they are still intended for different tasks and they are not interchangeable. We will tell you about them and recommend a couple of good attachments for wood and concrete. We have already told you how to distinguish drills for wood, metal and concrete. Here we will focus on large attachments, which we do not use very often, but without which we can’t go anywhere in everyday life.
Types of products and their features
Let's look at what options you can find in our retail network and how they differ from each other.
Feather drills
The most common and budget option, which is quite convenient for even inexperienced craftsmen to work with. And you can also master this simple process with your own hands.
Let's look at the main advantages of this solution:
- The diameter range varies from 10 to 60 mm.
- The work is done quite quickly, but the quality of the hole is low, and it is unlikely to achieve an ideal result.
- The maximum drilling depth is approximately 150 mm.
- Products are sold either in sets of 5-6 pieces or individually, so you decide which option is right for you.
- If necessary, you can buy an extension that clamps the drill and increases its length by 300 mm.
Large sizes are usually sold individually, small sizes are usually sold in sets.
It is impossible not to mention such an interesting option as an adjustable pen drill; this type of product can make holes with a diameter of 22 to 76 mm. The work is carried out at low speeds using fairly powerful power tools.
Adjustable nib – a new word in products of this type
Forstner drill
This product option is used very widely in furniture production due to a number of undoubted advantages:
- The edges of the hole are perfectly smooth, which is not possible with other options.
- High reliability and long service life allow such devices to be used for years.