Rules for ordering furniture additives
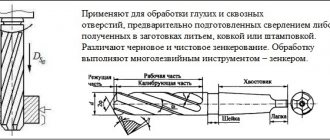
Drilling is the process of drilling holes in furniture parts. Among the main production operations - cutting, edge application and additives - the latter is the most labor-intensive, and the complexity of drilling parts for the same product can differ several times depending on the qualifications of the designer.
In order to order an additive in the production of Chipboard Kit, you must send us by e-mail a correctly completed order form for chipboard parts (see the section “Price lists, forms”) and drawings of the parts - see detailed information below.
Video: how the additive is made
How to choose and what to pay attention to
Choosing a high-quality circular drill is quite easy. The main thing is to know the main points that you should pay attention to first, but also not to lose sight of the little things.
The design is a very important point: a wood ballerina comes with one chisel or two or more. For frequent use, it is better to purchase an option with two or three cutting elements. It is easier to work with such devices and the quality of the processing performed will be at an acceptable level.
It would not be superfluous to be able to replace individual parts. Inexpensive circle drills can have a solid shank with a permanent center drill and rod.
Metal, its quality determines its strength and ability to withstand workloads. High-quality tools are made from high-strength steel or alloys. The shank and cutter holders are shaped using a machine tool. The rod is usually stamped and made of the same metal.
Preparing for furniture assembly: marking and adding chipboard with your own hands
After the furniture parts have been cut to size and all visible ends have been glued with edges, you can proceed to the stage of preparing the furniture assembly. It consists of two parts - marking the holes and adding laminated chipboard with your own hands. This is a rather important stage, the accuracy of which determines the appearance of the furniture and the quality of the assembly.
Strictly speaking, many craftsmen neglect marking and adding chipboard, preferring to use clamps and drill straight away. But this requires having several corner clamps in your arsenal and skill in handling them. Constantly pulling parts together at right angles in order to accurately drill and tighten them onto confirms, and then unscrewing them is quite labor-intensive and time-consuming. It is much more efficient to first mark the parts for fasteners, drill holes, and then assemble the furniture.
How to Use a Disc to Saw Chipboard Without Chips
Before we talk about the absence of chipboard when spraying chipboard and deciding what exactly to cut, let's define what it means without chipboard? Everyone has their own attitude towards their number after cutting, one at a time for many, and for some. just a dozen. So, let's look at not one, but only three types of chipboards at home, from which you can choose the most suitable one. For obvious reasons, we will not consider the use of expensive equipment designed for sawing laminated chipboards; this is a lot of professionals. We are still fans of furniture and therefore will use the right tool.
Crown with a hardened tooth
A crown with a hardened tooth at first seems like a good idea: the cutting part is thin, which suggests the idea of precise holes in thin material such as plastic or fiberboard. But we’ll see how to drill a hole in the chipboard in a minute.
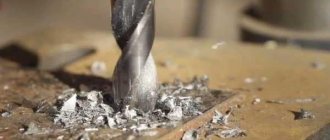
As in the previous case, this tool is not intended for blind holes, unless for lack of a better one and unwillingness to purchase the same Forstner cutter. The photo shows that you can knock off the inside with a chisel, but the bottom may remain uneven.
Drilling holes in wood with such a tool showed its complete inability to produce the exact specified diameter in the material. When measuring, the size of the hole was as much as 34.6 mm (.), although we used a 32 mm nozzle, as required by the experiment. Add here the uneven and torn edges of the hole - the tool does not deserve attention among professionals. At the moment, after using four tools, this one is the most inaccurate. It is noticeable in the photo that the cutting part near the teeth is much wider than near the base of the crown. Why this happened is a mystery.
Preparation and completion of work
Before cutting a circle in plywood with your own hands, you need to drill holes for the tool. It is important to choose the drilling location, because... in one case you need the cut out circle itself, and in the other - the outer side. A careful hole is made 5-8 mm away from the edge in the part that will go to waste, then the tool is adjusted, and work can begin. In the case of a milling machine, the hole is made along the path of the tool in a circle, because It will be difficult to expose it later.
After the cutout is ready, you need to sand it with coarse sandpaper.
At this stage, the quality of the working tool is checked, because With good sharpening and successful work there will be no chips.
But you shouldn’t be upset if you have them, because... everything can be compensated for with subsequent finishing.
Hole in chipboard
Hole in chipboard.
When making furniture with your own hands, the operation of drilling holes in the parts is perhaps the next most important place after sawing them. Technologically, drilling holes in chipboard is not much different from drilling other materials used in furniture production, therefore all the methods for making holes described in this article are also applicable to fiberboard, wood and other materials. A well-made hole is characterized by three main indicators: the absence of chips at the drill’s entry into the workpiece, a clean cut inside the hole, and the absence of chips at the drill’s exit from the workpiece.
The first question that arises when it is necessary to make a hole in a chipboard is what? and the next question will be - how? To get the correct answer to these questions, let’s divide the holes by diameter into three types, select a tool for each of them and consider the features of their manufacture.
- Small diameter holes from 2 to 12 millimeters are best drilled with ordinary wood drills.
- Holes of average diameter from 10 to 50 millimeters are made with special drills, such as a feather drill or a Forstner drill.
- Large diameter holes from 40 to 200 millimeters are drilled with special cutters or an adjustable drill (ballerina).
For holes of larger diameter in furniture parts, the term drilling should no longer be used and, accordingly, a tool should be selected like an electric jigsaw or a hand router.
Choosing the right drill
Regular twist drills are inexpensive. They are considered universal and are designed for drilling wood, metal and plastic. Typically, their tips sharpen the floor at a 118° angle for most applications.
But due to such an obtuse angle, the drill can deviate to the side at the beginning and tear out wood fibers at the exit, so reserve these drills for plastic and metal, as well as for holes with a diameter of less than 3 mm in wood (thin drills have less pronounced drawbacks). For holes with a diameter of 3 to 13 mm, choose drills with a central point designed specifically for wood. The tip of such a drill prevents it from moving to the side at the beginning of drilling, and the side cutting projections (the so-called trimmers) help reduce chipping.
To make holes with a diameter of more than 13 mm, use Forster drills. Like center point drills, they have a guide tip in the middle and cut very cleanly. Forster drills with a serrated cutting rim work much more aggressively, but the result of their work is no worse. When using such drills, you should reduce the feed and securely fix the workpiece with clamps.
EVERYTHING YOU NEED FOR THIS ARTICLE IS HERE >>>
Marking drilling locations
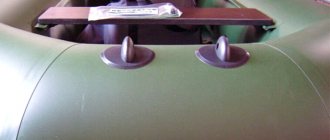
In order to perfectly fasten two parts, it is necessary to mark the places of their fastenings as accurately as possible.
On the part that will be applied to the end (the one on which there will be a through hole), you need to make two measurements - along the length (usually 5-10 cm) and from the edge - exactly 8 mm (this is if the thickness of the plate is 16 mm).
On a part that lies perpendicular, mark the drilling point at the end. Here you need to maintain the same distance in length (5-10 cm from the beginning), and in width - strictly in the center (8 mm from the edge).
Markings must be done as accurately as possible, especially along the length, because If the markings are incorrect, your parts may have extra gaps or protrusions when joined.
It is better to make a through hole in the first part, attach it to the second - and immediately use a drill to mark the drilling location at the end of the second part. And then, separately, calmly drill the hole.
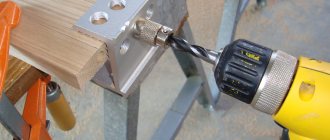
Support the workpiece from the reverse side
Regardless of the type of drill bit, when metal penetrates wood, the unsupported wood fibers on the back of the workpiece are torn, resulting in chips. Therefore, you should not forget to support the back side of the material with a trim
boards. The backing scrap supports the fibers where the drill exits and prevents a sharp increase in feed at the end. When making holes on a drilling machine, simply place the scrap under the workpiece, and when using an electric drill, secure it with clamps. If at the beginning of drilling the fibers around the hole rise or small chips form, apply masking tape to the surface, and then mark the center and start drilling.
Re: Round holes in chipboard?
I'm making an attachment for a jigsaw. Some jigsaws include this in the kit, but often there is an inaccuracy there. The bottom line is this: a rigid metal strip is attached perpendicular to the jigsaw frame, in which a hole is drilled at the required distance from the saw (the radius of the future hole), this hole is the center of rotation. I screw a screw of a suitable diameter through this hole into the center of the circle being cut out. It is important that the perpendicular drawn through the ends of the saw teeth passes strictly through this center, otherwise the saw will lead away. You need to take a saw that is not so narrow as it is thin, with a significant set of teeth. And measures must be taken to ensure that the saw does not dangle in the swing plane; this is the main drawback of almost all jigsaws. This way I can cut circles with a diameter of 75 mm (limited by the distance from the saw to the edge of the bed) to several meters. The result is almost perfect. There is one more trick. As I cut out the circle, I hammer wooden wedges into the already cut slot, thereby fixing what is being cut out relative to what remains. Otherwise, at the end of the cut, the center of rotation may shift quite far from the initial position, and the smaller the diameter of the circle, the relatively greater the displacement. The result is an unpleasant “step” at the exit. Wedges allow you to reduce this effect to a minimum.
Big hole
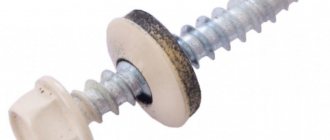
When drilling into a polished slab, place a felt washer on the drill, which will protect the surface of the slab from damage by the drill chuck, even if the drill goes through. By drilling a small hole at the end of a crack that has formed in a piece of plexiglass or other material, further development of the crack can be stopped. There are many devices for cutting large diameter holes in sheet material: plastic, plexiglass - plastic, plywood, chipboard, etc. A bracket is bent from a strip of steel 2 - 3 mm thick, its ends are sharpened, a hole is drilled in the center, then the bracket is put on a bolt with pre-sawed head. To operate, the device is clamped in the chuck of an electric drill. We suggest using a roller from a glass cutter for engraving on metal, glass, and plastic.
Wood ballerina: adjustable drill bit or how to make a large hole for drilling large diameter round holes. various: wood, fiberboard, chipboard, MDF, plasterboard, plastic. General.
How to make a hole in wood without a drill?
To do this, you can use a regular gas burner and an awl. Heat the awl red-hot with a torch and carefully pierce the plastic. You will get a smooth hole in the plastic, which can be quickly made without a drill. Instead of an awl, you can use a nail clamped with pliers.
Interesting materials:
What islands are located in the Indian Ocean? What relations are regulated by civil law? What branches of psychology can be distinguished? What grades are included in the Belarusian diploma? Which verbs answer questions? What vegetables can be planted in open ground? What wands do Harry Potter characters have? Which diapers are better for 2022? What are Rosselkhozbank's partners? What were the first printed books?
Hole in chipboard
You should not put pressure on the saw. Take your time - be patient. As an additional insurance, you can use wide adhesive tape, in the middle of which you should cut. This is especially important for slabs with a coating, such as varnish. In this case, it is better to even cut through the coating with a sharp knife. Of course, if you don’t care about the quality of the edge processing, you can cut the chipboard however you like.
Another action is drilling.
The advice is this: first make a hole in the chipboard with a drill with a diameter three mm smaller than required without special precautions. Then do the same with the desired drill, which will follow the path of the first. Since the material easily crumbles when drilling, it is necessary to strictly monitor the correct position of the drill so as not to get a funnel. If chipping on any side is undesirable, then you need to first drill one side to a small depth, then make a through hole on the other. Another option to avoid chipping is to place another chipboard under the drilled chipboard. The drill should have a sharp edge and should preferably be drilled at a fairly high speed. For through holes, a metal drill is preferable to a wood drill. Do not put pressure on the drill at the end. There are special confirmed drills for Euroscrews. They simultaneously form a cone for deepening the screw head. Drilling blind holes requires special skill.
Final touches
Finishing the edges of chipboard is done using a plane, rasp and file. It is necessary to guide the tool from the outer edge of the slab to the inner edge so as not to add creases. Very minor roughness can be improved with sandpaper.
When working with different types of wood, you always need to know the detailed variations in its processing. Before you cut a circle in plywood, you need to know all the options, because you often have to adapt to the situation. There are many options for carrying out such an undertaking, and they differ radically.
In order to cut a circle from plywood, you can use both professional tools and improvised means.
Re: Drilling ends for confirmations (with a router?)
No conductor can save you from crooked hands. The end-to-end additive is rehearsed on a piece of material if necessary. 5 holes is enough to understand whether this is your activity or not. Conductors, countersinks, typesetting drills for confirmations are complete nonsense for the pros. For confirmations there are 3 diameters of drills: 4.5-5mm (in the end), 6.8-7mm (in the plane), 10mm (countersink the hole for installing the screw head “sunk” if necessary). This applies to chipboard. If you have a furniture panel, then a plug is needed to cover the screw head. That's all.
Threat, conductors use small vehicles without a machine park to speed up work. The whole thrill of the conductor is not that it does not allow the drill to swerve, but that with its help you do not need to make markings.
Drilling for dowels
The hole for the dowels is made with an 8 mm drill. Also, in order not to drill through the part, it is advisable to equip it with a depth limiter.
At the end we drill with the same drill to a depth of 20 mm. Do not forget that during any work the drill must be strictly perpendicular to the plane of the part.
Of course, if you picked up a drill for the first time in your life, you won’t do very well. But this activity can be learned quite quickly.
Wood cutter (“ballerina”)
The third experiment started unsuccessfully with an attempt to establish the required diameter of 32 mm. The fact is that this tool has an extremely inconvenient scale for setting the required diameter. We warn you in advance: before drilling a hole in chipboard or other material, you will have to suffer in the literal sense of the word. Perhaps there are more successful models, but we purchased this one - we will fool ourselves.
So, with grief the diameter has been set in half, we begin drilling. As with a feather drill, you will not be able to make a blind hole.
1/2 pass
This will be prevented by a guide drill, which will not leave a through hole in too thick material. Also, the inside of the material is not drilled out; the best you can hope for is further work with a chisel. Conclusion: the tool is absolutely not suitable for a blind hole, unless there is no other tool, accuracy is not important to you and you have free time to fool your head.
Entrance
Towards the end of the drilling, the characteristic smell of burnt wood became noticeable. What it was became clear after measurements. So, the inlet had a diameter of 32.7 mm, and the outlet had a diameter of 31.7 mm. It turns out that it was precisely because of such a big difference that the material began to burn, since the cutting part was already standing on its base.
Exit
It was possible to drill a hole with a “ballerina” in the chipboard, as can be seen from the photo, with a bitter result: the edges are torn, the diameter of the hole is much different, and even different on the reverse sides. The only thing that turned out to be more or less satisfactory was the inner surface of the hole wall. When compared with previous tools, the wood cutter gets a rating of 3 with a minus.
It is noticeable that the surface is slightly burnt
An interesting point: we decided that setting the required diameter would be more accurate if we set it to whole numbers. We set it to 60 mm, drilled it, measured it - we got 58 mm. Conclusion: for imprecise work, a “ballerina” will do for lack of a better tool.
Confirmation drill – three in one
Working with a special confirmat drill (cutter) is much easier, since it has a special stepped geometry, and the entire operation is performed in one pass. An additional advantage of using it is that it simultaneously chamfers the countersunk head of the hardware. In fact, it replaces two drills and a countersink of different diameters. In addition, the confirmatory cutter has an insertion part with a sharp tip, which ensures precise insertion of the tool and eliminates the risk of it being pulled to the side at the beginning of drilling.
How to cut a round hole in chipboard?
However, if you choose the wrong tool for a particular surface material, the drill may become dull or even break, and scratches and cracks may appear on the surface. To prevent this from happening, you need to know certain nuances of doing the work. How to drill, how to properly prepare the surface and select a drill, we will consider further. The tool must be held correctly in your hands. The drill should be positioned straight and enter the surface in a vertical direction. To make drilling easier and more accurate, you can use an additional handle, which usually comes with the drill. Based on what type of surface you are working with, you need to select the material and size of the drill and determine the operating mode of the tool.
How to drill a hole with a feather drill?
For successful work when drilling with pen drills
secure the wood firmly in a vice and press the tip of the drill bit against the surface of the material. Then drill (at low speed) the hole until the tip of the drill appears at the bottom of the wood.
Interesting materials:
How to use Samsung wireless charging? How to use Betadine solution? How to use an action camera as a webcam? How to use water filters? How to use a bath geyser? How to use OTG cable? How to use bleach? How to use Honor as a modem? How to use a pastry plunger? How to use turmeric?
Hole depth and width
Usually a confirmat size of 6.4*50 is used. Because the thread diameter is 6.4 mm, and the diameter of the confirmation body is 4.4 mm, then for high-quality fastening of parts, the hole diameter must be in the range of 4.5-5 mm and a depth of at least 50 mm.
If the thickness of the hole is greater than the specified one, the confirmat will not hold the parts well; if it is less, its thickness can tear the chipboard.
For drilling, use a confirmat drill with a diameter of 4.5 mm, which is equipped with an additional head for drilling an enlarged hole for the neck of the confirmat, which also makes a countersink for its head.
Of course, you can use a regular drill with a diameter of 5 mm, but for high-quality fastening in the hole you will additionally need to make space for the neck of the confirmat and its head.
In order to perfectly fasten two parts, it is necessary to mark the places of their fastenings as accurately as possible.
On the part that will be applied to the end (the one on which there will be a through hole), you need to make two measurements - along the length (usually 5-10 cm) and from the edge - exactly 8 mm (this is if the thickness of the plate is 16 mm).
On a part that lies perpendicular, mark the drilling point at the end. Here you need to maintain the same distance in length (5-10 cm from the beginning), and in width - strictly in the center (8 mm from the edge).
Markings must be done as accurately as possible, especially along the length, because If the markings are incorrect, your parts may have extra gaps or protrusions when joined.
It is better to make a through hole in the first part, attach it to the second - and immediately use a drill to mark the drilling location at the end of the second part. And then, separately, calmly drill the hole.
We make a hole at a distance of 8 mm from the edge.
The drill should ALWAYS be held strictly perpendicular to the surface.
Before making a through hole, place a piece of unnecessary chipboard under the part. This will prevent chips from appearing on the reverse side.
When the through hole is made, the part can be drilled on the fly to drill holes for the neck and head of the confirmat.
The main rule is that when drilling at the end, the drill must be strictly perpendicular to the end of the part. If you don't hold the drill straight, the drill bit may go sideways and come out, ruining the part.
When drilling, you need to pull the drill out several times so that chips do not clog in the hole.
This option is considered the most accurate and, moreover, the fastest. But in order to make a hole in two parts at the same time, you will need to fix them before drilling. To do this, you may need special clamps, clamps and other devices.
Hole Drilling Tools
In order not to mark 8 mm from the edge each time both into the layer and at the end, you can use a special device, which, by the way, is easy to make yourself.
It is a kind of wooden template with a metal sleeve for a drill inside.
It looks like this, see photo:
And this is a more professional thing:
Watch a short video on how to accurately drill holes in chipboard for confirmations and assemble furniture parts:
Drilling metal
When drilling a hole in metal with a hand drill, the drill usually jams.
A wooden plug, previously driven into the hole, will help correct this defect. Drilling a hole in a thin sheet of metal will not be difficult if you hold it in a vice along with a wooden block. It is most inconvenient to drill thin metal sheets. Every now and then they try to break out and injure the driller.
Cut yourself a “shovel” from steel with a comfortable handle. Fasten the workpiece with clamps to the upper surface of the “shovel”.
Anyone who has tried it knows that a large-diameter drill will “break” the hole and it will be uneven. Place a piece of rubber or a rag folded in several layers under the drill and start working. The hole will be straight.
To cut blind holes in a part, you can use a piece of a round file clamped into the chuck of an electric drill. To avoid damaging the back wall of the part, the working end of the file fragment should be slightly rounded on an emery wheel.
Drilling a radial hole in a metal rod or tube is very difficult. Especially if you are trying to do it with a hand drill. You can make this task easier in this way: drill a hole of the appropriate diameter in a wooden block, insert a tube there and drill calmly, without fear that the drill will slip.
If a blind (non-through) hole in a metal part is filled with paraffin, then the thread cut on it will be clean.
Power tools or hand tools?
Tools and materials:
- drill;
- jigsaw;
- hand jigsaw;
- milling machine;
- nails;
- rope;
- chisel;
- hammer;
- stationery knife;
- sandpaper;
- compass.
When determining the diameter of the future circle, it is necessary to take into account the dimensions of the working cutter.
The most popular option among all is a jigsaw. This tool allows you to cut not only circles, but also any other geometric shapes. Its only disadvantage is the need to form additional grooves at turning points (corners), but this is not noticeable when creating a circle. It is very important to choose the right nail file, because... they come in 3 types: vomiting on the left, vomiting on the right, vomiting on both sides. After the canvas is selected, cut out a circle of any size.
An ordinary hand jigsaw.
Before cutting a circle from plywood using this tool, you need to make sure that the workflow is accessible. The main difficulty is the limitation (usually up to 30 cm) due to the physical structure, i.e. It will not work in deep places. When starting work, not from the edge, but directly from the center, the nail file is threaded last.
Milling machine. A very convenient option, but it requires rigid adhesion to the surface, for which a self-tapping screw is screwed into the center of the circle. A circle can be made of any diameter, and very quickly. Sometimes there is not enough working handle, which is why you have to make all sorts of improvised brackets, which can be a channel, a profile, a block, a board or even a rope, but with a rigid hitch it is much more convenient. This tool makes a fairly wide hole, so before starting work you need to carefully measure the future structure.
It is necessary to select only sharp nails, and sand the edges of the resulting workpiece with coarse sandpaper.
Nails. A very popular method in cases where the work must be done “yesterday”, but the tools will not be available soon. It is worth noting right away that the work ends up being quite rough, so it is used as a last resort. All you need is a hammer, 2 nails and a rope. One nail is driven into the center of the hole, and the other is pulled on a rope to the required length (radius), after which a circle is drawn with a firm movement. Such circles with pressure continue until the circle is finally cut out. At the very end, the nail is removed from the hole, turned over and carefully beaten with a hammer to achieve a more accurate seam.
Chisel and stationery knife. Here everything is much simpler, because first you need to draw a circle with a compass (pencil), after which this circle is circled several times with a stationery knife under pressure.
Milling without chipping
At the exit from the material, the tooth of a saw blade or cutter often forms chips - in wood, plywood or laminated chipboard. The most common way to combat this phenomenon is to have the cutting tooth emerge from the material inside the groove. For example, if you move the workpiece as the disk rotates. But it is absolutely impossible to select grooves to their full depth in this way. The energy of the rotating cutter is enough to tear the workpiece out of your hands. After which it will fly with great speed in the direction of rotation. The consequences can be the most unpredictable!
But nevertheless, this principle is used in some machines for cutting laminated chipboards. Only in them the disk, which rotates as the material is fed, makes only a shallow cut. When forming it, the impact of the scoring disk on the part is insignificant, so the work is safe. Following the scoring disk is the main working disk, which rotates, as expected, towards the feed of the part. The disc cuts the material cleanly, without chipping, since it uses an already selected shallow groove (the cutting tooth comes out of the material inside the groove). I use this principle in my work. For those who decide to try my method, I would like to remind you that a milling machine installed in a table is a highly dangerous tool. And when working with it, it is necessary to strictly follow safety rules - use protective screens and clamps and not exceed the recommended workpiece feed speed and cutter rotation speed. The table should be free of foreign objects and well lit.
1. If you put a groove cutter on a router and skip the workpiece, there will definitely be chips!
2. So first I attach the plywood trim to the router table guide so that the router protrudes just 2mm beyond the surface of the trim. And I skip the parts in the direction of rotation of the cutter. This results in a shallow groove without chipping.
3. Then I remove the cover - now the cutter protrudes to the specified depth. And I pass the workpieces, as expected, towards the rotating cutter.