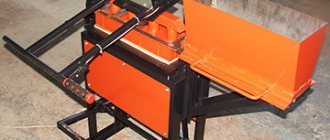
To equip a kitchen or bathroom with shelves, cabinets and various accessories, you need to make holes in a wall already tiled. The hole must go into the wall to a certain depth, a nylon dowel is inserted into it, and a self-tapping screw is screwed into the dowel.
Due to its fragility, ceramic tiles can crack, break into pieces and become completely unusable when drilled. This can happen for various reasons, but most often it happens due to unsuccessful actions of the work contractor. In order to avoid such unforeseen situations, it is necessary to adhere to certain rules when working with this capricious material.
Basic principles of drilling ceramic tiles
In the practice of drilling ceramic tiles, there are general operating principles:
- Drilling must be carried out with a sharply sharpened drill. If it is not sharpened properly, no amount of tricks with a tool, masking tape, or chipping the glaze will help. A dull drill heats up faster during operation and begins to be unable to cope with the material. If it is not sharpened in time, overheating will only intensify, which in turn will quickly lead to complete wear of the equipment. With every second, the tool will work slower and you will need to press it harder, which can lead to destruction of the material.
- Therefore, you need to use either a new drill, or check its sharpness, and sharpen it if necessary. Professional craftsmen usually sharpen drills every day. To sharpen a drill, you need a machine and an emery wheel; for a Pobedit drill, you need a diamond wheel and coolant.
When drilling tiles, the general rule is “The harder the material, the lower the speed.”
- Before the drilling operation, the shock mode in the drill is turned off and the speed is set to the lowest possible speed. The drilling itself should be performed at low drill speeds, usually from 200 to 800 rpm. The optimal speed is selected experimentally and depends on the type of drill, its diameter, thickness and composition of the material being drilled.
- You cannot press the drill too hard while drilling, but applying too little pressure will delay the process. With experience comes the optimal application of force on the instrument.
For beginners, it makes sense to try the process on tile scraps in order to feel the correct position of the drill and the required application of force during the operation.
- Do not allow the drill and tile to overheat, which may damage the tile. Water is used to cool the drilling site. The drill is dipped in cold water and then wiped dry. Cooling has a significant effect on increasing the life of equipment.
- It is unacceptable to change the direction of rotation of the drill while drilling.
- The drilling location should not be located near the edge of the tile.
- While working with tiles, small fragments of material may fly away. Therefore, we should not forget about safety measures: work on drilling tiles is carried out with protective glasses and gloves.
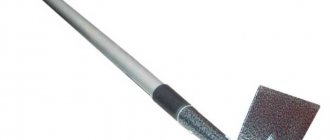
What tool will you need?
For drilling ceramic tiles, the best option is to use an electric drill with speed and operating mode switches. Power is not so important, so even the weakest Chinese drills should be enough to produce holes for dowels.
Tile tiles are drilled at speeds ranging from 200 to 800 rpm. It may not be possible to set 200 rpm on a household drill. Therefore, it is better to sometimes use a screwdriver.
A screwdriver may be suitable, either a battery-powered one with a sufficiently strong autonomous power source and set speeds of up to 800, or a mains-powered one with adjusted low speeds. In extreme cases, if these tools are not available, a hand drill will do. With it, the necessary speed of rotation and pressure will be guaranteed. The only thing is that it is difficult to do a large amount of work with a hand drill.
To deepen a hole in a concrete or brick wall behind a tile, it is better to use a hammer drill. If it is missing, then the drill must be powerful enough to drill through the wall to the length of the self-tapping screw. It is not recommended to use a hammer drill for drilling tiles. Only a professional master with the appropriate experience and skill can afford this.
Along with these basic tools you will need:
- a construction pencil, you can get by with a felt-tip pen or marker;
- masking tape or adhesive tape;
- ruler;
- level;
- conductor - in case of production of several different holes. It is a kind of stencil in the form of a plate with holes of the required diameter.
Trimming with a glass cutter
Many home craftsmen often face the problem of cutting ceramic tiles. It is irrational to buy an additional tool for one case. Therefore, you can get by with a good glass cutter.
The cut must pass along the front part, therefore, after measuring, the required size is marked on the tile and carried out with a continuous movement with a glass cutter until a well-cut train appears on the tile. Use the back side of the glass cutter to tap the cutting line (seam).
After this, use wire cutters or pliers to remove the cut piece with a sharp downward movement. It happens that if the job is unsuccessful, nicks remain, which can be smoothed out with sandpaper or a stone.
To make the material more pliable, it is recommended to soak it in warm water. But it’s unlikely that you’ll be able to cut a hole in a tile for an outlet with a glass cutter.
Which drill bits are best for drilling tiles?
The quality of the hole made in the tile largely determines the choice of drill. We can say that this is the main point in preparing for drilling ceramic tiles.
First you need to find out the parameters of the tile, primarily its thickness and hardness. Wall tiles and porcelain floor tiles may require different drill bits.
For example, diamond drills are used to drill porcelain stoneware and ceramics. Drilling depth - 35 mm. A set of three pieces of domestic diamond drills of different diameters costs from 1,300 rubles. It is believed that diamond drill bits are most suitable for drilling tiles. But they have a high price and it is reasonable to buy them only for significant volumes of work.
Pobedit drills are cheaper than diamond drills. Such a drill has a soldered plate of durable hard metal at the end, which is called “WIN”. It is an alloy of tungsten and cobalt in a ratio of 90% to 10%. Nowadays, tips are most often made from tungsten carbide. These drills are most often used when working with tiles.
To make small holes, in particular for dowels, drills with a spear-shaped tip or drills with four cutting blades are used. Water cooling is recommended for all of them. The price of pobedit drills is 200-300 rubles per piece.
Crowns for tiles with diamond coating. There are different diameters, starting from 5 mm. They are used to make significant holes when it is necessary to install sockets, pipes, or install a toilet in the floor. They are most often sold in sets and cost from 1,500 rubles.
There is another option in the form of crowns with cutting edges made of pobedit. Such a crown looks like a hollow cylinder with a drill in the center. There are cutting edges on the cylinder walls. The result of drilling is a ring, inside of which is untouched tile material. After drilling, it is shaken out of the crown. The diameter of the largest crowns is 15 centimeters. This is enough for holes for the largest pipes, including sewer pipes. It will not be possible to achieve a particularly clean opening with such a crown; the edges of the holes are not very smooth. Its resource is enough for 20 holes.
Circular drills (ballerinas for tiles). The design of the ballerina consists of a feather centering drill and a cutter on a bracket, with the help of which the diameter of the hole being made is set.
The ballerina is secured into the drill chuck using a rod. The cutter has a spear-shaped shape, is made of hard alloy, and can also be coated with diamond. The tool is inexpensive, its price starts from 345 rubles. This is a definite plus of the equipment. In practice, the ballerina replaces a whole set of crowns of different diameters on the tile.
Despite the apparent simplicity of the device, working with a ballerina is not easy compared to using a hammer drill or drill.
Drills with a pobedit tip for concrete are used if the above tools are not available. A concrete drill can be found in almost every home. But to drill through tiles, you must use only a sharp drill bit, and drill carefully, since its shape is not entirely suitable for such work.
Self-tapping screws with LM tip. Wall tiles can be drilled without a drill by screwing in the indicated screws. But this work is very labor-intensive; one hole will take 2-3 self-tapping screws.
In principle, in practice you can use expensive diamond drills, you can use Pobedit or ordinary SDS drills for concrete - the difference is almost not noticeable. The main thing is to avoid impact mode when drilling tiles, use minimum speed, but when the ceramic material has been drilled through, switch to impact mode and drill the opening to the end.
When choosing a drill, you need to pay attention to the type of shank of the drill, whether it will fit your drill. Drills come with a cylindrical shank and some with a hex shank. This shank is more securely fixed both in the three-jaw chuck and in the drill bit holder.
Modifications of tubular drilling attachments
Cylindrical drill bits are divided into the following two types:
- Conventional, which is a tube equipped with a groove for shaking out drilled powder and diamond coating at the end;
- Sector, which is a cylinder in which a sector is cut out, inside of which there is a diamond coating.
An ordinary tubular drill is an analogue of a crown. The destruction of the medium is carried out along the contour of the outer ring, the central part is removed after completion of the working cycle.
The cost of a tubular drill is determined by the method of applying the working diamond layer and ranges from two hundred and fifty to three hundred and fifty rubles.
Drilling algorithm. Step-by-step instruction
Let's look at the algorithm for drilling ceramic tiles using the example of making a hole in the wall for a dowel.
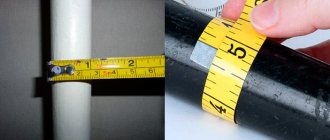
- Before starting work, it is necessary to study the parameters and condition of the tile, as well as the base under it. It is important to clarify the thickness of the cladding, tap the tiles, and identify whether there are voids underneath and in what place. A void may occur if there was a defect when laying the tiles. In a place where there is a void under the tile, making a hole is risky.
- Mark the hole using a ruler. To avoid cracks in the tile product, the hole is placed at least 15 mm from the edge of the tile.
If the holes being made are small in diameter and the seams between the tiles are wide enough, it is more advisable to calculate the fasteners so that the holes are drilled directly into the seam. It will be much easier.
- To prevent the drill from slipping, apply masking tape or adhesive tape to the future opening. A cross-shaped mark is applied to it according to the markings.
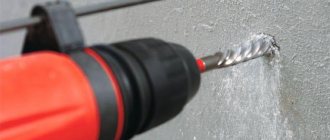
- The drill is switched to drilling mode, the selected drill is inserted into its chuck, the lowest speed is set with the switch, it is set strictly perpendicular to the tile and drilling is carried out in the intended place.
- After passing the glazed layer, the speed and pressure are gradually and carefully increased, avoiding overheating of the tool. If necessary, moisten the drill with water while turning off the tool.
- When the tile is drilled through, the drill is replaced with a hammer drill. An appropriate drill is inserted into it, and the hammer drill is switched to impact mode. Carefully, trying not to damage the tile, they continue to drill the base under the tile cladding. To drill a hole in the wall of the required depth, a mark is made on the drill with a marker.
- If there is no hammer drill, continue working with a drill. The drill is switched to impact mode, a concrete drill is secured in the chuck and carefully, maintaining a perpendicular position of the drill in relation to the wall, a hole is drilled to the proper depth. It should be noted that the concrete drill should not exceed the previous equipment, otherwise the tile will be damaged.
- At the end of the operation, the opening is cleared of dust and small waste, and only then the dowel is inserted.
Examples of working with different types of tips
Using these videos as an example, you will clearly see how to drill tiles. The master demonstrates various nozzles in action, tells how to make holes of different diameters and shapes, from standard to figured cuts, without purchasing expensive tools.
By following the basics of working with tiles, even a beginner can make neat holes in this material.
Select end switches of the desired configuration and diameter from the list. The tile and tile drills presented in this article are designed for both the smallest holes and large ones.
Drilling tiles that are not glued to the wall
To carry out work with tiles that will only be laid on the wall, it is necessary to equip a workplace. The surface on which the work is carried out must be smooth; you can use a workbench, a wooden board, a sheet of thick plywood or plasterboard.
- Before carrying out work, the tiles are soaked by placing them in water for 30 minutes.
- The tiles are placed on a clean, smooth surface.
- Apply masking tape to the location of the intended hole.
- Markings are made, taking into account a distance from the edge of the tile of at least 15 mm. Make a mark with a construction pencil.
- It is better to fix the tiles with a clamp. Drilling begins with a drill at the lowest speed, without applying excessive pressure on the tool.
- Particular attention should be paid to holding the apparatus at a right angle to the plane of the ceramic tile.
Hole for mirrors and shelves
To drill grooves with a diameter of about 10 mm, only narrow working nozzles are used. However, they can differ significantly in design.
When carrying out such work you will need:
- Household or professional construction drill;
- At least the simplest hammer drill;
- Portable screw driver with variable chuck speed.
How to drill a large hole in tiles
Large holes for sockets, pipe outlets or various accessories are usually made either with a ballerina or with a crown saw (circular saw).
Drilling with a crown
A circular saw is a saw blade with cutting edges. Typically sold in sets.
The operating procedure is as follows.
- The tiles are laid on a smooth surface and fixed in the order indicated in the previous section.
- The markings are made taking into account the required distance from the edge of the canvas.
- Attach the bit to the drill and set the speed to low.
- The centering drill is placed in the intended place, where either the glaze has already been cleaned off or masking tape has been glued. Place the drill at right angles to the plane of the tile and drill without much effort.
- As the central drill enters, drilling occurs with the edges of the crown. The process happens quite quickly. For reliability, jig templates with holes that match the size of the crown are used.
- If necessary, periodically moisten the working surface with water.
How to drill ceramics to install dowels?
A dowel is a fastening device used to create blind holes in surfaces, as well as in cases of hollow walls. On the tile, the dowel will securely hold a mirror, shelf or any other not too bulky accessory.
Distinctive features of drilling
The difficulties in installing dowels are similar to standard drilling into tiles. They consist in increased smoothness of the coating, which can interfere with reliable stop and installation of the drill. In addition to the methods of reducing slip described above (painting tape and removing glaze), you can use a jig.
Application of core drills with diamond coating
This type of drill is used when you need to drill tiles in the wall in order to obtain holes for installing pipes or sockets.
Select a crown of the required size and attach it to the drill.
The drill is set in mode up to 500 rpm. Drill with a diamond core with mandatory water cooling. Proper use of the bit allows you to drill up to 50 holes.
For more efficient work and to avoid mistakes, it is recommended to use a small crown without a centering drill together with a jig. You can make it yourself in a few minutes. All you have to do is find a piece of board or plywood and make a hole of the required size in it. The sheet is pressed by hand and drilling is carried out through the hole in it.
Drilling by ballerina
The big advantage of this type of drill is that it can be used to perform a significant amount of work on making holes of any size.
- The ballerina is secured into the drill chuck using a rod.
- Set the required drilling size. We must not make a mistake here. First, the radius of the future opening is calculated, and then the result obtained is set between the core and side drills.
- Tighten the locking screw firmly so that the movable cutter does not move under the influence of vibration.
- Markings are made on the tile by determining the center of the hole.
When using the “ballerina” at the very beginning, it is recommended to drill through the tile with a small-diameter drill - this will make working with the tool much easier
Drilling is carried out at low speeds, holding the drill firmly in your hands.
- Make sure that the depth of cut is the same around the entire perimeter of the circle.
- The edges of the hole may require some minor work after drilling. It is done with pliers and then with sanding paper.
- The drilling process with a ballerina is often accompanied by increased vibration, which is why it is not popular among users.
- To increase safety, the “ballerina” can be used with a special plastic cover that protects against ceramic fragments.
Possible difficulties
The main difficulty lies in the fragility of the material structure. With a significant point mechanical impact, it is destroyed, chips and cracks form. This is typical for all types of ceramic products. That is why you need to know how to properly drill a hole in ceramic tiles without uncontrolled deformation.
During drilling, a significant increase in temperature occurs in a certain area of the product. This entails a change in operational and technical qualities. One of the problems is the structure of the decor. It consists of a ceramic base and a layer of glaze. The second is much harder and is susceptible to destruction with a sharp increase in external pressure.
Before cutting a round hole in ceramic tiles, it is recommended that you familiarize yourself with the most common mistakes:
- Incorrectly selected tool. This applies to the cutting part, which must gradually destroy the glaze layer, and then the ceramic base;
- The working conditions do not meet the standards. The tile must be on a solid base. It doesn't matter whether it's a horizontal or vertical plane;
- Excessive load. The selected drilling technique should not involve pressure, but rather cutting ceramics. Otherwise, the likelihood of chipping increases.
Taking these nuances into account, you can choose several methods for forming holes of various shapes and sizes. First you need to determine the thickness of the tile and, according to this indicator, select the optimal tool.
Important
If the processing of decorative material is carried out after the final stop, cracks may appear on the inside. In the future, a small blow will be enough, which will lead to the final loss of appearance.
Other methods for drilling ceramic tiles
Drilling with a string
Tungsten wire for cutting ceramics can be purchased over the counter. It is used either with hacksaws for metal or with a regular jigsaw. Price from 150 rubles.
The string is used in cases where it is necessary to change the direction of the cut, to cut a hole from the end of the tile. A string can be used to cut almost any shape into a tile.
If the opening should be located inside the surface of the tile according to the markings, then you will have to first make a hole in it. Next, the string is threaded through the hole, secured into a hacksaw or jigsaw, and a cut is made along the marked line. The result is an opening with smooth and clean edges.
The advantage of this method is the almost complete absence of risk of damage to the tiles.
- The disadvantage of this method is unnecessary labor costs.
- If you need to make a large opening in a tile that is not on the wall, but you don’t have a ballerina or a crown at hand, you can use the following technique.
- Lay the tiles on a prepared, clean and smooth surface.
- Make markings and mark the center of the future circle. Using an ordinary compass, draw a line on a circle of the required diameter.
Using a tile drill (if you don’t have one, you can use a Pobedit concrete drill), make holes along the entire line inside the circle. The closer they are to each other, the better.
- The drilled part is either carefully knocked out with light blows of a hammer, or removed using pliers or wire cutters.
- Irregularities along the edges are removed with nippers.
- Finally, the cut area is sanded with sandpaper.
- Hole using glass cutter and wire cutters
- A large hole can be made using the old and proven method: wire cutters and a glass cutter.
- A circle is marked on the tile.
- Then it is divided into at least eight equal parts. Precision is not required.
- Cuts are made along the marked lines inside the circle using a glass cutter.
- Next, use a drill to make a hole in the center and carefully break out the first piece. Instead of a glass cutter, extreme sports enthusiasts use a grinder with a small disk.
Enough cuts must be made; if only two cuts are made, then when breaking out the pieces, most likely the tile will break in half. You should bite off the edges from the reverse side of the product, otherwise chips will be visible.
After receiving the hole, the edges of the opening are processed.