When purchasing a sink made of artificial stone, the buyer often faces a problem such as the lack of a hole for the faucet. Of course, you should turn to professionals, but you can solve this issue yourself. In order to understand how to drill a sink made of artificial stone , you must first understand what it is made of. There is no clear definition of “artificial stone”, so different manufacturers use this term for various materials that differ in density and properties.
The most common are:
- porcelain stoneware;
- agglomerate (fragranite, silgranite and their analogues);
- acrylic stone.
Working with any of these materials has its own characteristics. To decide which drill to use to drill a stone sink, you must first understand what exactly was purchased.
The photo shows a porcelain stoneware countertop
Porcelain tiles are the strongest and most durable of the above materials. It is not afraid of temperature and chemical influences, and is resistant to mechanical damage. It stands out due to its ringing “glass” sound.
Other types of artificial stone produce a duller sound due to the addition of plastic and polymer materials. Despite the fact that making a hole in other materials is easier than drilling a porcelain stoneware sink , very often the choice of clients falls on it. Given the extraordinary density of the material, ordinary drills will be powerless here.
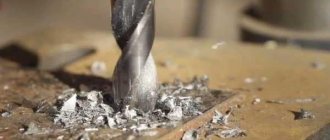
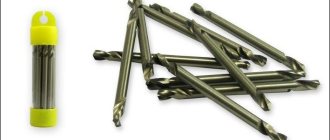
Only a crown or a carbide-tipped drill, preferably diamond, can handle porcelain stoneware. Sintered ring drills will also be able to work with it, but their cost is much higher, so they are rarely chosen only if there is a need for a large amount of work. Due to its high strength, when working with this material it is necessary to cool the drill and working surface with water. You need to work with porcelain stoneware at minimum speed (300-400 no more).
Where to cut the hole
Another important question that will arise regardless of what material the sink was purchased from: should I cut a hole in it from the front after installation? Or should I do this before installation and from the back?
Each method has a number of pros and cons:
- In the first case, the edges on the front side will be much smoother, but there is a possibility of damaging the front side of the sink with a drill, and if it has a narrow side, then splitting the edge.
- In the second option, the risk of damaging the bowl is much lower, but there is a possibility of getting a sloppy edge of the hole on the front side. In most cases, this is not critical, since the edges of the hole are closed by the mixer. When turning over, there is a possibility of unintentionally making a hole on the wrong side, so it is advisable to mark the side on which you want to install the faucet.
In any of the methods, it is advisable to place the hole away from the edge of the product, but without touching the bowl. To do this, before starting work, you need to attach the lower nut of the mixer to the sink and mark its center.
Nuances of algomerate shells
If you purchased a sink made of stone agglomerate, it will be a little easier to work with.
Agglomerate sink shown
Well-known manufacturers usually include a cutter or core, which is used to knock out a piece of stone that has already been drilled, but not completely. If they are missing, then it is best to use a cutter or diamond-coated crown and proceed as when working with porcelain stoneware.
The Fostner cutter will also cope with a hole in a stone agglomerate product. But be prepared for the fact that after this you will need to sharpen it, or even throw it away completely.
Be sure to read the instructions and operating rules before taking any action, so as not to accidentally void the product warranty.
Acrylic stone
If the sink is made as one piece with the countertop and the same color as it, then it is an acrylic artificial stone. Of the above materials, this one has the lowest density, so it is the easiest to work with. If the purchased sink is made of acrylic stone, then you can drill it with ordinary drills for working on metal or wood.
The hole for a standard mixer, in most cases, has a diameter of 35 mm. In a product made of acrylic stone, it can be easily drilled with a feather drill for woodworking or a forstner cutter of a similar diameter. It is necessary to work at low or medium speeds. When drilling this material, a large amount of chips is formed, and the plastic contained in the acrylic stone emits an unpleasant odor, somewhat reminiscent of epoxy glue.
An example of a sink made from this material
Acrylic stone is the most pliable of all types of artificial stone, which is why most countertops are made from it. If there is a need to make a hole in it for a sink or hob, it is better to first practice in the middle of the cut part so as not to spoil the entire countertop. Despite the fact that acrylic stone can be sawed with a jigsaw without any problems, it is not advisable to make cuts with it. When working with a jigsaw, so-called stress concentrators often arise (sharp transitions, sharp corners, microcracks), which will affect the service life of the product.
In this case, it is permissible to cut a hole 5 mm smaller than required with a jigsaw. After the work with the jigsaw is completed, bring it to a clean size using a cutter. It is imperative to make an R3 chamfer along the edges; it will also reduce stress and increase the service life of the tabletop.
More information in this video.
If you are not ready to take on this work yourself, delegate it to experts in your field. The contact form is located at the bottom right. Consultation on issues and cost calculation is free.
How to avoid mistakes
Let's say you decide to make a hole using a drill with a cutter.
Often, experts make a hole when the sink is already installed in the countertop. This solution has only one advantage - the edge on the front side will be smooth. But it has many more disadvantages: you can scratch the stone, damage the sink, chip the edge, and so on.
Therefore, it is better to drill a hole from the back. But there is a possibility that the hole will have an uneven appearance from the outside. However, a mixer will be located in this place, which will cover the uneven edges. There is no risk of damaging the front side of the sink.
There are two fundamentally different methods of work. The first involves working with a drill, and the second involves knocking out the weakened cast plugs provided for by the design. Let's consider each of them in order.
How to work with different types of artificial stone
There is no clear definition of artificial stone, and it includes several types of material:
- porcelain stoneware;
- acrylic stone;
- agglomerates (conglomerates).
Porcelain tile is the most durable of all, not afraid of high and low temperatures, as well as minor mechanical damage. An ordinary drill “will not take it”: only a crown (Forstner cutter) or a drill with a diamond tip (or another carbide) can cope with its density.
During operation, it is necessary to periodically “cool” the surface with water, and the drill should operate at low speeds - 250-350 rpm.
Acrylic is the easiest material to work with, since its density is minimal compared to others. You can use regular drills for metal or wood with it, for example, a feather type or the same Forstner cutter. A standard 35 mm hole for the mixer must be drilled at low-medium speed (the material is indeed very pliable, and can even be cut with a jigsaw, but it is difficult for them to achieve an accurate result). A large amount of “plastic” shavings and a characteristic smell are consequences of the high plastic content.
Agglomerate is a material with medium density. It is not as difficult to work as porcelain stoneware, but requires more care than acrylic. In order to drill holes in it, it is best to take the same cutters as in the case of porcelain stoneware.
Forstner drill
A kind of chisel, with pieces of “pobedit” (strong steel), both in the center and in a circle. This drill will be able to cut stone or artificial stone. And it crumbles it into small pieces. Read in detail in the article - WHAT IS A FORSTNER DRILL (click opens in a new window).
— Now we apply the mixer, which we will embed.
— We outline the mixer and determine the mounting location.
— Next, we determine the center for drilling.
— Install the forstner drill into the drill.
- We're drilling. Moreover, you need to drill slowly, not at high speeds. The main thing is not to damage the sink.
— After drilling, a smooth hole is obtained. You can install a mixer.
This way we get a smooth hole in the sink. I hope my article was useful to you. After we have made the hole, you can INSTALL THE MIXER, be sure to read.
Sinks made of artificial stone do not always have a special cutout, so there is a need to make a hole in the sink yourself. A common obstacle is the fear of damaging or crumbling the sink. Although artificial stone is close in properties to natural stone, in essence it is more like plastic: or, better said, like a polymer mass mixed with stone chips.
What to drill
Today, experts identify three types of tools that can be used for drilling ceramic tiles and porcelain stoneware.
Very often, diamond core bits with special galvanic coating are used to drill holes in porcelain stoneware. Among their advantages, it is worth noting their relatively low cost. If necessary, thin-walled crowns can be ordered. Such crowns significantly reduce the end pressure that occurs during drilling, and also allow you to increase the drilling speed itself. However, such crowns also have a significant drawback, namely the low drill life. One crown is enough for a maximum of five holes drilled in porcelain stoneware 8 millimeters thick.
Sometimes diamond sintered ring drills are used to drill porcelain stoneware. Most often, such drills are used for drilling concrete and other durable structures. The thickness of their working segment is 2 mm or more. However, such drills are rarely used, since their end pressure is greatly increased. Another disadvantage is the large amount of time spent drilling one hole. It takes about 3-5 minutes. However, despite the above disadvantages, such drills have a high drill life. They can make more than 100 holes before they become unsuitable for further use.
The best tool for drilling bathroom, kitchen and porcelain tiles, according to experts, are diamond drills. They combine the advantages of galvanic diamond crowns with high durability. All this is due to the high concentration of diamond grains in the tool itself. An example of such a tool is MonAliT drills. Their name stands for Monolithic Diamond Tool.
These are special drills from Russian manufacturers, developed on the basis of the latest technology for the production of diamond tools. A high concentration of diamond grains in such a drill is achieved thanks to vacuum diffusion welding technology. It allows you to increase the concentration of grains by as much as 2-2.5 times. When such a tool is sintered, a durable monolithic structure is obtained. Its pores are filled with metal, which makes holding the diamond even more reliable. Thanks to this production technology, it is possible to produce diamond drills with very thin walls. Their thickness does not exceed 0.8 mm. It is on the basis of this technology that drills for porcelain stoneware are manufactured.
Among the advantages of diamond drills, high drilling speed should be noted. So, it takes about 30-50 seconds to make one hole in an 8 mm thick tile. Such drills have a very high service life. If you use them for drilling porcelain stoneware without a drill stand, then they will be enough for about 50-70 holes. If you drill using a drill stand, then one drill is enough for 100-150 holes. In those cases when special equipment is used with cooling supplied to the drills, they can be enough for as many as 350 holes.
Another advantage of MonAliT diamond drills is their price. It depends on the specific type of instrument. The minimum price is 450 rubles, the maximum is 3200 rubles.
Best answers
Nadezhda Golysheva:
Swedish Mora fittings have a diameter of 32-36 mm.
Vladimir Petrov:
First, buy a faucet and then look at what diameter to cut the hole so that you have a margin
Santa Claus:
35mm
Oleg Zlanepomnyashchiy:
Any self-respecting plumbing manufacturer has instructions that come with the corresponding product.
Oleg Losev:
A 35mm drill usually goes to the sink...
Sergey Anisimov:
In sinks a la stone with a wing, which can be installed with the trough located on the left or right, the kit includes a cutter for independently drilling a hole for the mixer on one side or the other, and this cutter has a diameter of 35 mm.
What you will need
When asked how to drill granite, many say that this will require some complex specialized tool, but this is not so
A regular electric drill is suitable for the job, it is only important that it has the option of adjusting the speed of revolutions per minute
In addition to the drill, you will also need:
- a diamond-coated drill having the required diameter;
- plain water.
First of all, you need to fix the granite slab as carefully as possible, making sure that the surface on which it is installed is as flat as possible. Before starting work, you should use a drill to mark the center of the future hole: this will help prevent the tool from sliding along the polishing surface. Install a diamond-coated bit into the drill (remember that using a non-coated bit will not allow you to make a hole).
Drilling should be carried out exclusively at low tool speed without using the punching option. When you turn on the perforation mode, the granite may crack. Regularly rinse the stone and drill with water: as already mentioned, this helps to cool, clean, and neaten the hole itself. In order to add water, you can invite an assistant. Or fill a plastic bottle with water, make a hole in the lid and use such a “sprinkler” to water the drill and hole yourself.
What to do if there is no diamond crown
If you don’t have a diamond bit and you don’t know how to drill granite in this situation, you can carefully stick a plasticine ring 3-5 mm high around the entire circumference of the future hole. Place a little corundum, pobedite powder or diamond dust inside the ring and add water. Attach a copper tube to the drill (you can use a tube from any other non-ferrous metal). Now you can drill granite - also at low tool speeds, without using a hammer drill. You will certainly need water here: first of all, in order to regularly cool the metal tube.
If there is neither a crown nor a tube, what to do?
In this case, craftsmen suggest using an emergency and risky drilling method - using a Pobedit drill, at high speed with a constant supply of water. During this process you will need to constantly sharpen the drill because it will stop from time to time
Sharpen the drill with a semicircular file, very carefully, without overheating its teeth. Otherwise, the drill will soften and become dull even faster.
Drilling on granite is a very difficult and painstaking job. It requires certain knowledge and skills. But if you wish, you can always purchase them by seeking advice from more experienced craftsmen. In order to practice, first use fragments of stone: this will help both “get your hands on” and prevent damage to a high-quality new workpiece.
How to defeat porcelain tiles
For drilling porcelain stoneware, because it is very hard, use a drill with a special attachment.
Drilling porcelain stoneware is not easy; it is one of the hardest materials to process. To get smooth edges of the hole, you should always start from the front side. At the exit, the drill can make a chip, but in this case it will remain invisible. If the slab you are going to drill is not yet secured to the floor or wall, you should place a flat board or piece of fiberboard underneath it.
Read also: How to add a satellite to the receiver
If the diameter of the proposed hole is more than 6-8 mm, you must first drill it with a tool with a smaller diameter. To work with porcelain stoneware, it is better to use a hammer drill or a fairly powerful drill.
The drilling speed is low or medium, it depends on the diameter of the drill. The larger the diameter, the lower the speed. It is better not to use a hammer; there is a risk of splitting the slab. In some cases, especially with a large thickness of material, a striker is used at low speeds if there are no voids under the slab, but everyone does this at their own peril and risk. When drilling, you must use water for cooling.
The best results are achieved when using diamond tools. In practice, different drills are used: carbide tips for tiles, a stylus with a diamond tip, diamond-coated tubes, and diamond bits.
Good results are obtained with thin-walled monolithic diamond-metal tubes made in China, and they are inexpensive, about a dollar per piece.
The drill wears less if you drill perpendicular to the plane of the material. To do this, a drill or hammer drill can be mounted on a vertical stand. In this case, the drill resource almost doubles.
It can be very difficult to start drilling with a crown on a smooth surface; it constantly tries to move to the side, scratching the surface. Therefore, to obtain a high-quality result, you can make a template in advance for holes of different diameters. The template is firmly clamped with clamps and prevents the crown from moving from the drilling point. You can also add water here for cooling.
You can start drilling at an angle to the plane if a template is not used: then the crown cuts into the stone with one side and then is leveled. But this method is better used on softer materials.
You can drill holes in stone using concrete and agglomerates in the same way.
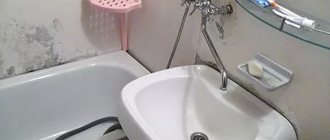
Making a hole in an artificial stone sink
Decorating sinks today can be very diverse. For example, there are models implemented as a single unit with a tabletop. In this case, a special acrylic stone is used. It has a low density, which makes working with it easier and simpler. If the sink is made of artificial stone, then many people wonder how to drill a hole for it. For this, traditional drills are used, specially designed for working with metal or wood.
To install a water tap, a hole of no more than 35 millimeters is often cut as standard. If the product is made of artificial stone, then you can use a feather blade or a Forstner cutter of the same diameter. The speed should be low and average. During operation, a large amount of chips will be released. Artificial stone contains plastic that has an unpleasant odor. Therefore, it is better to use protective masks.
This type of material is soft, making it great for creating sinks. You need to be as careful as possible when working with such material. The ratio of resin to stone chips may vary. Drilling such material is easier than ordinary stone. But even in this case, you need to be as attentive and careful as possible. No work should be carried out with such material until its temperature is equal to room temperature.
Standard errors
You need to be careful when creating a hole when using a drill with a router bit. Many experts try to make a hole at the moment when the countertop is already installed. There are also advantages to this method. For example, the edge of the front part can be made as smooth as possible. But this method has many more disadvantages. In this case, not only the stone, but also the sink can be damaged; the edges may break off, scratches may appear, and much more.
It is most reliable and safe to carry out all work from the rear sides. Of course, the hole that goes out may have an uneven appearance. But the entire structure will remain intact and unharmed. The mixer will also be stopped in this hole, capable of covering any unevenness. The front part of the sink will be safe and sound. You can work in two ways: using a drill, or knocking out loose cast plugs.
Drill hole method
- Initially, for work you need a drill with a diameter of 35 millimeters. The sink is located on the back side, and it is better to put paper or a board under it.
- Afterwards, the location of the mixer is noted in order to avoid making mistakes during operation.
- To do this, mark the center of the mixer nut. This point will be the center of the hole. It is better to make the hole further from the center, but without touching the bowl.
- During operation, the drill blow must be turned off. The work is performed at medium speed. This is necessary so that the cutter moves in the other direction.
- Initially, it is better to prepare a special box for chips, which will be collected during the work process. When the plastic is heated due to the cutter, an unpleasant odor appears. Therefore, you can wear a protective mask to avoid getting sick.
- Afterwards the hole must be cleaned of chips, dirt and dust. The irregularities should be small, a few millimeters in size. Then we can say that the job was done right.
How to punch a hole in a sink for a faucet
There are types of sinks that have special artificial stone. It has molded plugs, they can be knocked out during installation work. If you look from the front side, they are most often marked. Initially, the sink should be installed on the countertop, but should not be fixed.
After this, the necessary tool is selected and the traffic jams begin to break out. In this case, hammer blows are used. You can also use punches having a diameter of eight millimeters. It is better not to use a screwdriver for this activity. The cork is knocked out from above, from the front side. Next, a rasp is used to smooth the edges. This method is not suitable for all types of sinks, but it is simpler. Even a beginner who has never held a tool in his hands can handle it.
How to avoid mistakes
Let's say you decide to make a hole using a drill with a cutter.
Often, experts make a hole when the sink is already installed in the countertop. This solution has only one advantage - the edge on the front side will be smooth. But it has many more disadvantages: you can scratch the stone, damage the sink, chip the edge, and so on.
Therefore, it is better to drill a hole from the back. But there is a possibility that the hole will have an uneven appearance from the outside. However, a mixer will be located in this place, which will cover the uneven edges. There is no risk of damaging the front side of the sink.
There are two fundamentally different methods of work. The first involves working with a drill, and the second involves knocking out the weakened cast plugs provided for by the design. Let's consider each of them in order.
How to make a hole for a faucet in a stainless steel sink? – Stroim24.info
From the author: I am glad to welcome you again, my dear readers! When we renovate a kitchen or bathroom, we are certainly faced with the installation of a sink.
For some people, the hole for the faucet in a stainless steel sink becomes a real mystery that is quite difficult to solve.
I have repeatedly encountered cases where a person decided on untested methods, thereby simply rendering an expensive product unusable.
Be careful, now I will tell you two ways that will help you solve this problem.
What are the benefits of a stainless steel sink?
I get asked very often why a stainless steel sink is so good. Naturally, installing this item in the bathroom is not aesthetically pleasing, not practical, and generally not entirely normal. To decorate this part of the apartment, it is best to use specimens made of artificial stone.
Installation of the product discussed is more appropriate as part of a kitchen renovation project. An alternative could be a product made from quartz, but not everyone can afford it.
Let us highlight the advantages of steel samples:
- price. The most important thing when performing repair work is rational savings. Yes, if your budget doesn’t bite you and you can afford a more aesthetic product, do it;
- mobility. More than once, even I have encountered moments when a new sink was installed, and the old one was sent to another place for service. For example, to the country house. The issue of removal and re-installation in this case is more convenient;
- reliability. Not every housewife can boast of being careful when working in the kitchen. She can drop something heavy at any moment, and if it is a cast-iron cauldron and it falls on marble, then a crack in the latter is guaranteed. On the steel sink, only a small dent will remain, which can be easily removed with a regular hammer and a wooden block, and the scratches can be covered with special means so that they will not be visible at all;
- it does not need to be embedded into the countertop. This way you can optimize its use and not pay extra when ordering the kitchen itself.
From the above, it becomes clear that a stainless steel sink is the optimal, and most importantly, budget option for the average resident of our country.
Let's use a drill
You can make the necessary hole using a power tool, which every self-respecting owner should have at home.
An ordinary electric drill must be equipped with a specialized attachment, which is designed for working on metal.
This point is very important, since using a drill with a pobedite tip or diamond coating will simply render it unusable, and there will be no result.
First of all, decide on the place where the mixer will be located. In order to understand whether pouring water will splash onto the walls of the kitchen, simulate the pressure using a filled plastic bottle. Next, you need to create a small hole that will serve as the center point of the cut circle. To do this you will need a metal drill. Arm yourself with it and follow the procedure. Change the nozzle and install it exactly in the place that we created in step No. 2. Before you start drilling, set the desired diameter. Drill a hole.
Just four simple steps solve the problem with a bang!
There is also a special tool that allows you to do the same job, but using your physical strength. It is called "Fixa" and consists of two cylindrical bases connected by a bolt. One of them is sharpened in such a way as to create a standard hole for a faucet.
A little secret
When I worked as a salesperson in a construction hypermarket, the guys from the plumbing department were supposed to provide the service we are talking about for free. However, given that this needs to be done for free, not everyone advertises it. Remember that when purchasing a sink, you can take advantage of the additional functions of a sales assistant!
I am sure that my advice was useful to you, and there will be no problems completing the task!
Technology and instructions for cutting stone
Since decorative stone can be cut by two types of tools, each of them will have its own technology. At the same time, the beginning and end of the processes are the same, so let’s combine them into one instruction:
- When starting to cut stone, you should make sure that safety requirements are met.
- Carefully mark the cutting line.
- Securely secure the workpiece. Make sure that the cut part of the stone, having separated from the main body, will not create a threat to the worker and others.
- Cut the workpiece according to the markings.
- If you need to cut a closed contour using a jigsaw, for example, an opening for a sink in a kitchen countertop, you should first drill a hole inside the contour with a diameter larger than the width of the nail file.
- Unfasten the workpiece.
- After finishing work, clean the workplace.
(2 ratings, average 5 out of 5)
Where to cut the hole?
Another significant question that will arise no matter what materials the sink was purchased from is to cut a hole in it from the front after the installation has taken place? Or should I do this before installation and from the rear?
Each method has a number of advantages and disadvantages.
In the first option, the edges on the front side will be much smoother, but there is a possibility of damaging the front side of the sink with a drill, and if it has a narrow side, then splitting the edge.
In another option, the risk of ruining the bowl is much less, but there is a possibility of getting a sloppy edge of the hole on the front side. In many cases this is not a problem, since the edges of the hole are closed with a tap. When turning over, there is an option to unintentionally make a hole on the wrong side, so it is best to select the side on which you want to install the water tap.
In any of the methods, it is best to place the hole further from the edge of the product, but without touching the bowl. To do this, at the beginning of work, you need to attach the bottom nut of the water tap to the sink and highlight its center.
Differences between stone algomerate shells
If, for example, you purchased a sink made of stone agglomerate, it will be a little easier to work with.
Artificial stone sink made from agglomerate Well-known manufacturers in most cases include a cutter or core, which knocks out a piece of stone that has already been drilled, but not completely. If they are not present, then an excellent option is to use a cutter or a diamond-coated crown and act as when working with ceramic granite.
A Fostner cutter will also cut a hole in a stone agglomerate product. But be prepared for the fact that you will need to sharpen it later, or even throw it away completely.
Be sure to read the instructions and operating rules before taking any action, so as not to inadvertently void the product warranty.
Fake diamond
If the sink is realized as a single unit with the countertop and the same color as it, then it is an acrylic decorative stone. Of the materials listed above, this one has the lowest density, making it the easiest to work with. If the purchased sink is actually made of artificial stone, then the answer to the question of how to drill out a sink from acrylic stone is very simple - traditional drills for working with metal or wood.
The hole for a typical water tap, in many cases, has a diameter of 35 mm. In a product made of artificial stone, it can be easily drilled with a feather drill for woodworking or a Forstner cutter of a similar diameter. You need to work at low or average speeds. When this material is drilled, the vast majority of shavings will appear, and the plastic that is part of the artificial stone emits a bad odor, somewhat reminiscent of epoxy-based glue.
Sink made of acrylic stoneAcrylic stone is the softest of all acrylic stone options, thanks to which a significant part of the countertops are made from it. If there is a need to make a hole in it for a sink or hob, it is better to practice in the middle of the cut part in advance so as not to damage the entire countertop. Despite the fact that artificial stone can be sawed with a jigsaw without any problems, it is not advisable to make cuts with it. When working with a jigsaw, stress concentrators (sharp transitions, sharp corners, small cracks) often appear, which affect the service life of the product.
If you are considering how to drill out a countertop made of acrylic stone, then a router would be an excellent option, but it is not always available.
In this option, it is possible to cut a hole with a jigsaw that is 5 mm smaller than required. Once the work with the jigsaw is completed, bring it to a clean size using a router bit. It is imperative to chamfer R3 along the edges; it will also reduce stress and increase the service life of the tabletop.
Additional information in this video.
. Checking the sink
First, remove the sink from its original packaging and inspect the sink to ensure there are no visible signs of failure before considering drilling any holes for the faucet. Before leaving the factory, the washer undergoes strict quality control, so the likelihood of receiving a faulty washer is extremely low. However, once a sink has been modified, you will not be able to return the item.
Do I need to drill all the way through?
There are at least two answers to the question of how to drill a hole in porcelain stoneware. Drill all the way until a hole is formed, and don't drill all the way through. In the latter case, there is one trick that can increase the service life of the tool.
With this approach, the hole is drilled to 2/3 of the required depth, and then the resulting ring plug is knocked out with a sharp blow from the front surface. In this case, part of the tile on the reverse side near the hole will be chipped off, but in this case such damage does not play any role.
The damage is on the back side of the tile, which will then be glued to the surface. Bearing in mind this method of drilling, as well as the possibility of chipping when drilling a hole to the end at the moment the drill leaves the body of the tile, drilling must be carried out only from the front side. In this case, all possible damage to the tile surface remains invisible.
Drilling holes in porcelain stoneware is quite possible, although it is a very durable material. Diamond drills are most suitable for this operation. In addition, there are certain subtleties outlined above, the observance of which will allow you to drill a hole in porcelain stoneware without much difficulty.
Conclusion
Anyone can drill a ceramic sink, but any mistake leads to damage and destruction of the product, remember this. The video in this article will clearly show some important features of the workflow.
Sources:
- https://santech-info.ru/santexnika/prosverlit-otverstie-v-rakovine.html
- https://124prm.ru/santehnika/kak-prosverlit-rakovinu.html
- https://stroypomochnik.ru/kak-prorezat-otverstie-v-mojke-iz-nerzhavejki-iskusstvennogo-kamnya-pod-smesitel-video-i-foto/
- https://septik.guru
- https://remontstroimat.com/kak-prosverlit-mojku-iz-iskusstvennogo-kamnya-v-domashnix-usloviyax/
- https://gs16.ru/santehnika/kak-prosverlit-keramicheskuyu-mojku.html
- https://gidroguru.com/vnutrennyaya-kanal/santeh-pribory/mojki/1791-otverstie-v-rakovine-pod-smesitel
- 1