Copper products are found everywhere in different areas of life. For example, it is used to create strong and durable heating and water supply systems. But to connect the two elements, experts resort to a special technology - soldering copper pipes. The procedure requires suitable tools and materials, as well as knowledge. Since it has certain features that a beginner may not know about.
To solder copper, the master needs to have with him a composition such as solder. This thermoplastic substance seals the surface of the product and, under the influence of high temperature, melts, spreading over the entire joint. But as soon as it cools, it hardens and securely holds the products together.
The result is one item that has a long service life, withstands high loads, pressure and temperature changes, and is not afraid of ultraviolet radiation.
What tools and materials are needed
Soldering is carried out not only at industrial facilities, but also at home. To do this, you need to prepare the following tools and materials:
- electric soldering iron or gas burner;
- pipe cutter;
- solder;
- flux;
- brush and steel brush.
How exactly to connect the products depends on the convenience and preference of the master. But the power of the device is selected in accordance with the melting temperature of the solder. Flux can be liquid or solid; each type has individual differences that should be taken into account. If the material is used in the form of a thickened mixture, then it is applied to the joint, both before and after the connection. Flux is needed to protect the surface from oxidation, promote solder flow and improve adhesion.
Soldering tools
Before starting work, you need to prepare special tools and devices for soldering copper connections. You will need:
- Gas or oxygen torch for soldering copper (with nitrogen, acetate, etc.);
- Solder (for capillary soldering according to GOST R 52955-2008);
- A brush (hard, but not metal) and abrasive paper for stripping copper connections;
- Fittings or other connected elements;
- Soldering flux.
It should be noted that if the work is done on pipe connections, then you may also need a chamfer, an expander, or a special cutting device. All of these fixtures can be found at a professional plumber so you don't have to buy them.
Photo - burner
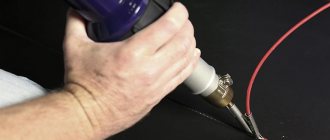
Burners for copper are: professional (for working with hard solders), for heating pipes and soldering with soft pastes, semi-professional or combined. There are also special hair dryers that are used for soft soldering. They allow you to quickly heat the joint at temperatures up to 650 degrees.
Solders are:
- Solid. They are represented by rods of a certain diameter, which is selected based on a certain gap when connecting. It is used when connecting copper and iron in water supply systems, gas supply and air conditioning systems. This solder can be with phosphorus or silver;
Photo - hard solder - Soft ones can be either in the form of paste or thin wire up to 3 mm in diameter. They are produced with lead and tin. Also sometimes the process is carried out with orthophosphoric acid.
Also, to join copper alloys, it is necessary to use flux. It performs several useful functions: it promotes better spreading of solder over the metal, protects the processing area from an oxygen film, and cleans the seam from oxide. Fluxes come with borax (for various high-temperature solders), used for medium-melting compounds of gold, copper, bronze, cast iron, and stainless steel. Outwardly, they look like a paste and are applied with a special brush.
Photo - flux paste
Brushes and abrasive sheets (sandpaper) are needed to remove solder residues from the seam after finishing work. Fittings are selected based on the required connections (they can be branching, corner, curved, etc.).
Photo - soldering iron
Types of fluxes and solders, features of working with them
Craftsmen know a variety of hard and soft substances that ensure high-quality soldering of metal products. 95% use tin, which is a low-temperature composition with slightly worse technical parameters. But it is valued for the fact that work can be carried out at any temperature without reducing the strength of the products being joined.
Connecting elements also include silver, which has excellent technological properties. Craftsmen often use three-component compositions of silver, tin and copper. Often, materials used in low-temperature soldering contain zinc chloride.
The advantage of soft solders is that they cover a larger area when applied to the surface of the part. They provide high strength and reliability.
Soft solders
Soft solder is used in the installation of water supply and heating networks, where the pipe diameter reaches 10 cm and the water temperature does not exceed 130 degrees. These types include:
- lead-tin type;
- with low tin content;
- special and fusible.
Lead-free flux is most often chosen as solder. The tin-copper type is the most common due to its affordable price. But its advantage lies elsewhere. All mixtures containing tin in the composition are economical in consumption.
It is enough to apply a little solder to half the surface being treated and it will spread over the entire area. This property is explained by the fact that tin easily penetrates and spreads throughout any structure.
Brazing alloys
When it comes to considering the environmental conditions in which soldering is performed, it is better to use hard solders. The use of such substances ensures high strength of the seam. The most common compounds are the following compounds:
- copper and zinc;
- phosphorus and copper;
- pure copper;
- no-clean flux.
Solid compounds are classified as refractory and low-melting. Each type is characterized by certain properties. For example, copper-phosphorus replaces expensive silver flux. It is moderately expensive, but has one drawback - it cannot be used at low temperatures.
The strongest of the solid compounds are copper-zinc and multicomponent ones. They are expensive, but the price is justified by the reliability of the connection. When soldering is performed with copper itself, it is necessary to use flux. In this case, it will be possible to firmly connect the two parts.
Necessary materials and equipment: tin and others
The following tools are required for working with copper pipes:
- pipe cutter, hacksaw or grinder with a thin disk;
- chamfer;
- pipe expander (expander);
- soldering flux;
- solder;
- soldering iron for copper, for example, a propane torch for soldering copper pipes;
- rubberized gloves;
- paper napkins.
Pipe cutters of various sizes are used to cut pipes. Larger samples have a large turning radius and are inconvenient to use in hard-to-reach places, so if there is a need to cut off a section of a finished installed water supply, use a small pipe cutter. You can cut the pipe with a hacksaw or a grinder with a thin disk, but a better cut can only be achieved using a pipe cutter.
After the pipe is cut, the burrs are removed. This is necessary to ensure that there is no turbulence in the fluid flow in the system. When there are no obstacles, the water supply does not experience stress and works like a clock.
Before welding the copper, the ends of the pipe are polished with fine-grained sandpaper, which can be purchased at hardware stores. They clean both surfaces that are preparing for soldering. Sometimes small brushes with a diameter of Ø 22 mm are used for these purposes; they are suitable for almost all pipes. For cleaning, the stem of the brush is inserted into a screwdriver or drill, with the help of which the process is carried out faster and with better quality.
Flux is applied to the cleaned, smoothed outer surface - a composition that prevents the oxidation process of copper.
Rubberized gloves are used to protect hands, since when cutting copper and burrs, many small metal elements are formed that dig into the skin like splinters. In addition, when cleaning the surface with a drill, the rotating brush chews on rag gloves.
To solder copper correctly, you need to take into account that from the moment of stripping and applying flux to soldering, no more than half an hour should pass, otherwise the stripping must be repeated again. If the flux is applied with a brush, there should be no bristles or hairs from it left on the surface - otherwise the connection will not be tight and the pipeline will leak after water is supplied.
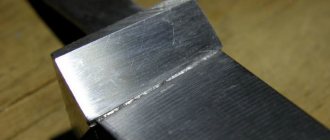
After inserting the pipe into the socket, the remaining flux is not completely removed with a napkin, it remains on the connection in the form of an edge of 1–2 mm, and when soldering, the solder is drawn inward - the capillary effect is triggered. First, the joint is heated with a burner, and the moisture between the walls is evaporated. Then the burner is brought up a second time, the copper gradually heats up, and the flux takes on a tin appearance. At this moment, solder is placed on the front side, soldering occurs, and the molten alloy flows down to the back side, solidifying as it moves. The excess metal overhangs that form below are separated on their own. Soldering copper can be done in different ways.
Why do you need solder paste?
Solder paste is a pasty mass consisting of small particles of solder, flux and special additives. Flux paste is used in industry when soldering elements on printed circuit boards. The paste is selected according to certain conditions:
- after application there should be easily removable particles;
- the substance must maintain viscosity and stickiness;
- do not have a negative impact on the surface being treated;
- do not leak onto clothing during melting.
How to work with the paste depends on the type and size of solder contained in its composition. The material also differs in the type of flux (rosin, water-washable, no-clean). It is necessary to hold small parts in place and facilitate the joining process.
Instructions for soldering copper pipes and fittings
The soldering technique according to the instructions allows you to obtain tight solder joints between a pipe and fittings made of copper and copper alloy, both in the workshop and in the field.
Skills and knowledge of instructions are necessary to obtain a high-quality soldered connection. Therefore, we will consider the technological instructions for soldering, first of all, with soft solder.
Preparation part: copper pipe measuring and cutting
The length of each copper pipe segment must be accurately measured. It should be emphasized: inaccurate measurements are accompanied by the risk of deteriorating connection quality. If the copper pipe is excessively short, that is, does not reach the bottom of the fitting cup, the connection is characterized as incorrect.
On the contrary, when a length of copper pipe is excessively long, there is a risk of deformation of the assembly, which negatively affects the life of the solder joint. This is noted in the soldering instructions, in particular.
Carrying out measurements of connecting node segments is a procedure necessary for accurately forming an installation site based on copper pipes and fittings
The copper pipe is cut to the measured length. Cutting can be done in a variety of ways, but taking into account that the cut end is obtained exactly at a right angle. It is recommended to cut copper pipes with a circular knife. It is also acceptable to use:
- hacksaw,
- abrasive wheel,
- stationary or portable band saw.
Measures should be taken to eliminate possible wall deformations during the cutting process of copper pipe.
A frequently used mechanical hand tool is a disc pipe cutter, with which it is convenient, quick and easy to make an even cut around the entire circumference of a copper pipe.
Soldering instructions: unfolding the cutting area
It is necessary to expand the cut ends of the copper pipe to the full internal diameter, thereby removing microscopic burrs that inevitably form during the cutting operation.
If the rough inner edge is not removed by reaming, there is a risk of erosion corrosion due to local turbulence and increased local flow velocity in the pipe.
A properly unrolled copper pipe area provides a smooth surface for the agent to move through in the interior area. You should also remove any burrs from the outside of the cut area of the copper pipe after the cutting operation to ensure proper mating with the fitting bowl.
Development of the internal area along the end cut of a copper pipe - in other words, cleaning the internal wall along the cut line from burrs and aligning the edge in a circle
Tools used for reaming pipe ends include:
- semicircular or round files,
- pocket folding knife,
- other suitable deburring tool.
If work is carried out on soft (annealed) copper pipe, care must be taken, as there is a risk of deformation of the end part of the copper pipe due to the intense actions applied.
In case of unintentional deformation of the soft copper pipe, the roundness can be restored using a calibration tool - a plug and a calibration sleeve.
Soldering Instructions: Cleaning the Soldering Area
Removing oxides and surface contamination from the cut ends of copper pipes and installation fittings is critical to proper solder distribution in the joint area.
Failure to properly clean will result in reduced capillary action and ultimately reduce the strength of the welded joint.
Therefore, light sanding (cleaning) of the end area of the copper pipe is required, usually using standard sandpaper, nylon abrasive pads, or a wire brush.
According to the soldering instructions, grinding is carried out on a surface area slightly greater than the depth of the cups of the installation fittings.
Cleaning the pipe surface using a classic processing material - sandpaper. Soldering instructions require the use of fine-grained sandpaper.
The capillary space between the copper pipe body and the fitting body is approximately 0.1 mm. The solder fills this gap due to capillary action.
The size of the gap is a critical parameter that determines the efficiency of solder filling the gap and, as a result, the strength of the connection.
Copper is a relatively soft metal. Obviously, when excessive amounts of material are removed from the end of a tube or fitting, too loose a fit can result in a poor quality connection.
Chemical cleaning of combined surfaces is permitted if the ends of the copper pipe and fitting are thoroughly rinsed after such an operation. As a rule, manufacturers of cleaning chemicals provide instructions in this regard.
Cleaning the inner surface of the fitting - an integral component of the connection that forms the working unit of the system segment
Do not touch already cleaned surfaces of copper parts with bare hands or oily gloves. Fat deposits on the skin of the hands, as well as any lubricating oils that fall on the cleaned surfaces of the articulated parts, worsen the soldering process.
Soldering instructions: using flux under the solder
The process of creating solder joints necessarily involves the use of flux. By treating the surfaces with flux, traces of oxide are additionally dissolved and removed from the surfaces to be joined.
By applying flux, cleaned surfaces are protected from oxidation when heated by a burner. Flux promotes better wetting of surfaces with metal solder, therefore it is clearly recommended by ASTM B 813 instructions.
Application of flux to the body of the copper pipe in the area where the end part meets the fitting bowl. A similar action is carried out inside the fitting. Use a work brush and protective gloves
It is recommended to apply a thin, even layer of flux to the surface of the copper pipe and fitting using a special brush. According to the soldering instructions, this is done immediately after the cleaning operation is completed in order to prevent the formation of new oxides (pure copper oxidizes very quickly).
Flux should not be applied with your fingers. The chemicals present in the flux are extremely harmful to the eyes, body, and open wounds.
In addition, excessive amounts of flux, the residue of this substance after soldering, often promotes the formation of corrosion, leading to perforation of the wall of the copper pipe, fitting, or both parts of the connection.
Soldering instructions: assembling a copper assembly
Insert the end of the copper pipe into the fitting cup. Make sure that the end of the copper pipe fits snugly to the base of the fitting cup.
Using a rotating motion, rotate the copper pipe a quarter to half a turn, which will ensure uniform coating of the inner segment with flux.
Remove excess flux from the outer surface of the copper pipe and fitting using a technical rag. Secure the copper pipe and fitting assembly, thereby ensuring uniform capillary space around the circumference of the connection.
The connecting unit, based on the component parts of the pipe and fitting, is assembled into a single whole. The copper pipe is slightly rotated in the fitting bowl, excess flux is removed with a rag
The uniformity of the capillary space will ensure high-quality capillary flow of molten solder. Remember, excessive joint clearance will cause the solder to crack under stress or vibration conditions. The connection made is actually ready for soldering. It is recommended to carry out the soldering process without delaying for a long time.
Soldering Instructions: Heating the Copper Joint
When working with open flames, high temperatures and flammable gases, ANSI/AWS Z49.1 and equivalent instructions must be followed. The assembled unit is heated with a gas burner flame directed perpendicular to the copper pipe.
The copper pipe conducts the initial heat to the fitting cup, the heat is evenly distributed throughout the entire area of the connecting unit. The degree of preheating depends on the size of the assembled unit.
Preheating of the assembly is accomplished by uniformly passing the torch flame around the entire circumference of the copper pipe in order to achieve the proper temperature for the entire joint area.
The procedure for preheating the parts to be joined has its own characteristics. In particular, heating is carried out from the bottom to the top with emphasis on the bottom area
When making horizontal mounting connections, avoid directly preheating the top of the assembly. This technique will help prevent the flux from burning.
The natural tendency for the temperature to rise will ensure that the top of the assembly is sufficiently preheated. The burner flame is then moved onto the fitting cup. Apply the heater flame alternately to the fitting cup and the copper pipe at a distance equal to the depth of the fitting cup.
Again, after preheating the circumference of the assembly as described above using a torch at the base of the mounting cup, periodically contact the solder rod with the body of the copper pipe. Heating is continued until the solder begins to melt.
It is unacceptable to overheat the connection and direct the flame to the inner front area of the fitting cup. Overheating burns the flux, soldering efficiency sharply decreases, and the solder does not flow into the joint gap properly.
When the solder begins to melt when applied to the copper pipe, the heat of the burner is transferred to the area of the base of the “glass” of the assembly. This maneuver enhances the capillary action to draw molten solder towards the heat source.
Option for soldering pipes and fittings using an electrically heated tool. The so-called electrical resistance soldering is characterized by the absence of an open flame.
Heating for soldering of a copper connection is usually organized using an air-fuel burner. Tools of this kind operate on acetylene or liquefied petroleum gas (LP, LPG - Liquefied Petroleum Gas, MAP).
It is also acceptable to use tools for electrical resistance soldering. Contact resistance soldering on copper pipes works on the basis of electrodes and is used when soldering with an open flame is not possible.
Soldering instructions: how to apply solder?
Soldering connections in a horizontal position involves the initial placement of solder at a point slightly offset from the center of the lower segment of the connection.
As soon as the solder begins to melt upon contact with the heated surfaces of the copper pipe and fitting, you should point the solder rod directly into the joint gap gap.
Periodically, during the preheating process, they check whether the operating temperature limit has been reached - the beginning of melting of the solder rod, and begin soldering as soon as the soldering temperature is reached
The flame of the gas burner is held at the base of the fitting and slightly ahead of the point where the solder is applied. This technique of applying solder performs a soldering pass from the bottom of the fitting to the top on one of the two sides of the assembly.
Then they return to the starting point and continue soldering on the other side of the assembly using a similar technique for applying solder. When soldering copper pipe and fittings, small balls of solder may form behind the point of application.
These formations indicate the filling of the soldering segment with solder - a kind of signal of transition to the next level. Connections in a vertical position of a copper pipe are made in a similar sequence of passes, starting from any convenient place.
Soldered joints rely on capillary action to draw molten solder into the narrow gap between the fitting and the copper pipe.
The molten metal solder is drawn into the joint by capillary action regardless of the direction of the solder flow - upward, downward, horizontal.
Capillary action is most effective when the distance between the surfaces to be joined is 0.1 - 0.15 mm.
Some loosening of the assembly parts is acceptable, but too loose a fit may cause soldering difficulties, especially with larger fittings.
It is recommended to use the manufacturer's instructions to connect the copper tube to the faucet slip ring. When heat is applied, the tap is moved to a partially open position, and the copper pipe area is heated first.
The instructions recommend using commercially available heat sink materials to protect temperature-sensitive components of the connection assembly.
The amount of solder consumed to adequately fill the capillary space between the tube and forged/cast fittings is determined based on the dimensions of the assembly.
There are technical tables for solder consumption. The flux requirement for soldering is usually 50-55 g per kilogram of solder.
Soldering Instructions: Cooling, Cleaning, Testing
After the soldering process is completed, the completed connection is allowed to cool naturally. Forced cooling with water is unacceptable, as it can lead to a negative load on the welded assembly.
Once the joint has cooled, remove any remaining flux with a damp cloth. If possible, it is recommended to flush the completed system to eliminate excess flow and remove debris.
Check the completed node for connection integrity. Follow the instructions for the testing procedure exactly, in accordance with applicable standards and regulations.
Soldering technology
The process is quite simple, therefore, when it is necessary to connect something at home, the owner does the soldering with his own hands and without the involvement of specialists. But still, you can’t do without the preparatory stage.
It determines how high-quality and reliable the connection will be. First of all, you should pay attention to the cut of the part, which should be strictly vertical, without burrs, with even and smooth edges. If you find the slightest defects, you should take sandpaper and rub it over the surface until the defects disappear.
If two copper pipes are connected, then, having brought the cut to an ideal state, it is necessary to insert it into the fitting and then remove it. The part that came into contact with the fitting must be cleaned of oxidation. The next step is applying flux. There is nothing complicated about this, you just need to run the brush over the entire part, paying special attention to the joint.
Then the elements are connected to each other and firmly fixed. Further actions depend on what is being used for soldering - a gas torch or a soldering iron. Considering that the parts must be stationary, an assistant will be required. He will be the one to hold them, but if one is not found, you need to manage and do it yourself.
When something needs to be soldered at home, a solid compound is most often used. But the master can purchase special pastes. With the correct choice of compositions, it is possible to connect two pipelines or radio components as accurately and firmly as possible.
Soldering is performed at either high or low temperature. In the first case, the process is distinguished by high strength of the seam, and the connected area also gains heat resistance. Which is very important if it later serves as part of various communications. But high-temperature soldering is not allowed on threaded connections. Most often this process is performed with a propane-filled torch.
When low-temperature soldering is used, a soft compound, paste or gel is used. It is most suitable for a beginner master because it is simple and easy. In this type of process, the temperature does not rise above 425 degrees, so it is even possible to use a soldering iron, which is found in almost every home.
Working with a soldering iron
Every person has seen a soldering iron at least once in their life, and many constantly work with it. Therefore, they will not see anything complicated in soldering copper products with this tool. The whole essence of the process is that the solder located between the two parts is heated with a soldering iron until it begins to melt.
When it hardens, the two parts will be securely fastened into one. To solder efficiently, it is necessary to distribute the substance evenly over the entire surface, filling every gap. It is important to choose exactly the material that can withstand the high temperature of the soldering iron.
Working with the burner
The tool is turned on when the two parts are already connected to each other. You should not hold it near the joint for too long, since the combustion temperature is several thousand degrees. While you only need to heat a certain place to 250-300 degrees.
This will take 20-30 seconds. As soon as the flux changes color to dark, the compound to be joined is introduced. Important! The burner or hair dryer should be placed in the middle to cover the entire joint area.
Welding
Let's look at how copper pipe soldering is done with your own hands:
- Any technology involves pipe preparation. You will need to cut the communication to the desired size and trim the ends with a bevel gun. This is necessary so that the next element is not damaged during connection and the maximum rigid adhesion of the parts is obtained;
- Soldering flux is applied to the edge of the copper pipe, and it is also applied to the fitting or other pipe. Afterwards you need to carefully insert the communications into each other. If soldering is done with self-fluxing solder or an electrode, then flux does not need to be used;
- The selected solder is inserted into the joint. It should be noted that if a paste is used, it must be applied after the flux. Under the influence of a certain temperature, the substance will begin to melt, filling the free space in the pipe. A very important point: the solder cannot be exposed to direct fire, it should melt only from the heat of the heated pipe;
Photo - soldering with solder - If tinning is used, then the flux and solder are applied in a very thin layer, otherwise an unsightly volumetric seam will form at the soldering site. If locks or radio components (usb, contacts) are repaired, this may disrupt the operation of the element;
- After heating is completed, the tool is removed. At this moment, the pipe cannot be moved - the connection is still too plastic, and turning the metal bends can damage the fastening. Copper pipes cool naturally;
- All that remains is to remove the remaining solder or flux with a brush, abrasive paper or brush. It is not recommended to overcool the joint during the first 24 hours, when the metal solidification process is not completed.
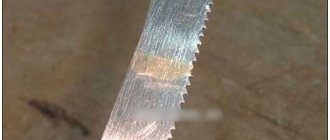
Photo - after cleaning
You can buy all the necessary tools used to solder bronze or copper at any electrical store; the price depends on the category. Burners cost from 3 dollars to several dozen, the cost of solder starts from 5 cu. e., flux - from 3.
Soldering with silver solder
When you need to solder parts at home, silver solder is often used. It is beneficial because you can create it yourself. But it should not be used alone, in combination with zinc and copper.
Treated with this solder, the seam will be very strong and neat. The percentage of components is controlled by GOST 19746 74. But you can find out exactly what types of substances to use from the instructions of experienced craftsmen or those included with the products being connected.
Safety precautions when soldering copper
It should be taken into account that the heat conductivity of copper is very high, as a result of which it is not recommended to solder parts while holding them in your hands without protection; this will most likely result in burns. Parts shorter than 30 cm are handled exclusively with pliers or in protective gloves. If during the soldering process flux drips onto exposed parts of the body, you need to immediately wash it off with soap and water, since, in addition to thermal burns, you can get a chemical burn.
For any work with open fire and hot metal, as well as flux that contains acid, synthetic clothing is undesirable, since such fabric ignites and melts much faster than others. Be sure to ventilate when working; smoke from burnt flux is harmful.
If you have absolutely no soldering skills, it is advisable to practice on scraps of pipes or wires before performing important work. There are few difficulties in this work, and 2-3 times, as a rule, are enough to master all the basic techniques. If the plumbing system is being assembled, it is recommended to pre-assemble it on the floor before installing everything in place. After assembly and soldering, the system should be thoroughly rinsed with hot, clean water to remove any flux and solder from the inside of the pipes.
Plumbing or heating systems made from copper pipes are expensive, but they are strong and durable. Since copper has a high thermal conductivity coefficient, good anti-corrosion and antibacterial properties, pipelines made from it are efficient and durable. Soldering copper at home is not difficult: a socket-coupling is put on the pipes, and then the seam is sealed. Instead of using a flare, sometimes they widen the end of one pipe and insert another into it. This connection is convenient because it does not require fittings, and the service life is equal to the life of the pipes themselves.
How to solder copper and stainless steel
If you need to solder copper to another metal, such as steel, you will have to work hard. This process is not easy, but it is quite feasible. This is explained by the fact that stainless steel interacts poorly with other metals and is difficult to heat treat.
When two different products are combined, you need to find an average composition that suits both at the same time. In such cases, you have to sacrifice quality and it is not even necessary to use flux. But it is important to carry out preparation, tinning and other soldering steps.
The need for a connection often arises at home. Joining stainless steel and copper requires little time and a conventional gas torch is sufficient. Therefore, having decided on the tool and solder, you should clean the surface of both joints and prepare flux. Then tinning the bonding area and applying flux. After which the two parts are connected, and the resulting seam is coated with solder.
The next stage is its uniform heating with a burner. Once the solder has spread, the product is left to cool naturally.
If solder, what kind?
Having decided on the tool, we proceed to the choice of solder. First of all, you should make sure that the material corresponds to a certain temperature regime. According to their characteristics, solders are conventionally divided into three groups.
- Low temperature. They should be preferred if the soldering iron or torch is unable to provide good heating. However, the strength of the connection in this case will not be too high. This option is not suitable for parts operating under heavy loads.
- Medium temperature. If the soldering torch has sufficient power, using such material it will be possible to create a durable seam with acceptable performance properties. But, for a number of reasons, such compositions are not widely used.
- High temperature. As a rule, when using them, the highest joint strength is achieved. It should be remembered that not all copper alloys can withstand significant heat. Everything will depend on the compounds included in their composition. But if you want the resulting seam to withstand high loads, you will have to choose this option.
But it’s not just the melting point that distinguishes one solder from another. Their chemical composition is no less important. Brazing of copper is the most common method. In the course of this work, mixtures prepared according to various recipes are used. They are divided into several main categories.
- Tin-copper and silver-copper. These are fairly easy-to-use low-temperature solders.
- Copper-phosphorus. These high-temperature solders are convenient because, if necessary, they can be used without fluxes. But at low temperatures its mechanical properties deteriorate and, as a result, the strength of the connecting seam decreases.
- Copper-silver-zinc. They also have high refractoriness. Their advantages include good ductility and high corrosion resistance.
- High-temperature silver solders have good mechanical properties, however, flux is required for their use. An important disadvantage is the high cost of the material.
With the abundance of offers on the market, making solder yourself is not very justified.
For the manufacture of water pipes and products in contact with food, it is unacceptable to use compounds containing lead. The reason is obvious - lead is poisonous. A separate problem is soldering stainless steel with copper. But this can also be solved by choosing the right solder and flux.
Basic mistakes when soldering yourself
Most often, it is haste that leads to the fact that the connection of two elements is unsuccessful. Because they forget to inspect the surface of the parts being connected. The first action to correct an error is to check for defects. They could appear when cutting parts.
How reliable the seam will be depends on the cleanliness of the surface. Therefore, it is still worth brushing off even invisible specks of dust. One of the most basic mistakes is made when applying flux. The master may forget to process a small area of the product. And it will cause the proper connection to fail.
It is also important to monitor the temperature of the torch or soldering iron, since overheating of the element being processed leads to combustion of the flux. But insufficient melting point is also harmful. In this case, the connecting compounds do not soften or stick.
Brazing
Do-it-yourself soldering of copper pipes using hard solder is carried out if you plan to operate the system at temperatures above 110 °C. The connection requires a temperature above 700 degrees, so soldering is performed using a gas-flame method.
Copper-phosphorus solder is produced in the form of rods and is used for high-temperature soldering
Note! Brazing technology involves annealing the metal, which softens the copper.
The use of copper-phosphorus solder does not require flux. If you properly ensure uniform heating of the ends of the products, it will fill the gap. The readiness of the connection is checked with a solder bar - it should melt.
The soldering steps are as follows:
- The docking unit is assembled and warmed up.
- Solder is introduced into the connection point between the socket and the pipe, which is softened by a burner.
- After the first coupling, the pipe is rotated and the softened solder is wound onto the next section of the joint.
The advantages of brazing copper pipes technology are:
- good seam strength;
- possibility of reducing the connection width;
- applicability in systems operating at high temperatures.
Since proper soldering of copper pipes with hard solder should prevent overheating of the products, which leads to ruptures, it is better to entrust the work to specialists.
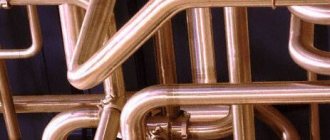
Brazed pipes are used in heating systems
Application of flux
In order for the solder and the wire material to interact with each other, and the connection to be high-quality, the wires must be cleaned of the oxide film and only then soldered.
For cleaning, you can use sandpaper, and for subsequent processing, use a special substance - flux. Flux will not only clean copper wires, but will also create a thin protective film that prevents oxidation of the material.
It is allowed to use both solid flux - pine rosin, and liquid - various types of soldering acids or a homemade composition.
Sometimes, in order to correctly and firmly solder copper wires to each other or to any metal object, they use only liquid flux. You can prepare it by dissolving ordinary pine rosin in ethyl alcohol. Soldering acid is prepared independently by dissolving zinc granules in hydrochloric acid in the proportion of 412 grams of zinc per 1 liter of acid. But it’s better to buy ready-made flux that meets all quality standards, since bringing acidic compounds to copper wires is undesirable.
Types of Copper Solder Fittings
In general, there are more than two dozen different shaped elements for copper pipes - fittings, but three types are most often used:
- couplings - for connecting two pipes;
- corners - for turning;
- tees - for creating branches in the pipeline.
Couplings for soldering copper pipes
The number of fittings used can be minimized - copper can be bent, which will reduce the number of angles needed. Also, if desired, you can do without couplings: one end of the pipes can be expanded (using an expander) so that the pipe goes into it and there is a gap for solder to get there (about 0.2 mm). When creating an expansion, the pipes must overlap by at least 5 mm, but more is better.
What’s hard to do without is tees. There is equipment for inserting a branch - a beading machine, but it is professional and costs a lot. So in this case it’s cheaper and easier to get by with tees.
There are fittings for soldering copper pipes with soldered solder
There are two types of fittings - conventional, with sockets, which provide the required clearance for solder to flow. Solder is supplied to the welding zone manually. There are fittings with built-in solder. Then a groove is formed on the socket, into which, during production, a piece of solder is installed, which makes the soldering process easier - you just need to heat the welding zone, but leads to an increase in the cost of fittings.