Saws are widely used in the woodworking industry, the main feature of which is a continuous cutting surface. It is a ring made of tape with metal teeth.
Welding of band saws is the basis of their manufacture, since they are obtained by joining a pre-prepared band into a ring. This process is also used in their repair. This article will talk about the main features of welding such devices.
general information
At first glance, welding and soldering band saws for wood or metal does not seem such a difficult task. The work is simple and straightforward. This is true, but there are some nuances. You must take into account that the band saw experiences significant loads during operation. These loads constantly stretch and bend the saw. And if the saw copes successfully, then the welded joint may not withstand these loads. And the point here is only in the quality of work. In order for the seam to withstand all the loads, it must be as strong as the saw itself.
How to achieve a quality connection? Of course, by entrusting the welding to a special apparatus. To achieve a strong permanent seam, you can use flash butt welding technology. But at the same time use a special machine for welding band saws. Let's talk about this in more detail.
Re-stripping
The process of tempering the metal creates visible sagging on it. They can be removed by repeated stripping. The latter is not so necessary for improving technical characteristics as for aesthetic purposes.
The band saw is cleaned with a grinder or any abrasive tool until the seam is visually erased.
It is also recommended to correct the recesses between the teeth, giving them the correct geometric shape.
Equipment used
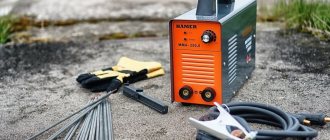
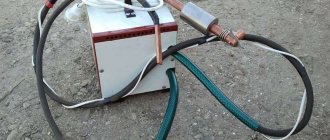
There is a separate group of welding machines for working with band saws. That's what they're called - a machine for welding band saws. They all differ only in the degree of automation. The simplest budget models have on board manual adjustment of the welding mode and control of seam formation. And the most expensive models are capable of welding automatically without an operator.
We will tell you about the simplest machine for welding band saws on wood or metal. It is shown in the picture below. The design is simple: 1 - housing, 2 - welding transformer, 3 - clamping mechanism with electrodes, 4 - start button.
Description
Contact welding is a thermomechanical process of forming a permanent joint of metals. A permanent welding joint, as is known, is formed due to the occurrence of interatomic bonds at the point of contact of the parts being connected. In the case of contact welding, these bonds are formed as a result of local heating of the parts being welded by an electric current flowing in the joint zone and plastic deformation developing under the action of compressive force. In this case, interatomic bonds arise either in the solid phase or in the liquid phase (when the metal melts in the contact zone) and are preserved after cooling and crystallization. This statement is somewhat conditional, because, strictly speaking, both solid and liquid phases are often present to one degree or another in the zone of formation of metallic bonds. Butt welding is a method of resistance welding when parts are joined in the process of joint plastic deformation of the ends of parts heated by electric current during upsetting over the entire cross-sectional area of the weld.
Stages of welding work
cutting
First, the saw blade must be cut to a given length. You can use different tools for cutting. We recommend guillotine shears as they give the most even cut. The cut itself should be located at the top of the teeth. Don't forget to leave about 1-2 millimeters on the cut side for settling.
To achieve an accurate cut, you can use the technique shown in the picture below. After such cutting, the ends of the saw will be smooth and fit perfectly together. And this directly affects the quality of the weld.
Stripping
After cutting, the ends of the saw need to be cleaned. This is standard preparation of metal for welding. Clean the metal from dirt and traces of corrosion. Then degrease with any solvent. For example, acetone. Then clean the edges with an abrasive material. We use sandpaper. Make sure there are no burrs on the edges. Ideally, they should be smooth and even.
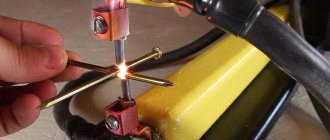
Installing the saw into the clamps
Above, we could already familiarize ourselves with the components that make up a machine for welding band saws. We said that there is a clamping mechanism. This is where the saw blade needs to be installed. The clamp has a movable and a stationary part. Place one end of the blade in the movable one and the other end in the fixed one. There is free space between the clamps. You need to install the canvas so that its joints are exactly in the middle of this space. Naturally, the joint must be smooth and precise.
Welding mode selection
Next you need to select the welding mode. If you have a simple welding machine, then all parameters need to be configured manually. The welding mode is selected based on the size of the saw and its cross-section. The larger the cross-section, the greater the welding current. These are general recommendations.
Typically, the welding machine comes with instructions that describe all welding modes depending on the size of the saw blade. Also pay attention to the setting of the speed of current pulses. For budget models, it must be controlled manually, otherwise the metal will heat up too much. The recommended current supply time is 1-2 seconds. In more expensive devices, this parameter is adjusted automatically.
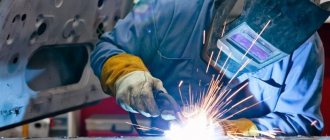
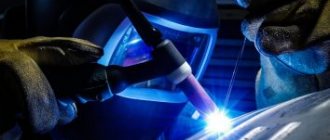
Welding
Welding for band saws begins with turning on the machine. The machine for welding band saws is launched depending on the model. This can be a separate button or a special handle. After starting, a welding current will be supplied to the ends of the saw, which will melt the metal in the area of the future seam. Current is supplied to the saw through the clamps. After heating the joint, the movable clamp must be moved slightly to form a weld bead. The seam is ready!
Make sure the electrode surface is clean before welding. It is not necessary to clean all the electrodes, just the part that is in contact with the saw blade is enough. If you ignore this rule, the connection will be of poor quality. Contamination will affect the circuit resistance.
Annealing
Next comes annealing. It is necessary because as a result of welding, the metal becomes too hard, which increases its fragility. Annealing helps return the canvas to its original condition. After pressing, the metal becomes plastic again, and its performance characteristics improve.
To perform annealing, you do not need to remove the blade from the clamp. Just set a different current mode. The main thing is to achieve a heating temperature of about 600 degrees. Expensive devices have a separate annealing function. But if you have a simple budget model, then you need to perform a few additional steps.
First of all, keep in mind that in addition to heating, you also need to cool the metal. And it is advisable to perform these operations one by one. Press the current supply button and hold it until the heating temperature appears on the display. Then release and let the metal cool. To ensure that the sheet cools evenly, you can periodically press the button again, preventing the metal from cooling quickly. Cooling time takes on average 5 minutes.
If your device does not have a display indicating the heating temperature, then you can focus on the color of the metal. Typically, the canvas takes on a cherry tint when the required heating temperature is reached. Do not allow the metal to become orange or yellow. Sometimes it is necessary to anneal twice.
Re-stripping
During annealing, visible sagging may form on the canvas. They need to be removed by re-cleaning. Now it is needed not for technical, but for aesthetic purposes. At the same time, you can correct the depressions between the teeth, giving them the correct geometric shape. Repeated cleaning can be done with any abrasive tool. Process the metal so that the joint is practically invisible.
Welding band saws: a homemade welding machine and how to use borax for soldering
Saws are widely used in the woodworking industry, the main feature of which is a continuous cutting surface. It is a ring made of tape with metal teeth.
Welding of band saws is the basis of their manufacture, since they are obtained by joining a pre-prepared band into a ring. This process is also used in their repair. This article will talk about the main features of welding such devices.
Welding work
Welding of band saws is divided into several stages. At each technological stage, it is necessary to strictly adhere to the methodology in order to achieve the best result.
There are several types of devices that allow the connection process to be carried out. They usually function as follows: the edges of the ends of the saw are connected by joining them and passing current through them.
Such equipment is perfect for small volumes of work; it will be especially effective in repairing saws in industrial sawmills.
Band saw connection drawing.
This method assumes high quality preparation of the joint and electrodes, as well as the correct choice of modes. Devices operating on the reflow principle offer higher productivity. In addition, they are able to work with all types of fabrics. Such devices are classified as middle class.
The method also requires good surface preparation, correct choice of modes and consideration of metal consumption.
Automatic devices using reflow technology require the machine operator to only install high-quality materials, as well as remove them after processing is completed. This tool is widely used in professional workshops and service centers.
The saw welding process, as noted above, is divided into stages, each of which will be described below.
Installation
After preparing the web in accordance with the steps listed above, the web is installed in the welding equipment. The edges of the product must coincide with each other.
Equipment parameters such as force, mode and course of upsetting are set based on the material selected for the web. The required modes are contained in the tables given in the documentation for the equipment.
Band saw soldering
Band saw soldering is also an acceptable method of joining blade edges. If you carry out this process in accordance with all the rules, you will ultimately be able to obtain a high-quality and durable saw that can be safely used in a band saw or, for example, in a wood saw.
This method is most preferable for use at home.
Preparation
Features of welding band saws. Soldering a band saw at home is a cheap and affordable way to make a cutting tool. The first thing you need to do before joining is to clean the edges of the canvas from any dirt.
The ends of the fabric should be joined end to end. It is important that they are beveled. You can obtain the edges of the required shape on an abrasive wheel.
The shape of the bevel is a right triangle, the length of one of the legs of which is determined by the thickness of the metal.
The beveled surfaces should be as smooth as possible and fit perfectly against each other. Don't forget about the pitch of the teeth. When forming a bevel, you need to ensure that the step is maintained.
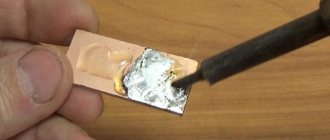
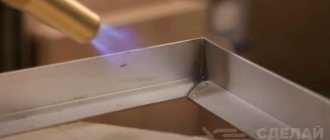
Soldering process
Band saw welding machine.
By and large, soldering this tool is very similar to the same process of working with high-temperature solders for other products.
The beveled edges of the blade are coated with flux and clamped in the machine so that the edges fit tightly against each other. It is important to ensure that the flux covers only the edges of the tool. If this procedure is done poorly, the flux will flow where it is not needed. Subsequently, you will have to spend extra time removing it.
Then the connection is heated with a burner to the required temperature. Solder is applied to the joint. Due to the action of capillary forces, the solder flows between the edges. As a result, a strip appears along the entire perimeter of the joint.
It is very important that the solder melts not from the burner flame, but from the temperature transmitted from the heated metal.
The product should be given a few minutes to cool down before removing it from the machine. If the entire sequence of actions is performed correctly, there should be no solder sagging. If they are, then the excess must be carefully removed.
This method is great for home use, for example, when creating a homemade tool and using it as a wood saw.
Quality control
Do-it-yourself band saw welding is completed. But if you lack experience, you will probably have visible defects. So do visual quality control. Carefully inspect the seam and make sure there are no defects. The most common defects are displacement of the edges, release of molten metal onto the blade and lack of penetration. The edges move due to insufficient current. The release of molten metal, on the contrary, when the current is too high. And lack of penetration is formed due to low pressure or low current.
Welding technology
Welding a band saw blade has several stages.
The material provides a detailed description of each of them.
cutting
The saw blade is sold in coils, which means purchasing a blade of a certain length. To cut metal with teeth, a guillotine and a cutting table are used, which give an even cut.
The tape is cut along the upper edge of the teeth, with an allowance of 2 mm on the cut side. This will allow you to maintain your pitch and draft.