Many people, even as boys, imagined themselves as historical knights with swords. As practice shows, childhood hobbies often carry over into adulthood. Today there are enough shops with a historical bias where you can buy a sword. The purpose of the acquisition is not important, either to hang the product on the wall, or to take part in a duel during the reconstruction of historical events. But you can make a sword with your own hands at home, this will save a penny and give the product its own zest.
Features of paper weapons
Making a sword out of paper is not difficult if you choose a clear algorithm with an accurate description. There are several different ways to make a sword of a certain shape and size out of paper. The easiest way to make a weapon is using the origami technique, but the appliqué technique is also suitable.
Required materials and tools
To make a craft, you need to prepare the following tools and materials:
- It is more advisable to make a solid base from cardboard, but in some models it is still preferable to use paper.
- Scissors or a utility knife for cutting out parts.
- PVA glue or double-sided tape for fixing individual parts.
- A simple pencil and ruler for preparing a template and sketch.
Additionally, decorative elements can be used - satin ribbons, plastic stones, decorative chains. To make the craft more realistic, paints are used - silver for painting the blade and gold (bronze) for the handle.
Where are they useful?
The use of cellulose swords is very widespread. There are many options for using such unusual weapons:
- A sword made from money can be an excellent gift for a friend’s birthday if you put the craft in a postcard or gift envelope.
- A paper sword is an interesting and safe attribute of a story game for boys.
- A beautifully crafted weapon made from cellulose can become the basis of a themed party for a bachelor party or birthday.
- Large swords or sabers are useful in school theater productions as props.
You can find many more ways to use it, the main thing is to get into the theme of a holiday, event or party.
Or maybe it’s easier to buy?
Many parents, after reading this article, will think that making a sword with their own hands is not worth the time spent. It’s easier to go to a children’s toy store and buy a ready-made one. In theory, this is, of course, very simple, but in practice everything turns in a completely different direction.
In the children's toy department of any supermarket or specialty store, the range of goods is huge. It seems that on the shelves there is absolutely everything your heart desires. The eyes simply run away from the bright colors and unusual shapes of the products, but, as the experience of many parents has shown, finding a sword is not so easy. For some reason this type of toy weapon is not in great demand. Swords, knives, machetes and other types of “edged weapons” - anything, but not swords.
This does not mean at all that they are impossible to find. Everything is quite realistic and doable, but you will have to make an effort - either by looking for a store with the right toy, or by reviewing dozens of Internet sites. There is no point in talking about the risk of buying on the Internet or receiving a product that does not correspond to the image shown; absolutely everyone knows about this in the modern world.
So it's worth thinking about how to do better. After weighing all the pros and cons, it is better to settle on a homemade option. The process of creating a sword can be presented in a playful way and involve a child in it. Fun and useful time spent with one or two parents will never harm a little mischief-maker. And the pride from the fact that the kid made his own sword will simply overwhelm him.
Methods for making a sword from paper
There are quite a large number of options for how to make a sword out of paper. It can be a flat or three-dimensional model, made using various techniques of working with paper.
To make weapons you will need paper, scissors, glue, cardboard and additional materials for decoration.
How to make a saber from a ball?
The saber is the weapon of pirates, musketeers, and brave cavalrymen. If you don’t get too boring, then samurai. In general, an almost universal weapon. And from a long ball you can make such a weapon in just a few minutes. The main thing is to initially stock up on material for creativity. For this purpose, there is delivery of balloons to your home or craft stores. And the step-by-step instructions are quite simple:
- Inflate the balloon using a pump, leaving a free end about 15 cm long to move air.
- Twist a round bubble at the end of the sausage.
- Roll an oblong bubble nearby, about 25 cm long.
- Then twist the same one.
- Twist three bubbles together with a lock - you should get a loop.
- The free end of the ball is passed into this loop.
As a result of simple manipulations, a quite elegant sword or saber/katana is obtained. Boys and girls will be delighted!
A simple sword made from a sheet of paper
One of the simplest options is a sword made from A4 paper
To make the model you will need:
- A4 sheets – 4 pcs.;
- Scissors;
- Stationery glue;
- A piece of cardboard 5 cm wide, 12 cm long;
- Thin tape.
Operating procedure:
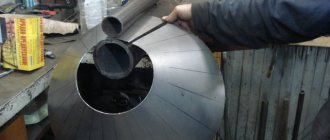
- The two sheets are glued lengthwise using glue or tape. The workpiece is rolled up to form a tube.
- To prevent the pipe from unwinding, the edge is secured with glue.
- A hole is cut in the center of the cardboard blank in accordance with the diameter of the base.
- The tube is threaded into the workpiece and secured at a distance of 3 cm from the edge.
- The third sheet of paper is for the pen. A blank is made from it the width of the sheet, which is secured with tape above the cardboard guard.
- From the last sheet, a workpiece with a slightly smaller diameter than the base is rolled up. It is inserted inside the base.
- This way the sword will be stronger and will break in battle. The tip of the blade is cut at an acute angle, the end is secured with tape.
To make a sword, you can use colored paper or paint the model with paints. You will get a real ninja weapon.
Important points
The length of the blade and handle are important, but not the only parameters. Before you start making a sword, you need to find out what the following parameters will be for the future weapon:
- Blade section shape. There are a huge number of options, but for a wooden sword the most suitable are a rectangle with pointed or rounded edges or a diamond.
- Handle shape. The best option is an oval handle, since in this case the weapon will be comfortable to hold in your hand. A round shape is not acceptable (the sword will rotate). You should also pay attention: the handle is usually made thinner than the blade.
- Point shape. It is arbitrary, but if you are making a sword for a child, then it is better to make its end rounded. For an adult, you can make a point, the two sides of which form an angle of 45 degrees.
- Garda. The widest part of the sword. Its width should be enough to protect the hand, and the sword should be comfortable to hold.
Sword for a pirate
Making a crooked pirate sword out of paper with your own hands is also not difficult. For the model you will need thick cardboard and metal foil.
- First you need to make a pattern. You can draw it yourself or find a ready-made version.
- The pattern is placed on a sheet of cardboard and outlined with a pencil. The sword and hilt are cut out as one piece.
- To make the model look like the real thing, the blade is wrapped in foil.
- It is preferable to apply an outline to the foil and cut out two blanks. They are then glued onto the sword. For gluing it is better to use PVA glue.
- A crosshair and hilt are cut out of thick dark-colored paper and strung onto the handle. For strength, the elements are secured with tape.
Cardboard craft
You can also make a beautiful sword from thick cardboard; it is better to use an unnecessary box.
To create a craft, in addition to cardboard, you will need scissors, a pencil, foil and glue.
From the prepared sheet we draw the details of the future musketeer sword, a photo of the template is presented below. Slowly cut them out with scissors and connect them together. To ensure reliability of the joint, coat the joint with glue and leave the product to dry.
To make the sword more realistic, we will decorate it with foil, as in the previous version. Coating small areas with glue, you need to carefully wrap the entire structure. Let it dry and that's it! The sword is ready!
Musketeer's sword
If you need to make a sword very quickly, then a sword made from ordinary newspaper is the best option.
You will need an old newspaper, tape, a piece of cardboard and scissors.
- Newspaper sheets are placed on top of each other and rolled diagonally into a tube.
- The edges are secured with tape.
- One end of the tube must be bent, slightly pressed, and a handle for the blade must be bent out of it. The handle is secured with tape.
- An oval with a hole in the center is cut out of cardboard. The blade is threaded into the hole.
- To prevent the hilt from slipping, you need to wrap the tube with a strip of paper and secure it with tape.
- All that remains is to color the finished product with felt-tip pens or markers.
All products are made quite simply. If you watch a video where swords made from paper are presented, you can find many other options and interesting ideas. The main advantage of this weapon is safety.
Master class on your sword Cardboard
Take a cardboard circle (I circled a plate), the main thing is not too large (about 6 cm in diameter)
Now draw a strip of cardboard 7 cm wide on it (it’s not very good in the photo, but it’s visible) two cm long on each side
bend along the lines
make cuts 1 cm wide
everything is clear here: we bend one side back and glue it to the crown (I bent one strip and stapled it to the crown)
Serrated Spartan Sword
Another option for creating a sword using a ready-made template.
Here's what you'll need to get started:
- At least three strips of thick paper or cardboard 20x100 cm, as well as an additional strip of cardboard 20x3cm
- PVA glue or hot melt glue
- Scissors or a utility knife for cutting out parts
- Paints (we use black, brown and silver)
- Two pieces of wire equal in length to a sword blade
- Sample: .
Procedure:
1. Print the template and cut out all the parts. Glue them together as shown in the diagram to get patterns in the shape of a finished sword.
2. Place the patterns on a sheet of thick paper or cardboard, trace and cut out the sword. Repeat this step three times to get three identical shapes. If the paper is not thick enough, you can make more layers.
3. Do the same with the handle parts - transfer the template to cardboard and cut out 4 identical shapes. If the paper is not thick enough, there may be more figures, but their number must be even.
4. Next, place 3 sword-shaped blanks on top of each other and fasten them with glue. This is done in order to give the final product the necessary rigidity.
5. Glue 2 additional handle parts on the top and bottom of the sword handle, as shown in the following photo.
6. All that remains is to make a characteristic bulge on the blade. To do this, take the wire and glue it exactly in the center of the blade, starting from its tip towards the handle. Do the same with the other side of the blade.
You can do without this detail, but with it the sword will look more similar to its prototype.
7. Wait until the glue has completely dried and paint the sword. Proceed one by one, painting one detail after another. When working on one area, wrap the rest with paper to prevent paint from bleeding.
Sword made of newsprint and cardboard
And finally, a quick project for which you don’t need templates or patterns. It is enough to have a newspaper, a piece of cardboard, scissors, markers and tape on hand.
1. Place two or three sheets of newspaper on top of each other and roll them into a tube diagonally, as shown in the figure:
Secure the edge of the tube with tape.
2. Roll the bottom end of the tube as follows:
Secure the edge with tape.
3. From a sheet of thin cardboard, cut out an oval with a hole in the middle and a rectangular strip. The hole should be large enough to fit your newspaper tube through. Color both parts with regular markers.
4. Insert the tube into the oval. After lowering it all the way to the handle, wrap and glue a rectangular strip of cardboard around the tube to keep it in place.
Finished swords:
The main rules of twisting
- If you need to inflate a lot of balloons, use a pump. When inflating with your mouth, a lot of extra time and effort will be spent. But if you still decide to exercise your lungs, then to make the task easier, crush the ball in your hands and pull the ends several times in different directions.
- We recommend inflating the sausage ball in equal parts. If the air does not flow well into the end of the “sausage”, you need to help it lightly. To do this, you will have to clamp different sections of the ball. The “sausage” should be smooth and not too tight. When filling it with air, leave a small part of it, 5-10 cm long, uninflated. When creating the product, air will move into it, otherwise the toy will burst.
- All necessary twisting is done with one hand, while your second hand fixes the bubble at the very beginning and the penultimate one.
- When creating different products, twists divide the ball into bubbles of the required size. After each twist, you need to press lightly on it so that the air moves into the left empty tail.
- When twisting, 3 rotations of this piece are made around its axis. Twists are always done in one direction (either only clockwise or only counterclockwise).
- In twisting, threads are not used; all completed products are fastened with a knot. The tail of the sausage ball is slightly pulled back and a knot is tied.
Ninja sword
It's easy to make a toy sword from A4 paper.
To create such a sword you need to stock up on:
- four sheets of A4 paper;
- a piece of cardboard;
- tape or office glue.
Operating procedure.
- From the prepared sheets you need to carefully roll two absolutely identical tubes.
- The blanks must be inserted one into the other. Secure the connection point with tape or glue it.
- Cut one edge at a 45 degree angle.
- Cut a rectangular shape from cardboard and cut a hole in it. Carefully place on the sword. This is a guard that protects the hand.
- To give strength to the blade, you need to twist a narrow tube from a sheet of paper and insert it inside the blade.
- From the remaining sheet of paper you need to roll up a wide cylindrical piece and secure it as a handle.
- Additionally secure the joints with glue or tape.
If desired, it is easy to color the handle and guard with paints or a felt-tip pen.
Assembly and design of the product
The handle of the blade can be decorated with leather.
The following materials are needed:
- wood for the handle and leather, cord for decoration;
- sheet metal for the cross;
- a piece of thick rod or a cast blank for the head of a sword.
A metal crosspiece (guard) is cut out and sanded, and the recess for the blade's shoulders is adjusted as accurately as possible so that the crosspiece does not move during use. The head of the sword is turned from a blank or cast. The mass of this part should balance the blade.
2 identical parts for the sword handle are cut out of wood. In the central part, a chisel is used to hollow out a recess for the shank of the blade, mark and drill holes for fastening.
- Put on a cross.
- The halves of the handle are smeared with glue and placed on the shank, wrapped with a cord until the glue dries. The handle is secured through the holes with rivets (studs) made of soft metal (copper, brass, aluminum) or a threaded connection is made.
- Put on the head. The protruding end of the shank is heated and riveted. If desired, it can be ground flush.
The blade is finally polished and the edges are sharpened, the handle is decorated with leather, cord or otherwise. Making a sword is available to anyone who is interested and who has at least basic skills and information in the field of metal processing.
Source: moyakovka.ru
Knight's sword
A massive knight's sword will require a sheet of thick corrugated cardboard large enough to create a solid piece. If there is no material of a suitable size, the structure can be glued together from several parts. However, this will affect the strength of the product.
To work you need to prepare:
- packaging cardboard;
- food foil;
- colored paper;
- PVA glue or glue stick;
- scissors and stationery knife;
- simple pencil.
Operating procedure.
- First of all, you need to decide on the size and make a template of the entire sword, along with the handle.
- The outlines of the template are carefully transferred to a cardboard base.
- Carefully cut out the blank from cardboard. It is convenient to cut thick cardboard with a stationery knife.
- The edges of the cut piece need to be cleaned a little so that they become even.
- The blade is carefully wrapped in foil up to the hilt.
- The handle is covered with colored paper.
- After the product has dried, it’s easy to apply spectacular patterns to the handle with a marker.
In the same way, it’s easy to make a hero’s sword from a piece of corrugated cardboard. Using food foil as decoration will make the sword look like a real one.
Letters
Rolling simple balloon letters is very easy, so there's no need for step-by-step tutorials here. Typically, the balloons are filled with air, leaving the end 5-10 cm uninflated. The folds are marked with a marker. For beauty, you can decorate these places with small 3 cm bubbles.
Balloon figures are easy to make with your own hands. Beginners need a little practice to master this skill. Then step-by-step instructions will not be needed, because experienced craftsmen rely only on their own imagination, inventing all kinds of new forms.
Diamond sword from Minecraft
There are many types of bladed weapons. Among the popular options are swords from the game Minecraft. One of them is the diamond sword.
Such a craft can please children and diversify their games.
To work you will need:
- corrugated cardboard;
- two sheets of colored paper;
- PVA glue or glue stick;
- stationery knife;
- scissors;
- markers or felt-tip pens.
Operating procedure.
- It is necessary to cut the blank from cardboard according to the template. The finished template is easy to copy or draw yourself.
- If necessary, trim the cuts using fine sandpaper.
- You need to cut out designs for both sides of the product from colored paper. In this case, one sheet is glued as a base. The top sheet requires square cuts to be made in order to create a sword similar to its digital counterpart in the computer game.
- Additional details can be easily emphasized using markers of different colors.
It is easy to make a stronger sword by gluing it from two cardboard parts.
Paper laser sword
It’s easy to please fans of the Star Wars series by making a glowing sword out of paper.
To work you need to prepare:
- A3 paper;
- small flashlight;
- tape or glue.
Operating procedure.
- First of all, you need to decide on the size of the sword in order to measure the required size of the workpiece.
- A tube is rolled out of paper, the diameter of which should correspond to the diameter of the prepared lantern.
- The flashlight needs to be inserted into the lower part of the workpiece, the one where the handle will be.
- The inserted flashlight must be secured with tape or paper and glue so that it does not fall out. In this case, it is necessary to provide the ability to turn it on and off.
- Decorate the handle with a small circle cut out of paper.
The laser sword is ready. The color of the backlight will depend on the color of the paper and the flashlight.
Japanese katana
If you have already made a paper knife, we suggest adding a sword to this weapon. Now we will look at how a toy katana is made from paper. The katana is the main weapon of the samurai. With her help they fight the villains.
For production you will need:
- three white bases and two orange;
- tape and hot glue;
- ten popsicle sticks;
- ruler and simple pencil;
- scissors and a stationery knife.
If everything is prepared, let's start manufacturing:
- Place one of the white materials on the work surface in a vertical position. Using a ruler, measure two centimeters from below and draw a line along this mark. Exactly along this line we bend the lower part of the material. We continue bending until the very end.
- Cut out a strip of orange about five millimeters wide. Starting from the edge of the previous workpiece, we wind this strip first in one direction. Cover it with tape on top. We cut off another such strip and, starting from the bottom, twist it onto the handle. Cover everything with tape.
- Solid orange material, folded in half. Then we turn it over and lengthwise, then bend it in half again. We bend everything several more times and fix the edges with tape. Having fixed the product, using a ruler and pencil we draw lines from corners to corners. It turns out to be a cross, focusing on its middle, draw a rectangle with a length of two centimeters and a width of five millimeters.
- Cut out the shape with a stationery knife. We insert the manufactured handle into this hole and fix it with hot glue. We combine two white sheets into one long one, and glue the joints with tape. Along the longest lower part we put the same mark of two centimeters, and twist the part with such stripes.
- We glue the edge with tape. Cut off the end from one side at an angle. We glue the sticks together and get five wide blanks. We fix the resulting elements by length. We insert them into the middle of the katana blade made of paper material. We insert the first part of the craft into the one we just made and fill the joint with hot glue.
The katana is ready. Now your child can become a real samurai. And if you also make shuriken, then any friend who comes to play with your child will envy such a gift.
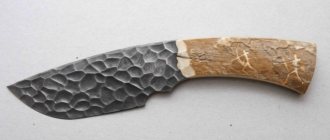
Types of swords and their characteristics
In the past, the sword had special significance. There were specimens, like works of art, that were considered family treasures. In battle, they used products that were more modest, but no less noble and strong.
The design of the sword itself is quite simple: a long blade with a hilt. However, the products come in various forms. The main purpose of the sword is to cut and thrust.
The most common and easiest to manufacture are straight and one-and-a-half blades.
One and a half blade
And the longest and heaviest is two-handed, it delivers heavy and fatal blows.
Two-handed sword
Based on their shape, blades are classified into three types. Each of them has its own advantage in battle:
| Blade type | Application |
| Straight and long blade. | Convenient for stabbing attacks. |
| Curved blade towards the butt. | Used for impact, the wounds are carved and deep. |
| Curved forward with a widened and heavy top. | Effective for slashing attacks. |
It should be understood that different blade shapes can be used to produce different strikes; you should not stop at one type. The ability to use various swords distinguishes a real warrior from an amateur.
Balancing and center of gravity of the blade
Sometimes a seemingly perfect sword may turn out to be inconvenient for its owner. It all depends on the correct balancing of the product and the anatomical features of the person. Correct placement of the center of gravity is the key to success in battle.
The most popular is its location on the blade , just 10-15 cm below the guard.
With a shifted center of gravity closer to the tip , the blow of the blade gains greater force, but controlling the sword becomes more difficult.
When the balance is shifted towards the handle , it may seem that controlling the product has become easier. But the force of the blow and its accuracy will decrease.
Correct balancing of the sword
Optimal sword sizes
To make a sword with your own hands, you will need to find out what size it will be:
- if the plan is to make a two-handed blade, then you should take a stick and measure the distance from the ground to the chin, this will be the total length of the product;
- a weapon in the Slavic spirit should reach the warrior’s sole in a lowered hand.
With such simple techniques you can get a blade that is convenient for the owner. But it is difficult to forge swords for an entire army, selecting individual sizes for each warrior. That's why there used to be certain standards.
What kind of swords were made?
Short swords were made 600-700 mm, and long swords were made a little more than 800 mm.
What was the weight of the sword?
The weight of the products varied from 1.5 to 5 kg.
What were the parameters of medieval swords?
Medieval swords were made more than 900 mm in length, but their weight was not significant, about 1.3 kg.
Today, modern fencing masters recommend the most suitable sizes for the product:
- the full length of the sword is the distance from the floor to the swordsman's chest;
- handle length 2.5 palms;
- the length of the guard is 1.5 palms;
- center of gravity 5 fingers along the blade from the guard.
Knowing the parameters of a swordsman, it is not difficult to make a weapon as convenient as possible. There are still some details left to figure out and you can safely start making a sword with your own hands.
Materials for making a sword
Craftsmen have a variety of raw materials at hand to make swords. The main task is to know for what purpose the weapon is being manufactured.
| Product material | Application |
| Wooden swords. | For training. |
| Blades made of steel. | Today they are used for reconstructions of historical events. Beautiful products that are valued as objects of art and collectibles. |
| Swords made of cardboard or paper. | To make a toy for a child. |
Double-sided sword with sheath
For little knights, let's make a double-sided version. It will take about half an hour of free time to make it, but after spending half an hour, you yourself will be surprised that you were able to make such a weapon.
Before starting production, prepare:
- fifteen sheets of A4;
- glue;
- scissors;
- clothespins;
- simple pencil.
Ready, then let's find out how such a sword is made from paper material:
- We combine three sheets, align the sides and bend them in half along their length. We unfold it to its normal position and turn each side towards the middle, that is, towards the resulting line. Next, we bend two corners towards the center, on one side. We bend the sides of the resulting workpiece one more time towards the center. Bend the element in half.
- Using an identical method, we make another such element. Using three more sheets, we make a similar part, only without the sharp sides. We unfold one of the parts with a sharp side and the element that was made last. Apply glue to the middle and glue an even piece. Glue the second part.
- We wait until it dries and fix the remaining sides of the elements to the base. Now apply a thick layer of glue, press them down and fix them with clothespins until dry.
- While the product dries, take one sheet and fold it in half and in half. We direct the sides towards the center. Roll it three more times and cut it into two pieces. We lift one side, apply glue and press the raised element. We also glue the second part.
- We attach the product to these blanks and put marks in the middle. We connect these marks with a horizontal line. Cut holes along the marks. We thread the base through them. We bring the elements almost to the center of the product, leaving room for hands. Let's fix these elements.
- Fold the sheet in half until you get a strip one centimeter wide. Unfold and cut into pieces along the folds. We fold all the resulting strips in half, spread glue on one side and twist two strips.
- Glue the remaining strips lengthwise. Apply glue to one side and twist it onto the handle itself at an angle. After lining the handle, we strengthen the fastening of the dividers with another layer of wrapping on both sides. We apply a whole sheet to the blade and wrap it. Having wrapped it, we glue the element and get a cover. We do the same with the other side.
Dec. 13, 2011
05:09 pm - Crafts. Puss in Boots sword and carnival costume.
After watching Puss in Boots 2011, my son has a new hero, actually Puss in Boots. New Years is soon. And of course, you need a suit for the New Year, and of course, a puss in boots. We went shopping in search of an interesting costume, but either a costume without a sword, or a sword with the wrong costume (with a musketeer costume). In general, we decided to make the child’s costume ourselves. We went to a fabric store and to the market. I quickly figured out how to make a sword. At the market we bought a set of three flower pegs (they are sold in sets of three) and a small funnel:
Below are step-by-step photo instructions on how to make a sword. (Last time when they made a soldier, I was asked to make more detailed instructions :))
This is actually a “flower peg”; you can buy it at any flower shop):
You will also need a shiny self-adhesive film (bought at a hardware store, we sell it by the meter):
Cut a strip 3-5 cm wide
To prevent it from curling when gluing, roll it in the opposite direction and leave it for a while:
At the ends of the “peg” there are these tips:
Carefully remove them using pliers:
Spread the film on a flat surface and remove the protective layer:
Jedi lightsaber
Every child who knows about the Star Wars movie universe wants to get the famous Jedi lightsaber. This beautiful and at the same time dangerous sword is generally very difficult to make, but there is a master class that allows you to make it within half an hour.
For making it you will need: a strong wooden round stick as the base of the sword, colored tape of the child’s choice (from the film it is known that the blue color is the Jedi sword, the red sword is the sword of the negative heroes of Star Wars, the green is Yoda’s sword), scissors, glue gun, utility knife, rope or twine:
- First, you need to make a handle on the base of a wooden stick. To do this, you need to wrap the selected area with twine and secure it to the wood with a glue gun. You can also use a paper towel roll as a handle, which is also attached with hot glue to the base.
- For the rest of the sword, i.e. blade, apply colored tape of the selected color around the entire circumference of the sword.
Thus, after two easy steps, the sword is completely ready!
Each of the swords must be made based on the interests of the child. With the help of the above master classes, you will be able to make durable and beautiful swords that will be indispensable toys for children's games.
How to forge a blade with your own hands?
To obtain the desired thickness, level the plane of the blade by moving it back and forth in a circle.
Forging involves the formation of a metal product by striking a hot material, which, due to exposure to high temperature, becomes plastic and soft. To make a sword using the forging method, you will need:
- low-carbon steel (rod or strip);
- hammer;
- anvil and forge
If you start forging from a rod, then the first step is to forge it into a square or rectangle along its entire length. Then a strip is cut from this blank, the thickness of which corresponds to the thickness of the intended product plus excess, which will be removed during further processing.
You should try not to cool the metal too much, since the inevitable bending during forging is better to straighten before the next heating of the workpiece.
The allowance along the butt is ground together with the debris and aligned with the side surface of the circle.
A distance is set back from the end of the strip that will be slightly less than the required length of the handle, taking into account that when this part is thinned, it will lengthen. Heat the workpiece until the metal glows red and break the shank. To do this, at the required distance on the edge of the anvil or on the backing tool, use the sharp end of a hammer to form a “step” - the shoulders of the blade body. The thinner part is called the shank. Pull the shank to a cone.
The body of the blade is given the desired contour. Slopes from the middle to the edges can be formed using sandpaper or forged by striking at a strictly defined angle from the edges to the center of the strip. The forger's elbow pressed to the body will help maintain a constant position of the hammer during forging. This way the blows will be delivered strictly vertically, and the inclination of the striker to the plane of the anvil will be controlled by fixing the hand in a certain position. The fullers on the blade are traditionally forged using a template.
Scale particles remaining on the metal make its surface uneven, covered with dents of varying depths. To remove scale during the forging process, the hammer and anvil are periodically moistened with water.
The bottom of the blade is satin-finished along its entire length, then the transverse line of the heel is processed.
After the final finishing of the blade, it is annealed to eliminate internal stresses: it is heated to red and left to cool in the forge. Then start hardening:
- The blade is heated to a barely noticeable red glow as evenly and slowly as possible. The air flow from the blast should not hit the product. At the quenching temperature, it is kept for some time, which is calculated by a coefficient of 0.2 from the heating time.
- To quickly cool a heated blade, you need a large volume of cold water. It is completely immersed in the container vertically or at an angle.
- The blade section is cleaned to a shine and the blade is again placed in the forge for tempering after hardening. Heating is carried out until the cleaned area acquires a golden color. The sword is cooled in air.