Calculators for calculating cone development sizes
Sometimes, while performing certain chores, the master is faced with the problem of making a cone - full or truncated. This could involve operations on, say, thin sheet metal, flexible plastic, regular fabric, or even paper or cardboard. And the tasks are very different - making casings, adapters from one diameter to another, canopies or deflectors for a chimney or ventilation, funnels for gutters, a homemade lampshade. Or maybe even just a fancy dress for a child or crafts assigned by the labor teacher at home.
Calculators for calculating cone development sizes
To roll a three-dimensional figure with given parameters from a flat material, you need to draw a development. And for this you need to calculate mathematically and transfer graphically the necessary exact dimensions of this flat figure. We will look at how this is done in this publication. Calculators for calculating the dimensions of the cone sweep will help us in this matter.
Creating a Christmas tree
You can create an excellent Christmas tree decoration from a finished paper cone. A wide variety of materials are used, but the overall manufacturing system remains common.
- Tape or cling film is glued to the paper cone.
- Thick woolen threads are attached on top of them, using PVA or other suitable glue.
- After they dry well, you need to remove the cone from them. The threads must retain its shape.
- All that remains is to add elements for decoration. These can be small knitted balls, stars made of shiny paper, or any other materials that are at hand.
To create a Christmas tree, you can use a completely different technique. Papier-mâché will come to the rescue, with which you can also make a paper cone. Of course, much more material and time will be required, but the finished structure will be durable and stately.
- For work you will need newspaper or magazine trimmings. Almost any paper will do. A base is also needed. You can take any plastic cone, for example, from children's toys. It will not be damaged during the manufacturing process.
- The selected base is coated with PVA and a layer of paper is placed on it. When it dries, you can apply the next one. In this way, the process continues until sufficient thickness is gained.
- Now you need to remove the base. Sometimes you have to cut the shape to do this.
- Then, instead of the base, you can mark a rod inside, which will act as a frame.
All that remains is to glue the cut halves back together, and you can start decorating the future Christmas tree. For example, you can actually paint it or wrap it with threads, as in the photo below. This scheme will allow you to create any variants of Christmas trees, depending on your desire and the existing base.
Calculators for calculating cone development sizes
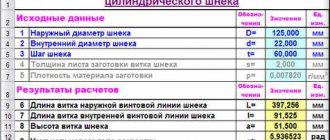
A few words about the calculated parameters
It will not be difficult to understand the calculation principle by understanding the following diagram:
A truncated cone with defining dimensions and its development. A truncated cone is shown, but with a full one - the principle does not change, and calculations and construction become even simpler.
So, the cone itself is determined by the radii of the bases (lower and upper circles) R1 and R2 , and the height H. It is clear that if the cone is not truncated, then R2 is simply equal to zero.
The letter L indicates the length of the side (generator) of the cone. In some cases, it is already known - for example, you need to make a cone according to a sample or cut out material to cover an existing frame. But if it is unknown, it doesn’t matter, it’s easy to calculate.
The scan is shown on the right. For a truncated cone, it is limited by the sector of the ring formed by two arcs, external and internal, with radii Rb and Rs . For a full cone, Rs will also be zero. It is clearly seen that Rb = Rs + L
The angular length of the sector is determined by the central angle f , which in any case must be calculated.
All calculations will take literally a minute if you use the offered calculators:
Step 1 - determining the length of the generatrix L
(If it is already known, the step is skipped)
Step 2 - determining the radii of the inner and outer sweep arc
Radii are calculated one by one - with a choice in the corresponding field of the calculator.
An example of solving a geometric problem
Given a round straight cone. It is known that its lateral scanning angle is 120o. It is necessary to find the radius and generatrix of this figure if it is known that the height h of the cone is 10 cm.
The task is not difficult if you remember that a round cone is the rotation figure of a right triangle. From this triangle there follows an unambiguous relationship between height, radius and generatrix. Let's write the corresponding formula:
The second expression that should be used when solving is the formula for the angle φ:
Thus, we have two equations relating two unknown quantities (r and g).
We express g from the second formula and substitute the result into the first, we get:
The angle φ = 120o in radians is 2*pi/3. Substituting this value, we obtain the final formulas for r and g:
It remains to substitute the height value and get the answer to the problem question: r ≈ 3.54 cm, g ≈ 10.61 cm.
Inclined cone development
Let us consider the procedure for constructing a scan of the lateral surface of an inclined cone using the approximation (approximation) method.
- We inscribe the hexagon 123456 into the circle of the base of the cone. We connect points 1, 2, 3, 4, 5 and 6 with the vertex S. The pyramid S123456, constructed in this way, with a certain degree of approximation is a replacement for the conical surface and is used as such in further constructions.
- We determine the natural values of the edges of the pyramid using the method of rotation around the projecting straight line: in the example, the i axis is used, perpendicular to the horizontal projection plane and passing through the vertex S. Thus, as a result of rotation of the edge S5, its new horizontal projection S'5'1 takes a position at which it is parallel to the frontal plane π2. Accordingly, S''5''1 is the natural value of S5.
- We construct a development of the lateral surface of the pyramid S123456, consisting of six triangles: S16, S65, S54, S43, S32, S21. The construction of each triangle is carried out on three sides. For example, △S16 has length S1=S''1'', S6=S''6''1, 16=1'6'.
The degree to which the approximate development corresponds to the actual one depends on the number of faces of the inscribed pyramid. The number of faces is chosen based on the ease of reading the drawing, the requirements for its accuracy, the presence of characteristic points and lines that need to be transferred to the development.
Transferring a line from the surface of a cone to a development
Line n lying on the surface of the cone is formed as a result of its intersection with a certain plane (figure below). Let's consider the algorithm for constructing line n on a scan.
- We find the projections of points A, B and C at which line n intersects the edges of the pyramid S123456 inscribed in the cone.
- We determine the natural size of the segments SA, SB, SC by rotating around the projecting straight line. In the example under consideration, SA=S''A'', SB=S''B''1, SC=S''C''1.
- We find the position of points A, B, C on the corresponding edges of the pyramid, plotting on the scan the segments SA=S''A'', SB=S''B''1, SC=S''C''1.
- We connect points A, B, C with a smooth line.
From a flat sheet to a round shell:
Rollers with an asymmetrical arrangement of rolls (Fig. 11) produce almost complete bending of the shell.
The most modern are four-roll machines (Fig. 12), which perform rolling and hemming of edges in one cycle. The bending radius of the shells is checked using templates. Possible defects in rolling of cylindrical shells are shown in Fig. 14.
Cones and transition elements in every strength and material quality
In addition to cones and transition parts, we also produce shells and extensions of any kind. Components that cannot be transported in one piece due to their size, we produce, as far as technically possible, in a number of segments that can be assembled on site to obtain the finished product.
High precision and reliability in forming technology - just in time
In production, we place great emphasis on outstanding quality and precision. There are many reasons why you might want to make a metal foil cone. Metal cones are used to block chimneys, even for certain types of fires in the open air and during barbecues, and sometimes for decorative purposes
Folding sheet metal is easier than you might expect, so don't be intimidated by the process
Metal cones are used to block chimneys, even for certain types of outdoor fires and barbecues, and sometimes for decorative purposes. Folding sheet metal is easier than you might expect, so don't be intimidated by the process
Enter it completely, but with caution, of course.
Also, the methods for obtaining the desired shape are different.
Bending of conical shells is done in several ways:
1) By installing at an angle the middle roll for symmetrical three-roll machines and the side roll for asymmetrical three-roll and four-roll rollers (Fig. 15). 2) Flexible along the center line sequentially in different areas (Fig. 16) on rollers. First, the edges are hemmed, then the middle of the workpiece is bent in each section with reinstallations. This method leads to increased wear and tear on the equipment.
3) Bending of shells on rollers with replaceable conical rolls. This method is justified in serial and mass production. 4) Rollerless method for sheets up to 20 mm thick. In Fig. 17 shows the folding method. The edges 3 and 4 of the workpiece are fixed in supports 2 and 5, brought together, and the supports are simultaneously rotated in different directions. Next, the edges of the conical shell are joined using tacks and removed from the machine. 5) The most productive method is to manufacture conical shells in dies (Fig. 18). Before welding parts of the shells, they are pre-fixed to prevent deformation of the elements and ensure welding gaps. Aligning the edges is usually done with clamps and assembly rings for thin sheets (Fig. 19). Two clamps are installed on one shell at the ends.
The cylindricity of the shells is ensured by special devices with jacks that push the part apart. When assembling dimensional parts, tie strips and wedge connections are used (Fig. 20).
Manufacturing of a working cone to order
The pencil will draw a circle, and the small indentation that the compass left where it was supported should be marked. 2 Cut the circle using special metal foil scissors. Wear gloves so that the edges of the metal are very sharp. 3 Cut the circle in half. Using the support point of your compass as a guide and as your end point, cut a straight line there starting at both ends. You will now have a circle of metal foil with a slit that starts at one side and goes all the way to the center. 4 Overlap one side of the cut over the other. Starting at the gap, press the sheet pieces one on top of the other. At the same time, you will see that the circle begins to shrink and form a cone. Stop when necessary, depending on how deep you want it. 5 Tape on each side of the overlay. This will prevent the metal from moving and get rid of rough edges. Your metal blade taper is now complete. Wear gloves whenever you handle a metal blade to avoid cutting your hands. Metal blade Scissors for metal blade Compass with pencil Duct tape Gloves. The establishment of certain uniform rules finds its rationale in the need to guarantee, in relation to all professions subject to certification, the objectives required by certificates of professionalism.
What materials are suitable for rolling?
We work with steel alloys, such as stainless steel, non-ferrous metals, various types of ferrous metals, galvanized sheets, profiles and pipes.
How is the work going?
The conclusion of the contract is preceded by contacting our managers and creating an application. Drawings are required to work on the project. You can provide them yourself or entrust it to our masters. In the second case, you need to provide a choice:
- sketch;
- photograph of the product;
- technical task.
Please note that drawing creation is not included in the basic service.
The next stage is the conclusion of an agreement, which will fix the final cost of the work and the deadline for its completion. If the order is urgent, you can also indicate this, and we will reduce the work time as much as possible.
After this, the work of our specialists begins. We manufacture a product that meets the provided parameters. We use high-tech equipment and control production at every stage.
When metal rolling is completed, we deliver the finished product and you receive it.
Order our services using an application on the website or call our specialists by phone in Moscow +7(495)730-222-4, +7(985)540-01-00.
Papier-mâché technique
This section will also teach you how to make a paper cone for your Christmas tree.
Large or small you need the size, in this case it does not matter. The workpiece is strong and solid even without an additional frame. This option is suitable for those who do not have a single dense sheet to make a cone of the appropriate size
This option is suitable for those who do not have a single dense sheet to make a cone of the appropriate size.
To work with this method, any paper is suitable, even newspaper or old magazines, however, you will need a blank base. You can use a plastic cone from a children's construction set (the original part will not deteriorate and will return to its place), plasticine, plaster, or polystyrene foam. Using one template you can make many papier-mâché blanks. Proceed like this:
- Cut or tear newspapers into small pieces.
- Wrap the prepared template in plastic wrap and coat it with PVA.
- Apply a layer of paper pieces onto the wet glue.
- Dry the first layer and then apply the second using the same technology.
- Work in this way until the required thickness of the workpiece is achieved.
- Cut the resulting shell and remove the original part.
- Install a frame rod if necessary.
- Apply a few more layers to seal the halves together.
All is ready.
You learned how to make a paper cone for the Christmas tree. Start by making the base and then start decorating it.
Small Christmas trees made from scrap materials are very suitable for New Year's decoration of an apartment. One of the main advantages of such Christmas trees is the ease of production and a wide field for imagination when decorating them. In addition, you can make many of these Christmas trees at once - different in appearance and decoration - and place them throughout the apartment, thus decorating it in an original way. The easiest way is to make a Christmas tree-cone out of paper. On specialized websites there are many ideas for decorating such Christmas trees, to which you can always add your own creativity. With all the variety of models, all Christmas trees have the same base - a cone made of paper or cardboard.