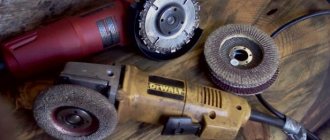
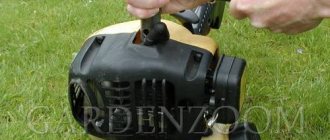
Removing and disassembling the starter, replacing broken parts
To repair the trimmer starter, you will need to first disassemble it and then reassemble it. This process is not particularly difficult. To work, you will need a screwdriver with a tip of the desired shape.
Everything should be done carefully, observing safety precautions, mainly so that the spring does not injure the technician if it accidentally flies out.
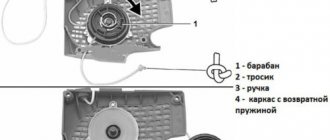
Starter assembly
Assembly of the starter unit is carried out in a number of stages:
- the coil is turned over, installing it so that the spring bend fits exactly into the groove of the body, as in the photo below;
- place two washers, between which a spring is placed;
- put the cup with antennae in place;
- tighten the screw (photos below).
When performing the above manipulations, it is necessary to place two washers. If this is not done, the spring will eventually damage the plastic cup, and when it is tightened, wedging will begin. Because of this, it feels as if a spring has come off. To eliminate this drawback, you need to install this part of a longer length or an additional washer.
When such spare parts are not available, you can simply unscrew the screw slightly and the starter unit will start working without jamming. But this option is temporary - it is better to repair it efficiently as quickly as possible.
Disassembly of the starter unit
The starting mechanism is disassembled in order to install new parts instead of broken ones in the following sequence:
- use a screwdriver to unscrew the screw that secures the pulley with the starter cover;
- remove the spring and antennae;
- carefully remove the pulley (you need to turn your head away or work while wearing glasses and gloves);
- determine why the trigger mechanism broke down;
- if the spring has collapsed almost completely, then it is replaced;
- when the spring leaves the hook, it is installed in its original place, bending the antennae first (the photographs show the installation process);
- After the spring plate is installed inside the groove, carefully twist it.
To change the spring, you should work carefully and carefully: it may accidentally burst under the influence of the force caused by installing it in place. Even if you carefully remove the roller, the spring strip very quickly flies off the reel and can injure your hand with its sharp edges.
immediately put the spring plate back in its original place. It often slips, so attempts must be repeated until the desired result is achieved.
Elimination of engine breakdowns
There comes an hour or day when the generator simply won't start. The cause is usually a faulty spark plug or an incorrectly adjusted carburetor. To do this, you need to remove the tip from the spark plug and unscrew it. Carry out an external inspection, clean the spark plug from carbon deposits and check its functionality: without screwing the spark plug into the cylinder, put on the tip with the wire and lean it against the metal surface of the gas generator. Next, we jerk the starter and look for a spark. If there is a spark, screw the spark plug into the cylinder . If there is no spark , then we check the integrity of the tip and wire or change the spark plug itself.
The ignition coil may need to be replaced. All gasoline generator engines are very sensitive to fuel quality. Often the fuel filter and the channels for gasoline entering the cylinder become clogged. This problem occurs quite often. To eliminate this problem, it is necessary to drain the remaining fuel from the tank and rinse the tank itself. Clean and rinse all existing filters: not only fuel, but also air. Most likely, you will have to remove and disassemble the carburetor.
In this case, it is best to have the necessary instructions on hand, since there are many small parts that will be difficult to assemble later. After cleaning and reassembling the carburetor, it must be readjusted according to the instructions from the manufacturer of the specific model.
Wear and tear of rubbing mechanisms is natural. After exhausting their resource, they need to be replaced. It is better to contact specialists with the necessary skills with this question. If you have experience in engine repair, then your own skills and the documentation supplied with the unit will be enough for you. Therefore, there is no need to consider a detailed overhaul.
Basic malfunctions of the trimmer starter
It is not difficult to determine the cause of the breakdown of the trigger device. There are several main options:
- broken cord (rope);
- when the spring breaks or becomes disengaged.
These parts are shown in the photo below.
It may happen that the starter mechanism is accidentally broken. The consequences will be disastrous if a broken rope is wound around the flywheel of a running internal combustion engine: then the spring will burst and the pulley will break. But such cases when a complete replacement of the starter assembly is required are extremely rare. In most cases, to repair the mechanism, it is enough to install a new spring or replace the cord.
Signs and causes of failure of the starter mechanism
The starter mechanism has two malfunctions.
In rare situations, the starter mechanism breaks due to careless use of the tool. The consequences can be unpleasant: a deformed cord wraps around the flywheel of a running engine, the pulley breaks, and the spring bursts . But these are isolated cases; a complete replacement of the starter is required very rarely.
How to repair a starter on a trimmer
Repairing the starter of a gasoline trimmer may be required at the most inopportune moment. In this case, there are two ways to solve the problem: replace the broken part or change the entire assembly. The latter option will cost more. To repair a device with your own hands, in most cases you will only need a screwdriver with an appropriate tip. Repair work will not take much time and does not require special knowledge. It is enough to know the device, the principle of operation, the nuances of assembling and disassembling the starter on a trimmer in order to achieve the desired positive result.
What to do if the chainsaw starter cord breaks?
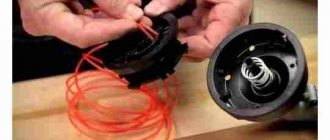
The cord may break where it is attached to the trigger reel or handle. A break in the middle is extremely unlikely, since manufacturers use very strong and wear-resistant nylon cables to make products. Such material can be sold in whole coils, but given the short length, it is wise to purchase a starter cord at a sports or hardware store.
To replace it, it is enough to buy 1-2 linear meters of thin nylon cable and make simple repairs with your own hands in a short time. This will save not only money, but also a lot of time compared to going to a repair shop. If you have all the necessary spare parts on hand, then in 20 minutes you will have a working chainsaw.
The design and principle of operation of a starter on a trimmer
The gasoline engine is, in principle, the main part of the brush cutter. Its power is in the range of 0.5-2.5 hp. The movement from it is transmitted to the shaft located inside the hollow rod, and then through a gearbox consisting of gears to a fishing line or knife (working body).
The lawn mower also has the following elements:
- protective casing;
- lever;
- a belt designed for ease of use of the device;
- a starter used to start a gasoline internal combustion engine.
All parts of the brush cutter are shown in the photo below.
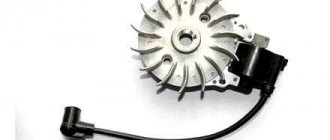
The starter on the trimmer is an integral part that starts the engine into operation. It is shown separately in two photos below.
The starting mechanisms of various models of lawn mowers work on the same principle: when starting the internal combustion engine, the protrusions, marked in the photo above with number 1, engage with pawls 3. When the engine starts to work, they return to their previous position due to the influence of centrifugal force. Wires 2 also play a similar role.
Replacing the starter pawl for Husqvarna string trimmer # 503873305
The process of returning the mechanism elements to their original position occurs due to the presence of a spring wound around an axis. It unfolds when the rope is pulled. After releasing the cord, it is retracted and wound due to the coiling of the spring. When starting the internal combustion engine of a lawn mower, the starting mechanism rotates its shaft until it starts working (starts up).
Today, gasoline lawn mowers are equipped with two types of starter mechanisms:
The first option is much more common.
The starter on the trimmer can function without breakdowns for a long time. It is impossible to clearly indicate the failure-free operation period. Everything is determined by the initial quality of the device and compliance with the rules of handling it.
READ How to Correctly Wind a Line on a Trimmer
Replacing a broken cord
A torn rope is replaced in the following sequence:
- the old cord is removed;
- choose a rope of appropriate size (thickness and length);
- having threaded it through a special hole located in the reel, tie a knot;
- cock the spring, producing the required number of revolutions;
- secure the handle.
It is better to tension the spring plate together with a partner so that the edge of the cord does not wind up inside the starter mechanism.
Assembling the starter on the trimmer and winding the spring is not difficult, you just have to do it carefully and with caution. For different models of lawn mowers, the breakdowns of the starting mechanisms are the same, so they are repaired in the same way. However, there are some nuances associated with their design features.
A brush cutter that starts with a button! If
If after repair the spring continues to fly off, then you can get rid of this reason using the following methods:
- squeeze a suitable piece of plate into the groove at the location of the spring hook;
- Drill holes on both sides of the groove in the coil, insert the spring hook into them and secure it with a wire.
The torn rope is replaced in the following sequence:
- the old cord is removed;
- choose a rope of appropriate size (thickness and length);
- passing it through a special hole located in the reel, tie a knot;
- cock the spring, producing the required number of revolutions;
- secure the handle.
It is better to tighten the spring plate together with a partner so that the edge of the cord does not wind up inside the starter mechanism.
Assembling the starter on the trimmer and winding the spring is not difficult, you just have to do it carefully and with caution. For different models of lawn mowers, the failures of the starting devices are the same, so they are repaired in the same way
With all this, there are certain aspects related to their design features.
Walk-behind tractors cannot be called complex structures, but still even they contain certain features. For example, during operation of the device, two starters work at once: the main and auxiliary. Spring, electric and manual options are used as reliable assistants.
The latter are the most common, because they can be easily installed on a walk-behind tractor and, if necessary, repair the object yourself. Such kickstarters are unpretentious and often successfully serve for years with careful use.
Trimmer starter - device and principle of operation
starter on your own , you need to understand the principle of its operation and know its structure. Today, manual and automatic starters are installed on trimmers, with the former being the most common.
The part is a plastic case that houses a pulley with a cord wound around it to start the engine. In order for the lace to twist itself after winding the tool, there is a band spring made of alloy steel on the inside of the pulley. A ratchet is installed on the front of the pulley, which engages the starter with the drive shaft of the tool motor.
On a note! Depending on the model and brand that produced the trimmer (Huter, Husqvarna and other brands), the ratchet pulley may be one piece or two separate components.
The principle of operation of the manual starter is the same on lawn mowers of Chinese, European and domestic production, be it Hitachi, Patriot or another manufacturer. To start the engine, the owner of the device sharply pulls the cord. This movement causes the pulley to rotate, and the protrusions on it engage with the pawls located on the flywheel. Next, the flywheel and crankshaft begin to rotate with the pulley. After starting the engine, under the influence of centrifugal force, the protrusions and pawls diverge in different directions. And the starter cord, after the user releases it, is wound around the pulley using a return spring.
Important! With intensive use, the drive cord breaks over time and the band spring wears out. These parts are easy to replace with your own hands.
Replacing the cord
To replace an element, you need to find a hole in the reel for it, through which you pass the cord, and then tie a knot. Next, you will need to cock the coil with the spring, performing several turns.
On a note! The exact number of turns can be found by looking at the instructions for using the trimmer, or manually. To do this, you need to measure the length of the rope and count how many times it can be wrapped around the reel.
For example, if the cord wraps around a circle six times, then to tension the spring, you need to turn the coil counterclockwise six times. After this, all that remains is to thread the rope through the hole and attach the handle to the cord.
Spring winding
Winding a spring is not an easy procedure. Not everyone succeeds in installing the part in place the first time, so you should not be upset if you fail. It is necessary to repeat attempts until the actions are successful. If you wish, you can watch a video on the Internet, where craftsmen tell in detail and show how to easily and quickly perform this operation.
Important! When winding and installing the spring, you need to remember that it is hardened, which means it can burst if you apply too much force. A new part is inexpensive, but you will have to spend time searching for it, which means that the work of mowing the grass will be postponed indefinitely.
To wind the spring, you need to place the bend in the groove, and then, turning the coil, carefully lay the part along the inner diameter of the bobbin. In this case, the spring must be constantly held with your hands - if it is not fixed, the part slips and jumps out, then the winding has to be done again. When done correctly, the spring is held tightly in its seat.
Other faults
Sometimes, after the repair has been carried out, the spring still falls off. There are two solutions to fix this problem:
- To prevent the bend of the spring from jumping out of the groove, you need to insert a small fragment of a metal plate between the bend and the wall of the seat. This will ensure a tighter fit of the spring.
- A homemade fastener also helps to hold the spring in the groove. It is necessary to drill holes in the coil on each side of the groove, place a spring bend in them and secure it with a piece of wire. These steps should be performed so that the wire does not touch the starter cover and does not slow down the movement of the pulley.
Assembling and installing the starter
To assemble the starter and install it in its original place, you must:
- turn the pulley with the spring down and place it inside the housing so that the spring bend falls exactly into the groove of the housing;
- install the washer, then the spring, and the second washer on top of it;
- Place a cup with antennae on top of the washer and screw in the screw.
When assembling, be sure to install both washers, otherwise the plastic cup will be damaged by the spring after some time, and when pulling the cord, the user will notice that it is jammed. It will look like a spring has fallen off. To fix such a breakdown, you will need to install a larger screw or another washer. If it is not possible to find the required parts, just loosen the screw a little, after which the starter will stop jamming. However, you need to understand that these are temporary measures and the problem should be fixed as soon as possible.
How to install a spring
In order to install a new spring, you must perform the following steps:
- Carefully remove the mechanism clip.
- Inspect the inside of the cage, in which the spring mechanism is located near the C-shaped element.
- Fix and tension the upper part of the spring with your finger and pull the trigger handle to the side.
- Remove the worn mechanism and wind a new spring. Kinks and twisting of the element should be avoided.
- Assemble a new spring mechanism. It is recommended to do this slowly so that the mechanism does not unwind.
- Thread the spring and insert it into the starter mechanism.
- Carefully secure the clip.
How to install a spring on a chainsaw starter?
Fitting the starter spring into the correct groove is not an easy task even for an experienced user. First, the spring should be twisted to its previous diameter and installed in the cavity of the drum hub. The outer end of the spring is fixed by the limiting protrusion, and the outer end should be positioned opposite the hole in the lock using a screwdriver. Using a screwdriver, align the loop at the inner end of the spring with the hole, after which the disk is lowered. By rotating the disk, check whether the ratchet pawl is in place. Next, the ratchet itself is assembled.
After installing the spring, it is necessary to adjust its tension. To do this, a cable is inserted into a groove on the circumference, and a return spring is twisted around it. After removing the slack, it is better to wind the spring an additional few turns to ensure the required tension on the part.
Starter for a chainsaw: device, breakdowns and do-it-yourself repairs
In the design of a chainsaw, the starter is responsible for properly starting the tool’s engine. Over time, chainsaw owners are faced with the need to repair this important unit. And, the sooner the malfunction can be eliminated, the less other important parts and mechanisms of the tool will be subject to wear.
READ Maintenance Trimmer Brushcutter Electric Parma Tk
Replacing the cord
When it is pulled out, there is constant friction of the cable against the starter housing. To replace, disassemble the unit body and carefully lift the ratchet drum so as to prevent the return spring from jumping off its sockets. It is better to do this work together: an assistant fixes the spring while the cable is being replaced. After securing the cable in the handle and in the grooves of the drum, the cable is wound onto the roller, and the body is assembled.
Worn cutting knives
Worn knives are the most common cause of motor drill failure. The edge of the cutting knife of a working auger should extend beyond the edge of the flange (more details here). A knife that is not replaced in time is the reason for the expensive repair of a clutch or gearbox, the price of which is many times higher than a spare knife purchased in advance.
It is very important to promptly change drilling tools that are unusable for work and to approach soil drilling wisely. If the drilling auger is jammed in the ground and it does not rotate, but the operator tries to continue drilling, does not reduce the speed and does not stop drilling, then the result of such actions will also be a breakdown of the clutch and gearbox.
Choose the right motor drill, be careful about the soil you are drilling, change the cutting blades on time and carefully read the instructions for motor drills, which say that you need to drill only at maximum engine speed. If the drilling tool jams in the hole, stop drilling and determine the cause of the jamming. This could be a stone in the ground, a tree root, or simply heavy soil that your motorized drill, due to its technical characteristics, is not able to drill through.
Starter replacement
Procedure for replacing a chainsaw starter:
- Remove the assembly from the tool body.
- Unscrew the mounting bolts and remove the side cover.
- Unscrew the mounting screw that secures the starter.
- Remove the clamp and spring mechanism of the starting system.
- Remove the pulley with cord.
- Replace all worn and damaged elements.
- Wind the pulley.
- Install a new starter .
- Reinstall the pulley with cord, clamp and spring.
- Screw the side cover and install the unit on the chainsaw body.
Before installing a new starter, it is recommended to inspect it for defects, check the quality of assembly and the presence of a guide bushing.
Device
The chainsaw starter device includes the following elements:
- ignition system screw;
- return spring;
- starting system coil;
- deflector;
- lid;
- magneto;
- drum;
- spark plug;
- the electronic unit;
- wiring;
- power button;
- handle and cable.
Main parameters of the chainsaw starting system:
- power - from 2000 to 2500 W;
- maximum number of revolutions per minute - 3000;
- weight - 0.5 kg.
After pressing the power button, the flywheel begins to rotate along with the magnet that is located on it.
An electromotive force appears in the system. The resulting current is converted into electrical signals using an electronic unit, which are transmitted to the moving elements. A spark is formed, which provokes ignition of the fuel-air mixture.
Prevention
Selecting and installing a starter is only half the job. If you want the purchased part to work for as long as possible, you need to pay close attention to caring for it. New things always work well. For example, a factory starter requires only one pull to start the engine. However, after a year of active use, the situation will certainly change. To prevent such problems from occurring, you need to constantly lubricate before starting. In addition, you should not overdo it when pulling on the handle, as this can cause mechanical failure.
If the kickstarter fails, repairs usually involve updating the components that have stopped working. For example, the cord is replaced if it is frayed, and the spring from the MB-1 can be refilled only if there are problems with its operation.
Thus, the starter is an irreplaceable part that ensures the operation of the walk-behind tractor. In the selection process, you need to pay attention to the manufacturer, compatibility with the walk-behind tractor itself and the type of model. In addition, you need to pay attention to constant care of the starter, which will avoid breakdowns and rapid failure during active use.
To learn how to prevent starter operation, watch the video below.
The use of any materials without our prior written consent is prohibited.
Design modification
Are there any options to improve engine starting? You can replace the mechanical component with an electric starter, then the need to pull the handle with all your might will simply disappear. But this modification is not available for all models of walk-behind tractors with manual start.
Electric starter device.
In addition, the electrical circuit chosen for installation will not fit every engine, so it’s worth looking at other types of walk-behind tractor starter. One solution could be a mechanical spring mechanism.
Some stores sell a kit for converting the Zubr walk-behind tractor. The old manual starter for the walk-behind tractor is no longer needed, so it is simply removed. An analogue with a spring trigger mechanism is suitable as a replacement. After installation, just change the position of the handle, and the engine will start almost immediately. A mechanical starter, thanks to the work of the spring, begins to accelerate the engine shaft without constant jerking movements. The replacement process will take no more than an hour.
The factory starter for the walk-behind tractor initially starts the engine with just one movement. Such smooth operation of the mechanism can last for a year, but the more often it is used, the faster the breakdown will occur. To avoid this as long as possible, you should check the amount of lubricant before starting, and also do not pull too hard on the cord handle. This will only reduce the likelihood of breakdown, but will not avoid it completely.
Installation Features
In order for the selected starter to be corrected for as long as possible and to be able to fully perform its assigned functions, it must be installed correctly. The installation process includes a number of steps.
- First of all, you need to remove the flywheel so that you can install the crown. Next, the filters are removed from the unit, allowing access to almost all parts of the walk-behind tractor.
- Now you need to get rid of the protective casing. This is quite simple to do: you just need to unscrew the screws that hold the starter basket. In order not to damage any parts during the removal process, it is best to use a special key.
- At this stage, you need to mount the generator in the designated place, wind the rope, and use it to install the kickstarter.
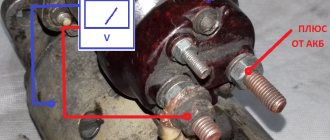
- The assembled system is mounted on the motor, and the starter terminals are connected to the battery.
As you can see, installing a starter on a walk-behind tractor yourself does not take too much time. The main thing is to strictly follow the rules and advice during installation. In addition, you should be extremely careful when choosing the starter itself. You must first make sure that it is suitable for your walk-behind tractor model. For example, an electric starter may not be available on all models. When repairing, the device must be disconnected from electricity.
If necessary, you can replace the starter using the same procedure. For ideal operation of the device, it is best to choose the same models that were previously installed on the device. Most power units of walk-behind tractors have a power of 13 horsepower, so you can use a regular top kit. To replace, use original components from the manufacturer, which will definitely not harm the integrity and performance of the walk-behind tractor.
Of course, it's much easier to fix something that can simply be replaced. For example, if the cord for a walk-behind tractor is damaged, you can easily replace it with a new one. But as for the starter spring, you will have to tinker a little. The fact is that you need to carefully study the mounting locations in order to select the optimal spring. If the hook is simply out of order, then it would be much more advisable to completely replace the mechanism.
Walk-behind tractor ignition system
Ignition adjustment
The ignition coil for the Neva walk-behind tractor is adjusted as follows:
Video review of adjusting the ignition of the walk-behind tractor engine
One of the main factors for the correct operation of the ignition system is the gap between the starter and the flywheel. It should be in the range from 0.1 to 0.15 mm.
To adjust it on the Neva walk-behind tractor, you need to remove the housing and unscrew the stator bolts. Then place the feeler gauge and set the required gap, tighten the bolts back and check the gap over the entire surface of the flywheel.
Generator, faults, elimination
The generator is an important component of the entire mechanism. It is designed to charge the battery and operate the headlights.
When choosing a generator, you need to pay attention to its power. It must exceed the power of all connected devices to ensure uninterrupted operation
For the Neva walk-behind tractor, it is possible to use an old car generator.
Important! During its installation, you must follow the diagram presented below. Otherwise, the generator may catch fire
There are 4 wires in total in the generator. Two of which are blue. It is thanks to them that the converter is connected. Red, connects to the headlights and supplies voltage to them.
Electric starter
Many people strive to improve the performance of their walk-behind tractor. During the winter seasons, it has difficulty starting due to the fact that the manual starter does not turn over. To solve this problem, a special electric starter was invented for the Neva walk-behind tractor. This is an autonomous device that, when the ignition is turned on, begins to rotate and gives a spark.
An electric starter is a complex design, and it is not possible to make it at home. You can use any other car electric starter that could be left over from an old car.
Candles
We have already figured out what spark plugs are for and how to change them. Let's look at the brands that are needed for each specific type of Neva engine:
| Engine model | Engine spark plug | Possible spark plug replacement |
| DM-1K (JSC "Red October-Neva") | BRISK NR17C | BOSCH WR8AC |
| I/C 6.0 (Briggs&Stratton) | CHAMPION RC12YC | NGK BKR5E |
| Vanguard 6.0 (Briggs&Stratton) mod.117 | CHAMPION RC12YC | NGK BCPR5ES BRISK DR17YC |
| HONDA GX200 | 98079-55876 (NGK BPR6ES) | DENSO W20EPR-U BRISK LR15YC CHAMPION RN9YCC BOSCH WR7DC ENGELS A17DVRM |
| EX17 (Robin SUBARU) | 065-01401-50 (NGK BR6HS) | BRISC NR15C BOSCH WR7AC CHAMPION RL82CC |
| HONDA GC160 | 98079-56846 (NGK BPR6ES) | DENSO W20EPR-U BRISK LR15YC CHAMPION RN9YCC BOSCH WR7DC ENGELS A17DVRM |
| I/C 8.0 (Briggs&Stratton) | CHAMPION RC12YC | |
| EY15 (Robin SUBARU) | 065-01401-50 (NHSP LDE6C) | NGK B6HS NGK BR6HS CHAMPION L86C CHAMPION RL86C |
| Honda GX120 | 98079-55876 (NGK BPR6ES) | DENSO W20EPR-U BRISK LR15YC CHAMPION RN9YCC BOSCH WR7DC ENGELS A17DVRM |
As standard, Neva walk-behind tractors are not equipped with a headlight. However, this option is presented as an additional option. Since carrying out work in the evening without a headlight is almost impossible.
If desired, you can install the headlights yourself from a car, scooter, tractor, etc. To do this, use welding to make a special box for the headlight and place it there. And connect the wires from it to the generator. But not directly, but through a switch, which should be located in the middle and be responsible for turning the headlights on and off.
Motoblock starter design - design features of the mechanism
Each walk-behind tractor model has its own design features and is equipped with different mechanisms. Thus, to equip more modern agricultural units, manufacturers use two starters at once.
Husqvarna 128r starter repair
A spring or auxiliary starter helps the main starter start quickly and smoothly. The main mechanism is a manual starter, which is responsible for starting the motor of the walk-behind tractor. Among the main elements of the walk-behind tractor starter are:
- Coil;
- Drum body;
- Washer, large and small spring;
- Reeds;
- Cord;
- Mounting nuts and bolts.
The reel on which the cord is wound is attached to the core of the drum body. A large spring is installed in the inner chamber of the drum, which is responsible for returning the drum to its previous position after each pull of the cord.
Some walk-behind tractors are equipped with an electric starter. The electric starter for the walk-behind tractor takes power from the battery. The larger the capacity of the latter, the longer the motor starting mechanism will work.
Both the manual kickstarter and the electric starter for the walk-behind tractor have proven to be quite reliable mechanisms with long service life and resistance to mechanical damage.
What other types of starters are suitable for a walk-behind tractor?
- Spring starter. It is considered not only easy to install, but also quick to start, because the device will start immediately after moving the handle of the walk-behind tractor. Thanks to the semi-automatic operation of the spring, the engine accelerates. Moreover, replacing a manual starter with a mechanical one will take no more than 2 hours;
- Electric starter for walk-behind tractor. The specified type is powered by a rechargeable battery. Naturally, it is this autonomous source that will determine the power level of the electric starter and the duration of its operation. But it is worth noting that not all models of walk-behind tractors with manual start can adapt to the specified one, therefore, before starting replacement work, you should consider this point and carefully study the capabilities of the existing mechanism.
Every owner of walk-behind tractors should understand that at first absolutely all starters function perfectly and can please their owners with this state of affairs for about a year. But without periodic lubrication of the parts, checking them and a commensurate jerk force, such joy will not last long. Take care of your starter and it will give you high performance and a long service life.
Starter for a walk-behind tractor: design, repair and maintenance recommendations
Motoblocks are known for their design features. In particular, because they use two starters at once. An auxiliary or spring starter helps the main one start properly and quickly. But, if the auxiliary starter suddenly fails, then you have to think about how to repair the recoil starter. Perhaps even with your own hands.
READ How to Set the Ignition on a Husqvarna 128r Trimmer
By the way, the spring option is not the only one. A manual starter on a walk-behind tractor is quite common; it is common in Russia. It is much easier to operate. It is easier to install, even if the user does it himself. It has a completely simple design:
- drum body;
- coil;
- a spring, or rather, two: large and small;
- washer;
- cord;
- reeds;
- bolts and nuts, without which neither a mechanical nor an electric starter can be assembled.
When assembled, it looks like this: the cord is attached to a reel, and it is attached to the core of the drum body. There is a special space inside the drum where a large spring is located around an axis. It is she who is responsible for ensuring that after cranking the starter returns to its previous position.
How does the starter of a lawn mower or trimmer work?
The starter is a generally unified and universal mechanism for lawn mowers, trimmers, gasoline and diesel generator sets. It’s not a problem to equip it even with a car, motorcycle or scooter, if you have free space in your vehicle to install it. It’s not for nothing that many Soviet cars and trucks were equipped with a starter tool that vaguely resembled a double-bent prybar.
A modern handbrake is started from a cord - it is tied to the mechanism and cannot be lost.
The starter assembly has the following parts:
- ignition spring with hook;
- cord wound on a reel;
- return spring;
- drive ratchet and main spring;
- mechanism housing protecting the ratchet;
- retaining bolt.
How to assemble a new lawn mower starter?
To assemble the starter, perform the following manipulations.
- Pass one end of the cord through the hole at the beginning of the spool and tie it in a knot. The knot should not pass through the hole. Otherwise, you will have to disassemble the starter again.
- Wind the cord around the spool itself.
- Install a spring into the starter housing, hook one end of it in the groove and wind it. For ease of winding, twist the housing counterclockwise.
- Place a ratchet mechanism on the spring.
- Hook the return spring hook onto the ratchet itself and secure it to the reel.
- Install the main spring and housing with the ratchet assembly, connect the starter parts together and tighten everything with the main bolt.
Once you have completed assembling the starter, pass the free end of the cord through the hole in the housing intended for the coil. Pass the same end again through the hole in the handle by which the cord is pulled. Tie a strong knot on the handle. Check the operation of the starter handbrake.
Worst case scenario
There are cases when the starter is still operational, but may break, for example, a worn cord . The ratchet has not yet had time to work when starting the engine, and the remains of the cord are immediately wound onto the reel, the return spring loses its hooks, and the grooves in the starter housing break. The result is a replacement of both the spring and the housing.
Sources:
https://bymosque.ru/remont-startera-trimmera-svoimi-rukami-video/
How to replace or replace the starter spring?
If everything turns out to be in order with the rope on the starter, suspicion falls on the reel itself. It is driven by a ribbon spring rolled into a roll. To change the spring, certain steps must be taken.
- Remove the starter from the lawnmower.
- Remove the starter coil.
- Unscrew the main bolt holding the pulley to the housing.
- Pull out the gripping tendrils and the spring; the ribbon spring will almost completely straighten or curl into rings of larger diameter.
- Hold it in advance.
- Check whether the spring is intact (there may be rust marks, breaks, etc.). If the hooks at its ends are torn, it will not be possible to bend new ones - high-carbon steel breaks when you try to bend it. Loose hooks are suitable for easy bending.
- Make sure the auxiliary (regular) spring and washers are in place. These parts protect the coil frame from being pierced by the ends of the main spring. If the washers and spring are broken and new ones are not available, do not screw the coil bolt tightly, but keep an eye on it - it may come loose and get lost.
- If the main (flat) spring is damaged, insert a new one of the same type. Place the engaging hook on the end of the spring in its place and bend it, inserting coil by coil into the space where it is supposed to be.
Rewinding the spring is completed in a minute. Skill in this action is acquired quickly.
How to replace or replace the starter spring, see the following video.
Starters for lawn mowers: design and installation features
A manual starter for a lawn mower or gasoline trimmer is a mechanical unit that includes a pulley mounted on a ratchet. A rope is wound around the pulley in its original position. When starting, it is pulled outward. The pulley is spring-loaded - as soon as you let go of the end of the rope, it will rewind. A flat strip rolled into a ring is used as a spring. It resembles the spring in a large mechanical watch that is wound once a day. The starter itself is often located at the rear rather than closer to the front end of the mower or trimmer. In order to correctly perform all manipulations with the starter for a lawn mower, you need to know the features of the device and installation.
Petrol mower repair: overview of faults and effective methods for solving them. Photo instructions from the pros!
Modern technologies and equipment make it possible to produce the best and optimal technical solutions, which become effective assistants in arranging a summer cottage or personal plot. A green lawn and other plantings can grow quickly; to tidy up the local area and mow lawns, a gas mower is used, which is also called a brush cutter, trimmer, or gas mower.
Traditional scythes are inconvenient and unsafe to use; they require a significant investment of time and effort, which will help save money with gas-powered scythes that combine functionality and practicality in their design. In the photo of lawn mowers you can see various high-tech devices, which are characterized by a set of performance characteristics, including such parameters as increased productivity and long service life.
A convenient and reliable trimmer is a technical device consisting of individual mechanisms, parts and elements that can wear out, become unusable and be damaged during intensive use.
Even with regular technical inspection, maintenance procedures and careful storage, such devices and their individual parts require repair and even replacement; all repair procedures can be carried out independently.
Brief contents of the article:
Assembling the brushcutter starter
When servicing and repairing a starter, it is important to assemble it correctly - as if the device was assembled by the manufacturer. Any of the parts, if installed incorrectly, will not allow you to fully use the trimmer or brush cutter.
- After winding the spring, turn the coil over and place it so that the second hook of the spring falls back into place. To control the correct installation of the spring, there are technological windows on the coil itself.
- Place the starter pulley and make sure that one of the spring hooks fits into the groove located on the starter cover.
- Insert the spring and washers on the sides so that the spring does not wear down the plastic compartment in which it is located. If the spring is broken and there is no other one like it, an additional washer is placed in its place.
- Insert the cup with antennae into the grooves of the coil.
- Place the coil in its place, tighten the bolt until it stops, but without fanaticism.
If you do not protect the compartment where it moves when the starter cord is wound and unwinded with washers from the main spring, the coil often jams when you try to start a gas trimmer or brush cutter. Loosening the coil bolt will result in its loss.
To learn how to assemble the starter for a lawn trimmer, watch the video.
Sources:
https://hitech-online.ru/tehnika-dlya-sada/trimmer/remont-startera.html https://zemlyconsalt.ru/pily/kak-ustanovit-pruzhinu-startera-benzopily.html https://tym- tractor.ru/populyarnye-stati/starter-na-motoblok-elektrostarter-svoimi-rukami-remont-ruchnoj-postavit.html https://stroy-podskazka.ru/trimmery/startery-dlya-benzokosy/
How tight is the spring?
You can give the spring the required potential force necessary for clear and quick winding of the cord by determining the length of the cord in turns. To prevent the cord handle from hanging down, add 1-2 more turns to the number of turns. So, if the cord has a length of 5 coil turns, then when charging the spring, rotate the coil 6-7 full turns.