Last week I lent one of my gas trimmers (which I wrote about earlier) Champion T-335 to a relative for use. What, strictly speaking, I don’t like to do in principle is borrow my own instrument. I don’t know what he (the relative) couldn’t figure out, but straight to the point - I DISASSEMBLED THE GAS TANK CAP, CLEANED THE VALVE AND LOST IT.
During the operation of the scythe, when taking fuel from the tank, so as not to create a vacuum inside (so that the tank does not shrink), there is also a need to take air from outside. This intake occurs either through a valve located in the gas tank cap (a rubber mushroom with a tricky hole inside), or a valve located directly on the tank itself, then the cap simply looks like a cap with a rubber seal and without holes. Air enters the tank through the valve, but cannot escape out.
Excessive pressure in the chainsaw gas tank
A chainsaw is a device that is useful for every owner. Regardless of what model of chainsaw you have, sooner or later you have to study it thoroughly in order to diagnose problems and repair the device yourself. Why is this necessary?
Of course, such a working tool is not insured against breakdowns, but some are not so serious that you need to contact a service center (where you will have to leave a tidy sum). Sometimes a chainsaw can fail due to a simple clogging of the breather. Don't know where the breather on your chainsaw is? You will learn about this and much more from this article.
What is a breather?
This is a part that looks like a standard valve. It plays an important role - it normalizes the pressure in the chainsaw tank. Why is it important to normalize blood pressure? In order to answer this question, we need to consider the process of vacuum formation in the tank. This happens when fuel is supplied when the gas tank is hermetically sealed (while the pressure on the walls increases). The breather equalizes the pressure (relative to atmospheric pressure). Without this small valve, the importance of which many people underestimate, proper operation of the chainsaw is impossible.
Owners of Husqvarna chainsaws can also read the manual - how to clean the carburetor correctly?
Where is the breather located on the trimmer of different tool manufacturers?
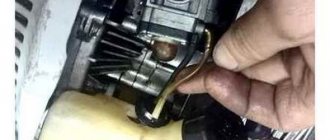
Knowing what a breather on a lawn mower or trimmer is, you need to figure out its location. Based on what the check valve is intended for, we can conclude that it is located directly in the design of the gasoline tank. On trimmers from different manufacturers, the check valve is located in different places. The most popular location for the device is on the gas tank cap. However, the part can be located not only on the lid, but in the structure of the gas tank. It all depends on the tool manufacturer. Stihl and Husqvarna trimmers and trimmers have a breather located on the gas tank cap. The photo below shows what the breather looks like.
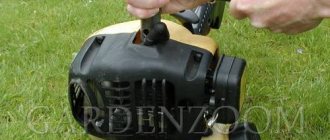
How to get to the breather?
You don't need any special skill. The easiest way is to refer to the instruction manual for your model. However, instructions for dismantling the handle can also come to the rescue.
First, pay attention to the preparatory stage.
- To make cleaning easier after dismantling the saw handle, remove the bar and chain, and the side cover. This is not necessary, but it is advisable, because at the same time you can use a brush and a compressor to remove traces of oil, dirt, and sawdust.
- Set the dismantled parts aside.
After cleaning, we proceed to removing the handle.
- The handle is attached to the body by three shock absorbers (all rubberized), but they cannot be removed immediately, so first we work with plastic plugs. They are usually located in the internal cavity of each shock absorber.
- Take a strong screwdriver and start squeezing out the shock absorbers. Start with the one that is located close to the handle at the back.
- We remove two screws that will allow us to dismantle the wire rod (it is connected to the carburetor and the gas trigger, located close to the handle where you removed the first shock absorber).
- At the end you are left with a handle that is connected to the shock absorber. Now all that remains is to unscrew the housing (twist the inside of the handle to the side).
- Remove the casing from the rubber band. All is ready!
If you have previously disassembled a chainsaw, you can quickly handle dismantling the handle.
Typically this step is followed by disassembling the starter. But, given the standard structural features of a chainsaw, we don’t need this step in order to get to the breather. If desired, you can also remove the starter, since a lot of sawdust accumulates under it.
Replacing the connecting rod mechanism
The connecting rod mechanism of the Partner 350 chainsaw is quite complex. Its malfunctions are often accompanied by loud engine operation. It should also be noted that when the connecting rod mechanism breaks down, the carburetor often fails. In this case, it is more expedient to start repairing the Partner 350 chainsaw with your own hands by inspecting the ignition module. You will also need to fully check the coupling. In particular, the condition of the centrifugal clutch deserves attention.
In order to inspect it, you need to remove the top cover. The clutch itself in this model is located near the carburetor. To get to the centrifugal clutch in the saw, the flywheel is removed. Next, the carburetor head is disconnected
In this case, it is important not to damage the fuel system. The centrifugal clutch is bolted on
This part can be disconnected using a key. If cracks are visible under the cylinder, then the clutch will have to be replaced. However, some experts advise not to rush into this. If the cracks are shallow, you can try to grind the surface a little with a file.
Breather Cleaning Procedure
A simple cleaning method is to use a sewing needle. Before cleaning the valve, make sure it is clogged. It's not difficult to do this.
- We remove the carburetor (it needs to be disconnected from the fuel hose), evaluate the number of traces of fuel.
- If fuel flows out and the breather remains clean, then everything is fine and you need to continue the diagnosis. If a weak stream of fuel flows from the fuel line, you can be sure that the breather needs a thorough cleaning.
Important! If, after cleaning, the chainsaw shows an increase in speed when idling, do not rush to panic and disassemble the tool or take it to a workshop. After cleaning, this behavior of the engine and carburetor (their interaction leads to an increase in idle speed) is considered normal. If this feature causes concern, you can slightly adjust the idle screw located on the carburetor and marked T.
Diagnostics of the candle channel
What to do if the fuel mixture used is in perfect order, but the gasoline trimmer still does not start? The reasons for the failure of the mechanism may lie in excessive moisture in the spark plug channel. To diagnose and fix the problem, you must do the following:
- Unscrew the spark plug. Wipe it thoroughly and then dry it.
- Drain excess fuel in the chamber through the appropriate spark plug hole.
- Clean the old spark plug if there is carbon deposits on its surface. Using a regular ladies' nail file or a needle file will allow you to cope with the task.
- When installing the element in place, set a gap of 1 mm. To check the parameter, just place any coin in the gap.
- Reassemble the functional block.
- Try to start the trimmer.
It is recommended to dry the spark plug channel for at least half an hour. However, in no case should you resort to calcining its elements. After all, heating the spark plug can lead to its final damage. What to do if the functional unit was serviced in accordance with the above recommendations, but the trimmer does not start, is there a spark? In this case, it is worth treating the threaded connection with gasoline. The latter does not need to be heavily soaked in fuel. It should be only slightly moistened. Such actions should be taken to ensure ignition. After all, no matter how strong a spark the candle gives, in a completely dry chamber there will simply be nothing to ignite.
Even if in this case the trimmer does not start, it is worth assessing the quality of the contact between the high-voltage wire and the spark plug. If there is no spark (even if there is a reliable connection between these elements), most likely the problem is caused by a breakdown of the ignition unit. In this situation, you will have to turn to the services of specialists who will reinstall the unit.
What is a breather and why is it needed on a trimmer?
Not many experienced mowers and tool owners know what a breather on a trimmer is and what it is intended for. What is it, and how does the part affect the operation of the lawn mower, it’s time to figure it out. Before understanding the question of what is called a breather on a lawn mower, it should be noted that this part has a direct impact on starting the tool’s engine.
A breather is a valve that allows air to pass in one direction. This part is called a check valve, through which the pressure in a closed container is balanced. This container on a lawn mower is the fuel mixture tank. Why do you need to balance the pressure in the trimmer tank, and how does the check valve affect the operation of the tool’s engine?
To understand the purpose of the check valve on a lawn mower, let’s briefly consider the features of fuel supply to the carburetor.
- The fuel poured into the tank is sucked into the carburetor while the engine is running. To do this, there is a hose in the tank that is connected to the carburetor
- A membrane is responsible for pumping fuel from the tank into the carburetor, which, by creating a vacuum, absorbs it
- When the engine is running, the tank gradually empties, and since the tank is a completely sealed container, in the process of reducing fuel, a vacuum or vacuum is created
- The higher the vacuum (increases with decreasing amount of fuel in the tank), the more difficult it is for the carburetor to pump fuel
- To eliminate the effect of vacuum in the trimmer tank, a check valve is used that allows air to pass in one direction and does not allow fuel to leak out.
The breather equalizes the pressure in the trimmer's gas tank, and if this part malfunctions, it becomes difficult to start the engine. This difficulty is that the carburetor membrane simply does not have the ability to suck in fuel due to the vacuum formed inside the container. The check valve works as follows:
- When pressure is created inside the tank, air is sucked in, thereby reducing the vacuum
- Air leakage into the tank during operation of the chainsaw prevents the fuel mixture from leaking out of the tank
STIHL MS180 oil pump and oil drive replacement
Video about repairing a STIHL MS 180 chainsaw on replacing the oil pump and priming oil.
If the lubrication system is working properly, oil will fly off from the tip of the tire onto the surface in which direction the tire is oriented, and a stripe of oily drops will appear. If there are disturbances in the system despite this, the surface remains unstained.
The second method is to remove the tire from the chainsaw and start it. When the engine speed increases, oil will flow from the oil channel at the location where the tire shank is installed; if this does not happen, you need to find the cause of the malfunction.
Shtil 180 has a standard configuration. However, like all modern chainsaws. Its components:
- Front and rear handle with anti-vibration system.
- Saw bar with chain.
- Two-stroke single-cylinder engine.
- Fuel and ignition systems.
- Housing made of high quality plastic.
Chainsaw Shtil 180, technical characteristics:
- A gasoline engine that runs on a mixture of fuel and oil in a ratio of 1:50. It has a power of 2 liters. With.
- The weight of the saw is approximately 4 kg.
- The saw is equipped with an easy start system.
- The capacity of the fuel and oil tanks is 250 and 140 ml, respectively.
- The saw bar is 14 inches (35 cm) long.
- Automatic chain lubrication.
When purchasing a new chainsaw, it is necessary to run it in. When operating in the cold season, it is necessary to warm up the engine before intensive operation. During operation, avoid overheating and take breaks to cool the saw. You need to do everything correctly and monitor the oil and fuel levels. Sometimes users have a question, what other oil can be used for this saw?
Is the breather the culprit behind chainsaw performance problems?
At the first sign of a malfunctioning chainsaw, do not rush to use the breather. Many people do not want to immediately start disassembling the handle if they are not completely sure that the small valve is the culprit for the malfunction. Before dismantling the chainsaw handle, rule out possible causes of device failure so that you know that the breather needs to be cleaned. Start small.
- Assess the quality of the fuel mixture. Not all manufacturers provide adjustable jets for chainsaw models. However, in some you can configure them. This gives “masters” the opportunity to experiment with the composition of the fuel mixture. Perhaps you decided to do such an experiment, but after a while you forgot about it, and now you blame the breather of the chainsaw’s gas tank for the malfunction of the tool. Remember that ideally you need to use the brand of oil recommended by the manufacturer (indicated in the instructions for the device); do not use the old mixture (it needs to be used up within two weeks maximum). In a month it will deteriorate and cause problems with the operation of the device.
- Check the spark plug (you may be filling it when you start the tool). Inspect this part, it should be clean without traces of oil. If there is plaque on it, it should be light; brown indicates a problem with the ignition coil. Keep spare spark plugs on hand to quickly eliminate this item from your list of saw problems.
- Not only the breather can become clogged, but also the carburetor jet and the fuel filter (which is why, after dismantling, the handle and the carburetor must be removed in order to properly clean the surface underneath from sawdust). You can clean both nodes yourself.
- Air filter clogged. This filter can become clogged with dust, which will become the main obstacle when trying to start the chainsaw.
Cycle No. 3: spark plug faults and spark formation
When the piston reaches top dead center and compresses the properly prepared working mixture along with air, it is ignited by an electric spark that jumps between the contacts of the spark plug.
A spark is a discharge of electric current in a gas environment. It must have a certain strength and power. A weak spark from a spark plug is unable to ignite the fuel mixture.
The reasons for a bad spark should be sought in the electrical and kinematic circuit of its formation - the magneto. This is the name given to a device that converts the mechanical energy of shaft rotation into a spark: current discharge.
Trimmers and chainsaws are now equipped with a contactless magneto electrical circuit: it creates fewer problems in operation than a system with a breaker. With it, the gas engine starts more reliably,
The ignition system of a lawn mower includes:
- flywheel or magneto rotor with built-in permanent magnets;
- high-voltage coil with wires and electronic circuit;
- spark plug.
When making repairs, you need to take into account that the electrical circuits of the magneto may differ in various electronic parts and spark plug designs, although manufacturers try to unify and standardize them.
The following picture will help you understand the principle of their operation.
The constant magnetic field of the rotor rotates next to a high-voltage coil that has control, power and charging windings. Each of them induces its own electromotive force, which is the source of electrical energy.
The output winding of the high-voltage transformer, under electronic control, produces discharge current pulses to the spark plug, between the contacts of which a spark jumps.
I used to see an old specialized spark plug tester in a sealed transparent case. Pressure was created inside the unit, the screwed-in spark plug was connected to the electrical circuit and checked for a spark.
However, each owner can check the spark strength and the operation of the spark plug and ignition coil directly on the trimmer:
- the spark plug is unscrewed from the cylinder block with a spark plug wrench;
- you need to connect a high-voltage wire with a dielectric tip to the head of the spark plug - we restore the connection contact of the output winding of the transformer;
- the metal part of the spark plug body is placed on the cylinder block. You can use a conductive conductor - the same spark plug wrench. Only it cannot be inserted into the cylinder: the piston head can be damaged;
- Use your free hand to pull evenly, but not pull, on the starter cord. Visually observe the state of the spark at the spark plug contacts.
The strength of the spark depends on the quality:
- spark plug contacts and the state of its insulation;
- integrity of the high-voltage wire;
- serviceability of the high-voltage coil;
- degree of wear of flywheel permanent magnets;
- air gap between the flywheel and the ignition coil.
If the spark is weak or absent, then most often the causes of the malfunction lie in dirty contacts or a violation of the factory spark plug gap. Other factors are less pronounced.
I wrote down the brand of my factory spark plug: L7T. You can use analogues in case of breakdowns or damage when repairs are required.
The spark plug gap of the non-contact ignition trimmer must be maintained in the range of 0.7-0.8 mm. During inspection and diagnostics, I recommend cleaning the contact electrodes from carbon deposits. Bluenose, a type of fine-grained needle file, will help.
The causes of malfunctions of the high-voltage coil and wire insulation must be taken into account. But they happen less frequently than with a candle. If you notice cracks, cuts, or damage to the insulating layer, then wrap it with electrical tape, put on heat shrink, or better yet, replace it completely.
A magneto air gap that is too high can also greatly affect the operation of the lawn mower. When it doesn’t start, you should reduce it yourself to 0.2 mm.
This issue is clearly explained by the owner of the video repair Nick TV in his video “A lawn mower or chainsaw doesn’t start well, first prevention.” I recommend watching it.
If you look at the bottom of the ignition coil, you will see a rectangular metal plate in the middle.
It should be located along the center line of the magneto. Shift forward or backward: the ignition will be early or late. The best performance is in the center. Achieve minimal deviations. The settings are simple.
How to clean the check valve and restore the functionality of the tool
First, let's figure out how to find out that the breather is faulty and needs to be cleaned or replaced. There are three ways to do this.
- The first method
involves inspecting the condition of the hole on the gas tank cap. If the hole is clogged with dirt, then the valve definitely needs cleaning. - The second method
is if the lawn mower does not start or the engine stalls after a short period of use. These are indirect signs that the carburetor cannot pump fuel into the system due to the pressure created inside the tank. - The third way
is to disconnect the fuel hose from the carburetor and then take a look. If fuel flows out in a strong stream, then the equalizer is working properly and does not need repair. If the fuel does not flow out or flows in a weak stream, this indicates a malfunction of the equalizing valve. Fuel does not leak due to the pressure created inside.
It’s quite easy to make sure that the problem is hidden in the breather - to do this, try unscrewing the cap. If this is difficult to do, and when you turn the hatch you hear the sound of air bleed, then you should definitely clean the breather.
You can clean the check valve in the following ways:
- Use a needle and compressor. The needle is needed to remove dirt from the hole in the tank lid. You need to blow compressed air from the compressor through the hole from the back side so that any remaining dirt flies out of the hole. This method is simple, but it is not always suitable
- Disassemble the breather and inspect it, followed by cleaning or replacing the device. The breather repair kit is not sold, so if the filter element or the valve itself is damaged (usually it is presented in the form of a rubber seal), you will need to buy a new gas cap for your model of tool
Below are instructions on how to disassemble the breather and clean it yourself:
- The first thing you need to do is make sure that the breather is located in the tank cap. Next, consider the case when the check valve is located in the lid structure
- Remove the lock from the cover, which serves to prevent the hatch from being lost when refilling the tool.
- We proceed to remove the pressure equalizer from the inside of the cover. To do this, you need to pry up the device and remove it along with the rubber seal.
- The parts removed from the cover are a rubber gasket and a breather with filter
- Next, you need to remove the filter from the rubber valve and clean and purge
- If the rubber valve shows no signs of damage, then it is enough to blow and clean it together with the filter, and then reassemble the device
At this point, the repair procedure is completed, and all that remains is to check the functionality of the lawn mower’s breather in action.
To summarize, it should be noted that this small detail is often the reason that it is impossible to start the chainsaw. Even completely cleaning the carburetor will not help eliminate this problem. Often, inexperienced mowers turn to service centers to repair tools, not realizing that the reason is hidden in this small part, which plays a very important role in the operation of the engine of a gasoline tool.
Malfunctions that you can fix yourself
When your petrol lawn mower won't start. First of all, you need to check the presence of fuel in the tank. If it is missing. top it up to the desired level. Often, when the device is not used for a long time, the gasoline “exhausts”, so it needs to be completely drained and refilled with new one. This procedure must be done carefully so that fuel does not get on the engine, as this can lead to further ignition (when the engine heats up). You can find out which gasoline is better to use from the technical data sheet of the device.
In order for the unit to start, you need to pump fuel with a primer (if this model has one) into the carburetor and set the maximum speed. You need to start the equipment carefully. The starter cord must be pulled out smoothly until it stops, and then pulled towards you in one even, sharp movement.
The problem may occur if the choke valve is not positioned correctly during the first start. Depending on the air temperature, it closes completely or is set to the middle position (above 30 C). Then it must be opened completely.
Check the air filter to see if it is dirty. To do this, turn off the machine and disconnect the wire from the spark plug. Unscrew the cap and remove the filter. Wash it with gasoline and dry it thoroughly, or simply install a new one. Remember that it is recommended to change the air filter after every 25 hours of operation.
Another reason why a gas lawn mower won't start could be a faulty spark plug. Perhaps it was simply filled with fuel. In this case, unscrew it, clean it and check for a spark. It may be absent when filling the spark plug with fuel. Set the choke control (if equipped) to the CLOSED position and start the engine. If this does not help, it is better to seek help from a specialist.
Try to constantly inspect the lower part of the device, since any damage to it may cause the engine to stall.
If your lawnmower started up normally, but stopped working almost immediately, the crankshaft or piston is most likely stuck. Another reason may be insufficient oil in the crankcase. We recommend that you manually move these parts and check the oil level using a special dipstick; you may be able to fix this problem.
However, remember that the replacement and repair of all faulty components and elements should be entrusted to professionals from authorized service centers. Never do this yourself.
If you want to talk to a specialist and get advice on an issue that has arisen, call us at: 7 (495) 135-29-39 every day from 10.00 to 20.00. We will provide all the necessary information.
Clutch
At low speeds, elements with friction linings (1), having a degree of freedom in the radial direction, are attracted to the center of the shaft by springs (4.5) and do not transmit rotation to the drum (3), connected to the sprocket driving the chain. When the chainsaw engine speed reaches values where the centrifugal force exceeds the force of the springs, the friction segments are pressed against the inner surface of the drum and do not begin to rotate it. As a result, the drive sprocket begins to rotate, driving the saw chain.
As you can see in the photo, the star is located
On other chainsaws, the sprocket may be located on the outside of the clutch.
The main advantage of clutches of this type is that when the chain jams, the chainsaw clutch slips without stopping the engine and without causing breakdown of the mechanisms that transmit movement from the engine to the chain.
Fixing an oil leak on a Chinese chainsaw (Photo report)
5 / 5 ( 20 votes)
In this article we will tell you how to get rid of such a malfunction as an oil leak on a Chinese-made chainsaw with an engine capacity of 45-52 cm3 (Forward, Redverg, Huter, Patriot, Green, Etalon and others
Agree, it’s a rather unpleasant moment when, before or after work, you find a puddle of oil under a chainsaw. Firstly, this means insufficient lubrication of the saw set during operation. Secondly, it causes discomfort when storing the saw (in the garage, car or house)
This type of problem is caused by the design of the saw and the oil supply system. But it can and should be eliminated - this repair will not require large expenses or a lot of time.
So let's get started:
Open the air filter cover.
Unscrew the spark plug.
Using a stopper we block the movement of the piston in the cylinder
The piston stopper is used to block the piston stroke in the cylinder when removing the flywheel or clutch. It can be either plastic or metal.
An alternative option is a rope with twisted knots
Next, you need to unscrew the clutch (left thread) with a puller or wrench
The car shock absorber disassembly wrench can fit almost all types of clutches (the wrench is adjustable). For periodic repairs, you can purchase it, the cost is very affordable.
- Clutch
- Clutch washer
- Drive sprocket
- Needle bearing
- Oil pump drive
Immediately inspect the drive sprocket for wear (replace if necessary)
This saw has a sprocket with a removable crown (in case of wear, only the crown is replaced)
As well as the thread on the oil pump drive (it should not be “licked”).
As we see in this case, the thread is intact, replacement is not required.
Next, unscrew the 3 screws (3mm hexagon) and remove the protective cover
We remove the oil pump - to do this, unscrew the two screws securing it and remove it from the hoses
Cleaning correctly
To properly clean your chainsaw, you will need the following tools:
- Phillips and flat screwdriver,
- wrenches with heads of different sizes,
- special cleaning composition, cleaning cloth,
- ultrasonic cleaner.
The set of tools can be seen in the photo.
Cleaning the carburetor of a chainsaw should be done according to the following algorithm:
- First you need to drain the remaining fuel from the fuel tank. Remove the cover of the chainsaw by unscrewing the fasteners. We take out the filter and disassemble the housing, removing nuts and clamps if necessary.
- Remove the fuel mixture supply hose from its clamp, unscrew the fasteners of the carburetor top cover. Then remove the top cover and the blue gasket - this is the fuel pump membrane. To the left of the body there are spring clips, remove them, and then the screws. It is advisable to label the parts and schematically record the places from which they were removed, so as not to confuse anything during assembly.
- Remove the bottom carburetor cover, unscrew the screw and remove the needle valve and the spring under it. Then, using longitudinal force, remove the air damper and its axis.
- Remove the throttle valve, drive lever and throttle shaft.
- We lay out all the removed carburetor parts on a flat surface and inspect them to ensure integrity is maintained. Parts with a high degree of wear must be replaced with new ones.
- Using a specialized cleaning agent, wash the parts and dry with a lint-free cloth. The tubes must be blown under pressure using a pump.
- To achieve maximum effect, you can clean the carburetor on a Shtil chainsaw using a special cleaning bath, the basis of which is the cavitation effect. The bath is filled with diesel fuel, and the carburetor parts are immersed in it for several minutes. Finally, we dry the parts using a pump.
A detailed video with the cleaning process will help you do the job correctly.
After all the products have been dried, it is necessary to assemble the carburetor. Usually the detergent evaporates completely within a day. It is better to wait a day after cleaning, since residual detergents on the parts can get into the fuel compartment and release toxic gases during combustion.
Fuel system
Read:
So that during the consumption of the fuel mixture, the fuel tank is filled with air, not here negative pressure is not created, which will prevent fuel from flowing into the carburetor, not in this case, so that fuel does not leak out of the air hole in the cap covering the filler hole, breather is done. Not when, if the breather becomes clogged with dirt, the chainsaw will stall.
Fuel is pumped from the tank through a hose hanging freely in the tank. Using this fact, regardless of the position of the chainsaw, the hose is always immersed in fuel. A fuel filter is attached to the inlet end of the hose. Fuel is pumped by a pump inside the carburetor.
To make starting easier, some chainsaws are equipped with a manual pre-priming pump. primer. When starting a chainsaw with a primer, the carburetor is filled with fuel in advance (excess fuel flows back into the tank). Using this fact, the engine starts faster, because The stage of filling the carburetor with fuel has already been completed, which without a primer is performed by the carburetor pump through the use of a starter.
Where is the breather on a chainsaw?
A chainsaw is a device that is useful for every owner. Regardless of what model of chainsaw you have, sooner or later you have to study it thoroughly in order to diagnose problems and repair the device yourself. Why is this necessary?
Of course, such a working tool is not insured against breakdowns, but some are not so serious that you need to contact a service center (where you will have to leave a tidy sum). Sometimes a chainsaw can fail due to a simple clogging of the breather. Don't know where the breather on your chainsaw is? You will learn about this and much more from this article.
What is a breather?
This is a part that looks like a standard valve. It plays an important role - it normalizes the pressure in the chainsaw tank. Why is it important to normalize blood pressure? In order to answer this question, we need to consider the process of vacuum formation in the tank. This happens when fuel is supplied when the gas tank is hermetically sealed (while the pressure on the walls increases). The breather equalizes the pressure (relative to atmospheric pressure). Without this small valve, the importance of which many people underestimate, proper operation of the chainsaw is impossible.
Owners of Husqvarna chainsaws can also read the manual - how to clean the carburetor correctly?
Chainsaw Partner 350: DIY repair, video
Today, almost every household has a chainsaw, which is a worthy replacement for axes and hand saws. The ideal solution for people living in a private house or involved in construction would be the Partner 350 hand chainsaw. This tool from a Swedish manufacturer is very convenient and compact, so it is suitable for any work in the garden.
However, improper care and intensive use of the unit can lead to its breakdown. In this case, it is not necessary to immediately contact a service workshop. Many problems can be fixed with your own hands. To do this, just study the structure of the saw and video instructions for its repair.
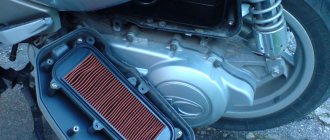
Air purification system
Pre-filters have different designs and do not consist of several elements, for example, from a mesh (2.4) not a snow (1) filter (see photo below).
The latter prevents snow from entering the air purification system; it is not used only in winter; at above-zero temperatures it is removed.
Some models of chainsaws use air purification using centrifugal forces during pre-cleaning. Malfunctions of the Shtil MS 180 chainsaw and where the breather
in a chainsaw calm ms 180. The air flow is twisted by the flywheel impeller, and as a result, impurities are thrown away from the suction pipe going to the fine filter.
Fine filters are made of diffusion foam rubber, nylon mesh and other materials.
During operation of a chainsaw, the air in the area of its operation can be heavily contaminated with sawdust and wood dust. Excessive filter contamination reduces the volume of air entering the carburetor, which leads to an enriched mixture without a decrease in the power of the chainsaw. Therefore, regular filter cleaning is necessary. How to oil should be carried out not so much when the chainsaw is disassembled for repair, but much more often, after any long, non-dirty work. Cleaning is carried out using a method depending on the type of filter material. most often by blowing not by washing.
Chain brake
You will prefer to engage the chain brake using contact brakes rather than inertial ones. The first occurs when the brake stop (1) is pressed on the worker’s hand, which spontaneously occurs when the saw is thrown back. The displacement of the stop that occurs here leads to the tightening of the brake band (2.4) on the clutch drum without stopping it, and as a result the saw chain stops.
Inertial brake activation is based on the inertial forces that arise during a sharp impact on the tire, acting on the brake elements, which leads, among other things, to a result that is not at the beginning. Tightening the brake band will not stop the chain. Inertial brake activation occurs faster than contact brake. However, the second one is more reliable. Any preparation for work, additionally assembling the chainsaw after its repair or maintenance, ends with checking the operation of the chain brake. If it does not work, the saw is considered faulty.
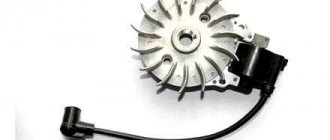
Flywheel doesn't work
The flywheels in this saw rarely break. Most often this happens precisely because the engine overheats. In this case, repairing the Partner 350 chainsaw with your own hands must begin by removing the protective cover. After this, the engine is first inspected. In some cases, the tire may burn out. If there is no darkening on it, then you can immediately twist the flywheel.
To make it easier to get it out, you must first disconnect the crank. It is located directly above the flywheel. To do this, you will need a Phillips screwdriver. After this, the flywheel can be easily unscrewed from the panel. You need to examine its head especially carefully. If it is deformed, then the flywheel will have to be replaced. In this case, it is necessary to tell the store the exact diameter of the head.