What is a workbench
The workbench is the basis of all plumbing work. It is believed that the birthplace of the workbench is Germany. It is a multifunctional table for performing metalworking, electrical, technical work and metal or wood processing. It is equipped with a large number of racks, cabinets and shelves.
A vice and other tools necessary for work are installed on it. During the work, you can use any other power tool. Places and attachments for drawings and other technological documentation are also often provided.
Among its other advantages, I would like to note functionality, durability and reliability. The workbench is able to withstand enormous loads and remain intact and undamaged afterward. This is not just a table, but a whole mini workshop with the ability to store tools, parts and workpieces.
The more shelves, cabinets and drawers, the more functional the design, and the easier it is to work on it.
If the workbench is single-seater, then its dimensions must correspond to the following parameters: height 0.8-0.9 m, width 0.7-0.8 m, length 1.2-1.5 m. The design and adjustable height 50 will be more convenient -250 mm. If the workbench is double/multiple, it is increased in length.
The workbench will serve as a good assistant to any craftsman, and the garage where it is located can already be considered a real workshop.
Estimate
As I already said, the cost of this metal profile workbench along with paint is 3,500 rubles. You can make it even cheaper if:
- use a 30x30 profile;
- take a pipe with a wall thickness of 1.5, not 2 mm, like mine;
- make the workbench shorter (not everyone needs such a huge one).
In the future, I plan to complement this workbench with a wall-mounted tool frame and a roll-out cart. We will do all this together: watch the video on YouTube and the articles on my blog.
Video
Reviews
Adding comments to unauthorized users is prohibited. Log in or register on the site
Purpose
A workbench is a work table convenient for performing various technical operations. The main purpose is metalwork using hand or electric tools, processing parts, assembling or disassembling mechanisms, manufacturing or repairing individual parts, etc.
In addition, the workbench is a place to store tools. If it is properly organized, all hand or power tools and accessories are in sight and located in the most convenient way, just reach out. Sockets for power tools, a vice for fixing workpieces and other equipment are installed nearby.
The result of any work directly depends on the conditions in which it was carried out, so the workbench allows you to get high-quality and expected results from the efforts made.
Design Features
Despite the fact that workbenches differ from each other not only in their dimensions, but also in their intended purpose, their design is approximately the same. A workbench made with your own hands is visually similar to a regular desk, complemented by various tools and parts. After all, the main purpose of a workbench is to keep everything you need at hand.
- The main structural element is the frame, usually made of metal. It is the support for the entire device.
- An equally important element is the tabletop - a strong, thick table surface that can withstand enormous loads, for example, a powerful blow from a hammer. Can be made of dense wood or metal. The tabletop is designed for installation on its surface of the necessary metalworking tools (clamp, machine, etc.).
- Nightstands. There may be several of them. They are most often located at the edges of the tabletop. Each cabinet may contain several drawers for storing tools (hammer, pliers, screwdrivers), which may be needed at any time during repair work.
- Additional shelves for storing tools are also installed in the workbench. As a rule, shelves are installed under or above the countertop.
A protective screen is hung on the working wall to which the workbench is installed, protecting the surface from various mechanical damage. Moreover, on such a screen you can always equip additional hanging shelves where the necessary devices and tools will be stored.
The workbench should be installed in a well-lit place. Therefore, there should be a socket near the equipment to connect a turning lamp to it. You can place the lighting in any convenient place: above the workbench, on the side or next to the device.
Main nuances
Most home craftsmen prefer not to buy a workbench, but to make it themselves. Firstly, a DIY metal workbench will cost much less than a purchased one. Secondly, when making a structure, you have the opportunity to realize your ideas, and finally, if everything is done correctly, the quality of a homemade workbench will be several times better than that of a purchased one. With some simple metal manipulation, a few tools, and some welding and cutting skills, you can get a pretty decent table.
When manufacturing, you should divide the workbench into components (for more convenient assembly) and take into account important nuances:
- The bed is the surface on which all the main work is carried out, so in its manufacture it is necessary to use a sheet with a thickness of 30 - 40 mm. The frame itself can be made from a square pipe, which will entail less waste, or from a corner, but the price will be slightly higher. It all depends on the material that is available. As for length and width, this is purely individual. If there is a lot of space in the room where the workbench will be located, then it would be reasonable to make it larger - for example, 70 by 200 cm.
- The components can be fastened using bolted connections or welds. The second option will be preferable, since the bolts may weaken over time, and the structure will be shaky. But if you plan to make a large workbench, in this case you should resort to bolted connections.
- Yew and various power tools will be attached to the frame, so care must be taken to ensure that the sheet is rigid and does not “play” when struck with a hammer.
- If the workbench will be used in blacksmithing, a small section of the table can be made from a sheet of 30 - 40 mm, and to give additional rigidity, the frame can be strengthened with additional jumpers.
- The shape of the table can have different variations. It all depends on the type of work and the space where the structure will be installed.
- It is better to make shelves under the table itself for tools or for workpieces. The best option would be to make drawers for storing tools and various components for work, but making boxes is quite a troublesome task, and such a workbench will take quite a lot of time.
- It is necessary to make a niche for the feet, otherwise you may get injured during work. It must be remembered that there should be no sharp corners or burrs under the workbench. After welding and cutting, all burrs and sharp edges must be cleaned.
- It is recommended to use the walls around the workplace for hanging tools. It is necessary to ensure that screwdrivers, keys, hammers and other devices do not fall due to vibration when working.
- The workbench must be grounded, otherwise in case of voltage leakage, electric shock may occur.
- It is worth thinking about lighting the workplace, as well as sockets for power tools. If possible, make a hood that protects the worker from harmful gases that are released during welding.
Kinds
Workbenches are classified according to several parameters: by the number of workstations, for example, single, double and multi-seat; for additional functions - folding (with folding work surfaces) and in the form of cabinets with many pull-out shelves.
Depending on the intended purpose of the equipment, the following types of workbenches are distinguished:
- A carpenter's workbench is installed less often. It has a maximum length of up to six meters, which allows you to fasten very thick and long boards and other lumber to the surface of the tabletop. In addition, clamps for lumber are installed on the surface of the device so that the boards remain motionless during processing.
- A carpentry workbench has a working surface that is always mounted on a durable frame. The tabletop is usually made of strong metal or dense wood (oak or beech), thanks to which various metal parts can be processed on it without fear of damaging the coating. The base consists of two strong support posts, fastened with longitudinal bars. A working vice is placed on the front surface of the tabletop to fix metal parts, and a rectangular cutout is made on the back surface, which is used to move additional vices. Holes are made in the tabletop for installing stops or clamps necessary for carpentry work.
- The best option for a garage is a metalworking workbench, which can be classified as universal. The surface is made mainly of metal, which is ideal when working with hard and heavy metal parts. On the surface of the tabletop you can perform any repair and construction work: sawing, grinding, engine disassembly, sharpening, cutting and much more. This design is much stronger and more stable than others due to the metal frame.
The structure for electrical installation work is made of a metal frame on which a dielectric heat-resistant tabletop is installed. Usually the materials for it are plastic or textolite.
The work place must be equipped with sockets and well lit. It is convenient if it is equipped with shelves on which you can place appliances and tools.
Important! When carrying out soldering work, it is recommended to install a hood.
In garages, as a rule, they perform plumbing and electrical work.
Installation location
When choosing a location for a workbench, there are several nuances to consider that can make the installation process easier.
- You need to choose a part of the garage that is very well lit and has access to sockets. It is best if natural light falls either directly or from the left side.
- The length of the working surface should be such that large parts can be placed without problems.
- The width should not exceed 60 centimeters - in order to easily reach the opposite side of the tabletop.
- The height of the stand should be such that it is as comfortable as possible to work at the workbench.
- The workbench should be located in such a way as not to impede the entry of the car into the garage and ensure the free opening of the door.
- It is necessary to design the placement of equipment so that you can safely work on it without driving the car out of the garage.
Three mistakes
Amateurs, sometimes, judging by their designs, very experienced, knowledgeable and diligent, sometimes make themselves workbenches on which, figuratively speaking, you can smash a tank with a sledgehammer. They take a lot of time and labor, and hardly less money than a good branded amateur workbench. Repeating industrial prototypes in a design for your own use, designed for intensive work in 3 shifts and a static load of more than a ton, with a service life of 20 years or more, is one of the typical mistakes in developing workbenches of your own design.
Advantages and disadvantages of a wooden workbench
The choice of material for making a table is primarily determined by its purpose. A wooden workbench in a garage is usually installed in cases where you need to quickly organize a workspace to perform simple operations. To create the frame part, you can use boards measuring 4x8 cm or timber measuring 5x10 cm. The rectangular base is assembled taking into account standard dimensions, and its components are fixed with nails or self-tapping screws.
To strengthen the structure, wooden spacers are installed in the upper and lower parts between the legs. The lower ones, which are located at a height of 15 cm from the floor, can be used as a basis for a shelf. To assemble the tabletop, a planed tongue-and-groove board made of oak or beech is suitable. You can also use a couple of sheets of moisture-resistant plywood 1.8 cm thick, which are glued together and sheathed along the edges.
To create a workbench in your garage out of wood with your own hands, you don’t need much effort or skill in handling a welding machine. The set of tools is minimal (electric jigsaw and drill), and the process itself takes much less time than manufacturing a metal structure.
On the other hand, a wooden table has many disadvantages:
- not able to withstand significant power loads;
- the working surface is not intended for the installation of several tools, which does not allow the simultaneous use of a heavy bench vice and sharpening or drilling;
- the wooden frame is short-lived;
- wood reacts poorly to humidity and contact with various paints, oils and other substances;
- there is a risk of fire.
The disadvantage of a wooden workbench is its inability to withstand large force loads. Note! The wooden surface must be treated with an antiseptic. This will protect it from rotting.
DIY workbench
First you need to decide where the workbench will be located and what you can attach it to. If the structure is angular, then the best option in this case is to start construction from the walls themselves, and they must be strong.
This option is good because it is possible to make amendments to the design along the way , but if the master is inexperienced, then it is better to use another option. The optimal solution is to manufacture a workbench according to ready-made drawings. Of course, the cost of this option is several times higher, but the dimensions and material have already been selected and indicated in the drawing, which greatly facilitates the work.
The base is made of 35-gauge angle with a wall thickness of 5 mm. This material produces a stable structure. A 3 mm thick sheet is used as a working surface; under the sheet there are 60 mm thick boards, which ensures even greater rigidity of the structure. The table frame can be made from a thinner corner, since the load on it is minimal, and boards from 20 mm can be used. As for the remaining shelves, plywood is used as a pallet, the thickness of which ranges from 10 to 20 mm. Drawers are made of 2 mm steel. To make a bench, the dimensions are shown below.
The height and width of the vice table can be changed and adjusted to suit your needs. You will also need the following materials:
- Corner 35 mm, wall thickness not less than 5 mm.
- Angle 20 mm for the frame.
- For the support legs, it is necessary to make plates from pieces of steel sheet to secure the workbench to the floor.
- Plywood.
- Timber 60 to 40.
After the frame is ready, it is necessary to strip the metal. Then, in order to avoid metal corrosion, the structure must be coated with a metal primer in 2 layers and then begin painting. Wooden elements must also be primed and, if possible, varnished. Wood treated in this way will last a long time and will not absorb moisture and rot.
Advantages and disadvantages of a metal workbench
To assemble a welding table with your own hands, you will need special equipment and skills in handling it. The workbench elements are connected by welding. Not every craftsman can produce a high-quality metal structure. In addition, the table turns out to be very heavy, and the material itself, unlike wood, is not cheap.
On the other hand, workbenches in a metal garage have many advantages that many car owners will appreciate:
- compactness with a high degree of reliability;
- ability to withstand severe mechanical loads;
- increased weight of the structure, making it more stable;
- a large selection of modifications (the design can be folding, mobile, shortened or with a folding tabletop);
- strength and reliability of all connections;
- fire safety;
- durability and ease of maintenance;
- the absence of sharp corners makes the tabletop safe;
- the working surface allows you to install two sets of vices;
- due to the high strength of the material, the table can be used for cutting and sawing, as well as grinding and turning metal and wooden parts;
- the space under the tabletop can be used to install shelves, organizers, grids and tool boxes;
- metal shavings do not damage the surface.
On a note! To prevent rust, the metal surface must be treated with anti-corrosion agents.
Preparatory work
Creating a drawing of a workbench is an obligatory part of the preparatory stage
Preparation for assembling a workbench consists of determining the design features, choosing the dimensions and installation location of the structure. In order to ensure that not a single moment escapes attention or is forgotten, it is recommended to create a working drawing of the workbench, made to scale with reference to the size of the garage
Particular attention should be paid to the height of the tabletop - it differs significantly from the height of a regular dining table. The optimal option is the height from the floor to the bend of the elbows of a person standing straight
Considering the difference in height between different people, assembling the optimal workbench for yourself can be a very useful exercise.
In addition, we must remember that the width of the tabletop should not be too large. The size of the garage is relatively small; you often have to work next to a car parked inside.
You will need space for a person to pass through, so the optimal width is considered to be 50 cm. You also need to decide on the size of the shield for the tools that are needed most often.
Materials and components
As you can see, workbenches vary greatly in design, and the materials can be very different. Usually these are what you have in the garage, but they can also be purchased.
For example, to make the frame of such a workbench you will need:
- corner 50x50x4 6.4 m long;
- pipe 60x40x2 24 m long;
- corner 40x40x4, length 6.75 m;
- strip 40x4 8 m long.
A total of 121 kg of metal is needed. Its quantity may vary depending on the size.
For this model you will need:
- 225 m square pipe;
- 8 m corner;
- 10 m strips measuring 40x4 mm.
Rental sizes may vary. The main rule is that the larger it is, the stronger and heavier the structure.
This thick section can be small and used as an anvil, while the other part of the tabletop can be relatively thin. The main thing is to ensure the reliability of the connection.
Consider other points as well.
- For the drawers and toolboard you will need plywood 5 mm thick. And if you want to make an outlet, you will need an extension cord and wire.
- In addition, bolts with washers and nuts are needed.
- For finishing work you need a primer, paint and varnish.
Required Tools
To make a workbench we will need:
- “grinder” or hacksaw for metal;
- cutting and sanding wheels for it;
- wood saw;
- welding machine and accessories;
- drill;
- roulette;
- chalk for marking.
Once everything is ready, we begin production.
Drawings and dimensions
To assemble a high-quality workbench for the garage, you must first decide on its dimensions. When drawing up a drawing, special attention should be paid to the height of the tabletop. The optimal option for this indicator is the distance from the elbow of a standing person to the floor.
The width should not be too large. This is due to the limited size of the garage and the need to often work when a car is parked inside the room. Space will be required for people to pass through, so the optimal width of the structure varies from 50 to 80 cm.
Materials and tools
In order to assemble a workbench in the garage with your own hands, you will need the following tools:
- welding machine with electrodes;
- level;
- screwdriver;
- drill;
- grinder equipped with a grinding disc and a wheel for cutting metal;
- roulette;
- electric jigsaw designed for cutting plywood sheets.
Protective equipment and protective clothing should also be used. To complete the procedure you will need the following materials:
- square pipe 6X4 cm, 24 m long and 2 mm thick;
- a strip of steel 4 mm wide, 8 m long, 4 mm thick;
- steel sheet for drawer holders 2 mm thick;
- plywood sheet 1.5 cm thick;
- screws;
- anchor bolts;
- corners 5X5 cm, 6.4 m long and 4 mm thick;
- corners 4X4 cm, 6.75 m long and 4 mm thick;
- sheet of steel for the countertop 2.2X0.75 m, 2 mm thick;
- wooden boards 5 cm thick;
- guides for drawers in the table;
- metal screws;
- paint for metal and wood.
Process of making a metal workbench
Development of a project for a future desktop
Before you start making this design at home, you need to carefully calculate and think through everything. If you want everything to follow the plan during work, then first make a drawing on a convenient scale.
You can build a tabletop with your own hands from wood or sheet steel. However, the wooden structure will still have to be covered with metal. The frame of a carpentry workbench is usually made of profile pipes or angles.
You need to immediately think about how to attach such a table to the floor. The workbench must be immobilized to avoid accidents and injuries; for such purposes, plates with recesses are welded to the legs of the structure. Through them, the fastening to the floor surface will then be carried out.
Sawing a profile for a workbench
To make a workbench from a profile, we will need to cut it into pieces. These drawings not only show the design of the future workbench, but also indicate the dimensions of all the sections into which the pipe will need to be cut, and its total footage.
An important point: we will make cuts strictly at an angle of 45°. This is necessary in order to weld all the parts without gaps. If moisture gets inside the structure, corrosion will begin to corrode the metal.
To mark the profile, we use a core (a tool for making marks on metal) and a corner. It is better to mark the pipe along all four edges so that the cuts are even. How I mark the profile and cut it with a grinder can be clearly seen in the video.
Do-it-yourself garage workbench made of wood
Your first experience in building garage equipment may be a simple wooden workbench or wooden workbench. The design of a table made of timber is more affordable to manufacture; working with a saw, jigsaw and drill is much simpler than cutting and welding a steel angle, from which professional-quality plumbing tools are usually made.
Building a wooden workbench for assembly work
To build a workbench, we will need:
- Wooden beam, preferably oak or pine, approximately 12-15 m, the cross-section of the material is selected individually, based on the expected load on the workbench;
- Planed edged board, 20-30 mm thick, smooth, without knots or surface defects;
- Sheet plywood, 6-8 mm thick, three sheets 200x60 cm;
- A set of wood screws and steel angles, shelf size 50 mm and length from 50 to 70 mm, at least 40 pieces.
Here you can learn the secrets of making a garage door with your own hands
Advice! All cutting work must be performed using a hand or stationary circular saw; trim the edges of timber or boards only with a jigsaw or similar power tool.
In this case, even in the absence of carpentry skills, the cut turns out smooth, and accordingly, the entire structure of the workbench will look like a factory one.
At the first stage, we make the frame of the workbench, while taking into account the dimensions of the space in the garage. To do this, you will need to cut four vertical posts, four horizontal beams and five horizontal short cross braces from the timber. If the dimensions of a wooden workbench for a garage do not exceed two meters, you can use a beam with a section of 70x70 mm.
We cut off four vertical posts - two 90 cm high, two 150 cm high. The latter are made 60 cm higher; after the assembly of the workbench is completed, a plywood screen will be installed on them for the tools stored in the garage.
The horizontal beams are also different sizes. To bandage the support posts of the frame in the lower part of the workbench, we cut two sections of timber 150 cm long; to attach the table top, 200 cm long sections are needed. The last of the remaining material is cut into transverse struts 60 cm long.
We assemble the entire structure using steel angles and self-tapping screws, as shown in the diagram.
We assemble the tabletop by gluing together sheets of plywood and boards. After leveling and adjusting the dimensions, the boards and plywood, coated with PVA-M or wood glue, are assembled in clamps until they dry completely and gain strength. We sew the tabletop along the contour with self-tapping screws.
We lay the tabletop on the finished frame and fasten it with self-tapping screws, after which the surface is carefully sanded with an emery attachment for an electric drill. Lastly, we install the screen and cover the entire structure with varnish so that in damp weather in the garage the wood of the workbench does not “sink.”
In appearance, the workbench for the garage turned out to be quite delicate, but in reality its strength is enough to withstand a load of more than one hundred kilograms. To increase rigidity, the rear pillars can be anchored to the garage walls.
Manufacturing
Frame
First of all, we take a metal profile, measure and cut it. (all dimensions in the drawing above)
Next, we put everything in place and see what happens. The workbench will have 6 legs and two areas for storing tools, one larger, the other smaller and divided into two parts. Then we weld the seams and measure the diagonal so that everything fits together clearly. If the diagonals come together, you can completely weld all the welded seams, clean them with a flap disk and weld the legs; it is advisable to use a square to weld the legs exactly to the base.
And this is roughly how the future table frame turns out. As you can see from the photo below, it turned out to be quite strong.
Rework before installation indoors
In my workshop it is not possible to place this table close to the wall, since there is a brick plinth underneath, so I decided to weld pieces from the profile behind the table.
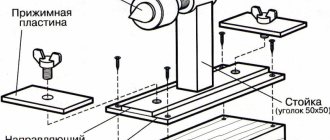
Next, from the 20*20 corner we make a frame for the panel.
I did not weld this frame to the workbench, since then it would be impossible to bring it into the workshop, so I made this part removable. From the photo below, I think everything is clear how it was done. The panel holds perfectly on this connection.
Painting
After all the work has been completed, we paint the workbench.
Safety precautions when working with a homemade workbench
Working with a homemade workbench requires compliance with the usual safety rules. Self-assembly does not change any requirements or standards.
It is necessary to connect the workbench to the common ground loop of the garage and secure it firmly to the floor or walls. The shelving and tool cabinet with the upper tier are firmly attached to the walls using anchor bolts. Screws cannot be used in this case.
All electrical wires must be hidden in corrugated hoses or cable channels. Lighting should be sufficient, directed from the left side and from above. The possibility of the workbench swaying should be excluded; all supports should stand firmly and tightly on the floor, ensuring complete immobility of the working surface.
Having a high-quality workbench will help you perform all the necessary work under normal conditions. The time to complete the work will be significantly reduced, and the quality of work will improve. Assembly work will take place quickly and efficiently if all the necessary tools and materials are prepared in advance, cut and categorized. Then it will become easier to perform assembly operations, and the possibility of error will be reduced to zero.
Safety requirements for a homemade workbench design
Any design must first be safe, and then functional and practical.
Working on a workbench carries potential danger, so it must meet the following requirements:
- The workbench must be securely fixed to the floor and not wobble during work.
- A table covered with sheet steel must be equipped with a protective mesh at least 1 meter high, running along the entire length of the workbench.
- The workplace should be designed conveniently and ergonomically: everything is at hand and nothing interferes with the work process.
- The corners of the tabletop should not have sharp edges.
- The wedges in the holes should be attached firmly, but not so tightly that the edges do not chip. The holes are made the same size.
- The screws are well lubricated to ensure smooth movement of the workbench running parts. They are made of metal, less often wooden
- At the end of the work, they should be loosened slightly and kept loose.
- The surface of the tabletop is sanded; it is important to achieve smoothness and absence of defects. The working surface must be constantly cleaned of chips and oil.
- Keep the floor near the workbench clean, otherwise injury may occur.
- The jaws of the vice must have soft gaskets to ensure reliable fixation of the workpieces.
- When using multiple vises, they should be spaced at least one meter apart.
- It is necessary to use vibration-damping rubber pads when working with power tools.
- You should not place hot things on the workbench, spill water on them, or place heating appliances near it.
- When drilling, sawing and other work that can damage the surface of the tabletop, you should place a protective board under the workpiece.
- A properly designed workbench can withstand a load of about 200 kilograms.
Important! The master must also remember about his safety. The workplace should be well lit, the tools should be in good working order, the vice should be equipped with an unworked notch and the parts should be firmly secured
You should work in special safety glasses.
More advanced requirements for work tables are described in GOST 20400 and GOST 22046. The workbench must meet all safety requirements and only after all conditions have been met should you start working.
locksmith table
For those who have little space for a workbench, a suitable option is one that combines a small metalworking table with elements of a workbench . On such a table you can place the most necessary plumbing equipment. The design looks like this:
You can make such a table for the workshop from a corner 60 x 60 or 70 x 70. The corners need to be welded together to form a kind of rectangle. You can put boards or plywood on the bottom of the table, but before that you need to drill holes in the lower parts of the corner to attach the table to the floor.
It is advisable to prime and paint the structure. If the table will be in a dry, heated room, then to save money you don’t have to treat the surface. The tabletop requires a sheet 6-7 mm thick, under which boards should be laid to dampen vibration from hammer blows and work with power tools. The sheet is secured with bolts or metal screws.
All sizes are purely individual and are selected by the master independently.
This design is good because it takes up little space, and even a novice mechanic can make it.
Recommendations
Working at your new desk should be comfortable.
- If the master is right-handed, then you need to attach a sharpening machine to the left side, and a vice to the right.
- Since work often requires a power tool, an extension cord can be installed on one of the legs. The block is secured with plastic clamps (stationary) or using a groove in the extension body. In the latter case, it can be removed.
- If you want adjustable legs, weld nuts with coarse threads (the largest you can find) on the bottom. Then you need to screw in the bolts on which the table will rest. The use of wheels in a mechanic's workbench is unacceptable.
- The metal base of a homemade workbench must be grounded, since power tools are often needed during work.
- Don't forget about lighting. One source should illuminate the entire working plane, and the other - on a flexible tripod - is used for local illumination. You can also use flashlights. The main thing is that the light should fall from the left (for right-handers) or directly.
- It is necessary to regularly clean the countertop from chips and debris.
DIY painting
Now a little about the best way to paint a metal profile.
I bought an inexpensive Dali three-in-one alkyd enamel for this. This is paint, primer and rust converter - all together. Its beauty is that you can degrease the surface and immediately apply paint. With rust, if it is insignificant, you do not need to do anything. The paint will do the job. If there is too much rust, it must first be cleaned and treated with a converter. Otherwise the paint will swell, and then it will peel off.
If you want a workbench in the same beautiful rich blue color as mine, choose a shade according to RAL 5005. Be sure to paint it in two layers.
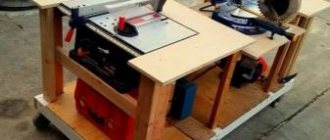
Photo
Depending on the materials used and the tasks being solved, the result may be surprising:
Sources
- https://intehstroy-spb.ru/osnastka/kak-sdelat-verstak-v-garazh-svoimi-rukami.html
- https://moy-garazh.ru/verstak-dlja-garazha-poshagovaja-instrukcija.html
- https://tokar.guru/samodelkin/kak-sdelat-verstak-v-garazh-svoimi-rukami.html
- https://sdelai-lestnicu.ru/stroi-tehnika/verstak-v-garaz-svoimi-rukami-39-foto-varianty-iz-dereva-i-metalla-razmery-i-certezi-samodelnyh-skladnyh-i- navesnyh-verstakov
- https://hozsektor.com/verstak-v-garazh-foto-primery-kak-sdelat-svoimi-rukami
- https://vasha-stroika39.ru/stati/slesarnyy-verstak-svoimi-rukami-300-foto-chertezhi-instrukcii.html
- https://svoimy-rukami.ru/kak-sdelat-verstak-v-garazh-svoimi-rukami/
- https://odstroy.ru/kak-sdelat-verstak-v-garaz-svoimi-rukami-certezi-razmery-izgotovlenie/
- https://stroy-podskazka.ru/stoly/slesarnyj-verstak/
- https://samodel.guru/mebel/sdelat/stol/v-garazh.html