Replacing rotary hammer brushes | Construction portal
A hammer drill is an indispensable assistant for any type of repair work. But, like everything under this sun, it is not eternal. Sooner or later you have to deal with its maintenance and repair. And the more carefully you treat it, the longer it will last.
For example, your hammer drill has lost power. What could this mean? Is the instrument expected to be repaired or has “its time come”? In most cases, there’s nothing wrong, most likely, it’s just time to replace the brushes in the hammer drill.
Tips from experts when repairing a rotary hammer
When replacing brushes yourself, experts recommend:
- When one is erased, both must be replaced.
- During repairs, it is also necessary to clean the collector from dust and carbon deposits.
- When replacing a part, it is better to grind it to the collector using fine-grained sandpaper
- It is better to install components that match the tool model
Replacing hammer drill brushes is a simple process that can be easily done at home.
When is replacement necessary?
Typically, the service life of brushes in household rotary hammers is designed, according to the manufacturer, for 70 - 120 hours of operation. But it is unlikely that the owner of a hammer drill will keep track of the time the tool is used. In this regard, it is worth noting the convenience of such a function as a brush wear indicator for a Makita rotary hammer. In addition, there is a tool with an automatic shutdown system when wear is exceeded.
But even if you don’t have such a top-end model, there are signs by which you can determine increased wear on the brushes. These include:
- — increased sparking in the collector area;
- — a significant loss of power of the hammer drill, the engine does not develop speed at full power.
replacing brushes and basic repair tips
Regardless of the brand of the hammer drill and its manufacturer, sooner or later a malfunction occurs. They are electrical and mechanical. Of the electrical problems, the most common are breakdowns associated with wear of the brushes, which are easy to replace yourself.
Replacing brushes: do it yourself or at a service center?
The easiest option is to take it to a specialist service center, such as replacing Hitachi hammer drill brushes, but not the cheapest.
- — quality, if in an authorized service center;
- — original brushes, also if the center is authorized;
- — maintaining the warranty on the tool if its period has not expired;
- — as a rule, a full inspection of all “vital” components of the instrument is carried out, including cleaning and lubrication.
There are also disadvantages: you will have to wait and if this is not warranty work, you will have to pay. In addition, the service is not always close…
There is another way - with your own hands. For example, replacing the brushes of a Skil hammer drill is not difficult, but...
Rotary hammer Bosch 2 28. Diagnostics Repair Replacement of brushes#ViktorPolev
Note. “Attempts to repair the instrument yourself, outside of an authorized service center. Unconditional signs include: broken warranty seals, creases on the splined parts of fastening screws, body parts, etc.” excerpt from the instructions for the hammer drill.
If the tool is under warranty, it is better to take it to a service center. You can do everything right, but who can guarantee that nothing in the hammer drill will fail? And you will have to repair it at your own expense. But, this is just a warning, in order not to open the tool before the end of the warranty period; usually in high-quality models with moderate use, the brushes require replacement after the expiration of the period.
What are the advantages of replacing it yourself:
- — speed, the tool is at hand and ready to work;
- - cheaper, you save on the services of masters;
- — You don’t wait for the tool to break, its condition is always under control, you just need to look inside;
- — increasing the level of skill, including the maintenance of power tools.
READ The Difference Between a Rotary Hammer and an Impact Drill
The disadvantages, perhaps, include the following:
- — there are no guarantees of work performed;
- — there may be a problem with original spare parts;
- - fear of ruining something, and this is the loss of nerve cells.
In fact, replacing brushes is an easy and quick procedure, and, as a rule, brushes for a hammer drill come with the tool.
Algorithm for disassembling a hammer drill
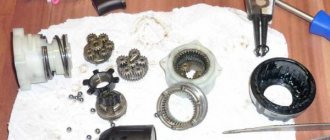
To eliminate mechanical and electrical faults (with the exception of a broken electrical plug), disassembling the unit body is indispensable. The most popular brands among craftsmen, both home and professional, are Bosch, Makita, Interskol, and Energomash hammer drills. The design of units from different manufacturers is approximately the same, therefore the methods for disassembling the devices will be similar. But you should not completely disassemble the device, since it will be difficult to put it back together. The photo below shows what a completely disassembled hammer drill looks like.
Removing the cartridge
Disassembling the unit for troubleshooting should be carried out carefully, inspecting each removed part. To make assembly easier, it is better to photograph the disassembly process. If you do not find any external defects on the device, then it is recommended to start disassembling it with the cartridge.
- First, remove the boot (1), made of rubber.
- Carefully, so as not to lose it, use a screwdriver to remove the retaining ring (2) and then the plastic boot (3).
- At the next stage, it is important not to lose the small ball that is located under the washer (4). Remove the washer (4), plate (5) and spring (6), as well as the ball (7). It is when these parts wear out that the drill falls out of the chuck. Some cartridge models may have additional balls and washers.
We disassemble the case
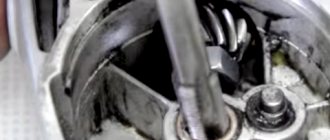
If disassembling the unit housing is required, you must first remove the operating mode switch.
- Place the switch in the “Blow” position. Usually a hammer is drawn in this place on the body. If this mode is not available, set the switch to the “Punch + Drilling” position.
- Next, you should press the button located on the switch handle and turn it slightly below the hammer icon until a characteristic click is heard.
- After this, you need to pry the switch with a screwdriver and, pulling it towards yourself, remove it. In some models of units, this switch can be screwed to the housing.
Disassembling the electrical part of the hammer drill
To get to the electrical part of the device, if you suspect that this is where there may be a breakdown, you must perform the following steps.
- Unscrew the screws holding the back cover and remove it.
- Unscrew the fasteners holding the network cable.
- Next, you should remove the wires from the fastenings and remove the start button.
- Remove all wires attached to the stator.
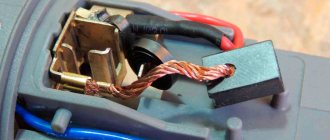
- Remove the brushes by unscrewing the mounting bolts.
- Separate the housings of the electrical and mechanical parts of the device by unscrewing the corresponding bolts. Use a flathead screwdriver to separate.
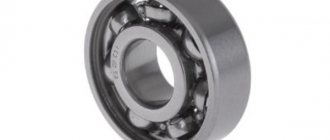
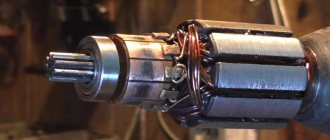
- Remove the rotor from the gearbox. If you need to replace bearings, use a special puller.
- Remove the air intake located in the housing of the electric part of the hammer drill.
- Disconnect the stator from the housing. To make it easier to come out of the casing, it is recommended to pull the stator by lightly tapping the casing with a wooden object.
If you need to disassemble a barrel perforator with a vertical electric drive, first remove the handle, and then unscrew the bolts holding the motor.
How to Change Brushes on a Bosch Rotary Hammer
The hammer drill is your assistant for all types of repair work. As annoying as it may sound, just like what our client can do here with the sun, he also does not work forever. The moment comes when you have to deal with its maintenance and repair. The more carefully you treat it, the longer it will last.
Nettle, your hammer drill has lost power. Does this indicate this fact? Is the instrument expected to be repaired or has “its time come”? Mostly something special, probably - it’s just time to change the brushes in the hammer drill.
Let's consider options in which the hammer drill does not hammer, but drills
Wear of rubber rings on the striker, striker, piston.
This reason appears gradually as the rubber rings wear out. At first the blow weakens, then disappears altogether.
The malfunction is eliminated by replacing the indicated rubber rings with new ones.
For any repair of rotary hammers or their components, all rubber products must be replaced.
Related Posts
Cordless Drill Screwdriver Bosch Easydrill
Cordless drill-driver Bosch EasyDrill 1200 (0.603.9A2.10A) Two-speed drill-drivers with lithium-ion batteries EasyDrill 1200 (1 battery) Compact, light, powerful - cordless with a good price-performance ratio Main properties of the productSyneon Chip: mental system Electrical energy management for good power and maximum endurance No memory effect or self-discharge: always ready for use thanks to lithium-ion technology Compact design thanks to lithium-ion […]
Drilling Ice with a Bosch GSR 18 Ve-2-Li Screwdriver
Drilling ice with a BOSCH GSR 18 VE-2-LI screwdriver
Design features of the Bosch 2–24 rotary hammer
It is best to start repairing a Bosch 2–24 rotary hammer by becoming familiar with the circuit and design features of the tool being adjusted. The operating principle of the Bosch 2–24 rotary hammer is similar to the operating principle of the Bosch 2–20 rotary hammer.
The torque is transmitted to the tool mounting shaft, simultaneously with the transmission of the shock impulse. The hammer drill has three operating modes: drilling with impact, drilling without impact, impact.
The helical gear of the rotor pos. 803 transmits torque to the helical gear of the intermediate shaft pos. 826.
Diagram of a Bosch 2-24 rotary hammer
The hammer drill stops hammering, but drills
The hammer drill does not hammer under load or in idle mode for the following reasons:
- the rubber rings of the striker, striker, and piston are worn out;
- the rolling bearing race has collapsed;
- the cylinder and the firing pin of the percussion mechanism were destroyed;
- cut off the splines of the clutch mounted on the intermediate shaft;
The splines of the clutch, pos. 67, mounted on the intermediate shaft, were cut off
The malfunction can be eliminated by repairing the clutch or completely replacing it. When making repairs, the worn teeth on the clutch are filed down. To correct this defect, a round needle file and a drill are used. The coupling is clamped in the hand, and the tooth profiles are straightened using a drill with an appropriate file. The splines on the intermediate shaft are modified in the same way.
The force of the conical spring pressing the clutch has weakened
When the pressure force of the spring pos. 50 decreases, the clutch slips on the intermediate shaft without transmitting rotation from the small spur gear to the large gear pos. 22 of the barrel shaft pos. 821 of the impact mechanism. By the way, on different Bosch , clutches are designed differently.
2 Reply from Ivanovich 2013-04-04 00:12:55 (2013-04-04 00:15:44 edited by Ivanovich)
- Ivanovich
- Participant
- Inactive
- Registered: 2012-11-11
- Posts: 175
How to extend the life of a Bosch rotary hammer
Bosch rotary hammers require mandatory technical inspection and maintenance. To operate rotary hammers correctly, you must:
- prevent dust from getting into the cooling holes (you can wear a nylon stocking or use a vacuum cleaner);
- lubricate the drill shanks with special lubricant;
- do not overheat the power tool (if overheated, the lubricant crystallizes and stops lubricating the rotating parts);
- during intensive work, replace the rear rotor bearing every 6 months; change carbon brushes after 70 hours;
- when drilling holes in the ceiling, turn the hammer drill down and rotate it in this position to allow the lubricant to flow into place;
- After work, be sure to blow out the insides of the hammer drill with compressed air;
- change the rubber cuff on the hammer drill chuck more often;
- prevent sparks from appearing on the commutator brushes in idle mode;
- the duration of continuous operation should not exceed a 30-minute interval;
- Do not use the “Shock” mode often.
READ How to Remove a Drill Bit from a Drill
When starting to repair a Bosch 2-20, 2-24, 2-26 rotary hammer, read the lubrication chart indicating lubrication points and lubricants.
Bosch hammer drill lubrication map
To lubricate Bosch rotary hammers, several types of lubricants are used, depending on the operating conditions of the components and parts.
Bosch rotary hammers use four types of lubricants:
- lubricant 1615430001 - for the gearbox and its cavity;
- lubricant 1615430002 - for gears, pendulum bearings, clutches;
- grease 1615430020 – for bearings (FT1V26);
- SAE 20 W lubricant – for rubber products.
Lubricants vary in viscosity and consistency.
Among Russian lubricants, we can recommend lubricants under the ringing name “Zubr”:
Domestic lubrication of drill shanks for Bosch
Bosch rotary hammers use 8 bearings: three rolling bearings pos. 13, 14, 67, a pendulum bearing (piston bearing) and four needle bearings pos. 60, 61, 62, 63.
Sectional diagram of a Bosch 2-26 rotary hammer
Assembling the mechanical unit and rotor
The rotor is attached to the assembled mechanical assembly. The rotor gears and impact mechanism assembly fit tightly into each other. To install the rotor into the mechanical assembly of the hammer drill, the helical gear of the rotor must be inserted into the inner housing until it contacts the helical large gear of the intermediate shaft. After assembly, rotate the rotor, checking for smooth rotation.
Connection of the rotor and the percussion barrel mechanism
The assembled mechanical unit is closed with a black plastic cover, pos. 819. The cover is secured with four screws, pos. 90, with the installation of a rubber sealing ring, pos. 77. Be sure to lubricate the rubber O-ring with SAE 20 W grease before installation.
It remains to connect the stator housing (green) with the mechanical block housing (black). The housings are connected with four screws.
Bosch GBH 2 26 DFR (Rotary hammer, electrical part)
At the last stage, carbon brushes pos. 811 are installed in the brush holders of the reverse switch pos. 16. The handle has a button position 4 for the speed controller.
Wires from stator windings pos. 101, 102 and power cable pos. 806 are connected to the button.
Rotate the impactor shaft (first by hand and then under power), and make sure that the rotor rotates smoothly and that the brushes do not interfere with its movement, evenly touching the commutator lamellas. The sparks in the area of the brushes do not have a tail, but spark evenly across the entire width of the working part.
It remains to close the cover, pos. 41, with two screws, pos. 77.
Assembling the rotor of a Bosch 2-26 hammer drill
On the repaired or new rotor, pos. 803, install the fan, pos. 5, and bearings, pos. 13, 14. To lubricate the rotor bearings, use Bosch grease 1615430020.
Why do brushes burn out quickly?
Starter armature repair: Polishing the lamellas (ALPHA, DELTA, SABUR / 139FMB) Foam filter.
If something similar is observed, it’s time to look at the condition of the brushes and commutator.
Note. Usually, for long-term use of equipment, brushes need to be replaced when their height is reduced from the nominal height by 1/3 (about 8 mm).
If, after removing the brushes from the brush holder, you observe wear, be sure to change both brushes when the wear is not uniform. When replacing brushes, it is always recommended to clean the commutator of graphite dust and carbon deposits. The collector is cleaned with gasoline (better for lighters, its quality is higher) or ethyl alcohol. When replacing the brush, you should definitely rub it into the commutator - this will reduce the electronic arc (sparking), which will have a beneficial effect on both the commutator and the engine power. Grinding is carried out with a soft sandpaper attached to the commutator. When the armature rotates, the sandpaper smoothes out the bulges of the new brushes.
An additional important aspect when replacing brushes is the degree of hardness of both the brushes and the commutator. If you put soft (carbon) brushes on a hard commutator, it will quickly wear off. Therefore, it is important to use branded brushes for replacement directly from the tool manufacturer.
When replacing, you should also pay attention to the brush holder assembly itself. It consists of a profile, a pressing device and a contact group. With all this, look at the condition of the spring of the pressing device; if you suspect serviceability and reliability, it is better to replace it with a new one. Fantasia is quite cheap. For example, if the spring is weakened, it will not fit tightly enough to the commutator, which will cause excessive sparking. This usually leads to premature wear of the collector plates. If it comes off, it will have time to do a lot of damage to the electric motor for a good repair of the tool.
When, if only one brush , the stator has burned out. It's easy to find, it's important to have a device for measuring resistance. The stator has two windings, the middle one has a resistance of 4 ohms. If the resistance of both windings is identical, the stator is intact.
There is no point in describing the replacement process, it is easy and the design of most rotary hammers allows for fast and easy replacement of brushes in the image of a Bosch rotary hammer or another, as can be seen in the video shown at the bottom of the review. You look for a special window on the case; it is usually closed with a plastic cover.
Assembling the mechanical part of a Bosch 2-26 rotary hammer
Before assembling the mechanical part, check the presence of new rubber seal rings, the integrity of all parts, and the presence of lubricants according to the lubrication chart given above.
Mechanical unit assembly diagram
Installing the mode switch knob
To install the mode switch knob pos. 832, you need to place the Bosch 2-26 hammer drill
Setting the mode switch
The assembled mode switch handle pos. 832 is installed in the hammer drill body so that the red button of the handle is directed parallel to the hammer handle.
The handle is rotated clockwise to the “drilling” position. A characteristic click will occur. The hammer handle is inserted.
Be sure to check the operation of the mode switch by turning it to the desired position and turning on the hammer drill in each mode.
Sources:
https://moy-instrument.ru/chertezhi-i-shemy/perforator-Bosch-gbh-2-26-dfr-shema.html https://sdelalremont.ru/poryadok-smazki-i-sborki-perforatora-Bosch -2-26.html