The most unpleasant thing is that household appliances sometimes not only fail, the motor smokes, sparks, and a fire is possible. Vacuum cleaners are no exception. Therefore, the technical operation rules stipulate that you should never leave a tool connected to the network unattended. What are the signs that your vacuum cleaner motor is burning out?
Prevention of electric motor contamination
Graphite or metal particles from the brushes contaminate the commutator lamellas over time. This causes a large number of sparks, overheating and carbon formation, as well as displacement of the brushes from the working (initial) position.
Dust can accumulate between the contacts on the rotor. It is necessary to periodically clean the surface using fine sandpaper and degrease it by wiping with alcohol or gasoline.
Checking the contacts of the brush-collector unit
The reason for sparking of serviceable parts of the block may be poor contact due to insufficient contact with the collector lamellas. During operation of the vacuum cleaner, roughness forms on the surfaces of the engine's switching parts, which prevent the necessary contact. Grinding with fine sandpaper – “zero” – will help eliminate bumps, grooves and scratches on the commutator.
Advice! If the brushes spark excessively, then they should be pressed more tightly to the commutator using springs. In this case, the free movement of the block elements must not be disrupted.
Replacing brushes
The simplest and most obvious cause of sparks is wear on the brushes. Despite the fact that commutator motors are equipped with special spark-extinguishing capacitors, which, in addition to increasing the service life of these elements, also reduce radio interference, over time the brushes wear out and need to be replaced.
To replace the brushes, you first need to get to the electric motor. To do this you will have to disassemble the vacuum cleaner. In most cases, this is quite simple to do with a screwdriver, but do not forget to unplug the device. Having disassembled the vacuum cleaner and provided convenient access to the engine, we find the brush holders. Depending on the design, to remove the brushes from the brush holder, you usually need to pull out the latches, which may require a screwdriver.
Read also: Why and why do spiders have many eyes?
In recent years, many manufacturers have supplied their vacuum cleaners with a set of spare brushes. But if you happen to purchase the device without additional spare parts, they can be purchased at stores that sell power tools.
When purchasing new brushes, you need to pay attention to their size and material.
Brushes are graphite and copper-graphite. It will be better if you remove the old elements from the electric motor of your vacuum cleaner in advance and go to the store with them, so as not to make a mistake in your choice.
Checking the wear of the sliding contacts
Most often, the cause of excessive sparking during operation of an electric motor can be exhausted or damaged brushes. It is not difficult to remove this pair of parts for inspection. Depending on the model, the sliding contacts are secured using clamps or bolts.
Important! A visual inspection makes it clear how badly the ends of the contacts are charred, what is the condition of the springs, in order to make a decision about replacing them with new ones.
If there is obvious damage on the end of at least one removed element, signs that they were burning, not only will they need to be replaced. You will also need a visual inspection of the following parts:
- collector;
- rotor or stator windings.
Advice! Brushes should be replaced in pairs. Some models provide for replacement of elements included with the brush holder.
Other annoying little things
It happens that sparks fly if the bearings are worn out, so be sure to check their condition. If you have had your vacuum cleaner for a long time, then it may well be that the bearings have worn out, and as a result, the rotor has stopped working evenly.
Inspect the collector itself, especially the plates, to see if there are any irregularities or protruding areas of insulation or scratches. Irregularities need to be eliminated, that is, simply polished. Abrasive paper or, again, fine sandpaper will help out.
Questions and answers
I can't find brushes of the right length. The ones in the store are too long or short.
Long carbon-graphite coins can be shortened using a needle file or file, gradually grinding off the contact end. If the brush is too short, you will have to either install a longer spring or look for other nickels.
After removing the brushes, it turned out that the spring was greatly weakened. The coal coin itself is slightly worn.
Spring needs to be replaced
It is important to ensure a tight fit of the graphite to the collector
There are brushes of the right size, but the plate locks are completely different. It is not possible to fix the coal nickel in the nest.
You can carefully solder the brass patches from the old brushes to the new ones.
Which brands of brushes are better?
Repairmen often use parts from well-known manufacturers: Bosch, Makita, Hammer and others. They last 2-3 times longer than brushes from unknown companies.
After replacing the brushes, the grinder still does not work.
It is necessary to check whether the button is working properly and inspect the collector planes again. They must be clean. During repairs, thin wiring may have been damaged. They need to be tested with a multimeter.
Why do brushes spark after disconnecting the motor from the mains?
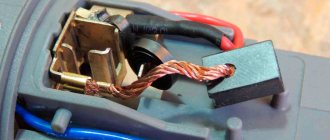
The basis of devices with AC electric motors is a brush-commutator module, which ensures electrical contact of the rotor with the static part of the electrical device. This module consists of two parts: a commutator located on the rotor and brushes - sliding contacts located outside the rotor part and pressed against the commutator.
Because we pay them for this! Find out the details. What this could mean is that the brushes in the drill began to spark a lot and at the same time a nasty smell appeared, and the drill itself lost power.
To make it go faster, at first, it is recommended to wash with an incomplete load and spin at medium speed.
Reasons for vacuum cleaner breakdowns:
- Bearings
- The wire
- Brushes
- Capacitor (failure)
- Failure of the power regulator
- Fuse
- There is no contact in the switch
- Motor winding
Safety precautions when working with the vacuum cleaner motor
A household appliance does not mean safe. A vacuum cleaner is a highly dangerous tool for those who repair it.
- All operations involving disassembling the tool must be carried out only with a visible break - the plug is turned off and moved away from the socket.
- When the motor is removed from the housing, when it is turned on with the impeller, a moment of inertia will arise, a strong jerk in the opposite direction. Before testing, the stator must be secured in a yew or pressed to the machine with a rigid insulator. Tests should only be carried out by two people in order to instantly turn off the current.
- A brushed motor, turned on with no load at all, will go haywire in seconds. Without an impeller, the assembly cannot . You can check sparking with the impeller and rigidly closing 80% of the incoming air flow.
These requirements must be observed in order to avoid electrical or mechanical injury and cause trouble.
Incorrect brush angle and bearing wear
Ideally, the sliding contacts should be located directly in line on either side of the axis of the rotating commutator. During long-term use, they can become dislodged, taking on a skewed position due to loose or deformed fastenings, as well as due to the rotor rotating with beating due to poor condition of the bearings.
Important! To eliminate sparking, you should adjust the location of the assembly elements using the fasteners provided by the manufacturer (usually screws).
Brushes, holders and fasteners with mechanical damage, with traces of corrosion, as well as worn bearings must be replaced. The schematic diagram below shows the commutator assembly with the brushes correctly installed. For the model of equipment you are using, you can also find a video on the Internet showing the entire repair process with an electric motor.
Causes of abnormal sparking of an electric motor
Intense flashes on brushes can occur for a number of reasons:
- the service life of the sliding contacts is exhausted (the springs or the brushes themselves are worn out);
- dustiness of the walls and contacts on the commutator and rotor;
- fault in the rotor or stator winding.
To determine a specific malfunction, it is necessary to diagnose the electric motor. This will help eliminate the cause.
Eliminate pollution
The commutator surface at the point of contact with the brushes must be clean. Coal or metal dust formed when the brushes rub against the rings or commutator can have a detrimental effect on the contact. Contamination of the latter causes sparking, from which carbon deposits are formed. Self-repair of a vacuum cleaner in this case involves routine cleaning. If the surface has traces of contamination, it is necessary to get rid of them using fine sandpaper, and then degrease it by wiping with alcohol or gasoline. You should also pay attention to the space between the contacts on the rotor. If they are clogged with dirt or graphite dust, they should also be cleaned and degreased.
TECHNOLOGY OF DISASSEMBLY AND ASSEMBLY WORKS
Electric vacuum cleaners and electric floor polishers use commutator motors that require special care during operation. When inspecting a vacuum cleaner, it is necessary to pay attention to the condition and degree of sparking of the carbon brushes, the condition of the collector plates, the sealing of the body, the serviceability of the locks, hose and dust filter, the tightness of the connections of the hose and extension pipes with the body of the vacuum cleaner.
The degree of sparking on the commutator (switching class) should be equal to two (weak sparking under a large part of the brush). The condition of the commutator and brushes is characterized by the presence of traces of blackening on the commutator, which can be easily removed by wiping the surface with alcohol or special synthetic detergents, as well as traces of carbon deposits on the brushes.
To eliminate malfunctions, in many cases it is enough to perform minor or medium repairs. Minor repairs are characterized by the elimination of simple defects, tightening of loose fasteners, and adjustment of easily accessible assembly units. Medium repairs involve replacing failed assembly units and adjusting them. In other cases, a major overhaul is performed: complete disassembly of the unit, its testing and adjustment.
Vacuum cleaners and floor polishers repaired at the customer’s home are checked visually. Inspect the housing, air intake unit, electric motor, drive belt, connecting cord and soldering points. Then the repaired device is connected to the electrical network and its operation is checked.
Typical malfunctions of vacuum cleaners and methods for eliminating them are given in table. 4.6, and similar information about floor polishers is in table. 4.7.
How to fix and what to do if the vacuum cleaner motor brushes spark
If the household unit begins to work worse, and standard cleaning of blockages does not bring results, it is necessary, first of all, to disassemble the engine. What to do if the vacuum cleaner motor sparks depends on the type of problem.
How to replace worn brushes
Most often, the vacuum cleaner engine sparks in the area of the brushes precisely because of the natural wear of the latter. Although modern models have special capacitors that slow down abrasion, sooner or later contact between the elements leads to unpleasant problems.
Worn parts need to be replaced. To remove them, you need to remove the back cover of the vacuum cleaner, find the brush holders and pull the latches with your hands or a screwdriver. Then all that remains is to purchase exactly the same elements.
Old brushes can wear down to the springs
In order not to make a mistake with your choice, you can go to the store with the old removed parts and, with the help of a consultant, buy similar ones. Then they are installed in the old place, secured with latches and the vacuum cleaner is assembled in the reverse order.
How to eliminate poor contact of new brushes
If the vacuum cleaner is completely new, or the brushes have recently been replaced, and the motor still sparks, the reason may be a poor fit to the commutator. The problem can be solved quite simply. The engine compartment is opened, the engine is removed and the protective casing is removed from it.
It is necessary to polish the vacuum cleaner brushes with the finest abrasive.
It is necessary to go over the installed brushes with sandpaper to eliminate the smallest roughness. You can also use abrasive sandpaper to treat the collector plates if they have scratches. The smoother the contacting surfaces are, the less likely it is that the vacuum cleaner will start sparking.
How to change the angle of the brushes
If the brushes are skewed relative to the commutator after prolonged use of the vacuum cleaner, sparks will occur when the engine operates. To resolve the problem you must:
- remove the motor from the vacuum cleaner;
- visually determine how correctly the brushes are positioned relative to the commutator axis;
- Use a screwdriver to tighten the two screws securing the brush holder to align the elements.
In old vacuum cleaners, you need to carefully examine the condition of the connecting nodes between the collector and brushes. If traces of corrosion and even cracks are visible on them, such elements must be replaced with new ones.
When the axis is knocked down, the brushes begin to contact the commutator loosely
How to clean dirt
Coal dust and the resulting carbon impair the friction between the brushes and commutator and cause the engine to spark. The problem can be resolved by regular cleaning. The motor is removed from the unit and the casing is removed, after which the brushes are disconnected and access to the commutator is opened. If dirt is noticeable on the surface of the parts, they are treated with fine sandpaper until completely clean.
Plaque accumulates on the brushes and commutator, so when cleaning they are additionally degreased with alcohol
How to eliminate a short circuit in the winding
Sometimes replacing brushes and other actions do not produce any results, and the vacuum cleaner continues to spark strongly. Usually the problem is an interturn short circuit of the commutator. There are two ways out of the situation - you need to either completely change the winding or replace the unit’s motor.
When a short circuit occurs, noticeable blackening appears on the collector plates
Rewinding an armature requires some experience and specialized knowledge in electrical engineering. Therefore, it is easier to send the engine for service or immediately purchase a new engine. This will be expensive, but buying just an anchor usually doesn't make sense. Its price is about 80% of the cost of the entire motor.
Integrity of rotor and stator windings
More serious problems that cause strong sparking of an electric motor are interturn short circuits of the rotor or stator windings. It is difficult to fix such a breakdown on your own. Signs of a problem with the winding are:
- engine operation is accompanied by popping noises;
- sparks fly around;
- blackening is observed on the collector lamellas;
- The electric motor speed has dropped.
Advice! If, during a visual inspection, the damage to the winding cannot be found, then you can resort to electrical measurements using a multimeter.
It will not be difficult for experienced electricians to figure out how to carry out electrical measurements:
- on paired winding outputs to the collector plates;
- between the collector and the rotor (armature) housing;
- between the stator housing and the winding output;
- test the integrity of the stator winding.
Important! Resistance and voltage measurements will help identify a failed component of the electric motor. A vacuum cleaner with a faulty electric motor winding cannot be operated.
For home craftsmen without special equipment, rewinding a faulty electric motor element is very problematic. Therefore, it is necessary to contact a service workshop. When you contact a repair center, for example, with a Samsung vacuum cleaner, they may offer to replace its windings or purchase a new motor.
How to replace
In order to correctly replace brushes for electric motors of a vacuum cleaner, it is important to remove the motor correctly. You need to unscrew the screws at the base of the vacuum cleaner and pull out the vacuum cleaner body. The engine is in a plastic protective shell. You need to unscrew it and take out the motor, take the engine in your hands and see if there is any damage to it. On two sides of the shaft, rectangles are visible. These are brushes. If they are damaged, you need to install new ones. The collector should also be inspected and wiped. Then you need to insert new brushes and repeat all steps in reverse order.
Important! When disassembling the vacuum cleaner, record or videotape all your actions so that you can later reassemble the vacuum cleaner correctly.
The most common reason for poor vacuum cleaner performance is wear and tear on its internal parts. Sometimes it is necessary to contact a service center, but first you can try to do the repair yourself. Good luck with your vacuum cleaners.
Thanks to household appliances, home owners gain complete comfort. Using the same vacuum cleaners significantly reduces the physical effort spent on cleaning. Meanwhile, even super-reliable equipment, for example from Samsung, does not last forever, which says one thing: someday the time comes for repair or replacement.
However, convenient and practical units quickly make users get used to working with them. Therefore, most of their owners prefer to restore their devices to their functionality rather than buy new ones. We will tell you what repairs of Samsung vacuum cleaners can be successfully carried out with your own hands.
First way.
First of all, a rough adjustment of the brushes to the commutator is required - this is done using a file and coarse paper. Then:
- The brushes are installed in place, and special glass sanding paper (No. 00) is placed under them. Its working surface should be facing the brushes. A piece of paper is measured so that its length is approximately 1.5 times the circumference of the collector.
- The armature is turned manually until the paper comes into contact with the entire surface of the brushes and grinds it.
- The mechanism is cleaned of coal dust and blown with a strong stream of compressed air.
- The engine is turned on with a load of 25-30% of the rated load for more thorough grinding of the brushes.
Since the presence of dust and brush wear products in the engine can lead to a short-circuit to ground in the brush holder bracket, after grinding it is necessary to blow out the generator with compressed air.
Engine diagram
For a more visual understanding of the operating principle of a commutator motor, there are two visual types of representation - simplified and detailed. The first format (Fig. below) is a conventional diagram, focusing on connecting the windings to the network.
More complex designs (Fig. below) have additional taps on the rotor and stator. For example, to power automation or regulate speed. The presence of thermal protection allows you to minimize the likelihood of overheating of the upper layer of the unit winding. This element removes voltage when the relay is activated, stopping the operation of the shaft.
The tachogenerator reflects the rotation speed of the engine. As an alternative, a Hall sensor is installed on some models. The device receives signals through the contacts of the collector panels.
What are brushes
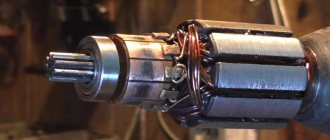
Modern electrical appliances often use commutator electric motors—electric machines that convert electrical energy into mechanical energy and vice versa. The commutator unit of the electric motor transmits electricity to the armature winding. During operation of the motor, a large number of revolutions are made when the armature rotates, which leads to strong friction. The contact is not metal, which, when rubbing against another metal, would produce additional friction and lead to wear of the commutator, but coal or graphite. Such a sliding contact, which converts mechanical energy into electrical energy, is called an electric brush.
- A – collector (mechanical switch).
- B – brush holder (supplying voltage to the armature windings).
- C – stator core (made of electrical steel).
- D – stator windings (related to the inductor).
- E – armature shaft.
This is interesting: Skinali for the kitchen - varieties and tips for choosing
Why do brushes spark?
Brushes can be called the weakest element of a commutator motor: during operation of the unit, they are subject to constant friction, which leads to their wear . This point is especially noticeable on copper surfaces, where a layer of coal dust accumulates during brush operation.
Design Features
In normal sliding mode, a small break occurs in the electric current circuit. Microscopic arcs appear, and this is a faithful companion of sparks. Here you can add a decent inductive reactance of the motor windings.
At maximum load on the unit, even with new brushes, there will always be a spark. Visually this may not be so noticeable, especially on low-power models, but sensitive equipment located in a room with a working vacuum cleaner will make this known in a specific background. Therefore, filters are installed on televisions, personal computers and other devices to eliminate such interference.
Wear
The part of the brush that comes into contact with the commutator is made of carbon. Over time, its length decreases, as does its total volume. As a result, the spring pressure weakens, and gaps appear, and with them sparks.
Graphite brushes for vacuum cleaner
Homemade brush
The element must fit tightly into the grooves and be positioned strictly perpendicular to the axis of the rotor shaft. If the brush is smaller than the required size, a skew will appear. This will again lead to sparking, and at the same time a decrease in engine performance. Therefore, here it is better to give preference to industrial options rather than homemade ones.
Further actions
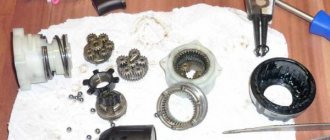
After the nut is unscrewed, it will be easy to pull out the washer, as well as the impeller located under the washer. Next, the cyclone mechanism is removed and the anchor bearings are already visible. All that remains is to unscrew the four retaining plates and lightly tap the manifold on the reverse side to disconnect the rotating mechanism from it. Shock absorbed bearings can be identified by looking at them as well as by spinning them. In cyclone vacuum cleaners, often, during long-term operation, the balls inside the bearings are destroyed. In this case, the only way out is to purchase and install new options.
Why brushes spark, the main reasons
The brushes are the weakest part. Most often it is from them that the vacuum cleaner motor sparks. Here are some reasons for sparking.
Wear of parts
There is a metal holder inside the brushes. When the graphite layer wears down to metal, the collector copper comes into contact with the holder steel. Hence the sparks.
Wrong angle
The design of the brushes includes a spring. Over time, its clamping ability weakens. This leads to misalignment. That is, the brushes are displaced relative to the plane of contact with the commutator elements.
The holder is secured to the body with two screws. They can also weaken during long-term operation of the vacuum cleaner. And this will again lead to a change in the angle of inclination.
Poor contact
The two previous reasons result from poor contact between the graphite surface of the brushes and the copper commutator. The electrical circuit breaks. It is short-lived, but it is enough for the electric motor to start working intermittently. That is, in jerks.
Dirt entry
Another reason is why the brushes on the vacuum cleaner burn. Dirt collects on the surface of the collector. Usually this is dust and graphite residues from old brushes. The contact between the two conductors weakens, causing the electrical circuit to break.
Attention! This problem can be solved simply - the collector surface must be cleaned with zero-grit sandpaper.
Motor short circuit
Sparks inside the vacuum cleaner can occur not only due to faulty brushes or their poor contact with the collector. The winding sparks - these are copper wires treated with a special varnish that does not allow electricity to pass through.
Sparking is a violation of insulation. In this case, sparks scatter in the direction of movement of the armature, that is, in a circle. The motor itself begins to hum, popping noises appear, and the power of the vacuum cleaner drops.
This fault can only be determined using a multimeter. This device measures the voltage and resistance of the winding.
Attention! The vacuum cleaner cannot be operated with such a malfunction.
Homemade brush
Under no circumstances should it be installed in household appliances, especially vacuum cleaners, home-made units and parts related to power supply. You can make a graphite brush with your own hands. But it is almost impossible to adjust it to the required technical and electrical parameters.
The vacuum cleaner motor acts as a compressor. Therefore, it works under load all the time. And it doesn’t matter to him at what frequency the voltage is applied to him. For an electric motor, it is important that there is always a balance between the load and the power of the device.
- And if there is no load, the engine will go into overdrive. It will simply be torn off its fastenings in a split second.
- If the power is reduced, and this is directly related to the brushes, then the vacuum cleaner loses its functional qualities. That is, it simply stops sucking up dust.
Homemade brushes will lead to the second point. That is, there is a high probability that the device will simply be useless in the household. In addition, no one canceled safety precautions. With homemade parts, her requirements are reduced to a minimum.
The drill sparks on the brushes - what to do
So, your drill sparks on the brushes and you don’t know what to do in this situation. This article will tell you why this happens, whether it needs to be fixed, and if so, how.
It is immediately worth noting that the presence of the specified sparking during operation is a completely acceptable phenomenon. This is true only if the sparks are small and there are not so many of them. If they just fall out, this may indicate a malfunction.
Note that on a new, working power tool, the brushes may also spark strongly at first, since they need to first get used to. Grinding in usually takes 10-15 minutes of work. If after this everything remains as it was, then it is better to take the instrument back to the store with a claim.
If your drill is no longer under warranty, you can try to fix it yourself.
But first we will describe the reasons for this phenomenon.
Why do brushes spark in an electric motor?
Sparks, including on a working engine, appear due to mechanical action between the brushes and the commutator. The brush, moving along the commutator from one of its contacts to another, alternately forms and breaks a connection with each of them. Now remember what happens if you unplug any working electrical appliance from the socket - usually at such a moment a spark jumps between the plug and the socket. In the case of a brushed motor, this is the same phenomenon.
Therefore, a small spark even on a working electric motor is acceptable, since connections and ruptures constantly occur here.
Causes of severe sparking and how to eliminate them
Now let's move on to strong sparking. It occurs mainly for the following reasons:
- contamination of collector contacts with carbon deposits
- graphite dust getting between the collector contacts
- interturn short circuit in the armature winding
Let's go through each point separately.
1) Soot contamination occurs as a result of engine overheating. The presence of carbon deposits leads to even more friction, which leads to even faster overheating and even more carbon deposits. Which very quickly leads to breakdown.
Excessive sparking here results from the fact that carbon deposits form additional resistance, which causes the spark to break when it breaks, becoming larger and more powerful.
In general, carbon deposits should be removed immediately.
This is done with zero grade sandpaper. That is, you need to remove the collector along with the armature and carefully clean it. Ideally, it is advisable to carry out the grinding on a lathe so as not to disturb the correctness of the circle. But, as a rule, this is not possible, so you can get by with manual stripping. The main thing is not to overdo it.
2) When using a drill, the brushes wear out, which causes the formation of graphite dust. It can easily accumulate between the collector contacts and lead to short circuits between them, since it is a conductor of electricity and has its own resistance. Because of this, the current is distributed unevenly, which leads to large sparks in some places.
In a working drill, wear occurs quite slowly, so graphite dust hardly accumulates. Accordingly, its accumulation signals that the brushes are in the wrong position during operation. This usually happens when they do not stand tightly in their groove, but, on the contrary, have some play.
This often happens when replacing brushes, when they are selected to be not quite suitable in size.
Therefore, when replacing this point, you should pay close attention.
Repair of such a malfunction is carried out by removing dust with some pointed tool and replacing the brushes with more suitable ones.
3) In the event of an interturn short circuit in the armature, the current flows in a larger value to some contacts and a smaller value to others. Because of this, more current flows in some places than necessary, resulting in large sparks.
Identifying such a short circuit should be done when the two previous points did not give much effect. It is produced using a special device that creates an alternating magnetic field. When an armature is placed in this field, it begins to rattle, as induced currents appear in it.
Some people make such a device themselves from a power transformer, in the core of which a cutout is made where the armature is placed.
If the reason turns out to be an interturn short circuit, then you need to rewind the winding or completely replace the armature.
These are the causes of excessive sparking on the drill brushes. Remember, if you don't do anything about it, the engine will most likely break down soon. Therefore, do not be lazy and follow the recommendations indicated in the article.
instrument-tehnika.ru