In beer production, there is a need to quickly cool the wort before adding yeast to minimize the chance of contamination. In this article, we'll look at the benefits of quickly cooling wort after boiling, and we'll also make a simple immersion chiller using copper tubing, which can be purchased at your local hardware store. Cooling your wort quickly after boiling will greatly improve the clarity and flavor of your finished beer. Some of the benefits include:
- Reduced chance of infection
– Your wort is vulnerable to bacterial infection when it is already less hot and without added yeast. You can minimize the possibility of contamination by quickly cooling and pitching the yeast in no time. - Improved Clarity
– When you sharply cool hot wort, many of the heavy proteins and tannins become no longer soluble and fall out of the wort. Pumping the wort during a “cold break” will increase clarity and improve flavor. - Reduction of volatile compounds
- dimethyl sulfide (DMS), which gives beer a strong smell of “sweet boiled corn”. DMS may continue to break down after the boil and may be noticeable in the finished beer if the wort is not cooled quickly.
It is possible to quickly cool 20-40 liters of boiling hot wort and here are some solutions for the home brewer. Ideally you want to reach fermentation temperature as quickly as possible and in the range of around 10-20 minutes is acceptable. Commercial brewers achieve these goals by using complex two-stage glycol heat exchangers to achieve the final fermentation temperature. Homebrewers often opt for something less complex and below are some popular wort cooling systems for home brewing.
What is a chiller?
First, it’s worth understanding what a chiller is in general. A chiller is a special device for cooling wort. The fact is that the brewed wort must be cooled as quickly as possible, otherwise we risk the entire batch. At high temperatures, bacteria multiply faster, which means the longer the wort remains hot, the greater the chance of infecting it with unwanted pathogens. Slow cooling also has a detrimental effect on the taste of homemade beer. The third factor that votes FOR a chiller is the volume of brewed beer. If the volumes are not large (5-10 liters), then cooling will take place quickly enough; just take a larger pan. But if you brewed 50 liters, you can’t do without a chiller.
Counterflow for cooling wort when brewing beer
I'm tired of cooling the brewed beer wort with a chiller, it takes a lot of time. Now I’m brewing 50 liters of beer, with a chiller the cooling time leaves more than an hour in winter, and in summer it can reach up to 1.5 - 2 hours. In the “home brewers” group they advised me to buy a counterflow. Counterflow
- movement of coolants in a heat exchange system (for example, in a heat exchanger) in parallel, in opposite directions. Simply put, the counterflow consists of plastic and has 2 inlets and 2 outlets. Hot liquid enters one inlet, cooled liquid comes out, cold liquid enters the other inlet, and warm liquid comes out. To make it more clear, here is a diagram:
I decided to buy a complete set: - counterflow for 30 plates - 4 fittings - 4 metal clamps - silicone tube - faucet adapter - fum tape The counterflow came in air packaging material (not sure what exactly it is called):
It itself was packed in film and there were plastic caps on each terminal:
The counterflow has 30 plates, everything is fair:
The top has a flat surface, and the bottom is concave:
I tried to take a photo of the insides through the hole:
The faucet adapter fits almost everything except modern faucets; it does not fit on the faucet aerator; I had to unscrew the faucet aerator and attach the adapter, I probably need to come up with something else. Photo of the adapter:
The fittings come with different outlet holes; silicone hoses are inserted into them and secured with metal clamps:
Fum tape is an ordinary white shapeless lump:
But I didn’t plan to use fum, I decided to replace it with silicone gaskets, but I found only one, so I made one outlet hole with a gasket, the rest with fum:
Counterflow weight is almost 1700 g:
Silicone tubes of different diameters, as well as fittings:
First I decided to connect the cold water hose and made the first start, which was successful:
All that's left to do is connect the remaining connections and is it possible to cool or not? It turns out, of course not, in order for the wort to cool, it needs to be fed under pressure, by gravity very slowly, because... There is scale (bruh) in the brewed beer, which will clog all the plates and nothing will flow. The easiest option for me is to use a diaphragm pump, which I wrote about, and this is what I got:
Let me explain a little, from the brewing tank the wort goes countercurrent through the tube, from there the cooled wort goes to the pump, and then into the fermentation tank. The counterflow, after passing hot and cold liquid through it, becomes covered with condensate, but not all of it, but only half, because one half is still hot, and the other is already cold:
Well, it's time to launch and take readings. To begin with, I turned on the cold water, then I opened the tap and turned on the pump, hot (about 90-95 degrees) wort ran, the counterflow became covered with condensation, the wort came out of it already cold, at first it was 28 degrees, then I added cold water and the temperature dropped to 22 degrees, when all the wort was drained, the total temperature was 25 degrees, which I consider ideal for one time cooling:
And only 15 minutes passed and I chilled 50 liters of beer! True, about 100-120 liters of cold water flowed away. I used a chiller to cool it to this temperature in about 1.5 hours, which is a very long time and there is a chance of contaminating the beer. I poured the cooled wort back into the tank and aerated it:
The foam is gorgeous))
Let me summarize:
+ cools the wort very quickly + quality product + good kit - not cheap - requires a lot of cold water - requires a pump - difficult to clean
Conclusion: although counterflow has many disadvantages, it helps a lot in brewing and I would never trade it back for a chiller. Overall, I recommend
!
Thank you for your attention! I will answer questions whenever possible.
Description of industrial chiller
Chiller (water-cooling machine) is a device for cooling liquid through a vapor-compression or absorption refrigeration cycle. After the temperature has decreased, the liquid is used to cool the air in the heat exchanger (fan coil) or to remove heat from equipment.
Operating principle of an industrial chiller
The device is used in various industries. A cooling unit in a connected system with a fan coil is used in some models of air conditioners.
Operating principle of an industrial refrigeration plant
In production, special absorption chillers are used as a rapid heat removal unit. It is necessary to ensure the operation of various industrial equipment that generates heat. The chiller selects and removes excess heat and maintains the optimal temperature and thermal conditions of the equipment. Lithium bromide in water is used in industrial installations as a liquid that absorbs gas in full.
During the cooling process of water, excess heat is released, which is released into the environment.
The industrial installation consists of two blocks:
- top - generating hot container with relatively high pressure;
- lower - includes an evaporation tank and a section with an absorbent.
Nature of operation of the installation:
- The heat from the generator affects the absorbent, which releases water vapor.
- The steam is transferred to the condenser and turns into a liquid state, giving off heat to a special reservoir of water.
- Having lost heat, water from the condenser is supplied to the evaporator.
- Here the water evaporates under pressure, absorbing heat from the refrigerated circuit (chiller).
- By pumping boiling water through a pumping unit, heat transfer is enhanced.
- At this time, the remaining absorbent concentrate is transferred to the absorber, where gas is absorbed from the evaporator and heat is released.
- The exhaust circuit removes heat from the absorbent container outside the installation.
- After the heat is removed, the resulting water and absorbent are again transferred to the generator.
Advantages of chillers over compression refrigerators:
- small amount of energy consumed;
- low noise emission during operation;
- environmental friendliness, because the working substance is plain water, not freon;
- absorb the released energy;
- long period of effective operation;
- industrial safety;
- ease of control.
Flaws:
- price;
- the need for a source of hot energy;
- heavy weight;
- high water consumption of the system.
Chiller for beer production
Water cooling machines are actively used in beer production. It is used to cool the wort. When receiving malt liquor, you need to quickly reduce the temperature. The quality of the drink depends on this. This broth contains beneficial and harmful bacteria. Beneficial elements are preserved at temperatures above 60°C, and all harmful bacteria die. But with slow cooling after 60°C, the likelihood of the appearance of harmful microorganisms increases. Therefore, it is necessary to reduce the temperature quickly.
The importance of the speed of the production process is also reflected in the fact that the fermentation process and the addition of yeast can only be carried out at a favorable temperature of about 20°C.
When the broth cools slowly, a large number of bacteria are formed. Yeast, when added, will not be able to absorb excess microorganisms. The drink will be spoiled. Slow cooling also impairs the commercial quality of the product.
Chiller material
A chiller for cooling beer must be made from a material that:
- conducts heat well;
- suitable for food products;
- is not fragile;
- able to withstand temperatures up to 100 degrees.
Based on the above characteristics, the conclusion suggests itself that the best material for a chiller will be metal. It remains to find out which metal will be more advantageous in use and will withstand all the loads.
Stainless steel has fairly low heat transfer. In addition, the cost per small piece is significantly high. Aluminum should not even be considered, as it oxidizes and releases harmful components. Only copper remains. Copper pipes are available in any plumbing supply store and are readily available. Buying them won't be difficult. This material conducts heat well and bends remarkably.
When purchasing a tube, you need to take into account its diameter, the number of turns, and the diameter of the turn. These parameters will affect the final cost of the tube.
Submersible evaporator for chiller
A plate evaporator is used for more powerful installations, usually with a cooling capacity of 10-15 kW, since with such powers a submersible (twisted) evaporator will be too bulky and will require a large container, which must be completely filled with cooled liquid, which is often the case in a production line not provided. Or the container should be inside the chiller, which, compared to a plate heat exchanger, will increase the dimensions of the chiller several times.
And in the production of industrial chillers with capacities over 150-200 kW, as a rule, shell-and-tube evaporators are used.
To a client wishing to buy an industrial chiller, the chiller manufacturer recommends one or another type of evaporator, indicating the pros and cons of its use.
The compressor-condensing unit for the production of a chiller can be taken in fact, almost any one in which the compressor corresponds to the temperature regime and the required cooling capacity (medium or low temperature). If this is a former air conditioner (or rather a split system), then you can unsolder the three-way valve and connect everything directly, if you do not need a heat pump function, as in a standard refrigeration unit - KM-KD-Receiver-TRV. And instead of an electronic board with a remote control designed for a split system, install conventional automatic motors and starters, block pressure switches, as well as a microprocessor controller with a temperature sensor.
The Internet is replete with various manuals and videos on how to make a chiller yourself; there are two main points that are often not mentioned anywhere, although their understanding is critical for high-quality assembly of the chiller.
Most often, those who want to assemble a chiller themselves use a submersible - twisted evaporator, as the cheapest and simplest option that can be made independently. The question is mainly about the correct manufacture of the evaporator, regarding the power of the compressor, the choice of the diameter and length of the pipe from which the future heat exchanger will be made.
To select a pipe and its quantity, you need to use a thermal engineering calculation, which can be easily found on the Internet. For those who do not want to make an accurate thermal calculation of the evaporator, for some reason, fixed power values will be given below. For the production of chillers with a power of up to 15 kW, with a twisted evaporator, the following diameters of copper pipes are most applicable: 1/2; 5/8; 3/4. Pipes with a large diameter (from 7/8) are very difficult to bend without special machines, so they are rarely used for submersible evaporators. The most optimal in terms of ease of use and power per 1 meter of length is a 5/8 pipe. Under no circumstances should an approximate calculation of the pipe length be allowed. If the chiller evaporator is not manufactured correctly, then it will not be possible to achieve either the required superheat, the required subcooling, or the freon boiling pressure, as a result the chiller will not work efficiently or will not cool at all.
Below are data on the thermal power that one meter of pipe can transmit. The data are not reference data, they were obtained by a combination of thermal engineering calculations and an empirical method, but at the same time they have been successfully used in the calculation of submersible evaporators for many years. The power values include a margin of ~3%.
Chiller evaporator data:
— Pipe 3/8 ~ 0.14 kW/1 meter of pipe = 0.029 m2 of heat transfer surface.
— Pipe 1/2 ~ 0.19 kW/1 meter of pipe = 0.039 m2 of heat transfer surface.
— Pipe 5/8 ~ 0.25 kW/1 meter of pipe = 0.049 m2 of heat transfer surface.
— Pipe 3/4 ~ 0.29 kW/1 meter of pipe = 0.059 m2 of heat transfer surface.
— Pipe 7/8 ~ 0.33 kW/1 meter of pipe = 0.069 m2 of heat transfer surface.
In practice, we have not used pipes with a diameter of more than 7/8 in the production of industrial chillers.
Also, one more nuance, since the cooled medium is water (most often), then the boiling point when (using water) should not be lower than -9C, with a delta of no more than 10K between the boiling point of freon and the temperature of the cooled water. In this regard, the low pressure emergency relay should be set to an emergency level not lower than the pressure of the freon used, at its boiling point -9C. Otherwise, if there is an error in the controller sensor and the water temperature drops below +1C, the water will begin to freeze on the evaporator, which will reduce and, over time, reduce its heat exchange function to almost zero - the water cooler will not work correctly.
Chillers (coolers) for wort
AGREEMENT 1. Provision of information by the Client:
1.1. When registering on the website doctorguber.ru (hereinafter referred to as the “Site”), the Client provides the following information: last name, first name, email address. When placing an order on the website, the Client provides the Seller with information: last name, first name, patronymic, phone number, email address, city and delivery address. When ordering a call back on the Seller’s website, the client provides: phone number, city of residence. When registering for training seminars through the website, the Client provides the Seller with information: last name, first name, patronymic, phone number, email address, city.
1.2. By providing his personal data, the Client agrees to their processing (up to the Client’s withdrawal of his consent to the processing of his personal data), located at the address: 191002, St. Petersburg, st. Dostoevsky 24/9A, 3N and TDDG Retail LLC located at the address: 190068 St. Petersburg, Rimsky-Korsakov Avenue, building 3, lit. A, room 19N (hereinafter referred to as the “Seller”), for the purpose of execution The seller and/or his partners of their obligations to the client, selling goods and providing services, providing reference information, as well as for the purpose of promoting goods, works and services, and also agrees to receive advertising and informational messages and service messages. When processing the Client’s personal data, the Seller is guided by the Federal Law “On Personal Data”, the Federal Law “On Advertising” and local regulatory documents.
1.2.1. If the Client wishes to clarify his personal data, block or destroy it if the personal data is incomplete, outdated, inaccurate, illegally obtained or is not necessary for the stated purpose of processing, or if the client wishes to withdraw his consent to the processing of personal data or eliminate unlawful actions by the Seller and/or its partners in relation to his personal data, then he must send a written request to the seller’s email address. E-mail address
If the Client wishes to delete his account on the Site, the Client contacts us at the following address with a corresponding request. This action does not imply the withdrawal of the Client’s consent to the processing of his personal data, which, according to current legislation, occurs in the manner provided for in paragraph 1 of this paragraph.
1.3. Use of information provided by the Client and received by the Seller.
1.3.1 The Seller uses the data provided by the Client during the entire period of the Client’s registration on the Site for the purposes of:
- registration/authorization of the Client on the Site;
- processing the Client's Orders and to fulfill its obligations to the Client;
- to carry out activities to promote goods and services;
- assessment and analysis of the Site’s operation;
- determining the winner in promotions conducted by the Seller;
- analyzing the Client’s purchasing characteristics and providing personal recommendations;
- Client’s participation in loyalty programs;
- informing the client about new articles, news, promotions, discounts and special offers through electronic and SMS newsletters.
1.3.2. The Seller has the right to send advertising and informational messages to the Client. If the Client does not wish to receive advertising and informational messages from the Seller, he must change the appropriate settings, a link to which is contained in the letter sent to the client, or make a corresponding request at features of the operation and interaction of information systems, as well as the terms of contracts with counterparties who carry out, in the interests of the Seller, the distribution of advertising and informational messages. The Client’s refusal to receive service messages is impossible for technical reasons. Service messages are sent to the email address specified when registering on the Site, as well as via SMS messages and/or push notifications and through the Customer Service Service to the phone number specified during registration and/or when placing an Order, about the status Order, goods in the Customer's basket.
2. Provision and transfer of information received by the Seller:
2.1. The Seller undertakes not to transfer information received from the Client to third parties. It is not considered a violation for the Seller to provide information to agents and third parties acting on the basis of an agreement with the Seller to fulfill obligations to the Client and only within the framework of the agreements. The transfer by the Seller to third parties of data about the Client in an impersonal form for the purpose of assessing and analyzing the operation of the Site, analyzing the Client’s purchasing characteristics and providing personal recommendations is not considered a violation of this clause.
2.2. The transfer of information in accordance with reasonable and applicable requirements of the legislation of the Russian Federation is not considered a violation of obligations.
2.3. The seller has the right to use “cookies” technology. Cookies do not contain confidential information and are not transferred to third parties.
2.4. The Seller receives information about the IP address of the visitor to the website doctorguber.ru and information about the link from which Internet site the visitor came from. This information is not used to identify the visitor.
2.5. The Seller is not responsible for the information provided by the Client on the Site in a publicly accessible form.
2.6. When processing personal data, the Seller takes necessary and sufficient organizational and technical measures to protect personal data from unauthorized access to it, as well as from other unlawful actions in relation to personal data.
3. Storage and use of information by the Client
3.1. The client undertakes not to disclose to third parties the login and password used by him for identification on the website doctorguber.ru.
3.2. The Client undertakes to ensure due diligence when storing and using the login and password (including, but not limited to: using licensed anti-virus programs, using complex alphanumeric combinations when creating a password, immediately changing the password after automatic registration, notification of which is sent by email the client, not to make available to third parties a computer or other equipment with the Client’s login and password entered on it)
3.3. If the Seller has suspicions regarding the use of the Client’s account by a third party or malicious software, the Seller has the right to unilaterally change the Client’s password.
Making a chiller yourself
To quickly cool liquids at home, you can make a chiller yourself. Let's figure out how to make a chiller with your own hands.
Necessary materials
Requirements for materials for a do-it-yourself chiller:
- good thermal conductivity;
- suitability for food use;
- possibility of processing at home;
- strength;
- withstands temperatures up to 100°C.
Glass fits these criteria perfectly, but the problem arises with one parameter - the possibility of processing. Silicone is not suitable. It does not withstand high temperatures well and does not have the necessary heat transfer parameters.
There remains one type of material - metal. Options include aluminum, copper and stainless steel. With stainless steel there are complaints about price and heat transfer. Aluminum oxidizes and is unsafe for health. The best choice is copper.
Homemade chiller made from water pipes
What parameters need to be decided on:
- Tube diameter. A larger diameter will ensure a high level of heat transfer.
- The number of turns in the circuit. The more turns, the better the heat transfer.
- Overall coil diameter.
When calculating the required parameters, it is necessary to determine the volume of the container into which the chiller will be immersed to remove heat.
The diameter of the coil and the diameter of the tubes must ensure free immersion and maintain the same distance from the device to the walls and center of the container. You can make any distance between the turns, but the closer they are to each other, the more they can be created.
DIY copper tube chiller
Private microbreweries are far from uncommon today. In addition, the availability of technology and equipment allows you to brew this invigorating drink yourself.
Cooking recipes are beyond the scope of this material: we will talk about a device without which homemade beer can be hopelessly ruined at the preparation stage: a beer chiller.
In fact, this is an ordinary cooler, reminiscent of a coil in moonshine. It just works the other way around: it itself is a source of cold.
Options for cooling water in a home aquarium
Knowing the three main ways to effectively cool water in an aquarium, you can save the lives of the small inhabitants of your home “reservoir”. The presence of such a device in the house will help maintain the required temperature level throughout the day, which means it will ensure comfortable life for the inhabitants of the aquarium. Create favorable conditions for your fish and notice that they get sick less often and stop dying.
Manufacturing
A do-it-yourself chiller for cooling beer is quite simple. You need to take a pan, for example, with a diameter of 32 cm and a height of 30 cm. A 10mm tube is suitable for this container. It is better to make the radius of the coil equal to ¼ of the diameter of the pan itself. With these parameters, better heat transfer will be achieved.
The distance between the turns should be 2cm. The result is 10 turns. It took 6 meters of copper tube to create the entire structure with the above parameters.
For convenience, you need to take any strong object of the appropriate diameter and start curling the tube. Place hoses on both ends of the tube. Connect one end to the faucet, and lower the other into the bathtub or sink.
Place the beer chiller in the center of the pan. Connect to the tap, turn on cold water. The process of uniform cooling will begin. The drink needs to be stirred periodically.
This is how I made my own beer chiller. It took about 40 minutes to make, assuming that all the elements were already prepared for assembly.
Assembly
Here photographs will help more than a lengthy description in words.
I started by insulating the water blocks. The block was filled with foam, after drying, insulation was placed on the tubes and the whole thing was covered with electrical tape.
This way I insulated all three water blocks.
All that remains is to isolate the motherboard. I smeared the entire space around the socket and chipset with dielectric grease, did the same with the blocks, then made gaskets from foam rubber. I treated the back side of the motherboard and video card in the same way, then installed foam rubber and secured it with acrylic plates.
When the blocks were ready, I started working on the air conditioning. I completely disassembled it, being careful not to break anything.
To easily and painlessly bend the tubes in the right places, I recommend using a tool called “pipe bender” (I don’t know the exact Russian name).
The air conditioner evaporator is installed in the tank.
The same foam was used for insulation; I attached the temperature sensor to the pump installed inside.
Then I insulated the pipes near the compressor and installed a fan to cool the condenser.
After that I added methanol. The first check in a couple of hours showed the following results:
The water chiller freezes the refrigerant rather slowly, but the reverse process occurs in a well-insulated tank for quite a long time. After 12 hours of inactivity, the temperature rose to just -12C. And now - the final stage, installation into the system. Be sure to make every effort to insulate both the water blocks and the circuit boards. As you can see, the goal has been achieved - the processor is pleasantly cool at -9C.
Advice for brewers
To increase the density of beer, you need:
- use roasted and caramelized malts. The latter type of malt has long chains of sugars that have no taste and are not fermentable at all. Remaining in the finished product, they enhance the overall taste. 500 grams of such malt increases the beer body of a 20 liter batch. Roasted malt has other elements that also increase the finished body, impart a sweetish flavor, increase the body of the product and enhance the aroma;
- Use unmalted grains that contain protein. These crops include: oats, wheat, barley flakes, barley. Proteins are not fermented and affect the taste of the product. These components reduce the transparency of the finished beer, so their use is rational in dark varieties of the drink.
- When mashing, use high temperature. The temperature range should be between 68.5 - 69.5 degrees. This temperature will allow you to preserve as many sugar chains in the product as possible, which are not fermented. They help increase the density of the beer.
- use a yeast strain with a reduced fermentation rate. This will result in low consumption of complex sugars by the yeast. The result is a dense drink with a full beer body. If possible, then to increase density you need to choose yeast with a fermentation degree of at least 70%. These may be a variety of ale yeast.
Thanks to these tips, you can brew dense, rich and tasty beer at home. The above recommendations can be combined or used separately.
Follow us on VKontakte
Read us in Zen
Read us on Telegram
Tell friends:
Return to articles feed
Chiller device for a small brewery
In fact, a chiller operating on the principle of a moonshine still exists. Hot wort is driven through the coil, and the external chiller itself is immersed in cold: running water or a container with the same ice.
The efficiency of such a device is higher than a saucepan immersed in a tub of ice. And yet, when hot beer moves through pipes, instantaneous cooling does not occur.
The next stage of technology is a plate chiller. It is a classic honeycomb radiator in which wort moves through tubes. In the outer container, cold water moves towards the wort. Thanks to counterflow, the chiller cools the beer almost immediately. The only drawback is that while the hot wort is moving through the pipes to the chiller, the negative processes have time to do their “dark and muddy” work.
The most efficient is the immersion cooler. This is a spiral-shaped chiller with refrigerant in the tube. When the heat exchanger (more precisely, the cooler) is turned on, the wort is cooled instantly.
The formation of bacteria does not occur; the rags of bruja immediately bind and settle to the bottom. And dimethyl sulfide, in principle, cannot be formed at such a rate of temperature drop.
The diameter of the tube is selected depending on the volume of cooled liquid. There is a principle of reasonable sufficiency: a chiller spiral that is too thick will require a powerful refrigeration unit.
The material used for production is neutral: usually copper. You can try food-grade aluminum, but it is too fragile for such temperature changes. They also use stainless steel tubes, although they are more expensive than copper ones and are much more difficult to bend.
3 secrets for making a do-it-yourself submersible chiller
The first secret is the diameter of the tube; the larger the diameter, the larger the heat transfer area!
The second secret is the number of turns - the principle is the same
The third secret is the coil diameter.
It is worth noting that all 3 of these parameters significantly affect the price. So, if you want to make a cheaper chiller, then know that the price is not only in rubles, but also in efficiency.
How to use a homemade beer chiller
We immerse the chiller in the center of the pan, connect it to the tap, lower the other end into the sink, and open cold water! All! You can stir the wort to cool evenly.
Sources
- https://homebeer.csutio.ru/oborudovanie-dlya-varki-piva-doma/kak-sdelat-chiller-dlya-piva-svoimi-rukami/
- https://vozduhstroy.ru/kondicionery/chiller-svoimi-rukami.html
- https://cp-h.ru/tehnicheskaya-informatsiya-po-holodiljnoy-tehnike/chiller-svoimi-rukami.html
- https://teplobloknn.ru/oborudovanie/samodelnyj-chiller.html
- https://saiding-v-permi.ru/oborudovanie/chiller-protivotochnyj-svoimi-rukami.html
- https://varimtutru.com/chiller-iz-nerzhaveyki-svoimi-rukami/
- https://paes250.ru/delaj-sam/kak-sdelat-chiller-svoimi-rukami.html
[collapse]
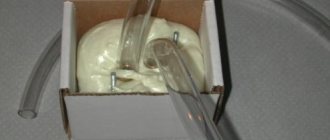
Submersible chiller:
The simplest solution for most home brewers, an immersion chiller (pictured above) is a coil of 10-15 meter copper tubing that is immersed in hot wort in a pan. The piping is connected to a faucet or garden hose and cold water constantly flows through the chiller to cool the wort. Starting from 15 meters the copper pipeline has a large contact area, 20-40 liters of wort can be cooled very quickly using this method. Immersion chillers may also include a two-stage system consisting of an additional coil that sits in front of the main coil and is immersed in an ice water bath to lower the temperature of the main water that passes into the wort and cools it. The two-stage immersion chiller cools even faster and helps when the temperature of the tap water entering the chiller is above or near the required fermentation temperature. Immersion chillers are also very easy to make, as will be described below, and are also easy to clean on the outside of the coil, simply wiping and washing after use.