What is a chiller?
First, it’s worth understanding what a chiller is in general. A chiller is a special device for cooling wort. The fact is that the brewed wort must be cooled as quickly as possible, otherwise we risk the entire batch. At high temperatures, bacteria multiply faster, which means the longer the wort remains hot, the greater the chance of infecting it with unwanted pathogens. Slow cooling also has a detrimental effect on the taste of homemade beer. The third factor that votes FOR a chiller is the volume of brewed beer. If the volumes are not large (5-10 liters), then cooling will take place quickly enough; just take a larger pan. But if you brewed 50 liters, you can’t do without a chiller.
Assembly
Here photographs will help more than a lengthy description in words.
I started by insulating the water blocks. The block was filled with foam, after drying, insulation was placed on the tubes and the whole thing was covered with electrical tape.
This way I insulated all three water blocks.
All that remains is to isolate the motherboard. I smeared the entire space around the socket and chipset with dielectric grease, did the same with the blocks, then made gaskets from foam rubber. I treated the back side of the motherboard and video card in the same way, then installed foam rubber and secured it with acrylic plates.
When the blocks were ready, I started working on the air conditioning. I completely disassembled it, being careful not to break anything.
To easily and painlessly bend the tubes in the right places, I recommend using a tool called “pipe bender” (I don’t know the exact Russian name).
The air conditioner evaporator is installed in the tank.
The same foam was used for insulation; I attached the temperature sensor to the pump installed inside.
Then I insulated the pipes near the compressor and installed a fan to cool the condenser.
After that I added methanol. The first check in a couple of hours showed the following results:
The water chiller freezes the refrigerant rather slowly, but the reverse process occurs in a well-insulated tank for quite a long time. After 12 hours of inactivity, the temperature rose to just -12C. And now - the final stage, installation into the system. Be sure to make every effort to insulate both the water blocks and the circuit boards. As you can see, the goal has been achieved - the processor is pleasantly cool at -9C.
Why do you need a chiller?
Let's think a little about why a chiller is needed? I think it’s clear that the main task of the chiller is to cool the wort; accordingly, its size and efficiency must be justified, because Cooling 50 liters with a small chiller will be, to put it mildly, difficult, and at the same time, putting a chiller designed for 100 liters into a 5-liter pan will also be problematic. So the size of the chiller must be appropriate, and not only the size, but also its efficiency is very important!
Choice of material for the chiller.
If you just think about why and how the chiller is used, then quite logical thoughts arise:
- The material must conduct heat well
Good options are glass, but we definitely won’t be able to process it at home, so we discard it. Silicone hoses do not withstand high temperatures well, and the heat transfer is not very good. The best option is metal.
What metal should I use to make my own chiller?
We don't have many options:
- Stainless steel
- Aluminum
- Copper
Stainless steel is expensive and its heat transfer is not the best. Aluminum oxidizes, and in general it is harmful - so we discard it. What remains is copper.
Copper tube is sold at any plumbing store; it has good heat dissipation and bends easily. Great! decided!
Do it yourself: freon chiller from an air conditioner
The idea of redesigning the cooling system of a laser machine has been in my head for a long time, but, as usual, my hands can’t keep up with my head. Initially, the work of cooling the “pipe” (laser emitter) was performed by a simple Chinese chiller, exactly like in the picture.
Its design is banal and simple: the liquid passes through a radiator made of an aluminum tube, which, in turn, is blown by a fan. Of course, there can be no talk of any temperature stability or power reserve. In the summer, a regular window air conditioner was purchased to accompany it, which simply cooled the air supplied to the chiller. The solution was temporary, but, as we know, there is nothing more permanent than something temporary.
The last straw was the upgrade of the machine to a more powerful “pipe”, which required more serious cooling. Initially, the choice fell on a Chinese freon chiller, but delivery times and costs turned out to be higher than expected, so it was decided to modify what was available. The system requirements were as follows:
• Stable temperature maintenance in the range of +8 ... +14 C • Autonomy • Ability to work in mode 247 • Less power consumption compared to the current system
The simplest thing that could be thought of was to immerse the cold part of the air conditioner in the liquid that directly cools the “pipe,” which is ultimately what was done.
We disassembled both devices, so recklessly that we forgot to take a picture of it. The outer casing, the fan impeller that blows through the cold part, the insulation and a pair of tin walls were removed from the air conditioner. We took out all the electrics and the expansion tank from the chiller.
It was decided to make the reservoir for the cold part from PVC 6mm thick, since there was an abundance of plastic; it can be easily cut with either a router or a simple knife. And it's easy to glue. In addition, I didn’t want to disassemble the freon part of the air conditioner - I would have to re-pressure the tubes, refill, etc. The tank was glued almost in place, creating a rectangular box 360x300x90mm, which was connected to the expansion tank using two fittings mounted on sealant and a hose.
(I apologize for the quality of the photo - I only had an old iPhone at hand)
We glued the top cover of the tank with a bolt as a plug for the gas outlet (not shown in the photo)
We connected the pump, operation indicators and alarm system from the old chiller, charged the system (antifreeze was used as a refrigerant), and turned on the air conditioner in the “chill until victory” mode. Pretty soon the thermometer showed +5 degrees.
After some time, the temperature dropped to -2 and continued to fall. At this point, it was decided to stop the tests and work on the visual component of the device. The front panel and top cover were made from a piece of thin plastic, the air intake hole was covered with a mesh, and the tubes were thermally insulated.
Introduction
From the editor (ALT-F13): It just so happened that we were able to publish the article just two months after it was written. During this time, the author did not sit idly by, but moved further towards more extreme cooling. Now Steff is engaged in assembling homemade phase-change direct-die systems, in common parlance - “freonok”. At the time of writing these lines, he has already demonstrated the second version of his system. However, the first one also worked great. So the lines with which the text of this article begins - “I became interested in extreme methods of cooling a computer quite recently, so this is a description of my first experiment in this area” can be considered invalid :)
I became interested in extreme computer cooling methods quite recently, so this is a description of my first experiment in this area.
I used water cooling for several years, but the moment came when I wanted more. You could, of course, buy a ready-made Asetek VapoChill or nVentiv Mach II (ex-Prometeia) system, but freons have their drawbacks. Firstly, this is the price, and secondly, the ability to cool only one element of the system. To cool, for example, a video card, you would have to buy another device and seriously bother with installation. Starting my acquaintance with extreme cooling by building a homemade direct-die system seemed to me quite a difficult task, so I chose a different path. An alternative to direct-die cooling are water chillers, that is, water-cooling systems with efficient cooling of the refrigerant, allowing to achieve temperatures below ambient temperatures. Today there is only one serial water chiller; it is a rather inefficient (about 0 degrees at 50-70W load) and expensive ($330) system from Swiftech. The Dutch OC-Shop.com promise to start selling their chiller, but over the past six months they have not made much progress towards the goal. Only the price of the product is known - 600 euros, which is even more than the Swifttech product. Due to the lack of effective mass-produced chillers, there are two options left - make it yourself or buy a chiller designed for another application. There are two main types of water chillers: based on phase-change or using Peltier modules. The first are a dual-circuit system, where the freon evaporator cools the refrigerant in the liquid cooling circuit. In the second case, water or other refrigerant passes through a water block cooled by Peltier modules. This type of chiller is more compact and easier to manufacture, but suffers greatly in terms of temperatures and the efficiency/energy consumption ratio. Thus, 500 W of the total power of the modules gives a liquid temperature just below zero degrees at a load of about 100 W. So, it’s decided - we’ll make a phase-change waterchiller with three cooled elements (processor, northbridge, video card core).
Description of industrial chiller
Chiller (water-cooling machine) is a device for cooling liquid through a vapor-compression or absorption refrigeration cycle. After the temperature has decreased, the liquid is used to cool the air in the heat exchanger (fan coil) or to remove heat from equipment.
Operating principle of an industrial chiller
The device is used in various industries. A cooling unit in a connected system with a fan coil is used in some models of air conditioners.
Operating principle of an industrial refrigeration plant
In production, special absorption chillers are used as a rapid heat removal unit. It is necessary to ensure the operation of various industrial equipment that generates heat. The chiller selects and removes excess heat and maintains the optimal temperature and thermal conditions of the equipment. Lithium bromide in water is used in industrial installations as a liquid that absorbs gas in full.
During the cooling process of water, excess heat is released, which is released into the environment.
The industrial installation consists of two blocks:
- top - generating hot container with relatively high pressure;
- lower - includes an evaporation tank and a section with an absorbent.
Nature of operation of the installation:
- The heat from the generator affects the absorbent, which releases water vapor.
- The steam is transferred to the condenser and turns into a liquid state, giving off heat to a special reservoir of water.
- Having lost heat, water from the condenser is supplied to the evaporator.
- Here the water evaporates under pressure, absorbing heat from the refrigerated circuit (chiller).
- By pumping boiling water through a pumping unit, heat transfer is enhanced.
- At this time, the remaining absorbent concentrate is transferred to the absorber, where gas is absorbed from the evaporator and heat is released.
- The exhaust circuit removes heat from the absorbent container outside the installation.
- After the heat is removed, the resulting water and absorbent are again transferred to the generator.
Diagram of a chiller in production
Advantages of chillers over compression refrigerators:
- small amount of energy consumed;
- low noise emission during operation;
- environmental friendliness, because the working substance is plain water, not freon;
- absorb the released energy;
- long period of effective operation;
- industrial safety;
- ease of control.
- price;
- the need for a source of hot energy;
- heavy weight;
- high water consumption of the system.
Chiller for beer production
Water cooling machines are actively used in beer production. It is used to cool the wort. When receiving malt liquor, you need to quickly reduce the temperature. The quality of the drink depends on this. This broth contains beneficial and harmful bacteria. Beneficial elements are preserved at temperatures above 60°C, and all harmful bacteria die. But with slow cooling after 60°C, the likelihood of the appearance of harmful microorganisms increases. Therefore, it is necessary to reduce the temperature quickly.
Cooler at a beer production plant
The importance of the speed of the production process is also reflected in the fact that the fermentation process and the addition of yeast can only be carried out at a favorable temperature of about 20°C.
When the broth cools slowly, a large number of bacteria are formed. Yeast, when added, will not be able to absorb excess microorganisms. The drink will be spoiled. Slow cooling also impairs the commercial quality of the product.
System components
The easiest way to assemble a chiller is based on a household air conditioner. It is advisable to find an air conditioner that uses R22 gas rather than R134a, since R22 evaporates at a lower temperature. A refrigerator system is also suitable for these purposes. I used a 5000BTU air conditioner, they usually have 1/2 HP compressors.
Any container with thermal insulation will be suitable as a reservoir, but in extreme cases you can make it yourself. In my case, this is an insulated cold water tank.
The main headache for those who venture into extreme cooling is thermal insulation to prevent condensation. The simple methods described in the article “Thermal insulation of water blocks” will no longer be enough if the temperature approaches zero and below. Therefore, “heavy artillery” will be used. For heat exchangers - polyurethane foam filler and insulating tape, for tubes and hoses - closed-cell foam rubber. It is necessary to use dielectric grease for the places where the water blocks are installed (a silicone coating can also be used, but then it cannot be removed from the boards).
The actual components of the water cooling system, water blocks and pump. My kit consists of PolarFlo CPU waterblock, Danger Den Z-Chip block, Swiftech MCW50 VGA block and Rio Aqua 1400 pump.
The next question is the choice of refrigerant. In this case, I was guided by two parameters: the liquid should not freeze at low temperatures and have the highest possible thermal conductivity. For low temperatures, antifreeze is suitable (who would doubt it;)), vodka or a mixture of water + methanol. I chose methanol: it is poisonous (attention!), but has the best thermal conductivity. One of the easiest ways to get it is to buy windshield wiper fluid at an auto store.
Making a chiller yourself
To quickly cool liquids at home, you can make a chiller yourself. Let's figure out how to make a chiller with your own hands.
Necessary materials
Requirements for materials for a do-it-yourself chiller:
- good thermal conductivity;
- suitability for food use;
- possibility of processing at home;
- strength;
- withstands temperatures up to 100°C.
Glass fits these criteria perfectly, but the problem arises with one parameter - the possibility of processing. Silicone is not suitable. It does not withstand high temperatures well and does not have the necessary heat transfer parameters.
There remains one type of material - metal. Options include aluminum, copper and stainless steel. With stainless steel there are complaints about price and heat transfer. Aluminum oxidizes and is unsafe for health. The best choice is copper.
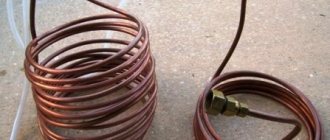
Homemade chiller made from water pipes
What parameters need to be decided on:
- Tube diameter. A larger diameter will ensure a high level of heat transfer.
- The number of turns in the circuit. The more turns, the better the heat transfer.
- Overall coil diameter.
When calculating the required parameters, it is necessary to determine the volume of the container into which the chiller will be immersed to remove heat.
The diameter of the coil and the diameter of the tubes must ensure free immersion and maintain the same distance from the device to the walls and center of the container. You can make any distance between the turns, but the closer they are to each other, the more they can be created.
Chiller device for a small brewery
In fact, a chiller operating on the principle of a moonshine still exists. Hot wort is driven through the coil, and the external chiller itself is immersed in cold: running water or a container with the same ice.
The efficiency of such a device is higher than a saucepan immersed in a tub of ice. And yet, when hot beer moves through pipes, instantaneous cooling does not occur.
The next stage of technology is a plate chiller. It is a classic honeycomb radiator in which wort moves through tubes. In the outer container, cold water moves towards the wort. Thanks to counterflow, the chiller cools the beer almost immediately. The only drawback is that while the hot wort is moving through the pipes to the chiller, the negative processes have time to do their “dark and muddy” work.
The most efficient is the immersion cooler. This is a spiral-shaped chiller with refrigerant in the tube. When the heat exchanger (more precisely, the cooler) is turned on, the wort is cooled instantly.
The formation of bacteria does not occur; the rags of bruja immediately bind and settle to the bottom. And dimethyl sulfide, in principle, cannot be formed at such a rate of temperature drop.
The diameter of the tube is selected depending on the volume of cooled liquid. There is a principle of reasonable sufficiency: a chiller spiral that is too thick will require a powerful refrigeration unit.
The material used for production is neutral: usually copper. You can try food-grade aluminum, but it is too fragile for such temperature changes. They also use stainless steel tubes, although they are more expensive than copper ones and are much more difficult to bend.
3 secrets for making a do-it-yourself submersible chiller
The first secret is the diameter of the tube; the larger the diameter, the larger the heat transfer area!
The second secret is the number of turns - the principle is the same
The third secret is the coil diameter.
It is worth noting that all 3 of these parameters significantly affect the price. So, if you want to make a cheaper chiller, then know that the price is not only in rubles, but also in efficiency.
How to use a homemade beer chiller
We immerse the chiller in the center of the pan, connect it to the tap, lower the other end into the sink, and open cold water! All! You can stir the wort to cool evenly.
Sources
- https://homebeer.csutio.ru/oborudovanie-dlya-varki-piva-doma/kak-sdelat-chiller-dlya-piva-svoimi-rukami/
- https://vozduhstroy.ru/kondicionery/chiller-svoimi-rukami.html
- https://cp-h.ru/tehnicheskaya-informatsiya-po-holodiljnoy-tehnike/chiller-svoimi-rukami.html
- https://teplobloknn.ru/oborudovanie/samodelnyj-chiller.html
- https://saiding-v-permi.ru/oborudovanie/chiller-protivotochnyj-svoimi-rukami.html
- https://varimtutru.com/chiller-iz-nerzhaveyki-svoimi-rukami/
- https://paes250.ru/delaj-sam/kak-sdelat-chiller-svoimi-rukami.html
[collapse]
Manufacturing process
A small homemade chiller will require about 10-15 m. Create turns. To do this, you can use a strong stick or other suitable object. The tube is bent to obtain the required number of spirals so that the overall size allows the structure to be placed in a container.
A hose is attached to one end of the tube. We connect one end of the hose to a faucet or pump, and lower the other end into a sink or other available drainage device. Chiller is ready.
Using a copper chiller when brewing beer
The principle of operation of a do-it-yourself chiller:
- The device is immersed in the container.
- The hose is connected to the tap. The second end is lowered into the sink.
- Cold water turns on.
- Hot liquid is placed in the container.
- There will be a rapid loss of temperature in the liquid.
Using a homemade chiller
A self-made chiller may be required for the following purposes:
- cooling malt when making homemade beer;
- reducing the water temperature in the aquarium;
- creating optimal conditions in a small pool.
Brewing beer with a chiller
Having a homemade chiller will allow you to quickly cool any liquid at a convenient time.
Do-it-yourself chiller (heat pump)?
- Send topic by email
- print version
- Go to page:
Do-it-yourself chiller (heat pump)?
Post by Tengel » Aug 23, 2015, 10:45 am
Re: Do-it-yourself chiller (heat pump)?
Post by NightV » Aug 23, 2015, 10:49 am
Re: Do-it-yourself chiller (heat pump)?
Post by Tengel » Aug 23, 2015, 10:52 am
Re: Do-it-yourself chiller (heat pump)?
Post by niksooon » Aug 23, 2015, 11:06 am
Re: Do-it-yourself chiller (heat pump)?
Post by sergey27rus » Aug 23, 2015, 2:28 pm
Re: Do-it-yourself chiller (heat pump)?
Post by niksooon » Aug 23, 2015, 03:10 pm
Re: Do-it-yourself chiller (heat pump)?
Post by sergey27rus » 23 Aug 2015, 15:17
Re: Do-it-yourself chiller (heat pump)?
Post by niksooon » Aug 23, 2015 6:18 pm
Re: Do-it-yourself chiller (heat pump)?
Post by niksooon » Aug 23, 2015 6:28 pm
Re: Do-it-yourself chiller (heat pump)?
Post by sergey27rus » August 24, 2015, 00:24
Re: Do-it-yourself chiller (heat pump)?
Post by ultrus » 14 Oct 2015, 21:47
I was planning to make a 130W CO2 laser. I was puzzled by the price of a freon chiller. Its cost is slightly less than the pipe itself. I scoured the forum, looked at what people were doing, but didn’t find anything suitable for myself. Bending and soldering copper tubes is not fun at all. Too much hassle and no ergonomics. And I want everything to be according to Feng Shui.
The idea arose to make a chiller from a window air conditioner. Avito is full of them now. In my city for 4 rubles I found this Erisson EC-W05C4, 1500 W:
The easiest way to glue a tank to size is from PVC; pools are glued from it. The pump can be placed separately or thrown into the tank.
Share your thoughts: will it turn out to be a normal unit? Or not to bother?
Re: Do-it-yourself chiller (heat pump)?
Post by balomut » Oct 14, 2015, 10:46 pm
Re: Do-it-yourself chiller (heat pump)?
Post by ultrus » Oct 14, 2015, 11:01 pm
So everything should work out.
Re: Do-it-yourself chiller (heat pump)?
Post by aftaev » Oct 15, 2015, 00:12
Re: Do-it-yourself chiller (heat pump)?
Post by ultrus » Oct 15, 2015, 00:23
Re: Do-it-yourself chiller (heat pump)?
Post by aftaev » Oct 15, 2015, 00:37
Re: Do-it-yourself chiller (heat pump)?
Post by dpss » 15 Oct 2015, 02:33
Re: Do-it-yourself chiller (heat pump)?
Post by Serg » 15 Oct 2015, 02:39
Re: Do-it-yourself chiller (heat pump)?
Post by dpss » 15 Oct 2015, 03:41