To automate many production processes, it is necessary to monitor the water level in the tank; the measurement is carried out using a special sensor that gives a signal when the process medium reaches a certain level. It is impossible to do without level meters in everyday life; a striking example of this is the shut-off valve of a toilet cistern or an automatic system for shutting off a well pump. Let's look at the different types of level sensors, their design and operating principle. This information will be useful when choosing a device for a specific task or making a sensor yourself.
Various types of level sensors
Design and principle of operation
The design of measuring devices of this type is determined by the following parameters:
- Functionality, depending on this device, is usually divided into alarms and level meters. The former monitor a specific tank filling point (minimum or maximum), while the latter continuously monitor the level.
- The operating principle can be based on: hydrostatics, electrical conductivity, magnetism, optics, acoustics, etc. Actually, this is the main parameter that determines the scope of application.
- Measuring method (contact or non-contact).
In addition, the design features are determined by the nature of the technological environment. It is one thing to measure the height of drinking water in a tank, another to check the filling of industrial wastewater tanks. In the latter case, appropriate protection is necessary.
Types of level sensors
Depending on the principle of operation, alarms are usually divided into the following types:
- float type;
- using ultrasonic waves;
- devices with a capacitive level detection principle;
- electrode;
- radar type;
- working on the hydrostatic principle.
Since these types are the most common, let's look at each of them separately.
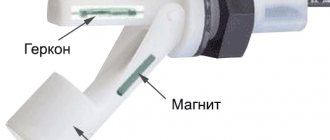
Float
This is the simplest, but nevertheless effective and reliable way to measure liquid in a tank or other container. An example implementation can be found in Figure 2.
Rice. 2. Float sensor for pump control
The design consists of a float with a magnet and two reed switches installed at control points. Let us briefly describe the principle of operation:
- The container is emptied to a critical minimum (A in Fig. 2), while the float drops to the level where reed switch 2 is located, it turns on the relay that supplies power to the pump pumping water from the well.
- The water reaches the maximum level, the float rises to the location of reed switch 1, it is triggered and the relay is turned off, accordingly, the pump motor stops working.
It’s quite easy to make such a reed switch yourself, and setting it up comes down to setting on-off levels.
Note that if you choose the right material for the float, the water level sensor will work even if there is a layer of foam in the tank.
Ultrasonic
This type of meter can be used for both liquid and dry media and may have an analogue or discrete output. That is, the sensor can limit the filling upon reaching a certain point or monitor it continuously. The device includes an ultrasonic emitter, receiver and signal processing controller. The operating principle of the alarm is demonstrated in Figure 3.
Rice. 3. Operating principle of ultrasonic level sensor
The system works as follows:
- an ultrasonic pulse is emitted;
- the reflected signal is received;
- The duration of signal attenuation is analyzed. If the tank is full, it will be short (A Fig. 3), and as it becomes empty it will begin to increase (B Fig. 3).
The ultrasonic alarm is non-contact and wireless, so it can be used even in aggressive and explosive environments. After initial setup, such a sensor does not require any specialized maintenance, and the absence of moving parts significantly extends its service life.
Electrode
Electrode (conductometric) alarms allow you to monitor one or more levels of an electrically conductive medium (that is, they are not suitable for measuring the filling of a tank with distilled water). An example of using the device is shown in Figure 4.
Figure 4. Liquid level measurement with conductometric sensors
In the example given, a three-level alarm is used, in which two electrodes control the filling of the container, and the third is an emergency one to turn on the intensive pumping mode.
Capacitive
Using these alarms, it is possible to determine the maximum filling of the container, and both liquid and bulk solids of mixed composition can act as the process medium (see Fig. 5).
Rice. 5. Capacitive level sensor
The operating principle of the alarm is the same as that of a capacitor: the capacitance is measured between the plates of the sensitive element. When it reaches the threshold value, a signal is sent to the controller. In some cases, a “dry contact” design is used, that is, the level gauge operates through the tank wall in isolation from the process medium.
These devices can operate over a wide temperature range, are not affected by electromagnetic fields, and can operate over a long distance. Such characteristics significantly expand the scope of application up to severe operating conditions.
Radar
This type of alarm device can truly be called universal, since it can work with any process environment, including aggressive and explosive ones, and pressure and temperature will not affect the readings. An example of how the device works is shown in the figure below.
Level measurement with radar sensor
The device emits radio waves in a narrow range (several gigahertz), the receiver catches the reflected signal and, based on its delay time, determines how full the container is. The measuring sensor is not affected by pressure, temperature or the nature of the process fluid. Dustiness also does not affect the readings, which cannot be said about laser alarms. It is also necessary to note the high accuracy of devices of this type; their error is no more than one millimeter.
Hydrostatic
These alarms can measure both maximum and current filling of tanks. Their operating principle is demonstrated in Figure 7.
Figure 7. Fill measurement with gyrostatic sensor
The device is built on the principle of measuring the level of pressure produced by a column of liquid. Acceptable accuracy and low cost have made this type quite popular.
Within the scope of the article, we cannot examine all types of alarms, for example, rotary-flag ones, for identifying granular substances (a signal is sent when the fan blade gets stuck in a granular medium, after first tearing out the pit). It also makes no sense to consider the principle of operation of radioisotope meters, much less recommend them for checking the level of drinking water.
How to choose?
The choice of a water level sensor in a tank depends on many factors, the main ones:
- Composition of the liquid. Depending on the content of foreign impurities in the water, the density and electrical conductivity of the solution may change, which is likely to affect the readings.
- The volume of the tank and the material from which it is made.
- The functional purpose of the container is to accumulate liquid.
- The need to control the minimum and maximum level, or monitoring of the current state is required.
- Admissibility of integration into an automated control system.
- Switching capabilities of the device.
This is not a complete list for selecting measuring instruments of this type. Naturally, for domestic use it is possible to significantly reduce the selection criteria, limiting them to the volume of the tank, the type of operation and the control circuit. A significant reduction in requirements makes it possible to independently manufacture such a device.
Pros and cons of a homemade device
Advantages of a homemade float dispenser:
- simplicity of design;
- manufacturing requires a minimum of tools;
- assembly is completed in a matter of minutes;
- if the float fails, you can quickly make a new one;
- You can get a homemade float for free, you only have to buy tablets.
Disadvantages of a homemade float:
- it is necessary to first calculate the number of tablets and select a suitable container for making a float;
- you will have to independently control the pH level and composition of the water;
- If you accidentally turn the float over, water will get into it and it will sink to the bottom.
Most of the disadvantages also apply to factory dispenser floats. Their only advantage is greater stability. However, it is not difficult to restore the buoyancy of a homemade dispenser - you need to lift it from the bottom and pour out a certain amount of water.
Making a water level sensor in a tank with your own hands
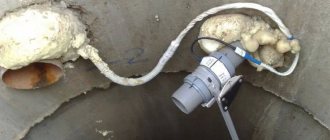
Let's say there is a task to automate the operation of a submersible pump for water supply to a dacha. As a rule, water flows into a storage tank, therefore, we need to make sure that the pump automatically turns off when it is filled. It is not at all necessary to buy a laser or radar level indicator for this purpose; in fact, you don’t need to purchase any. A simple problem requires a simple solution, it is shown in Figure 8.
Water pump control circuit
To solve the problem, you will need a magnetic starter with a 220-volt coil and two reed switches: a minimum level for closing, a maximum level for opening. The pump connection diagram is simple and, importantly, safe. The principle of operation was described above, but let’s repeat it:
- As the water collects, the float with the magnet gradually rises until it reaches the maximum level reed switch.
- The magnetic field opens the reed switch, turning off the starter coil, which leads to de-energization of the engine.
- As the water flows, the float drops until it reaches the minimum mark opposite the lower reed switch, its contacts close, and voltage is supplied to the starter coil, which supplies voltage to the pump. Such a water level sensor in a tank can work for decades, unlike an electronic control system.
Step-by-step manufacturing instructions
Making a dispenser float is a simple task, quite accessible to anyone, even without special training.
There is no need to do complex operations here; you can use any containers. The only condition will be the presence of a tight-fitting lid and a size that can accommodate the required amount of chemicals.
The first step is to calculate the amount of chemicals that should be in the float. Here the main criterion is the volume of water in the pool, on the basis of which the dosage is calculated.
Then you need to select the float body.
Capacity requirements:
- Tight-closing lid.
- Size sufficient to fit inside the tablet.
- A material that can be drilled or burned through with a heated metal object.
The best option is a plastic pill jar. It has the right size, the lid is threaded, and the plastic can be drilled without problems (or holes can be made in any other way).
If you don’t have such a jar at hand, you can use any similar jar. Some users make do with a regular plastic drink bottle of 1-1.5 liters.
Tools and materials
Before starting work, you need to prepare everything you need:
- a plastic container with a closing lid;
- electric drill and drill with a diameter of 5-10 mm.
If you don’t have an electric drill, or you don’t have the skills to handle this tool (drilling holes in a plastic can is a rather dangerous activity), you can make holes in any other way:
- Burn them with a hot metal object (soldering iron, heated nail, awl, etc.).
- Poke holes with a sharp tool.
- Use a special punch - a tube with a pointed end edge (this option is only suitable for jars with a wide neck, so that you can rest the container from the inside on a wooden stand).
The most unreliable option is to pierce holes. They will be small in size, preventing the dissolved drug from entering the water in sufficient quantities. The best option is to burn holes.
You can make holes using a semicircular wood cutter (if you have one). They will have a sufficient diameter for good water passage.
In this way, you can make oblong holes, like on factory dispensers. They best ensure the free movement of water in and out of the container.
Drawing and its decoding
Let's look at what the diagram of a simple homemade float from a pill jar looks like:
1 - cover. It must close tightly to prevent air from escaping. 2 - can body. 3 - holes with a diameter of 5-10 mm.
If a bottle or other container is used instead of a can, nothing fundamentally changes. The main condition is to ensure the buoyancy of the hull, for which the holes are made no higher than half its height.
The vertical position of the housing will be ensured by the tablets themselves, which are located in the lower part of the container. When they dissolve, the float may turn over on its side. There is nothing wrong with this, but if necessary, you can attach a small weight to the bottom. It will stabilize the float whether there are tablets in it or not.
Stages of work
Procedure:
- Rinse the container prepared in advance, inside and out, and remove the paper or plastic label.
- Using a convenient and accessible tool (drill, soldering iron, cutter), make holes in the bottom and lower part of the case walls. The holes should not be located above the middle of the container, otherwise there will be too little air left in it and the float will sink to the bottom.
- The number of holes should be sufficient for the free movement of water. The more there are, the better. However, it is necessary to ensure sufficient strength so that the housing does not collapse and the chemicals cannot fall out.
When the holes are ready, the manufacturing process can be considered complete. The only addition would be to seal the lid threads so that air does not escape through the leaks.
You can wrap it with a couple of turns of FUM tape or apply a little candle wax and screw on the lid. The wax will harden and make the connection fairly airtight.
DIY pool float, video instructions: