In our article we will talk about the types of damage to plastic bumpers, what materials bumpers are made from, the properties of these materials, we will describe all the main methods of repairing plastic bumpers, and we will provide step-by-step instructions for performing repair work.
Types of damage to plastic bumpers
Scratches
Scratches are non-through damage to the bumper surface in the form of grooves. Bumper scratches are divided into two types:
- superficial scratches
- only the paintwork of the bumper up to the primer layer is damaged. - Deep scratches
- damage grooves have a significant depth, and not only the paint layer and primer layer are damaged, but also the plastic of the bumper itself.
Don't take too long to remove scratches on the bumper; over time, they can turn into cracks.
Scratches on the bumper can be removed by sanding with sandpaper or a sanding machine. The surface of the bumper is sanded until smooth, then the surface of the bumper is puttied, primed and painted.
Dents
Dents are deformations of the surface of a plastic bumper due to local stretching of the plastic. Dents are formed due to strong mechanical impact on the bumper. Dents are often accompanied by scratches and cracks.
To remove the dent, the deformed part of the bumper is heated using a hair dryer or a gas burner. When the deformed section of the bumper softens, the dent is straightened, returning the bumper to its correct shape.
Cracks
Cracks are called through damage to the bumper, having different lengths and shapes. Cracks are the most common type of bumper damage. Cracks that are not repaired in time increase in length over time due to vibration. There are different ways to repair bumper cracks: welding with a hot air gun, gluing with fiberglass and liquid polymer, soldering in a metal mesh or metal brackets with a soldering iron. The choice of repair method depends on the material from which the bumper is made and the size and appearance of the damage.
Chips
Chips are end-to-end damage to the bumper with separation of individual fragments from the bumper. Chips most often appear along the edges of the bumper after a car collides with obstacles. The methods for repairing bumper chips are similar to the methods for repairing cracks.
Business concept
Demand for custom bumpers is consistently high, driven by several factors. Firstly, not all car owners can afford an original part from the manufacturer due to its high cost. Secondly, according to statistics, the share of foreign cars in the passenger car market is approximately 60 percent. Moreover, more than 30 percent of them are over fifteen years old. Many of the models have already been discontinued, and getting an original bumper for them is either unrealistic or very difficult. And thirdly, the reason for replacing a bumper is not always due to its damage; owners often tune the car by replacing the original part with a new one that matches their aesthetic ideas.
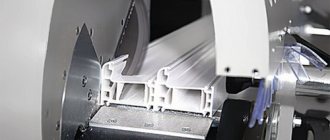
Production technology
The bumper manufacturing technology is quite simple, and if you have skills in working with 3D graphics, the entire process can be carried out by one person. First, based on the client’s wishes, a bumper layout is created using specialized computer programs. Then the layout is agreed upon and adjusted if necessary. The next step is to create a matrix for the future product, which is then inserted into a molding machine and, under pressure, a bumper of the desired shape is bent from plastic. The final stage is painting the product in the desired color (it is very difficult to ideally choose a color to match the car; an alternative is painting it in a contrasting color).
Types of bumper materials
The bumpers of modern cars can be made of different types of plastic. Before starting repairs, to choose the correct repair method, you should determine the type of plastic. The easiest way to do this is by looking at the inside of the bumper, where the type of plastic used to make the bumper should be indicated with a letter code. In the absence of markings on the back of the bumper, the type of plastic can be determined by indirect evidence by testing a broken piece of the bumper. Experienced craftsmen determine the type of plastic by appearance alone.
The main types of plastics used to make plastic bumpers are:
- PP - polypropylene
, flexible and tear-resistant, softens when heated, burns with a clear flame, blue at the base and yellow at the top, does not form soot when burning, forms drops during combustion, when burning it emits an odor reminiscent of oil or wax, does not extinguish itself, does not dissolve in acetone. It can be welded well with a hairdryer, soldered with a soldering iron, the use of reinforcing material is not necessary. When welding and soldering, it is important to observe the temperature regime. Melting temperature 300℃, welding temperature 300-340℃, destruction temperature 350-370℃. - ABS - acrylonitrile butadiene styrene
, fragile, when bent the bend turns white, burns with flashes, an orange flame, smokes heavily, quickly passes from solid to liquid, very fluid, bubbles when overheated, smells like rubber when burning, does not extinguish itself, easily dissolves in acetone. It is welded with a hairdryer, soldered with a powerful soldering iron, gas torch, and glued together. Melting temperature 350℃, welding temperature 350-370℃, destruction temperature 380-400℃. - PA - polyamide,
when bent the bend turns white, burns poorly, with a yellow flame with a blue base, melts when burning, foams, emits a pungent odor of formic acid, extinguishes itself, does not dissolve in acetone. It is welded with a hairdryer, soldered with a powerful soldering iron, gas torch, and glued together. Melting temperature 400℃, welding temperature 400-440℃, destruction temperature 450-470℃. - PUR - polyurethane,
difficult to weld and solder, requires good reinforcement. It is welded with a hairdryer and soldered with a soldering iron with precise temperature control. It is important not to overheat the part. The melting point of polyurethane is 200℃. - PC - polycarbonate
, burns with a yellow flame, with flashes and flaming ash, emits a caramel smell when burning, and partially extinguishes itself. Melting temperature 350℃, welding temperature 350-370℃, destruction temperature 380-400℃. - PE - polyethylene
, burns with a clear flame, with a yellow top and blue base, forms drops during combustion and emits a smell reminiscent of stearin, does not extinguish itself. Melting point 270-300℃. - PVC - polyvinyl chloride
. It is welded with a hairdryer and soldered with a soldering iron. The seam must be reinforced due to the low strength of PVC. Melting point 300-400℃. - Fiberglass
- does not have any special markings; it is repaired by laying several layers of fiberglass cloth and impregnating it with polyester or epoxy resin.
Methods for repairing plastic bumpers
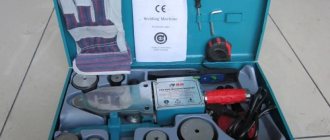
Welding a bumper with filler rods and a hair dryer
Welding a bumper using filler rods and a heat gun is the most durable way to repair plastic bumpers. During the welding process, when the filler rod and the bumper melt, a monolithic connection is obtained that is not inferior in strength to a whole bumper that has not been repaired. Welding the bumper with a hairdryer allows you to repair cracks and chips in the bumper.
For high-quality bumper welding, it is advisable to use a hair dryer (heat blower) with smooth temperature control and air supply control. For a hair dryer you will need a set of welding attachments. A welding nozzle with a nozzle with a diameter of 5-7 mm is best suited for welding plastic bumpers.
For welding plastic bumpers, special filler rods are used. Filler rods can be flat, triangular, or round in shape. The rods must be made of the same type of plastic as the bumper. If there are no rods, you can replace them with thin strips cut from another bumper, which should be made of the same plastic as the bumper of the car being repaired.
When repairing large cracks and holes, it may be necessary to use reinforcing material, which can be metal mesh or staples from a construction stapler. The mesh and staples are heated with a hairdryer and pressed into the plastic from the inside of the bumper.
When repairing a plastic bumper, heating to the required temperature is important. When heated to the plasticity temperature, the plastic can be given a certain shape and bent in the desired direction. When heated to the melting point, the plastic can be welded, connecting the parts together. When heated to the destruction temperature, the plastic hardens, but the weld contains plastic decomposition products and does not have the necessary strength.
Welding of a plastic bumper is carried out in the following order:
- the bumper is cleaned on both sides of the future weld to a width of 15 mm. The ends of the cracks are drilled to prevent their further growth. Using a Dremel with a cone attachment or a grinder, chamfer both sides of the future seam, so that a recess is formed in the form of a groove, into which the molten filler rod can then be placed.
- The crack or parts of the broken bumper are connected and fixed with special clamps, clothespin clamps or metal tape.
- Set the temperature on the hairdryer to about 300-350 degrees and warm it up for 5-10 minutes to stabilize the temperature of the hot air. At first it is better to set a lower temperature on the hair dryer, then if the rod does not melt, it is gradually increased.
- To facilitate the start of the welding process, the end of the rod must be sharpened. When welding, the rod is held at an angle of 45 degrees, pressing with force towards the seam. The hot air flow must be directed in such a way that not only the rod melts, but also the thin edges of the bumper at the seam site. The rod is melted and, under pressure, placed in the prepared groove.
- If necessary, welding can be done in two stages: first, the edges of the damaged section of the bumper are fastened using short seams (tack welds) along the entire length, then final welding is performed.
- To strengthen the weld without using reinforcing material, some craftsmen make transverse bridges from a filler rod on the inside of the bumper every 3–5 cm.
- The resulting seam should be smooth and rise above the surface to be welded. First, the bumper is welded from the inside, then from the front side.
- After welding, the bumper should cool down for 5-10 minutes; during this time, you should not check the weld for strength or make sudden movements with the bumper, all this can lead to damage to the integrity of the seam.
- After the plastic of the bumper has completely cooled, you should cut off any protruding bumps, and then sand the bumper using sandpaper.
Useful video
A visual video about welding a bumper with your own hands from several parts:
Every car owner should know that burst bumpers cannot be glued together for a long time with any glue, they can only be soldered. There is no officially declared adhesive for thermoset plastics, polypropylene and other plastics. “Moment”, “Superglue” and other types of glue, even when using reinforcing fabric, move away from the plastic over time. Previous
RepairWhat comes first: primer before putty or vice versa?
Next
RepairCar putty technology: practical tips on how to putty both bumper and metal with your own hands
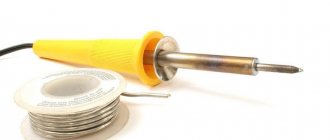
Soldering the bumper with a soldering iron
Using a soldering iron, you can repair cracks and chips on plastic bumpers. It is best to solder bumpers made of polyamide with a soldering iron; worse, those made of polypropylene; it is better not to repair bumpers made of ABS plastic with a soldering iron.
The soldering iron does not have the ability to adjust the power, so it is very difficult to maintain the desired temperature, which leads to overheating. It is very difficult to heat the plastic to the required depth and temperature with a soldering iron, which makes it impossible to obtain a homogeneous monolithic connection.
To solder bumpers made of polyurethane, polypropylene, polyvinyl chloride (PVC), use an 80-watt soldering iron. To solder bumpers made of polyamide and ABS plastic, use a 100-watt soldering iron.
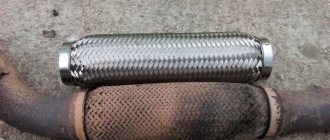
When repairing a bumper made of thin plastic, if the damage site has uneven edges or is located at the edge of the bumper or has a difficult shape, then a metal reinforcing mesh is used for soldering. When repairing minor damage, instead of metal reinforcing mesh, you can use metal staples for a construction stapler, which are soldered in 2 cm along the entire length of the crack. Minor damage can be sealed without reinforcement at all.
Soldering a plastic bumper using a soldering iron is carried out in the following order:
- A patch is cut out of a metal reinforcing mesh, slightly larger in size than the damage on the bumper.
- The reinforcing mesh is soldered with a soldering iron into the inner surface of the bumper, connecting the torn edges of the crack. You should try to bury the mesh as deeply as possible into the plastic, but without damaging the front side of the bumper.
- Use a soldering iron to solder the seam on the outside of the bumper, covering the reinforcing mesh with molten plastic.
When repairing minor damage, when reinforcing mesh is not used, use a sharp soldering iron tip to make transverse notches every 1–2 cm on the inside of the bumper to preliminarily fix the edges of the damage, then use the flat side of the soldering iron tip to fill the remaining gaps and level the surface. Then do the same on the front side of the bumper.
Repair method
Let's look at the basic expressions. Everyone basically calls bumpers plastic because when you look at them, that's what they look like. But in the production process they use not ordinary plastic, but propylene or polyurethane.
By understanding these subtleties, you will be able to better understand welding techniques in the future. Because in this case, you need to cook not ordinary plastic, but a polymer that can withstand the load; they are still a little different compared to ordinary plastic.
But, basically, they are called “plastic bumper” or “plastic bumper”, meaning thermoplastic bumper. For convenience, we will use this definition.
Welding plastic bumpers consists of two stages: preparation and welding. Let's talk about them in more detail later.
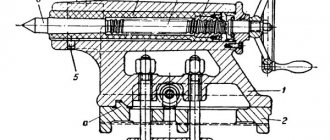
Soldering a bumper using a gas torch
Soldering a plastic bumper with a gas torch will not work because the temperature is too high, which can reach 1000 degrees. To use a gas torch for soldering, you must purchase a special flame arrester attachment, or use a Dremel gas soldering iron, where such an attachment is included in the kit.
Soldering with a gas torch is no different from welding with a hair dryer:
- a chamfer is removed from the edges of the future seam.
- A gas burner with a nozzle is brought to the weld area, the burner flame melts the filler rod and the edges of the crack, and the rod is pressed into the seam groove.
- After cooling, the seam area is cleaned and sanded.
Most craftsmen who repair plastic bumpers use a gas torch not for soldering, but as an additional tool for other methods of bumper repair, for example, for heating reinforcing mesh or staplers.
Answers to frequently asked questions
How to solder the fastening (ear) of a plastic bumper?
In order to reliably solder the bumper fasteners without loss of strength, the repair site must be reinforced with reinforcement. You can use wire mesh, hot staples, or regular construction staples for this.
How to solder a large crack on a car bumper?
A large crack must be sealed, ensuring that its edges are tightened and reinforced. Large holes and breaks can be repaired using composite material (fiberglass or fabric + polyester resin).
Is it possible to solder a bumper with a metal rod?
It only makes sense to use a non-melting metal rod as a heating element. You should not solder plastic parts with metal solder.
Gluing
Bonding with fiberglass and epoxy or polyester resin is used to repair fiberglass bumpers, and in some cases, to repair bumpers made of hard, refractory plastics. The disadvantage of repairing a bumper in this way is the low strength and fragility of the repair site.
The bumper is glued using fiberglass and epoxy or polyester resin in the following order:
- Clean the front and back sides of the bumper at the point of damage using fine-grained sandpaper 5 cm from the edge of the crack, chip or hole.
- Cover the damaged area with tape on the front side of the bumper.
- Degrease the edges of the damage on the back of the bumper.
- Cut several patches from fiberglass measuring 5 cm larger than the damaged area.
- In a plastic container, mix the resin and hardener in the proportions specified by the manufacturer, mix thoroughly.
- Apply resin to the damaged area on the inside of the bumper with a brush.
- Place a fiberglass patch over the damaged area and smooth it out.
- Apply resin and apply the next fiberglass patch, repeat until the thickness of the layer reaches the approximate thickness of the bumper.
- After the resin has dried on the inside of the bumper, remove the tape from the front side, smooth the edges around the damage and form a depression.
- Degrease the surface of the repair area on the front side of the bumper.
- Apply the resin with a brush, apply a fiberglass patch, and smooth it out.
- Repeat brushing the resin and applying fiberglass patches until you are level with the bumper surface.
- Dry the bumper completely.
- Thoroughly sand the surface of the bumper with fine-grit sandpaper.
Preparation for the main work
You can solder the bumper yourself at home. To do this, you will need to prepare a workplace and appropriate soldering equipment. To make it easier to restore the body kit in a car, you will need to remove the part.
Soldering of the body kit should only be done if the body part is severely damaged. Small cracks can be sealed.
Work cannot be carried out in a completely enclosed room or outdoors. Soldering the bumper is accompanied by an unpleasant smell of burnt plastic, but if the operation to restore the body kit is performed outdoors, the result may be spoiled by environmental influences. The optimal place for repairs is the garage. It will protect the treated surface from wind and rain, and the motorist can open the gates at any time and ventilate the room.
putty
Puttying a plastic bumper is done to restore the geometry of the bumper and level its surface. The putty is applied to the area of the bumper where the damage is located, smoothed out, allowed to dry, then sanded using sandpaper. In most cases, putty is applied in several layers.
Final stage
After the soldering area has cooled and completely hardened, use 40 and 80 grit sandpaper to remove excess plastic and smooth the seam with putty.
To finish leveling the seam, we use a special putty for plastic. Try not to apply too thick a layer of putty, as this may lead to it peeling off from the seam during use. We wait until the putty has completely hardened and begin sanding the seam with P800 sandpaper. We dilute the primer according to the manufacturer's description indicated on the can of primer. Apply the primer in 2 layers, waiting 15 minutes between each layer. Additionally, you can apply a layer of developing primer, after which the identified defects can be eliminated using nitro putty, followed by sanding with P1000 sandpaper. After removing dust from the surface, you need to degrease the part, after which you can begin painting the bumper. Paint the part following the paint application technology.
Primer
Before covering the bumper with primer, it is thoroughly washed with water and allowed to dry. Then apply the primer, let it dry, sand the primer with 800 grit sandpaper. Wash the bumper again with water and then apply a second coat of primer. When the primer is completely dry, the bumper is inspected using a lamp; the bumper should have a perfectly flat surface.
Painting
Painting a plastic bumper is done in 2-3 layers, with drying between layers for 5-10 minutes. After the paint has completely dried, varnish is applied to the bumper in two layers. Intermediate drying is also done between two layers of varnish. After painting is completed, the surface is inspected; if paint smudges are detected, light sanding and polishing is performed.
How to restore the shine and uniformity of paintwork at the site of a crack
The original shade is quite difficult to repeat, this is because the fixing mixtures make adjustments to the condition of the base. Even with careful sanding and priming, the problem area becomes slightly visible.
The part is also not completely painted, and in this case it is simply impossible to achieve the ideal combination. Polishing soft wheels on a grinder or drill can help get rid of fading; professionals often use colorless acrylic varnish for their work.
Mismatches of tone can be avoided or minimized, but many people will find the work painstaking, and you need to be patient.