The characteristics of concrete monoliths largely depend on the quality of the reinforcement, which distributes static and dynamic loads. Therefore, it must be correctly oriented in the thickness of the structural element and reliably protected from the external environment with a layer of concrete. For this purpose, reinforcement clamps are used - embedded elements designed to secure and hold the reinforcing structure until the concrete solution sets.
Protective layer of concrete and its functions
The distinctive properties of reinforced concrete are explained by the unique combination of physical and chemical properties of its components. The metal frame works in tension, while the concrete mass has high compressive strength. They have the same coefficient of thermal expansion. The hardened solution turns into an array of artificial stone with an alkaline environment, which becomes an excellent insulator for steel frame elements from corrosion. This insulation is effective when, after concreting, the distance between the reinforcement bars and the surface of the finished product is sufficient to prevent the penetration of water, oxygen, and other aggressive substances through the pores of the concrete to the surface of the metal products. The minimum value of this distance (usually 10-40 mm), called a protective layer, depends on the conditions of further operation of the reinforced concrete product or structure and the influence of various factors.
Compliance with the protective layer is a guarantee of the strength and reliability of the structure being built.
Building codes define the requirements for the thickness of the protective layer. After all, a thick layer increases the load on the frame, increases the weight of the structure and is more expensive, while a thin layer partially loses its functional characteristics. Determining the required concrete thickness is influenced by:
- type of structure being built (wall, column, staircase, foundation, ceiling);
- diameter of the reinforcement used;
- external environment and climatic zone (temperature range, maximums and differences; humidity; contact with the ground and others).
According to the standards, in the most common cases, the following recommendations on its thickness are relevant for regulating the protective layer of concrete:
- rooms with normal or low humidity - at least 20 mm;
- wet rooms without waterproofing – 25 mm or more;
- unprotected external surfaces of buildings - at least 30-40 mm;
- part of the structure buried in the ground that does not have additional protection – 40-76 mm;
- foundation – from 40 mm;
- floors up to 25 cm thick - from 12 mm; more thickened - from 17 mm.
Special magnetic control sensors help to find out the actual depth of reinforcement in finished reinforced concrete structures.
Knitting methods
To work you will need:
- plastic clamps;
- wire;
- clamps with a metal core.
They mainly use a proven method - wire connection. Clamps also have a place in connecting reinforcement; they can be fastened faster and do not require additional assistance. One of the disadvantages of such knitting is poor fixation, this is visible only when forces are applied to the frame before pouring. When the mixture hardens, the clamps are as strong as wire.
There is a small recommendation. If there is hesitation in choosing a connecting element, you should take clamps with a metal interior. This method combines the properties of wire and a regular clamp, the connection is strong. Once the connection and type of reinforcement have been selected, you can begin to select the tool.
What provides the protective layer?
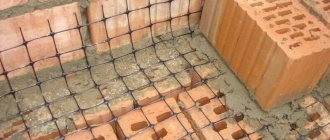
The location of the elements of the reinforcing frame before concreting can be verified, maintaining the required distance to the walls of the formwork and the base. But the possibility of displacement of individual elements from the flow of fresh concrete when filling and compacting the volume cannot be ruled out. At all stages of obtaining a reinforced concrete structure, the position of the metal elements and the entire frame will remain stable if clamps of the protective layer of reinforcement are used. The saying about a small, but no less expensive, spool is very relevant when applied to them.
Positive qualities of products and benefits from their use:
- The clamps are made of durable plastic - a material that is resistant to corrosion, temperature changes, and the effects of aggressive substances.
- The strength of the products allows you to maintain stability of geometric shape and size, and create a reinforced reinforcing frame for loaded structures.
- Versatility - they can be selected for any type and size of reinforcement, various methods of its fastening, and ensuring the required thickness of the protective concrete layer.
- Plastic supports for reinforcement are also used when concreting structures with a frame base made of composite materials.
- Mass produced retainers are interchangeable.
- The metal frame of the future reinforced concrete structure is assembled easily, quickly, without the use of welding or wire to fix a certain position of the rods relative to each other and the formwork.
- They prevent the frame mesh from appearing above the concrete surface and keep it in a fixed position.
- Support for metal reinforcement prevents concrete from cracking because it minimizes bending and deformation of the rods under the significant weight of the structure.
- They help maintain a constant required thickness of the protective layer.
Made from plastic, the fasteners are a consumable item that remains in the poured concrete. Very rarely, being an element of the formwork, the support for the reinforcement can be reusable. Working with such a product (for example, a cone-type reinforcement clamp) involves dismantling and filling the remaining cavity with solution.
The orientation of the reinforcement affects the classification of the fasteners used with it, which can be:
- support – to fix the position of the frame in the horizontal plane;
- wall - for vertically directed reinforcement (the most used is the star reinforcement clamp);
- universal – combining the capabilities of the first types;
- special - for use in special cases and specific situations; Such fasteners include plugs and tubes, which create the necessary cavity in the concrete and provide the required distance to the reinforcement from the surface of the future product.
The optimal principle for placing clamps in the body of the future product is a checkerboard pattern. With this arrangement, the recommended interval between them is 50-90 cm. The specific value is selected taking into account the dimensions of the metal frame, the cross-section of its rods and the design features of the clamps themselves. According to building regulations, the usual consumption of reinforcement clamps is 4-10 pcs/m2.
Mesh on plastic supports for reinforcement, arranged in a checkerboard pattern, every 80 cm, consumption 5 pieces per square meter.
How to calculate the quantity?
The consumption of reinforcement, as well as fasteners, must be correctly calculated. Experts recommend using 5-10 fasteners per 1 m2. If the thickness of the reinforcement is 2.8-3.2 cm, then it would be advisable to use 5-6 fixation elements. When using thin reinforcement with a diameter of 1.2-1.4 cm, it is worth using 8-10 clamps. This rule applies to all types of devices.
The thinner the reinforcement and the larger the concrete layer, the more racks will need to be installed. The average quantity is 7 units per 1m2. If you take this rule into account, then there will be no difficulties with the calculation. For example, a master will have to concrete a floor with dimensions of 8 by 11 m, which is 88 m2. The result obtained must be multiplied by 7, as a result of which it turns out that for concreting a floor with the given parameters, 616 reinforcement clamps will be required.
Types of fasteners
Manufacturers present an impressive range of products of various types. The production of plastic fasteners for fittings is constantly introducing new developments. Already well-known designs are being refined and improved. Let's take a closer look at the most popular of them.
"Cube"
A universal embedded element that can withstand heavy loads due to its thickened wall. A reinforced version of the clamps can serve as a support for reinforcement with a diameter of up to 40 mm, and provide a protective layer from 35 to 80 mm. The most popular is the cube retainer with a wall thickness of 2.1 mm, provides a protective layer of 35, 40, 45 and 50 mm in size, and is used for reinforcement with a diameter of no more than 28 mm.
"High Chair"
The most common support clamps for metal reinforcement when reinforcing ceilings, floors and other horizontal planes. The shape is a cylindrical barrel with four grooves and open bridges at the top. The usual version has 4 legs, the reinforced version has 5. The fixture for the reinforcement is a “chair”, has a fixed size, and can provide a protective layer in sizes of 15, 20, 25, 30, 35 and 40 mm, the choice of the required size is carried out according to the requirements of the drawing structural reinforcement. This type of clamp is suitable for fittings with a diameter of 4 to 14 mm.
"Herringbone"
A modified version of the chair, which has 2 pairs of inclined bars at the top. The products allow you to obtain 4 different layers of the required concrete protection - 20, 25, 30 and 35 mm. Suitable for metal rods with a diameter of up to 20 mm.
"Cone"
The clamp is installed at the ends of the tube. The role of the tube is to form a through hole in the mass of poured concrete for the formwork tie bolt. The function of the cone is to prevent concrete from getting inside the tube. After removing the formwork, the cone can be reused.
"Star"
A common product in monolithic construction, which received this name due to its star-like appearance. Designed for vertical fixation of the reinforcing frame and creating a gap between it and the formwork. The star lock helps to obtain one option for the thickness of concrete protection, ranging from 15 to 75 mm. Used for fittings with a diameter from 4 to 22 mm.
"Rack"
The cylindrical reinforcement clamp rack is very similar to a cube. By installing it on top of each other, you can hold several rows of reinforcing mesh at one point, but at different levels.
Important! If the concrete surface will be formed on a layer of waterproofing or on a loose base, it is recommended to use an additional “base” fixer. It prevents the supporting legs or body of the main product from breaking through the waterproofing layer; prevents unwanted immersion of the fixer into loose sand or gravel with the inevitable disruption of the uniformity of the protective layer in this area.
Homemade clamps and supports for reinforcement
The desire to save money, small volumes of individual construction, the impossibility of purchasing or the urgency of completing the work encourages the use of improvised means (brick, paving slabs, wooden beams, paving stones) and various devices made independently as a stand for fittings.
Note! Wood and brick have increased water absorption. Wooden blocks also swell subsequently, and in the future they generally collapse. Therefore, such options for stands are unacceptable, since in the area where they are installed, the reinforced concrete structure loses its reliability.
Often bars or elements of the desired shape are cast from concrete. Their advantages are good adhesion to poured concrete due to the same structure, very high strength indicators. The main disadvantage is that the support does not reliably fix the frame, which can move when the solution is supplied to the work area.
Craftsmen can also use the following self-made fasteners for fittings:
- a plastic retainer made from a sewer plastic pipe in which the necessary grooves or holes are made for laying the fittings;
- socket boxes with and without cuts for fixing fittings.
Plastic embedded clamps simplify the process of self-assembly of a metal reinforcing frame and significantly speed it up. After pouring concrete, the frame has a guaranteed protective layer on all sides. This is the key to long and safe operation of the resulting reinforced concrete structure or its individual element. And simple plastic fixtures for fittings help achieve this result.
Various plastic adapters work well in tandem with the protective layer clamps. They increase the supporting area of the frame on loose surfaces, help regulate the size of the concrete protection layer, and expand the possibilities for optimal use of standard fasteners without the cost of additional highly specialized products.
DIY supports for fittings
reinforcing the foundation reasonably arises . This is exactly what this article will discuss. Let me remind you that how to make formwork for the foundation with your own hands was described in detail in the corresponding article.
As for the actual reinforcement of the foundation, the main attention will be paid to the method of tying and laying the reinforcement, as well as the list of necessary tools and devices.
Methods of tying and bending reinforcing bars
The most common method of tying reinforcement in individual construction is hand tying. There is no need to buy a special tool. There are several knitting techniques. In all cases, the first loop should be placed along the spiral grooves, since with such a connection the reinforcing bars hold better and do not dangle. The main knitting methods are given below:
- Wire knitting.
This is a simple method that does not require special explanations or skills. For reinforcement ø12 mm, cut wire 180-200 mm long and bend it in half. The wire is wrapped around the fastened elements so that both free ends are 30-50 mm long. Holding the loose ends with one hand, insert the crochet hook into the loop with the other and twist the wire with rotational movements of both hands.
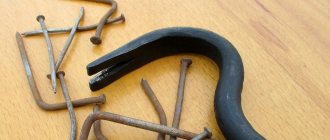
- Connection with reinforcement clips
(can be bought in a store). This method is good for connecting reinforcement in hard-to-reach places. As can be seen from the picture, a paper clip made of spring steel is fixed in diameter on one rod, and with its other end it presses another reinforcement. Fast and convenient!
- Overlapping connection.
It is used to lengthen the reinforcement frame and at the nodal points of the foundation walls. The recommended overlap length should be about 30 reinforcement diameters. For example, with a rod diameter of 10 mm, its length should be 300 mm. - To bend the rods we will use the simplest device. It can be made from two steel pipes with an internal diameter of 20-30 mm, a length of 500 mm and 800-1000 mm.
In a short pipe, starting from its end, use a grinder to cut off two symmetrical flats 80-100 mm long so that the height of the cut part of the pipe is within 18-20 mm. The result should be two cylindrical surfaces.
We will bend them outward at an angle of 90˚ relative to the longitudinal axis of the pipe. It is important to ensure that the transition from the pipe to the bent ends is made within the radius.
If you preheat them with a blowtorch or gas torch, this can be done easily.
Inserting one end of the reinforcement into a short pipe, and a long pipe into the other end, bend the reinforcement at the desired angle. In this case, the bent part of the short pipe will act as a radius stop.
If we bend the second cut part in a short pipe, and process the second end of the pipe in the same way, then we will get a device with four stops.
When bending reinforcement, you can use any of them.
Finally, you should think about securely securing the device to some stable base. To give additional strength to the stops, you can insert a wooden spacer between them.
How to reinforce the foundation for a bathhouse
Before pouring the foundation, you must remember to mark and cut holes in the formwork for plastic tubes for ventilation of the underground space of the bathhouse and laying utilities. For water and sewerage - the lower, the better, since in winter it will not freeze.
Manufacturing of reinforcement cage
You will need to make a template according to which the reinforcement cage will be assembled. Its design is quite simple and can be done by anyone. Frames for foundation reinforcement are assembled in a convenient place. Their length depends on the length of the reinforcement and the structural dimensions of the foundation. The finished structures are placed in formwork and tied together with wire.
Particular attention should be paid to the corner and internal intersections of the bathhouse foundation walls. In these places, the reinforcing bars are bent at 90° and overlapped with each other. The remaining node connections are connected crosswise with wire in the usual way. The design of the template is shown in these sketches:
Laying reinforcement in formwork
An important condition for reinforcing a strip foundation is that the reinforcement should not touch the walls of the formwork. That is why it is necessary to provide gaps within 50-70 mm between the frame and the outer surfaces of the foundation walls, including its sole (base). This forms a protective layer against rust and other harmful atmospheric influences.
The frame in the formwork must be so stable that it does not move from its place when poured with concrete. To do this, star-shaped clamps are put on the vertical rods, and special bosses (stands) are placed under the lower rods, which ensure the stability of the frame and the necessary clearance.
When building a bathhouse, you can simplify this process and place broken bricks or stones underneath. And to ensure side gaps, tie in increments of 2-2.
5 meter transverse rods 10-15 mm long less than the internal width of the formwork. They will then act as clamps.
This method is quite acceptable, but will not provide the same accuracy as when using special clamps and stands.
Tips and tricks
- Before laying the reinforcement in the formwork, it should be cleared of dirt, debris and unnecessary objects.
- Reinforcing bars are cleaned of rust, scale and dirt. It should be stored on wooden stands under a canopy, excluding exposure to precipitation.
- The blanks are marked with chalk, along which they are cut or bent.
- It is advisable to photograph the results of the work. These pictures may be useful in the future.
- It must be borne in mind that when purchasing fittings, the presence of rust on it is not a defect.
- The permissible deviation in curvature when purchasing reinforcement should be within ±6 mm per linear meter.
- The standard consumption of reinforcement in individual construction is 50-80 kg per cubic meter of concrete.
So, we have reinforced the foundation
under a log bathhouse.
In the following articles from the series on how to build a bathhouse with your own hands, we will consider questions about pouring the foundation with concrete and waterproofing it.
DIY strip foundation
The foundation is the foundation for any structure, be it outbuildings, a one-story country house or a large industrial facility. The choice of foundation type depends on a number of aspects:
- functional purpose of the building;
- size and number of floors of the building;
- total load on the foundation;
- features of the relief and soil type;
- climatic conditions of the region;
- seismic activity;
- budget possibilities.
For example, if you are planning to build a foundation for a bathhouse from timber or rounded logs, the optimal solution would be a shallow strip foundation . Its design and construction is not very expensive in terms of time and money, but it is a completely reliable basis for not too heavy wooden and brick buildings.
Soil requirements
Strip foundations for bathhouses and other private buildings can be erected on dry and non-flowing stable soils. If the soil on your site is heaving and freezes to a great depth in winter, you will have to spend more time, effort and money on excavation work and reinforcement of the foundation, and perhaps choose a different type - for example, a pile foundation.
Construction site preparation
The strip foundation is erected on an area that has been previously cleared of vegetation, debris and topsoil - grass cover. If during the preparation of the site you come across fragments of bricks and stones, do not rush to throw them away: in the future you will need raw materials for use as a concrete mortar compactor.
Territory marking
Before you begin construction of the foundation, the design of the building, in our case a bathhouse, must be completely completed. Having a detailed drawing in front of you, you can proceed to marking the site. To do this you will need a tape measure, a square, a non-stretch cord, and pegs.
First, the outer perimeter of the structure is marked. It is very important to maintain a 90° angle between adjacent walls, of course, unless otherwise provided by your project. To check whether the outer perimeter lines are perpendicular to each other, compare the two diagonals: the deviation should not exceed 20 mm.
Next, mark the internal perimeter and location of the walls inside the building. For buildings made of timber, the thickness of the foundation should be about 30 cm, and for brickwork - 35-40 cm.
Choosing fasteners - advice from an expert
In my 10 years of practice in monolithic construction, I quite often encountered the problem of defective fasteners. After installing them under the reinforcing mesh, and then stepping on it, the stands simply scattered to the sides. They broke in half, and the mesh was lowered onto the formwork. There was also a case with the “star” fasteners; during installation on the reinforcing mesh, they simply flew apart, half the bag was simply thrown into the air. The problem was low-quality plastic; it was fragile.
When purchasing, I advise you to open the bag with plastic stands and check them. If it's a chair, stand on it, it shouldn't break, it might just bend. The fastener is an asterisk, try to put it on something of a suitable diameter, bend it, it should not break. Plastic must be flexible and at the same time strong. If everything is ok, buy it.
Currently, the range of fasteners for fittings is simply huge, and every year it is growing all the time. New companies, new forms appear, but their goal remains the same, which is to provide the necessary protective layer to the reinforcement so that the structure you are building is strong and reliable.
Basic anchorage length
Direct anchoring and with tabs are used only with periodic profile reinforcement. Smooth stretched rods are secured with loops, hooks, welded transverse elements, and anchor devices. Craftsmen do not recommend using hooks, loops and claws for compressed reinforcement (except for smooth reinforcement, which is sometimes subject to tension).
When calculating the anchorage length of the reinforcement, they take into account the steel class, profile, cross-section, strength of concrete, stress state of the monolith in the anchorage zone, anchorage method and design features.
Formula for calculating the basic (optimal) anchorage length
designed to transfer forces in steel with a full design resistance index Rs to concrete:
Here:
- As and us – the area of the transverse diameter of the rod and the cross-sectional perimeter, which are calculated based on the nominal diameter
- Rbond – resistance according to calculations of the adhesion of reinforcing bars to concrete, which is assumed uniformly along the entire length of the anchorage and is calculated using the formula Rbond= η1η2Rbt
η1 is a coefficient that depends on the type of reinforcement surface:
- Smooth (class A240) – 1.5
- Periodic profile, cold-deformed reinforcement (class A500) – 2.0
- Periodic profile, thermomechanically hardened and hot rolled (classes A300-500) – 2.5
η2 is a coefficient that depends on the diameter of the reinforcement:
- Diameter less than or equal to 32 millimeters – 1.0
- Section 36 and 40 millimeters – 0.9
The estimated anchorage length of the rods is calculated using the formula:
Here:
- lo,an – basic anchorage length
- As,cal, As,ef – areas of the transverse diameter of the reinforcement
- a – coefficient of influence on the stress state indicator of concrete, rods, design features of the product in the anchorage zone
Determination of coefficient a:
- Periodic profile bars, straight ends, as well as smooth reinforcement with loops/hooks (without devices for stretched bars) – 1.0
- Compressed rods – 0.75
The length of the anchorage can be reduced in accordance with the diameter and number of transverse reinforcement, as well as the amount of transverse compression of the concrete where the anchorage is carried out.