The application of paint and varnish material to a surface has certain features, the observance of which determines the overall quality of the applied coating. When working with a pneumatic spray gun, you should adhere to the established sequence of actions to ensure the best result, without smudges, streaks or peeling of the material. If you have started paint spraying procedures, but do not yet have experience in carrying them out, this publication will help you understand the technology of the process and will bring your work closer to a professional level. We hope that the presented theoretical basis will become a good basis for your further development in the field of painting.
Types of spray guns and their differences
Before we talk about how to use a spray gun, let's figure out what they can be and what they are used for. First of all, they are intended for applying paint and varnish material, but the applicability of paintwork materials by type and the quality of work will differ.
Pneumatic spray gun
Painting with a pneumatic spray gun Source 1pofasadu.ru
The most popular type of spray gun in a professional environment. It works in combination with a compressor that delivers the required pressure. It features high-quality results. The operating principle is based on feeding paintwork materials into a nozzle through which a powerful air flow passes. Upon meeting, it breaks the paint structure into fine dispersed dust and sprays through the so-called torch.
Pneumatic sprayers can be with an upper or lower location of the working container. The remaining design features on most models are almost identical.
Healthy! The advantage of such spray guns is the minimal consumption of paint, which is applied in a thin and even layer.
Full exterior painting sequence
It is better to start the complete exterior painting of a car from the roof. If you leave the roof for last, paint dust can spoil the already painted hood and trunk lid. The dust on the roof is not so noticeable. One of the sequences for completely painting a car is shown in the figure below.
Let's summarize a little and highlight a few main points regarding car painting techniques:
• Hold the spray gun straight (at a right angle), tilting is allowed only in exceptional cases.
• The average distance from the spray gun to the surface is 15-20 cm. We try not to move away from it.
• The average speed of the spray gun is 40-50 cm/sec. One pass from edge to edge takes about 2 seconds.
• We start and end the pass a little away from the part, and in no case above the part itself.
• We make passes with horizontal movements from left to right.
• The degree of torch overlap is not less than 50%. That is, each passage must overlap the previous one by at least half.
• When spraying, do not describe too large an arc with the spray gun.
How to use a spray gun
Surface painting using an electric or pneumatic spray gun is carried out in the following sequence:
- Preparing the base. At this stage, the surface is cleaned of the old layer of paint and rust, plastered, primed, degreased, and dried. Other preparatory work is carried out, the order and duration of which are assessed individually.
- Preparation of paint solution. The viscosity of the composition is selected according to the recommendations of the tool manufacturer. The viscosity must correspond to the nozzle diameter.
Healthy! Most kits have a special measuring funnel for this purpose. With its help, you can easily and quickly determine the fluidity of the paint and varnish material. It’s quite simple to use: you need to pour the specified amount of diluted paint and time how long it takes for it to flow out of it.
- Inspection and assembly of the spray gun and test painting with assessment of the quality of the resulting surface.
- The main stage of applying paint.
- Cleaning the instrument. A crucial point, ignoring which will lead to the unusability of the spray gun.
Product benefits
A pre-selected spray gun for a compressor has the following advantages:
- Reducing time for repair work.
- High quality coating.
- Significant increase in the area of the treated surface.
- No need for professional skills.
- Reducing the consumption of paint and varnish material.
- Affordable cost of the device.
- A variety of design types, allowing you to choose the most suitable option for the job.
However, before you buy a device, you need to choose the right spray gun for the compressor.
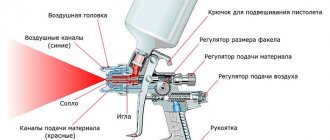
General view and design of the tool
Before using a spray gun, you should understand its design. As mentioned earlier, the design of electric and pneumatic devices is almost the same. Therefore, let’s consider the situation on one of the most popular versions designed to work with a compressor.
General view and design of the instrument Source instrumentoria.ru
Manual
Regularly check the tightness of bolted connections before starting work. This primarily concerns the adjusting screws and the air intake nut. Repairs and maintenance are carried out only with the device de-energized. Violation of safety precautions can lead to serious consequences.
The procedure for working with a spray gun begins with preparing the device for the task. To do this you will need:
- Set the nozzle to the desired size.
- Blow out and make sure the air supply hose is intact. Use it to connect a compressor with a spray gun.
- Turn on the device and select the appropriate shade, adjust the air supply, paint and torch width. This is done not on the surface being processed, but on a template. It is recommended to start painting only after all the mentioned settings have been completed.
How to work with a spray gun correctly Source evrotek.spb.ru
To prevent overspray, keep the distance between the torch and the surface to be treated in the range of 15-25 cm. You need to spray the composition evenly, moving the spray gun perpendicular to the surface, as shown in the image.
The answer to the question of how to use a spray gun correctly will remain incomplete if we do not mention the mandatory cleaning of the tool after completion of work. Cleaning is carried out with a solvent, white spirit, solvent or other composition with similar characteristics. To do this, unscrew all elements that come into contact with the coloring composition and rinse them thoroughly. The easiest way to clean a spray gun is to bathe it in a solution poured into a small container (on average, it takes about 300-400 g of white spirit to wash a tool).
Complete disassembly and cleaning of the spray gun Source kraskistroi.ru
Healthy! Before taking our advice, carefully read the instruction manual for your device. Some manufacturers categorically do not recommend putting the gun in solvent.
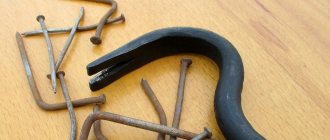
Hardened areas are rubbed off manually. It is not recommended to use hard objects for these purposes. To clean the nozzle nozzles, you can use needles whose cross-section corresponds to the diameter of the holes.
Important! Rinse the spray gun immediately after completing paint work (before the paint begins to harden) and never leave it soaked in solvent or its analogues.
What should the torch size be?
To achieve maximum efficiency when painting, experts recommend applying the paint layer using a torch of the maximum size. The larger the width of the torch, the more uniform the layer of paint applied to the surface is. To achieve the maximum width of the torch, it is necessary to unscrew the adjusting screw to the maximum in the “+” direction.
If you need to paint a small part or part of a car body, then you should reduce the size of the torch. It is important to remember that the position of the adjusting screw at “—” ensures the application of a paint layer in the shape of a circle. When the regulator is turned to “+”, an oval shape of application of the paint layer with an increased width is obtained.
Preparing the paint
A small electric spray gun for the home Source i1.wp.com
A feature of spraying paint with a spray gun is the strict requirements for the composition used. The consistency must have the viscosity declared by the tool manufacturer. Too thick a composition will lead to uneven distribution, increased drying time and waste of material. When applied to inclined or vertical surfaces, this will negatively affect the quality of the paint. Microcracks and roughness will be unevenly covered.
Paint diluted very thinly will not be able to completely cover the surface and will require a second coat. The result will be an increase in the volume and time spent on work.
To achieve the specified thickness of the paint and varnish material, a liquid recommended by the paint and varnish manufacturer is added to it. It can be a solvent, white spirit, gasoline, solvent, water.
Important! The type of paint thinner for the spray gun is selected in accordance with the paintwork material used.
Surface preparation
Before figuring out how to paint correctly with a spray gun, you should pay attention to an earlier stage of work. Surface preparation before painting is of fundamental importance in the entire process, on which the reliability of the adhesion of the material and the final appearance depend. Despite its importance, the preparation process is quite simple and requires only a little attention.
A good surface for painting should be washed (not greasy), sanded and dry. If there is dirt or grease on the element being processed, the density of adhesion of the paintwork material to its surface will be minimal, which will lead to easy abrasion of the material and the formation of bubbles. Sanding with fine-grained sandpaper forms tiny grooves on the surface, and at the same time levels it to an almost ideal (for the human eye) state. Light roughness allows the paint to penetrate into the “pores” of the element being processed, which significantly increases the strength of the gluing. Excess moisture, such as dirt and grease, does not contribute to the overall picture and causes the applied material to peel off.
We strongly recommend that you take the surface preparation stage seriously, as 80% of success depends on it.
Features of working with a spray gun
Standard set for a compressor Source kontrast-kraski.ru
Using a spray gun, you can spray various types of paints and varnishes: oil, latex, acrylic, alkyd and other types of paints. The only condition that must be met is the fluidity of the composition. Its value is selected individually, depending on the characteristics of the instrument. You can find the exact value for each model in the instruction manual.
The spray gun trigger is pressed evenly Source vmirekraski.ru
How the principle of collecting paint in a spray gun is constructed Source idoallsam.ru
In addition, when working with a spray gun, you should pay attention to a number of other equally important aspects:
- When carrying out interior work, you need to prepare the room for painting: close or remove interior items that cannot be painted. When covering, secure the material with masking tape.
- The composition should be sprayed so that spilled drops and particles flying past the surface to be painted do not fall on those that remain uncovered.
- When working outside, choose a position based on the wind and its possible gusts.
- It is recommended to use personal protective equipment when working with a spray gun: gloves, goggles, respirator.
- When using stagnant paint, strain it through cheesecloth. This will clear the composition of lumps that can cause clogging of the instrument.
- Do not apply copious amounts of paint at once. This will cause the formation of streaks and drops.
- Each subsequent row slightly overlaps the previous one, which minimizes the likelihood of unpainted areas.
- The second and subsequent layers are applied after the previous one has completely dried (the duration depends on the temperature conditions and the type of paint used).
Advice! If you do not have experience with a spray gun, start painting from the “back”, “less noticeable, significant” area. Don't touch the front one yet. During the course of the work, you will gain certain skills and be able to create a higher-quality coating than at the very beginning of painting (on the “less significant side”).
How a spray gun works Source avtograph-oem.ru
How to paint a car correctly
Before setting up a spray gun for painting a car, you should study the entire algorithm for such actions. In order to paint your car efficiently, you must first test the nozzle. To do this, you need to set the torch to spray in a horizontal position and open the air supply screw to full power.
Then adjust the paint flow screw so that the next time you press the trigger, you get the correct shape of the color spot. To obtain a thin and uniform final layer, it is necessary to carry out local circular spraying without using spraying in one direction.
Paint application should occur in a uniform circular motion and perpendicular to the surface with a radius of less than 8 cm. The trigger should be released after each local spraying, which will ensure the quality of painting.
To begin with, it is better to paint small and barely noticeable parts, because later it will be much more difficult to paint them. Before finishing painting, you should make sure that the base layer has already dried and become uniform in structure.
To accurately maintain the proportions, a measuring ruler is needed. You can also use a special plastic vessel, which should be graduated evenly. This will allow you to accurately mark the portion of paint, hardener and solvent.
spray gun diagram
When painting a car with a metallic effect or with special protection from environmental factors, a two-layer coating is required. First, apply the base paint, and then acrylic varnish.
All parts of the composition must be mixed according to the instructions, which should be indicated on the pack. Activation is not needed for the paint, since it dries under the influence of the evaporating solvent.
Feed regulation is based on the fact that the adjustment screw acts as a limiter under the action of a needle made of stainless steel. Due to this design, the needle does not completely cover the outlet hole for paints and varnishes.
With this design, the person working with this tool has the opportunity to adapt by opening the screw to full power and manually pressing the trigger with varying strength.
To avoid paint smudges at the edges of the surface, it is better to press the trigger of the spray gun before moving it along the part. Then, having started the transition, do not release the trigger until it is completely completed.
When painting the inner corner, to prevent paint accumulation, you need to direct the center of the torch, shifting it to one side. Painting is done in two steps, once for each side of the corner. Sometimes when painting interior corners, the trim will create a hazy cloud. To avoid this, it is necessary to reduce the paint supply and air pressure.
When painting outside corners, it is almost impossible to prevent excess paint from appearing on an already painted surface. It is better to paint all sides of the corner at one time. You need to start painting the corner from the top.
If you follow all the points listed above, then there should be no problems when painting. The surface should be flat and smooth. If you do not follow them, then it is unlikely that you will be able to avoid unevenness, and the coating will take much longer to dry.