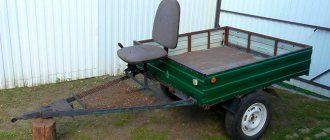
Specifications
Advantages of the Tselina NMB-603 walk-behind tractor from other manufacturers: reduced noise levels and a small amount of harmful substances in the exhaust. It is allowed to use the walk-behind tractor in public places: parks, gardens, dacha cooperatives.
Characteristics of the Tselina NMB-603 walk-behind tractor:
- Unit dimensions: length 110 cm, width 50 cm, height 90 cm including the handle.
- The weight of the structure is 100 kg.
- Engine cylinder diameter is 68 mm.
- Engine speed is 3600 per minute, volume is 196 cm3.
- Gear reducer, walk-behind tractor start - manual.
- Wheels size 4.00-10.
- If desired, you can install wheels of larger diameter.
- Total number of gears: 4, of which reverse is 1.
- Oil for refueling: for gasoline engines, 4-stroke. Oil must be selected according to the season - synthetic in winter, semi-synthetic or mineral in summer.
- Gasoline: AI-92, AI-95.
Installation
If the user purchased cutters without assembly, they must be assembled correctly. Today this is not difficult, since the buyer has at his disposal not only detailed instructions from the manufacturer, but also a wide range of video materials that can be obtained on the Internet
When assembling the product, it is important to ensure that the active part of the unit enters the soil during operation. Side options are installed on both sides of the walk-behind tractor; they operate from drive shafts and wheels
In this position, the cutters are a practical replacement for the wheels of a motorized cultivator; they are the ones that set the motorized equipment in motion.
The cutters, whose operation is carried out by the power take-off shaft, are located behind the cultivator. They do not take part in the movement of the device.
To install the cutters on the cultivator, you need to use special wooden trestles with a height of about 50 cm. Also, in this case, the equipment must not only be lifted, but also rested on the coulter, and also tilted at an angle of 45 degrees. Then the wheels are removed from the cultivator and cutters are placed in this place. Next, special plates should be installed on the outer ends on both sides, due to which the movement of the device will be smooth and stable.
Additional sections are installed to the main ones through the use of pins. The restrictive metal disk is connected to the frame using bolts. In this case, the number of blades should be selected for the cultivator, based on its power. To assemble cutting blades, it is possible to use one or more axes
When assembling a four-blade cutter, it is important to consider the sequence of the right and left blades that are placed on the mounting plate
Classification of cutters
According to the location of the cutters, there are side and mounted ones. The side ones are installed on both sides of the walk-behind tractor and operate from the drive shafts of the wheels. In fact, with this arrangement, these cutters replace wheels and set the equipment in motion.
The second type is a milling cutter, powered by a power take-off shaft, located at the rear of the unit and does not participate in movement. Motoblocks of the brands Tselina, Neva MB-1 and MB-2, MTZ have just such a cutter device.
Based on the design of knives, there are two types of cutters - saber-shaped (active, standard) and the so-called crow's feet.
Active cutters
The active cutter consists of a set of four powerful knives installed at an angle of 90° relative to each other. There can be two or more such sets on one axis. The number of additional cutters, as well as the size of their knives, depends directly on the performance of the walk-behind tractor. The knives of this cutter are in the form of curved strips, bent alternately in different directions. Their design and strength allow you to safely process virgin soil, as well as areas where stones and roots come across.
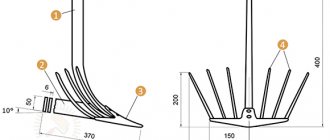
Crow's feet
The second design type of cutters is crow's feet. The product got its name from the unusual shape of the cutting elements, reminiscent of the feet of a goose. They have the shape of a triangle and are located on the edges of the racks. The number of cutting elements and the size of this module also depends on the power of the walk-behind tractor. The more racks with knives, the better the processing.
This cutter is capable of processing heavy virgin and clay soils, but in areas with increased vegetation and roots, the product will most likely become clogged.
Features and purpose
By its design, the cutter for the walk-behind tractor consists of several tillage knives mounted on the rotation axis. For their production, 2 types of steel are used: alloy and high-carbon, and the second undergoes high-frequency current treatment and mandatory thermal hardening. Thanks to the use of such materials, the products are very strong and durable.
This device is used to loosen the soil, remove weeds, plow virgin lands and dig up the garden in spring and autumn. In addition, the use of milling cutters is effective when applying mineral and organic fertilizers, when deep and thorough mixing of the soil with the preparations is necessary. Thanks to careful plowing, it is possible to achieve optimal soil density, increase its chemical and biological activity, and also significantly increase the yield of agricultural crops growing on the cultivated soil.
In addition to the included module, it is possible to purchase and place additional pairs of cutters. With their help, it is possible to improve the controllability of the unit and improve the quality of soil cultivation. However, you should not particularly overload the walk-behind tractor; this can cause the engine to overheat and lead to its breakdown. In addition, there are some restrictions associated with installing additional kits. For example, when plowing virgin soil, the use of additional equipment is not recommended. For such processing, one module included in the main kit will be sufficient.
Features of cultivator cutter knives
A tiller for a walk-behind tractor (a rototiller) is a device for cultivating soil. They are installed on light cultivators instead of wheels. For heavy models of walk-behind tractors or mini tractors, they are manufactured according to the type of attachment. Rotators are used to chop, loosen or level the soil. Attachments have proven themselves well when developing virgin soil. It is also used for applying fertilizers and plowing green manure.
Types of knives for walk-behind milling cutters
First of all, the design features of the knives determine the depth and type of soil being cultivated.
For dense and hard soil, as well as virgin soil, thicker ones are used. If you plan to process a deep arable layer, use long blades. To improve grip, the cutting tool has a curved shape. The bending direction can be to the right or left. 7 useful devices for a modern summer resident There is an opinion that working in a summer house is a rather tedious task that takes a lot of effort and time... The cutting body, according to the method of attachment to the cutter body, can be collapsible or monolithic. The latter is an all-welded structure without the possibility of replacing damaged parts. A more practical option is the collapsible one. In this design it is possible to replace a failed component. In addition, having a set of interchangeable knives of various lengths, you can quickly adjust the device for cultivating the soil to different depths.
Material for making knives
In order to withstand heavy loads during operation and also be resistant to abrasion, the cutting blade of the cutter is made of high-quality carbon steel. This material tolerates heat treatment well to increase strength and hardness. Hardening increases the wear resistance of the tool by an order of magnitude. Some manufacturers produce the cutting part using the forging method. This part has great durability.
The effect of pressure on steel during forging causes the effect of cold hardening - hardening of the surface layer of the metal. This makes the cutting edge harder, and such a tool needs to be sharpened less often than a stamped one.
Types of cutters for motor cultivators
If you choose the right cutter, you don’t have to buy a plow. When milling, it is very easy to operate the cultivator; there is no heavy load on the operator. The cutters for the cultivator are selected depending on the power of the equipment and the type of soil being plowed.
There are three main types of soil rotators:
- Factory ones. Most cars are equipped with them. They come in assembled and disassembled types. Axle with welded plates and attached saber knives. Two or three identical sections are connected with bolts. The width of cultivation depends on their number. Factory cutters will handle pre-treated areas;
- Crow's feet. The design is non-separable - the number of sections is selected according to your needs. With the help of such cutters, hard soils are processed and plant remains are interrupted. Reduced load on the gearbox. The cultivator is easy to operate. The crow's foot cutter is perfect for equipment with an air cooling system;
- Virgin land. The cutter is excellent for processing virgin soil, plowing soil at great depths, and loosening the soil. The design is reliable and durable.
Often a factory cutter is not enough. To increase productivity, reduce the load on equipment and save time, it is worth purchasing “Crow’s Feet”. For heavy development of virgin soil, Tselina soil tillers are more suitable.
How to sharpen cutters
First of all, we note that sharpening rotary cutters is not necessary in all cases. For example, if heavy soil is being processed with a powerful unit on which reinforced cutters are installed, there is no point in sharpening - you will not notice a difference in the quality of cultivation, you will only waste your efforts on sharpening.
At the same time, when working with lighter equipment, sharpened cutting devices can temporarily increase the efficiency of cultivation. But you need to be prepared for the fact that sharpening is not enough for a long time; after a few hours of active use, the knives become dull, and you will have to sharpen them again, which is quite labor-intensive. In addition, too sharp knives crush the root systems of weeds, which does not help fight them, but, on the contrary, accelerates their reproduction.
However, if desired, you can sharpen soil knives. To do this, remove the cutter from the walk-behind tractor, clean it of dirt and carefully sharpen each knife using sandpaper.
This is interesting: methods of plowing land using a walk-behind tractor.
How to assemble cutters on a walk-behind tractor step by step
Assembling a cutter for a walk-behind tractor takes 1-2 hours, but it can take a long time and become a problem if suddenly a complete set of fasteners is not available.
These are the kits used to assemble the cutters:
Despite its apparent simplicity, this is a rather complex assembly in which the correct placement of the blades is extremely important. On different assemblies there can be from 6 (two cutters with 3 blades each) to 32 (8 cutters with 4 blades each).
The video will show how to assemble cutters for a walk-behind tractor:
All blades are divided into left and right. For some, the sharpened cutting edge is bent in one direction, for others - in the other. Sometimes there are assemblies with 3 left and 1 right blades, or other combinations. There are assemblies with 1 shortened blade.
If assembled incorrectly, the following problems arise:
- The walk-behind tractor jumps during operation and moves jerkily (one or more blades are turned with the blunt side towards the ground);
- one strip is processed by two blades, but an unplowed strip remains nearby (all blades are turned in one direction);
- if all the blades are installed with the cutting edge sharpened in the opposite direction, the walk-behind tractor will not be able to plow at all;
- An incorrectly installed blade can hit the gearbox. At low speeds the engine will simply stall; at high speeds the gearbox can be punctured and the blade bent.
After any assembly and installation on the walk-behind tractor, it is necessary to rotate the cutters without starting the engine and check that the blades do not cling to the parts of the walk-behind tractor.
Assembling new blades can be done without problems if you have an old factory cutter in front of your eyes. In this case, new blades are installed looking at the correct sample.
If the installation of new blades is carried out on the old shaft and flanges, before removing the old blades, you can photograph their position on a smartphone or sketch it. You can simply remember if you disassemble one cutter after another sequentially, and not remove all the blades at once.
Figuring out from the manual how the blades should be positioned can be a challenge. The picture does not always show the correct position. Translation from Chinese may not be clear. Numerous videos on this topic on the Internet may not help, since (see above) the assemblies are all different. Sometimes the video shows simply incorrect assemblies. The correct information will have to be collected piecemeal.
If the old cutters were disassembled a long time ago, not everything is clear in the manual, there is no clear video with a suitable model, assembly is carried out according to the following general rules:
- the outer blades are always attached inside the flange area (from the side of the walk-behind tractor), and not outside;
- on most models there are equal numbers of left and right blades. On a 4-blade assembly - 2 left and 2 right;
- left/right blades alternate, turned in different directions. But be sure to keep the cutting edge facing the ground.
Let us remind you that there are models and kits with other combinations.
But no matter what blades and in what combination were on the walk-behind tractor, you can purchase a standard kit (example in the photo above) and assemble it. In this case, the main thing is that it matches the walk-behind tractor model in size, shaft diameter, etc.
How to properly plow with a walk-behind tractor with cutters
As mentioned above, one of the important factors in the efficiency of soil treatment with rotary cutters is the level of depth of the coulter. The second no less important point is the correct choice of unit speed. Experienced users recommend using second gear, as this increases the number of revolutions and improves the quality of crushing the soil and diving to the desired depth.
Reviews
Victor Semenovich
“I’ve been working on a walk-behind tractor for over 30 years. I made the cutters myself, because everything that is on sale does not suit me. I use the “crow’s foot” type, modified it four times to suit my requirements. After switching to a modern walk-behind tractor, I see the same excellent results.”
Sergey
“I assembled the rotary cutters myself, but I paid insufficient attention to the recommendation to follow the drawing exactly - I thought that I could get the desired result “by eye.” Because of this, I had to disassemble and reassemble several times, I had to tinker
I highly recommend that everyone who assembles cutters on their own not repeat my mistake and neglect accuracy.”
User manual
Instructions are also supplied with Tselina walk-behind tractors. This document must be retained for the entire period of operation.
Construction of the Tselina walk-behind tractor
Using the instructions, the walk-behind tractor is assembled and started for the first time. Next - more details about the launch and operation of the walk-behind tractor.
First launch and run-in
The first start-up of the Tselina walk-behind tractor is carried out after assembling the unit. For assembly, use the tool kit (if included). After assembly, the walk-behind tractor should be filled with gasoline, and oil should be poured into the gearbox and engine crankcase. Turn on the walk-behind tractor and let the engine idle, without load. After 15 minutes you can start working with attachments.
After running-in, you can use the walk-behind tractor for heavy work, for example, plowing virgin soil or transporting heavy loads. Do not exceed the maximum lifting capacity for your equipment model.
Maintenance
The manufacturer fills some models of walk-behind tractors with oil while still in production. Ravenol oil for gasoline/diesel four-stroke engines is indicated as recommended.
For the gearbox: a little TAD17 or similar viscosity. Gasoline AI-92 or AI-95, like other gasoline walk-behind tractors. You should not use cheap gasoline, such fuel will negatively affect the quality of engine operation and increase the likelihood of breakdown.
Conservation
If the walk-behind tractor is not used in winter, winter storage is called “mothballing”
Please note that Tselina walk-behind tractors, according to the operating instructions, are designed to operate in temperatures ranging from minus 5 to plus 35 degrees
Also, at temperatures below zero, you can start the walk-behind tractor in a warm room, for example, in a garage, and only then go outside to work.
Basic malfunctions and their elimination
How to make cutters for a walk-behind tractor with your own hands
The cutters are not complicated. Before assembling them, it is worth familiarizing yourself with the existing parts and their design features.
Suitable drawings are contained in thematic publications and on forums on the Internet. After defining the model, it is necessary to prepare materials for assembly. If shaped parts are used, they should be ordered from a craftsman or forged yourself if you have certain skills and access to special equipment.
Materials you will need
Before assembly, you should measure the area you plan to process, and based on the data obtained, begin assembling the mechanism. To get the most correct design you will need:
- welding machine,
- Bulgarian,
- parts that will act as leavening agents;
- long metal tube with a diameter of 42 mm.
The basis for rippers can be automobile springs, which are bent and welded at an angle to the main pipe.
Manufacturing Tips
First of all, pay attention to the correct assembly . Avoid any deviations, no matter how minor. If you are not careful, the axis will be broken. When installing homemade cutters for a walk-behind tractor and cutters for a cultivator, it is important not to confuse the direction of rotation of the teeth.
It is recommended to manufacture elements with a diameter not exceeding 500 mm. This means that the tool will be able to penetrate the soil 260 mm and capture approximately a meter in one go.
Saber knives are less dangerous compared to others. With them, the risk of serious injury is minimal. The alternate arrangement of the knives makes their entry into the ground consistent, there are no blows or jerks.
To maximize the service life of homemade devices, you need to adhere to a few simple rules, in particular, when starting, the friezes must be above the ground , after which the revolutions start, the blades slowly lower into the soil - this is how processing begins.
Build process
As already mentioned, work begins with taking measurements of the site. After all the calculations have been made, you can proceed directly to the assembly. Using a welding machine, connect the knives to the pre-prepared pipe. Before this, you can sharpen the edges of the elements at the desired angle.
The resulting device must be fixed on the hitch unit - and the work can be considered completed. To ensure the system is working properly, perform a test run and make adjustments.
People with experience working with metals can easily assemble cutters for the Neva walk-behind tractor. Pre-compiled diagrams, as well as a set of high-quality tools and materials, make installation easier.
You can assemble a mechanism such as a milling cutter for a walk-behind tractor with your own hands, you just need to read the recommendations and strictly adhere to consistency in your work. Then the device will serve for decades.
Saber models
Such elements are considered very durable and reliable due to the fact that only steel is used in their production process. In addition, such models boast a unique design that makes them resistant to any mechanical damage. Saber-shaped models are included in the standard kit of most European and American-made walk-behind tractors. The effectiveness of such elements has been tested in areas with any type of soil, which sets them apart from other models. These cutters are distinguished by their improved quality and high strength, which allows for high-quality soil cultivation.
The main feature of saber-shaped knives is that carbon steel is used to manufacture the working parts, which guarantees the reliability of each part even after a year of active use. In addition, the knives are specially treated and hardened using high-frequency currents, making them incredibly durable.
"Crow's Feet"
The second type of cutter is the “crow’s foot” model, which received its original name due to the triangular shape of the cutting parts. Similarly with the saber-type device, the size and number of cutting components depends on the weight of the main unit. For example, for the MTZ walk-behind tractor it is recommended to install four or more parts, but for other similar models only three. In fact, you can install an unlimited number of knives as you see fit, but you must take into account that the power of a walk-behind tractor with a weak engine will drop significantly.
With the help of crow's feet, complex types of soil and virgin lands are most often cultivated. But it is worth noting that if the soil contains a large number of branched roots, the system may become clogged and malfunction.
Any type of cutter requires initial inspection and further careful handling
This type of cutter was widely used in the eighties during the USSR, when the active development of homemade devices in the economic sector began. Farmers were forced to look for ways to increase productivity on their plots and for this reason learned to create cutters for walk-behind tractors with their own hands. It should be said that the design of the unit has not changed since then, which once again proves its timeless efficiency.
How to assemble crow's feet
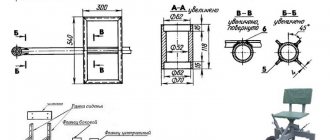
The main element of the soil device is the drive sleeve, the parameters of which must be at least five mm of the wall length, and the optimal indicator is considered to be approximately seven mm. Next, you need to machine the inside so that it fits easily onto the shaft, and make a special hole for the axial pipe, thirty or forty mm deep.
As for the axial pipe itself, it is usually made on the basis of the standard model AE25-32, but other similar parts can also be used. There are two types of finished pipe: collapsible and non-dismountable , it all depends on your expectations. But if you believe the reviews of farmers, the collapsible option is still considered the most effective, since it is always possible to add or remove knife installations. It is impossible to predict how the walk-behind tractor will behave in a certain area, and for this reason it is better to have a backup modification option just in case.
Be sure to read: Rotary mower KRN
Having chosen the appropriate type of axial pipe, it is necessary to install a special flange on it for further fastening of the knife units. The total length of such a device will depend on the width of the knives and their distance from each other. The optimal width of triangular knives is approximately 60-80 mm, since larger sizes significantly increase the resistance of the unit to the ground and impair its performance. The knife inserts themselves should be made of dense steel and have a thickness of 3-5 mm. Next, you should assemble the cutting element stand, which consists of a curved strip and a sharpened edge.
"Crow's feet" work well on rocky soils and destroy weeds
By connecting the blade unit and the axial tubes, you get the overall design of a modular element. Actually, this is the final stage of creating “crow’s feet” and you can carry out the first “run-in” of a homemade installation. Also, before starting the cutter manufacturing procedure, you should first make a small drawing to reduce the risk of damage to parts. The necessary drawing can be found in many automotive publications or on the Internet; if you have a technical education and understand the design of the cutter, you can make a rough plan yourself.