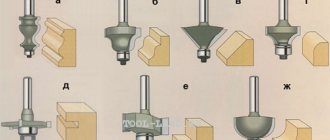
Tell me if anyone knows! Is it possible to make a chip-worthy blade from a band saw blade (for sawmills); if so, how can you harden it at home?
Can. The device will be up to par. Although a little fragile. There is no need to do thermal treatment
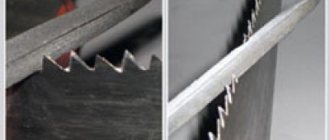
Leonid, don’t confuse warm with soft. Thin band saw, mm 0.8. 1 approximately thick. Saw in the form of a ring. Thin piece of iron. The engine turns so disgracefully that the tree is being sawed. The blade is supposed to be made, but it’s small and crappy. because, as mentioned, it is extremely thin. Normal saws should be taken, from sawmills, about one and a half meters long, 3 mm thick. Here's a THING, about the band saw, it's like that. Haveha by and large.
Thank you! I will have to.
To what temperature should it be heated and where should it be placed (in the sense of water or oil)?
quote: Originally posted by Serjant: Leonid, don’t confuse warm with soft. Normal saws should be taken, from sawmills, about one and a half meters long, 3 mm thick.
And it is better, in my opinion, to take saws for cutting metal (well, we are talking about mechanical saws) from quick-cutters P6, P9 (my favorite) or P18. Of course, it is difficult to process (long and tedious), but it turns out to be an excellent blade. You can buy freely and without stress. If necessary I will reset the links. I recently made a blade from a P9 quick cutter (made in 1980) and the thing turned out great. The descents are from the butt, the mixing is worn out, and the polishing is lousy. But it shines like a mirror, shaves and doesn’t dull.
If it's not too much trouble, reset it.
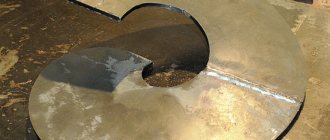
Here’s a saw from a sawmill, I just can’t figure it out:
Again, from such a saw, only the blades are small in size, it immediately catches the laugh, although it can be sharpened to a razor
2 osb “If necessary, I’ll reset the links.” Reset if not too difficult. Thank you.
You can buy it here
quote: Originally posted by vegur: Again, from such a saw, only the blades are small in size, it catches the laugh instantly, although you can sharpen it to a razor
I have a knife made from such a saw. My father-in-law (former) gave it to me and made it himself before my eyes. Of course, his knife turned out to be ugly, but I couldn’t refuse the gift. After divorcing my wife and visiting my mother, I threw this knife into the kitchen as it was unnecessary and scary. So that at least there is a moral right to throw it out. Like it will rust into trash and into a bucket. So, 4 years of harsh exploitation in the kitchen, sometimes for days in the sink, don’t give a damn to him. For a mother, the sharpest knife is generally the sharpest. Sometimes it’s true, but after a long period of time in the sink, rust appears on the sharpening itself and then it is immediately removed with a touchstone (5 times in all time). Now I started to remember how many times during this time I sharpened it and I only remembered 2 times.
Conclusion: To prevent rust from sticking, the blade is etched with orthophosphoric acid over a heated knife several times, the color turns out to be almost black and resistant to abrasion.
It’s strange, from such a saw it turns red in some places and turns black in others when it gets into the kitchen. And in the desk drawer, it brightly shines with polish
I understand the posts about the saw from the sawmill? Just today I wanted to ask what kind of steel is there and is it worth using it for our needs? Over the weekend I just practiced making bevels on a workpiece using a sawmill. I had it lying around unfinished for 2 years
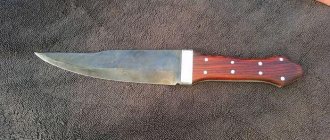
I made it as an experiment from tape from an imported machine for sawing steel rods. It clearly shows a 5-millimeter layer of another metal welded to the working part, apparently a quick cutter, and it was brought to the RK. Thickness 0.9mm - not suitable for a serious knife, used as an auxiliary knife. Blade length 78mm, handle - unidentified wood, frame - titanium ring, mounted on epoxy. Impressions - the properties are close to high-speed cutting.
quote: Originally posted by Reglan: Conclusion: To prevent rust from catching, the blade is etched with orthophosphoric acid over a heated knife several times, the color turns out to be almost black and resistant to abrasion.
Can you be more specific? To what temperature should the blade be heated?
Source: guns.allzip.org
Homemade knife from a metal saw - how to make a tool with your own hands
I had a blade from a Sawzall saw blade and wanted to make a knife out of it. These blades are already heat treated, so if we are careful not to overheat the steel during grinding, we can theoretically bypass the heat treatment process entirely and still end up with a hardened blade.
This project started when one of the big blades on the sawmill broke. Always in search of scrap metal from which I could make something, I took the blade for myself, I hope this idea is no worse than assembling a knife from a hacksaw blade.
Required tools and materials
Since there is no need to forge and harden the future blade, the entire tool can be found in a garage that is at least somewhat equipped. We will need:
- markers: black and silver;
- ruler, piece of paper and caliper;
- angle grinder (grinder);
- files with different grains;
- as well as sandpaper and masking tape;
- epoxy adhesive;
- grinding and drilling machines;
- container with water for cooling;
- hammer, core and vice.
Mechsaw knife.
Everything in this set is wonderful for one simple reason - any element can be replaced with something similar.
A drilling machine is, of course, cool, but an electric drill is enough. And so with any tool from the list. You will definitely need materials to make the handle, but more on that later.
Saw blade
And today they gave me such a “piece of debris.” Thickness 2.4 mm (measured in several places), the remaining dimensions can be estimated from the photo. Question for the venerable assembly: Is THIS worth using on knives, or what? If you use it, will it be with a thermal bath or just like that? If with heat treatment, then what kind of steel could it be, approximate hardening and tempering modes?
It has an interesting bend, not perpendicular to the plane, but at an angle. I haven’t measured the hardness yet, but the file takes it with difficulty. There is an idea to use a grinder to dissolve this disgrace into strips of acceptable width and use it for blades, if you give the go-ahead.
|
Sharpening two-handed saws yourself or how to simply restore an old long hacksaw
If you have an old two-handed hacksaw Druzhba-2 in the garage, then before using it, it is recommended to restore its integrity. Before using the tool, pay attention to the following points:
- Handles - wooden handles may have dried out over a long period of non-use, so it is possible that they could freely fall out of the holes. You can restore the serviceability of the handles by dipping them in water for several hours so that they swell. You can also machine new handles for the tool, which won’t take a lot of time and effort.
- The presence of corrosion on the canvas - signs of rust should be eliminated, and then treat the device with machine oil
- Sharpening the teeth - after storing the tool for a long time in the garage, there is a high probability that the hacksaw needs to restore the sharpness of the teeth
If there are no difficulties with restoring the handles and removing corrosion, then sharpening the teeth is just the opposite. A large saw requires a lot of time and effort to restore the integrity of the links. However, there is an advantage to this, since large teeth are much more convenient to sharpen. Although the tool differs from an ordinary hand hacksaw, however, the principle of restoring the sharpness of the teeth is similar. A step-by-step description of sharpening teeth on a two-handed saw has the following format:
- First you need to fix the tool. It will not be possible to do this in the jaws of even the largest vice, so we use two corresponding board lengths. We place the boards parallel to the blade, leaving only the teeth visible. If you don’t have a vice, you can use a clamp
- Work should begin with setting the teeth. All teeth must be the same height. You can determine the presence of protruding links by eye, and to align them with the rest, you should work with a flat file
- At the next stage, it is necessary to align the teeth at the same angle of deviation from the plane of the blade. To perform the wiring, you will need a special tool. It is also recommended that you first make a template (layout) to check whether the links are sufficiently spaced (or buy one). The teeth should be spaced 0.5 mm from the plane of the blade or 1 mm from each other. The wiring process is performed one by one. Not many craftsmen know how often to set teeth. According to the rules, it is necessary to carry out setting no more often than 1 time per 5-6 sharpening of teeth
- As soon as the teeth are set apart, you can move on to the final and most important stage - sharpening. For this, a special triangular file is used, the size of which must be no less than the height of the teeth
- Correct sharpening is performed by moving the file away from you with medium pressure against the tooth. In the reverse position, the file should not touch the blade. It is necessary to pass the file confidently, but not quickly
- First you need to go along one side of the teeth, and then along the other. When sharpening, you should also choose the appropriate angle from 35 to 70 degrees.
Finally, all that remains is to treat the tool blade with machine oil and use it for sawing thick logs, trees and even lumber. When carrying out work, it is recommended to follow safety precautions to avoid injury.
This is interesting!
If you have mastery of working with a grinder, you can sharpen the teeth with a power tool with an abrasive disc.
Homemade knife from a metal saw
Good day !
This article will discuss the method of making a knife; the cutting blade of a high-speed saw will be used as the material.
Let's start making!
We take our blank and mark it with the future shape of the blade. When everything is ready, for convenience, we clamp it in a vice, and using a grinder with a thin cutting wheel, we cut off the excess parts of the metal along the contour of the marking. In order to accurately fit the cut out shape of the blade, according to the drawn markings, you need to additionally process the edge using sandpaper or go over it with a grinding wheel.
Since the surface of the canvas has traces of rust, which we do not need, we remove it with a special attachment for a drill, or with a regular hand brush
Let's return to our bolster, after we have fired, the bolster needs to be finally fixed on the blade, and to hide unnecessary cracks, the author decided to solder it.
Since the author did not have a powerful enough soldering iron, he decided to use another proven method, using a heated brass blank. Soldering acid was used to solder the metal to the brass bolster; a trim from the bolster was used for precise fitting.
Source: usamodelkina.ru
Article rating:
Save to:
Knife from a sawmill Link to main publication
Why is the file called “Friendship-2”
Surely everyone knows this type of chainsaw tool called “Friendship”. The next chainsaw model was to receive an appropriate name with the prefix “two”, but the name “Friendship-2” went to such a cutting device as a two-handed saw. It got its name due to its design features. A two-handed crosscut saw is designed to work in pairs, and not just two people. In a pair - this means well-coordinated friendly work with the device, which is where the name actually originated back in the USSR.
The Soviet two-handed saw was popular because its main advantage was its low cost. During the Soviet era, few people could afford to buy a specialized tool - a chainsaw, which cost astronomical amounts of money. Cutting thick logs and large trees with a hand saw is not only difficult, but it also takes a lot of time. That is why such a type of cutting unit as Druzhba-2 appeared.
Even if there is now a two-handed saw from the USSR era in your garage or attic, do not rush to get rid of it. It can not only cut trees and logs, but also make various tools, for example, a knife or a handsaw. If you remember that a two-handled hacksaw is gathering dust somewhere in the garage, then it’s time to find out all its advantages and capabilities.
Shank drilling
The handle on the shank can be secured with rivets or glue. The most reliable option for attaching the handle is to use rivets. To install them, you need to make holes in the shank. The holes are marked on the shank so that they are located approximately in the middle of the future handle. To prevent the drill from slipping at the initial stage of drilling, the holes are cored.
Due to the fact that the circular saw is made of alloy tool steel, drilling it will not be so easy. Ordinary metal drills will not last long here.
Drilling should be done with cobalt drills or a ceramic drill with a pobedite tip.
During the drilling process, it is important to add oil to the drilling area and not allow the drill to overheat. Drilling through hardened steel is quite a difficult task.
Therefore, it is possible to produce holes in the shank using an electrochemical method. To do this, attach a wire to the workpiece, then completely cover the shank with bitumen mastic or plasticine. In areas of future holes, the protective layer is scratched down to bare metal. Next, a saturated solution of table salt is prepared, into which the blade shank with a wire and an unnecessary metal plate, also with a wire, are dipped. Both wires connect to the battery or car charger. A “plus” is applied to the future knife from a circular saw, and a “minus” is applied to the plate. The etching process is accompanied by the release of gas. In 30–50 minutes the holes will be ready
Drilling through hardened steel is quite a difficult task. Therefore, it is possible to produce holes in the shank using an electrochemical method. To do this, attach a wire to the workpiece, then completely cover the shank with bitumen mastic or plasticine. In areas of future holes, the protective layer is scratched down to bare metal. Next, a saturated solution of table salt is prepared, into which the blade shank with a wire and an unnecessary metal plate, also with a wire, are dipped. Both wires connect to the battery or car charger. A “plus” is applied to the future knife from a circular saw, and a “minus” is applied to the plate. The etching process is accompanied by the release of gas. In 30–50 minutes the holes will be ready.
Blower installation
We move on to the final stage - installation of the blower. We attach the first part with the pipe to the engine. Here you should pay attention to the fastening so that they are reliable. Next, install the impeller in this part and close it all with a lid. The latter is also secured with epoxy resin. For a more presentable look, you can paint the structure in a single color. As a result, the snail design should look like this:
Now the fan for the forge is ready and all that remains is to attach it to the forge itself and check the effectiveness of the product.
This type of blower for the ash pit is most preferable, since the air flow can be directed in the desired direction.
Replacing varnish
If neither “tin” nor light means help, you will have to change the varnish. But don't be scared. There is nothing complicated about replacing this, it’s easy to do it at home:
- Lay out a waterproof film so that the removed varnish does not stain the floor. Put on a dressing gown or overalls.
- Take a special liquid intended for removing varnish, soak a brush in it and start moving it over the varnish. This is how you remove the varnish. Be sure to use a respirator and gloves, and do not light matches - nail polish remover is usually highly flammable.
- Now the brass needs to be polished. Use special products for this - polishes.
- Rub the polish into your jewelry and figurines, then polish until they begin to shine.
- Now is the time to start applying new polish. Distribute it over the brass surface in an even thin layer. It's best to do this with a brush. But if you’re not much of an artist, use cotton balls.
- Now wait until the varnish dries thoroughly.
- Wipe down your brass items with some soft, dry cloth.
If there is no polish on your brass, and nothing can be done to clean the alloy, then there is only one way out - contact a specialist.
And finally, a video “on topic”:
- How to remove pen marks from leatherette
- How to clean plasticine from clothes
- How to clean gold-plated silver at home
- How to clean salt from suede boots
Flange preparation
The emery, made with your own hands, provides for connecting the electric motor to the stone circle via a flange. It must be machined from metal. For this purpose, they usually turn to a specialist (turner). You will need to know the parameters of the device, the diameter of the internal hole of the emery wheel, and the diameter of the shaft.
The flange is attached to the shaft using a nut, bolt and washer. They also need to be prepared. The threads on the nut and flange must take into account the direction of movement of the shaft coming from the electric motor. If you plan to rotate the stone clockwise, then the thread must be cut to the left. When the shaft rotates counterclockwise, the thread must be right-handed. This is necessary to comply with safety regulations. The fact is that with this direction of the thread, the nut will tighten under the influence of vibration during operation, preventing the circle from breaking off. If the thread is in the other direction, the nut will unscrew. If it unscrews completely, the sanding wheel will fly off. And this is dangerous.
It is not always possible to find a turner. Therefore, it is not always possible to grind the flange. In this case, you can resort to an alternative solution. In such a situation, homemade emery is made with your own hands using pipes of a suitable diameter. If there is a gap between the bushing and the shaft, it can be eliminated with fabric insulating tape. If there is a large gap, you can put one bushing on another.
Peculiarities
A self-made knife has many advantages.
- It will be much stronger and better quality than an inexpensive knife purchased on a Chinese website or in a hardware store.
- The product can be made “to suit you”, that is, so that the handle fits easily in the hand and the blade is easy to handle.
- You can give the product some personality if you make its handle from an unusual material, for example, from polycarbonate or from some valuable wood like alder. Hand-applied decorations on the handle will make it unique.
You can also make several blades from one blade at once, which will be used for different purposes.
Cleaning Brass Coins
It is not often that you come across coins made of brass. As a rule, they are traditionally made from copper or bronze. However, such products can also be found in collections. Despite the high wear resistance of brass, coins are susceptible to oxidation and corrosion over time. You can clean brass coins at home using the following methods.
- Cleaning brass coins with soap. This method is the most gentle for the alloy. Regular baby or laundry soap is grated and the soap slurry is dropped into boiling water. The mixture should be stirred until a homogeneous mass is formed. Then the coins are immersed in it for a while. After obtaining a satisfactory result, the products are removed from the composition and washed under running water with a toothbrush. The only drawback of this procedure is that it takes a lot of time. Although the result is worth it.
- Removing oxide and dirt with citric acid. The acid is also suitable for cleaning copper coins. Citric acid is diluted in ordinary water. Coins are immersed in the liquid for a while, sometimes turned over for uniform cleansing. They are removed after obtaining the required result. The procedure is quite lengthy, directly depends on the amount of acid, on average it takes about 10 minutes. The seized coins are washed from the solution with running water.
- Cleaning brass coins with vinegar. A very convenient and effective way. However, vinegar may not be suitable for all coins - it all depends on their constituent components. The process is quite simple - a brass coin is placed in a vessel with vinegar for several days. Finally, the product is washed with running water and wiped with a cloth. After such cleaning, the coin may shine like new or, conversely, significantly deteriorate its appearance. The procedure requires careful monitoring.
- Coca-Cola is an effective cleaner. Sweet water can remove dirt and excess patina from coins, as it contains phosphoric acid. In general, Coca-Cola is suitable for minor stains, but has no effect on more complex stains.
There are other options, for example, a brass cleaner with oxalic acid. The cleaning method is individually selected for each type of coin, because all products have a different composition.
So, it became clear how to clean brass yourself and choose the most appropriate method without much difficulty. If objects suddenly become dirty or they have lost their former appearance, these recommendations will help to cope with the problem and remove unwanted oxides, while preventing the products from losing their shine and value.
June 28, Alexandra Bondareva
Tin, nickel, manganese, aluminum and lead are often added when making brass. The properties and color of the alloy directly determine its composition. Brass products may take on a golden, greenish or yellow tint.
It’s not for nothing that brass is also called the “eternal metal” - products made from this material have excellent wear resistance, they are practically not subject to temporary influences and do not lose their original state. The material is light and plastic, and therefore has become widespread in the manufacture of various types of jewelry.
Industrial fans design
A fan for a forge of this type often has a casing that is made in the shape of a snail. Its internal structure and principle of operation are shown in the figure, where a) is the appearance, b) is the structure and arrangement of internal parts.
The principle of operation of the “snail” is as follows:
- Inside the casing (3) of the fan housing, a rotation wheel (1) equipped with blades (2) is located on the axis.
- The shape of the blades and the direction of rotation of the wheel create the movement of air flow into the pipe (4) in the direction of the combustion zone.
- The direction of air flow is provided from the hole located in the central part of the volute body to its final turn, which has a narrowing. Due to this, the air pressure increases.
An example of an industrial product is a fan of the common brand VT1-2, produced under the Blacksmith brand.
It is designed for blowing both stationary and portable forges with a completely open top. The diameter for connecting the pipe of such a device is 50.8 mm, power is supplied from a 220 V network, power consumption is 150 W, the impeller rotates at a speed of 3000/3600 rpm.
The maximum pressure (pressure) of the air stream in the supply hole is 490 Pa. The fan has dimensions of 225x180x225 mm and weight of 2.65 kg.
The fan housing is made by casting and is highly durable. The device operates almost silently and is easily connected to the forge.
Working with a workpiece
Having formed the basis of the future knife, proceed to the most important and difficult stage of the work - removing the slopes. The bevel is a surface on a knife that gradually tapers towards the blade. The purpose of the knife directly determines the angle and width of the bevels. Therefore, choose the average value if you want to get a utility knife from a saw.
Before starting to work on the machine, draw the expected slopes on the metal sheet using a marker. Grind carefully, slowly, so as not to spoil the future knife. It is recommended, as in the previous step, to practice on a spare part. The slopes should be symmetrical and lie at the same angle on both sides. In this case, the blade should not be sharpened: leave an indent of approximately 0.25 mm.
To sharpen the blade, use sandpaper. For such purposes, sandpaper of 8-10 hardness is best suited. It is better to sharpen a knife from a metal saw on a wooden block. To prepare a makeshift sharpener, take a block and glue sandpaper to it.
Using coarse sandpaper, you will give the blade the necessary sharpness, and using a finer sandpaper, you will polish the metal blade completely.
At the final stage of processing, polish the blade. Cover the same wooden block with felt or leather, rub it with GOI paste and polish until you achieve the desired effect.
Red fastness
If hot hardness characterizes what temperature steel can withstand, then red hardness characterizes how long the steel will withstand such a temperature. Those. How long will quenched and tempered steel resist softening when heated?
There are several characteristics of red fastness. Let's give two of them.
The first characteristic shows what hardness the steel will have after tempering at a certain temperature for a given time (see Table 1).
Table 1
Characteristics of heat resistance of carbon steels and red resistance of high-speed tool steels [2]
| steel grade | Holiday temperature, ºC | Exposure time, hour | Hardness, HRCе |
| U7, U8, U10, U12 | 150 ÷ 160 | 1 | 63 |
| P9 | 580 | 4 | |
| U7, U8, U10, U12 | 200 ÷ 220 | 1 | 59 |
| R6M5K5, R9, R9M4K8, R18 | 620 ÷ 630 | 4 |
The second way to characterize red hardness is based on the fact that the intensity of the decrease in hot hardness can be measured not only at high temperature, but also at room temperature, since the hardness decrease curves at high temperature and room temperature are equidistant, and measuring hardness at room temperature, of course, is much simpler, than at high.
Experiments have established that cutting properties are lost at a hardness of 50 HRC at cutting temperature, which corresponds to approximately 58 HRC at room temperature. Hence, red hardness is characterized by a tempering temperature at which in 4 hours the hardness decreases to 58 HRC (designation K4р58).
Is it possible to simplify the process?
Craftsmen say that the hole can be made without the use of drilling tools. The blade together with the shank is covered with a layer of varnish. Where there should be a hole, you need to clean the surface of varnish. You should place a knife from a wood saw in an electrolyte solution and lower a wire with a negative charge into the container with the workpiece, and connect the positive one to a power source, which can be used as a regular battery.
As a result of such an impact, you will get a hole in the metal, although it will not be perfectly round, but you definitely won’t be able to damage the blade in this way.
Mini sharpening machines are at your service:
All devices are divided into two types: attachments or stops for universal tools, and independent devices of narrow specialization. Let's look at the most popular of them, from simple to complex:
Hand holder
This is just the device for those who have a steady hand and a diamond eye. In fact, it only allows you to hold the drill in a given position without fear of injuring your fingers. Angle control is visual, according to the position of the “wings” relative to any landmark. There are few advantages: instant readiness for work, compactness and price. The disadvantages are obvious: manual control of the process does not add accuracy.
Stop for electric sharpener
In fact, this element is not a special device for drills. It simply allows you to fix the tool at a certain angle. The accuracy will be higher than in the previous version. Most stops allow you to set the angle of inclination, and even have a marking scale. And yet you have to rely on firmness of hands.
There are also more advanced stands: with replaceable elements and adjustment of not only the angle, but also the height. The devices are mounted not on the emery body, but on the workbench: which makes them more versatile.
In fact, such a stop can be adapted to any electric sharpener. An additional bonus is that with the help of such a stand you can sharpen knives, cutters, screwdrivers, chisels, etc.
Semi-professional guides for all types of drills
This is a fairly advanced tool that allows you to control sharpening characteristics with micron precision. All linear parameters are securely fixed, the values are set according to the markings. The drill is mounted in the groove, accidental displacement or rotation around its axis is excluded.
For sharpening, the possibility of both linear movement and movement of the edge along the arc path is provided (for conical sharpening of large diameter drills). Linear movement (along the axis) can be controlled by a master, or a limit stop can be installed.
From the point of view of processing quality, the device has practically no shortcomings. But for proper sharpening, the operator must know the parameters of the drill. That is, there is no automation: therefore the tool belongs to the professional category.
As a development of the line - a guide with its own sharpening unit. There is no need to install a stop on the workbench and change discs. In fact, you have a semi-automatic tabletop sharpening machine.
Important note: All listed devices are designed to work with standard electric sharpeners. Therefore, before starting to process drills, it is advisable to install a special emery disc.
Electric sharpening machines
They are specialized power tools for performing a single task: sharpening twist drills.
Even a person who is far from technology can use the machine (although why does he need sharp drills?). The operator only needs to determine the diameter of the drill and immerse it in the appropriate hole. It is convenient to work, errors are practically excluded. However, all drills are sharpened with the same comb. The price to pay for ease of use is the lack of flexibility in settings. For home use - the best choice: especially if there is an additional attachment for sharpening knives and scissors.
There are versions for masters. The drill is installed taking into account the sharpening parameters, the process can be controlled by the operator.
The sharpening angle, the method of edge processing (linear or conical), and the depth of metal removal are selected. The drill is not located in a common holder, but in an individual cartridge.
Industrial sharpening equipment for a metalworking shop
During intensive use of drilling machines, a separate post is required to restore the functionality of the tool. Professional stands for sharpening drills of any diameter save time and effort, but the cost of such equipment is too high for home use.
How to remove “non-critical” tarnishing
Toothpaste
For “moderate” tarnish, toothpaste works well:
- First, wash the brass thoroughly in soapy water or a cleaning solution.
- Next, apply toothpaste to the brush and start brushing. Don’t be too zealous, do everything calmly, the dirt will start to “go away” quickly. If after 10 minutes there is no result, stop this and try more serious cleaning products.
- Finally, wash the brass items with running water and wipe thoroughly with a dry soft cloth.
Another useful article: How to clean a glass-ceramic stove
Ketchup
Not just any ketchup is suitable for cleaning, but only one that contains a minimum of dyes and a maximum of “acidic” preservatives.
- Apply ketchup to a sponge and rub it over the oxidized brass objects.
- Do not touch for 20 minutes, and then remove with a cotton or terry cloth.
- Wash and wipe with a dry cloth.
Another useful article: How to clean a suede jacket at home
Yogurt
Yogurt is another good brass cleaner. The more lactic acid it contains, the better the result will be.
- You pour yogurt into a saucepan and put tarnished figurines and earrings in it.
- You don't take it out for about an hour.
- Then wash the brass products with water and wipe with a soft cloth.
Remember: Brass is very easy to scratch, so if you have long nails, handle the alloy with extreme care.
Detergent with oxalic acid
Oxalic acid is often found in detergents. It will thoroughly clean brass surfaces that are beginning to oxidize.
- Apply the oxalate-containing product to the darkened areas.
- Leave it for a short time (half an hour is enough). Don't worry when you see that the dirty places have become even darker. That's the way it should be. It was simply an acid deposit that began to separate from the brass surface.
- Running water and a brush with soft bristles “dispels the darkness.”
- Now apply a little baking soda and use a wet cloth to go over the remaining dirt.
- Wash with water and dry thoroughly with some soft cloth.
Soap solution
Helps only with relatively mild stains.
- Pour lukewarm water into a basin and add some detergent or soap (preferably laundry soap).
- You foam the solution.
- You dip dull brass into it. Keep it there until the solution begins to cool (that is, a maximum of 10 minutes).
- You take out your figurines and ring. You start cleaning them with a soft bristle brush. At the same time, wash with lukewarm water.
- Wipe with a soft cloth.
Important: After cleaning, always polish brass using special polishes. If you don't do this, it will be difficult to achieve the desired shine.
arrow_left
Polished brass reflects the world like a mirror.
Lime and soda
Lime in the company of soda does a good job of brass oxidation:
- Add 60 g of regular soda to 50 ml of water.
- Apply the resulting mixture onto the brass with a sponge. Don't touch for 20 minutes.
- Now cut the lime fruit in half.
- Treat your brass items with the pulp of this citrus fruit. Then do not touch for 40 minutes.
- Wash with water and wipe.
If you don't get the desired result, repeat the process again. The second try will almost certainly clear it.
Remember: Unvarnished brass is much more difficult to clean than lacquered brass, because the oxide eats into its unprotected surface much deeper. You won't be able to get by with regular detergent.
Hot hardness
In Fig.
Figure 1 shows curves characterizing the hardness of carbon and high-speed tool steels at elevated test temperatures. At normal temperatures, the hardness of carbon steel is even slightly higher than the hardness of high-speed steel. However, during the operation of the cutting tool, intense heat is generated. In this case, up to 80% of the released heat is spent on heating the instrument. Due to an increase in the temperature of the cutting edge, the tool material begins to temper and its hardness decreases.
After heating to 200 °C, the hardness of carbon steel begins to rapidly decrease. For this steel, a cutting mode in which the tool would heat up above 200 °C is unacceptable. High-speed steel retains its high hardness when heated to 500 ÷ 600 °C. High speed steel tools are more productive than carbon steel tools.
Direction of movement of the emery
First you need to determine which winding is intended for starting the engine, and which for the main work. To do this, you will need a tester that will help measure the resistance. In the first case, the value should reach 30 Ohms. The resistance in the working winding is much lower and is 12 ohms.
The winding responsible for the working process is connected to the electrical network. The starting winding is connected on one side to the coil. On the second side it is connected for a short period to the winding terminal. A relay is used for this. The engine starts.
In this simple way, by changing the ends of the winding necessary to start the motor, the direction of movement of the rotor changes. You can even do without a relay. In this case, you need to manually turn the sanding wheel in the desired direction.
Forming the cutting edge
Before you begin shaping the cutting edge, it is necessary to carry out preparatory work. It consists of applying markings on the edge of the workpiece. The markings are placed exactly in the center and serve as a guide for making a symmetrical descent.
To do this, paint over the edge that will be cutting with a marker and, using a drill equal in thickness to the workpiece, scratch the markings. The drill has a conical sharpening. Therefore, if you place the drill and the workpiece on the same plane, the tip of the drill will be exactly in the middle.
Edge cutting device
Then, using a coarse file, you can begin shaping the cutting edge. If you do not have the proper skills to create a smooth edge, you can use a simple device. It consists of a base, an angle and a guide with a platform for sandpaper. 180-grit sandpaper is glued onto the platform with the guide. Several holes must be pre-drilled vertically one above the other in the corner. The knife is fixed flat on the base and the guide is inserted into the hole at a height so that the angle between the plane of the base and the platform with sandpaper is the same as that chosen for forming the slopes. A universal angle is from 22 to 30 degrees.
Having made an even descent to the middle of the thickness of the workpiece, turn the knife over, then make the same descent on the reverse side. Using such a simple device, you can easily form an even blade.
Fan drive for forge
- electrically;
- by manual force;
- a combination of methods.
When using an electric drive, rotation is carried out using an electric motor that converts electrical energy into mechanical rotational energy.
The manual method involves simply rotating the handle of a glider-type gearbox.
This option is usually a backup and is used when there is a power outage and the installed electric motor cannot be used.
The figure shows the drives: a) - manually, b) - using an electric motor.
1—belt on pulley;
2 and 3 - transmission gears;
4 — rotation handle;
What is brass and where is it used?
Brass is an alloy of copper and zinc. The material contains elements such as manganese, tin, aluminum and lead particles, which change the characteristics and color shades of the metal. Zinc was discovered in the 16th century, but brass was discovered in ancient times. The metal was obtained by melting copper and zinc-containing ore.
When making the alloy, up to 30% zinc is added to the composition, but to improve technical characteristics, up to 50% metal is added. Brass practically does not wear out and is used in the manufacture of automotive spare parts, serpentine elements, heating radiators, as well as stamped parts and various accessories. Alloy brass is used for the production of aircraft, ships, watch parts and main pipes.
Using tombak (an alloy with a zinc content of no more than 10%) insignia is made. To protect elements from corrosion, cast brass is used. It is used to manufacture bearings, shut-off valves, and separators. Thanks to the properties of the alloy, compasses and heating radiators are produced. Cleaning of brass is carried out without the use of additional equipment and special products.
The metal is used in jewelry in the manufacture of costume jewelry, as well as counterfeit gold jewelry. The alloy content of up to 15% zinc and the addition of 5% aluminum allows you to obtain a material similar to precious. This condition is used when making frames for icons, as well as other items in churches.
What you might need
Before you start cleaning metal, you need to stock up on the necessary tools and equipment.
Latex gloves
Protects hand skin from cleaning agents. They are especially relevant when a person deals with chemical compounds.
Paper napkins
Necessary for removing mushy compounds from the surface of the product. They also help remove excess moisture, helping the figurines dry faster. Have plenty of napkins on hand so you don't have to interrupt your work.
Liquid container
Not a single cleaning procedure can be done without this device. Depending on the number of products and their volume, a suitable container is selected.
How to clean brass with special products?
List of cleaning products:
- Now you can buy a variety of products containing acids. These are Silit Beng, Ayos, samtex, Milam, domotec. Look at household chemical stores for products containing oxalic acid. They are usually applied for just a few minutes. When exposed to acid, brass turns dark. This plaque is easily removed using the rough side of a sponge and soapy water.
- You can clean brass products using special products. They are called Metalin and Dali. They contain acid, which eats away dirt on the metal surface. In addition, other substances containing acid will also be useful.
- A special metal cleaner is sold in the Amway network company. We rub the surface with this product and get extraordinary newness and shine. Here is a link to this product for metal surfaces.
Cleaning brass
Fracture Resistance
In addition to the “hot” properties of the cutting tool material, high mechanical properties are also required; This means resistance to brittle fracture, since at high hardness (> 60 HRC) fracture always occurs by a brittle mechanism.
The strength of such high-hard materials is usually defined as the resistance to fracture during bending of prismatic, uncut specimens under static (slow) and dynamic (fast) loading. The higher the strength, the greater the force the working part of the tool can withstand, the greater the feed and depth of cut that can be applied, and this increases the productivity of the cutting process.