Wood is a unique, environmentally friendly material, which makes it highly sought after and popular. Making products from this material is considered the height of craftsmanship in the world. Homemade woodworking machines are in demand among small entrepreneurs who carry out individual orders.
Having woodworking tools or a special machine at hand, it is easy to show imagination and skill in all directions - build a house, equip a summer cottage, make furniture and interior items.
In specialized stores, multifunctional machines are not cheap, so as an alternative, it is worth considering the possibility of making a woodworking machine yourself.
Using homemade machines in the workshop
The work that is performed in the workshop affects the equipment of the room with special devices. Typically, equipment is placed if the free area is at least 3 m2.
Workshops are often set up in small rooms, outbuildings, and garages. The best place is a separate building. In this case, the noise from the work being performed will not disturb other residents of the house.
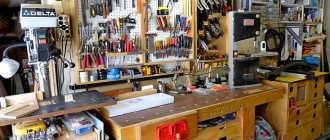
Universal workshops are often set up to perform various jobs. If a person is engaged in the production of any products, then specific homemade tools and devices are made. Often workshops are equipped with machines for carpentry and processing of metal blanks. Often, premises for the repair of wheeled vehicles are also set up.
Basically the workshop is equipped with:
- devices that allow you to prepare tools, facilitate labor and mechanize operations;
- homemade products for processing metal parts;
- workbenches.
A workbench made of wooden elements Source skilljob.ru
It is also necessary to install shelves in the room where various tools will be stored. At the same time, they ensure unhindered access to them and compliance with fire safety rules.
Features of the units
What types of woodworking machines are there? What types of work are easy to perform on them?
Multi-functional combined woodworking machine
Basically, the machines are used to trim and cut wood, sand it, and additionally turn it. Based on this, machines are divided into the following types:
- universal;
- specialized;
- narrow-profile.
With the right approach and manufacturing, homemade units turn out to be universal and are able to cope with all these tasks.
Basics of the initial stage that must be taken into account in order to make a woodworking machine with your own hands.
Please note that installation of the machine will require the required amount of space. It is advisable to have a separate room for this so that all materials and equipment are at hand.
Before you begin preparing parts for assembly, you need to make accurate drawings. If you do not have experience in this area, you should seek the help of a specialist or find information on the Internet.
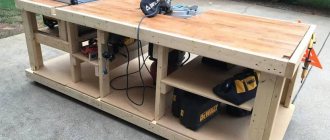
Workbench for a carpenter
This type of equipment is a table. It is distinguished by its high strength and the presence of 2 vices on the tabletop. The table is also equipped with clamps that clamp the workpieces during planing. In addition, the workbench may still have places where other homemade devices, such as a router, will be attached.
A special table must have a comfortable height. She matches the height of the master. The minimum length of the workbench is 1000 mm. Often it is equal to 1700 mm or even 2000 mm. The standard width is 800 mm.
Before making a workbench for carpentry, get acquainted with its main parts Source infourok.ru
A workbench table is created as follows:
- The table surface is created - this is a shield, which is made from oak, beech or hornbeam boards with a minimum thickness of 55 mm. They are tightly fitted to each other. The boards used are impregnated with drying oil before joining. To create a rigid structure, a 50 mm block is used. It is fixed around the perimeter of the working surface.
- The supporting elements of the workbench are made. To do this, use linden or pine timber. Its size is 120*120 mm or 150*150 mm, and its length is approximately 1200 mm. The supports are connected by jumpers in the horizontal plane. To do this, take boards that are fixed at a distance of 300 mm from the floor.
- Make homemade devices to accommodate the tool. These are shelves located under the countertop. When they are open, they are often replaced with bedside tables.
- Attach a vice.
If a stationary workbench is created, its supporting elements are fixed to the floor. Depending on the specifics of the work being performed, mobile and collapsible tables are also manufactured.
Mobile workbench on wheels Source foamin.ru
Carpenter's workbench vice
This homemade tool is made using a screw rod. Its thread length must be at least 160 mm. In this case, the diameter of the rod itself must be 20 mm. For the vice you will also need wooden blocks and metal pins. The manufacturing sequence is as follows:
- Prepare a block of 200*300 mm. Its minimum thickness should be 50 mm. This will be one of the sponges. A hole for a screw is drilled in the center of the workpiece. On the sides of it, two more holes are made for the studs.
- A second movable jaw 200*180 mm is cut out and similar holes are drilled in it.
- A threaded pin is inserted into the workpiece. A handle is installed at one end. To prevent the jaws from moving, pins with a cross section of 10 mm are passed through other holes.
Wooden vice for a carpenter Source infradom.ru
Make or buy?
An electric drill is a ready-made drive, gear, spindle and chuck in a monoblock. Place it on the carriage of the machine and you can drill. In terms of accuracy, the solution, generally speaking, is not optimal (see below), but in many cases it is acceptable, but eliminates the need to order expensive turned parts of increased accuracy, see below. In view of this, frames for installing drills are now sold only on the street from trays; prices are affordable. When choosing one to make a drilling machine from a drill, be guided primarily by the operating mode of the equipment; The price also depends on it:
- Occasional drilling/milling for yourself with the accuracy of what you get - cast plastic bed or stamped steel. The feed mechanism is lever with a cranked lever (see below). Carriage sliding bearings (see below) are steel on steel or with nylon liners. Prices are $20-$30.
- Regular drilling for yourself or to order with ordinary machine-building precision. The materials processed are up to the hardness and toughness of ordinary structural steel. Everything is the same, but the sliding bearings are steel on steel (worse) or with bronze bushings, and the frame is cast iron or (more expensive) composite, also vibration-absorbing. Prices: $30-$40.
- Regular drilling and milling of any materials that can be tooled with periodic overloads of the tool and/or with increased accuracy - plain bearings are only bronze on steel, cast iron frame. The feed mechanism is rack and pinion (see below); vibration-absorbing console. Prices: $60-$180.
Choosing a bed
The stand for the drill (which sellers for some reason stubbornly call stands) must be chosen not according to - not “China”); Now the market is full of “German China”, not to mention products from post-Soviet states. The design needs to be checked.
First, samples with plastic non-nylon liners for sliding bearings are definitely rejected: runout and drill drift of more than 0.5 mm will appear already on the 10th – 20th “hole” and will further increase. The second is console play. We take it by the far end, swing it up and down and to the sides while holding the latch. There should be no noticeable “chatter” (the tactile sense of an untrained person feels a beat of 0.4-0.5 mm).
Next is an inspection of the structure, see Fig. below. For regular drilling, the one shown in pos. 1. The ideal option is at pos. 2: collet clamp of the drill, shifting the column to the side reduces the vibration of the console by an order of magnitude, and by turning it sideways by 45 degrees, you can mill the part by hand with the precision “as best you can” on a standard fixed table, removing a couple of table fasteners, because in this case, its manual displacement relative to the horizontal working axis of the console will be linear.
How to choose a bed (stand) for a drill
And here is a sample for pos. 3 do not take under any circumstances. Firstly, the collar of its column is low and its fastening is unreliable. Secondly, longitudinal grooves under the table facilitate manual milling “as it happens,” but, unlike diagonal ones, they do not dampen vibrations of the bed. Moreover, they will concentrate where shown by the arrows (the tide under the column is made too narrow) and from there they will go straight into the column and table.
Popular articles Free Easter greetings
Which is cheaper?
Bench Drill Press Spindle Drawings
Let’s say the price for the machine you like doesn’t suit you. Or a drill, if it’s a “crowbar” one, with an impact mechanism, that was used in work on building structures and the beating of the chuck is visible to the eye. Then the first thing we do is find out if there is a craftsman within reach who owns a lathe with high precision (no rougher than 0.02 mm). Which, by the way, is not a fact - a high-precision machine is very expensive and never pays off with the flow of regular orders. But let's say he was found. We take the drawing in Fig. on the right, we go to him and ask if he can turn it out of steel no worse than 30KhGSA, and how much he will charge for the work. “This” is the drawings of the tabletop drill spindle. The rest of its parts can be turned on a regular machine, or found in ruins at an iron market or in your trash. Most likely, it will turn out that it is cheaper to buy a bed + table, and if you estimate the costs for the rest, then perhaps a drill of increased accuracy will emerge. There are some of these on sale; they can be recognized by the absence of a striking mechanism and a collar specifically for installation in the frame: a turned steel cuff is put on it.
Metal workbench for a mechanic
All useful homemade products and devices simplify the processing of workpieces. Such devices include a workbench for a mechanic. Its minimum dimensions are:
- length – 1800 mm;
- width – 700 mm;
- height – 900 mm.
The table is created in the following sequence:
- frame assembly;
- installation of 2 cabinets, covered with metal;
- securing a working surface consisting of a wooden base in the form of a shield, on which a sheet of metal of a suitable size is placed on top;
- assembly and installation of a rack at the back of the workbench to strengthen the entire structure and accommodate tools.
When assembling a bench, use:
- beams as racks - four corrugated pipes 40*60 mm with a wall thickness of at least 2 mm;
- three beams 50*40 mm to connect the racks and ensure longitudinal rigidity of the structure;
- corrugated pipe 40*30 mm with a wall of at least 1 mm in the amount of 9 pieces to create the frame of the cabinets;
- metal corner 50*50 mm for the manufacture of shelving racks, the height of which will be a maximum of 2000 mm;
- board 50 mm thick for the tabletop panel;
- a sheet of metal no thinner than 6 mm to cover the top surface of the workbench.
Sheet metal Source glavmetall.com
See also: Catalog of construction companies that have their own production of materials and components for the construction of houses
DIY garage press options
Homemade garage presses allow you to process various products and materials under pressure. Structurally, the equipment consists of cylinders. In the garage, such a machine is useful for straightening or fastening various elements, as well as for bending sheets of metal or pressing cardboard.
An example of a homemade press
For private use, a capacity of 10-15 tons is sufficient. Most often, a bottle jack is used with a provided hand pump, which acts as the main structural element.
Here are some interesting options for homemade garage presses:
Option made from scrap materials Rails will also come in handy Ready-made purchased model Convenient homemade press
Do-it-yourself press from a jack: drawings and manufacturing options
There are two ways to create a homemade press from a jack:
- fix the device on the base of the frame to apply upward pressure;
- installing a jack closer to the top of the bed to apply downward pressure.
Here are some helpful plans for creating your own home press:
A simple design option with dimensions With a description of the elements Detailed drawing of the future press Example of a finished device
To choose the right model and dimensions of the future press, you need to take into account several points related to the jack itself:
- its dimensions;
- the magnitude of the working stroke of the rod;
- table thickness;
- height of blanks for pressing.
Watch how to properly assemble a press from a jack with your own hands in the video:
Watch this video on YouTube
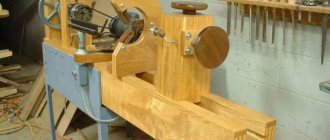
Wood lathe for lathe
There are various homemade machines and machines for the workshop. They all make the job easier. These include a lathe. Its structural elements are:
- Durable frame made of metal angle or pipe. Sometimes it is created from wooden blocks. The bed is fixed to the floor, and its lower part is weighted.
- A support, which is a supporting element for the cutters. This part of the machine must provide reliable fixation and allow the workpiece to move to the side. For this purpose, the design provides a screw rod.
- The clamping spindle, also called the headstock. The head of a powerful electric drill is often used as it.
The head of an electric drill is often used as a headstock. Source woodtoolsimg.ru
- Tailstock used for longitudinal movement of the workpiece. It is recommended to use the factory spindle, which has four cams.
- Electric drive providing rotation of 1500 rpm. Its power should be from 250 to 400 W. Often a washing machine motor is used as an electric motor. The design also includes a belt drive. This is a transmission, for the operation of which it is necessary to install pulleys on the shafts.
The electric motor of washing machines is often used as a drive for a lathe. Source dobro-teh.ru
Cutters for the machine
It is recommended to equip homemade devices with factory cutters. After all, they are sharpened with high quality using special equipment. As a last resort, for production use:
- old files without significant defects;
- steel square reinforcement is the optimal material for making cutters;
- square or rectangular spring from the car.
Subsequently, the existing workpieces are sharpened. Creates a semi-circular cutting edge for roughing wood parts. Finish turning work is carried out with a cutter that has a straight blade.
After sharpening, the cutting elements are hardened. During this process, the cutters are first heated and then placed in machine oil.
Wood boring tools for a lathe Source 24aul.ru
Assembling the device
The main problem that often arises during manufacturing is the components. A multifunctional machine requires attention and scrupulousness from the master. Experts in this field advise purchasing factory-made mechanisms and parts. They are made of tool steel and are quite durable and reliable in operation.
Combined multifunctional woodworking machine
If it is not possible to order factory products, you should use improvised means, for example, a mechanism from a chainsaw or circular saw. In this case, it is worth considering that the parts will not be as durable, and homemade units will not have a high degree of safety.
After all the parts and necessary materials have been prepared and the machine assembly diagram is clear, you must proceed directly to the process itself. According to the drawings, first the frame is assembled and strengthened. Then the motor and rotor are attached.
Any woodworking machine can help the owner in everyday life. Pre-assembled and correctly machined parts will make assembly very quick. After installing all the necessary structures, it is necessary to check the starting mechanism and engine operation. And only after this it is necessary to install the necessary cutting part and try the machine in operation.
If all the points were observed with precision and all the component parts were manufactured and secured correctly, then homemade woodworking machines will not be inferior in functionality to factory ones. All that remains is to follow safety precautions and work on the machine for your own pleasure.
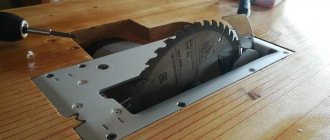
Stationary circulation saw
The stationary circular saw is placed on a sturdy table. Its working surface is usually made of metal sheet. It is reinforced with stiffening ribs. For their manufacture, a steel angle is used.
On the working surface there are usually:
- stops;
- guides;
- elements for adjustment;
- cutting disc.
On a note! The circular saw is powered by an electric motor. Its power should be approximately 800 W, and its rotation should be 1700 rpm. The electric motor of the angle grinder corresponds to these characteristics.
Angle grinder for a stationary circular saw Source tdrim.ru
Before making a device for sawing wooden parts, prepare a working angle grinder with the necessary characteristics. Further actions are performed in the following order:
- Assembling the frame.
- Prepare a worktop in which a slot is made for the cutting disc.
- Two wooden blocks are fastened in parallel. They will be used as stops.
- Set the scale necessary to control the cutting of wooden parts.
- Clamps are installed so that workpieces and guides can be fixed.
- The grinder is secured by first installing the disk into the previously created slot in the table top. The power tool is fixed from below the working surface.
Drilling machine
Interesting homemade products and devices often help craftsmen out when making various products in the workshop. One such device is a drilling machine. Its main parts include:
- electric drill;
- base made of metal parts with the ability to secure the workpiece;
- a stand for fixing an electric drill, which is created using chipboard with a thickness of 20 to 25 mm or an old photographic enlarger;
- a unit that supplies the drilling tool.
The drill press stand must have guide rails. They are necessary for the electric drill to move strictly in a vertical direction. There are different options for feeding an electric tool, but the most common design is a lever with a spring. It is manually controlled by simply pressing. The design of the machine also includes stops. They are needed to adjust the depth of the hole created in the part.
Optional equipment
A homemade woodworking machine requires the introduction of several parts, with the help of which the mechanism can repeat the maneuvers of an industrial unit. There are additional parts included in the housing.
Electrical wiring - the electrical power must be 380 V. The wiring must be done correctly, in compliance with all safety standards. The wires are secured so that there is no chance of getting into the engine or cutting mechanisms.
Protective covers are installed on all dangerous parts of the machine and are designed to protect body parts from damage if parts accidentally slip during processing. Most often they are made of tin or textolite.
CNC router
There are homemade machines and devices of complex design. Such devices include a CNC router. It is made for processing metal and wooden parts.
Work with a CNC router is carried out to a higher quality. This machine has advanced capabilities. When creating it, an LPT port is used, and numerical control is also provided. The copying unit is created from printer carriages with a matrix of needles.
The milling device is assembled as follows:
- The tabletop is made using a plywood sheet. Instead, chipboard with a thickness of at least 15 mm is used.
- A cutout is created to accommodate the cutter.
- The milling unit is installed.
- The electric drive is located.
- The transmission is secured.
- The spindle is mounted.
- The stops are fixed.
The process of creating a wood router Source tmklazer.rf
A CNC milling machine for processing metal workpieces is made with a more durable frame. The device is created in the following sequence:
- The column and frame are mounted when using a channel. From them a structure in the shape of the letter “P” is created. In it, the bridge between two supporting elements is formed by a part that is the base of the milling unit.
- Guides are made from angle iron. They are fixed with bolts on the column.
- Guide consoles are created from a pipe with a rectangular cross-section. To move them to a height of maximum 150 mm, the design provides a car jack.
- A threaded pin is inserted into the console.
- A working surface is created.
- A vice, fixing elements and guides are installed.
- The rotating unit is mounted. In this case, they strictly ensure that the shaft is in a vertical plane.
Selecting an Electric Powertrain
When choosing a motor to power the turning system, it is necessary to clarify how powerful it is. For the construction of a homemade self-heating unit, an indicator in the range of 1.2 - 2 kW is quite sufficient. In this case, you should find out exactly what scheme the connection is made according to.
For desktop woodworking, a motor from a household centrifuge is sufficient. Although he is not able to provide turning of a massive workpiece, he will definitely master the processing
- Miniature souvenirs;
- Kitchenware;
- Various types of furniture accessories.
Thicknesser
Crafts for the workshop are often created to perform woodworking. The material always has to be planed. It is to solve this problem that a surface planer is made. The machine consists of the following parts:
- The frame consists of two frame structures, which are welded from 40*40 mm corners. The frames are fastened with studs.
- Tabletop made of metal or lumber, pre-impregnated with drying oil. The working surface is bolted to the frame.
Bed with a steel tabletop for thickness planer Source prostanki.com
- A broach consisting of rubber rollers. They are taken from a broken washing machine. The rollers are provided with smooth rotation by sliding them onto bearings.
- A casing that protects rotating parts. It is made of sheet metal about 5 mm thick and fixed to a frame made of corners measuring 20*20 mm.
- Electric motor with a power of 6 kW, which can rotate at a speed of at least 3000 rpm.
Clamps are used to secure the thickness planer. The device is fixed on the working surface. Do not forget about the required gap, when setting it, take into account the thickness of the workpiece.
Device components
Parts that most often make up woodworking machines.
Bed (body, desktop)
The future structure will be attached to it. They are often made of steel or cast iron, that is, the structure must be quite heavy and stable for the machine to rest securely on it. All parts are held together by welding, which is more durable.
Sometimes assembly is carried out using bolts, but such fasteners have the ability to become loose, so in such cases you will have to regularly check and tighten the structure. Often the bed is additionally reinforced with cement - in this case the workplace will be stationary. But there are also designs with a movable table.
Shaft mechanism
Has three types:
- saw;
- knife;
- spindle.
A cutting mechanism is installed on the end of the shaft, and on the other side a drive in the form of a belt from the control unit. The shaft is located at the top of the work bed and is often 30 cm thick in circumference.
Cutting block
The part that will be directly responsible for wood processing. It varies depending on what operation needs to be performed. This is sometimes a circular knife, a milling cutter, a grinding or emery wheel, or a jigsaw knife.
Control block
The mechanism of operation of the machine, that is, the engine. He is responsible for work, adjusting the rotation speed of working parts. Special requirements are imposed on it: the power must be 1.5–3 kW, and the speed must be 1.5–2.5 thousand revolutions. The engine is mounted below the workbench.
Guide part
This is a moving bar, with the help of which the width and thickness of the parts to be cut are adjusted; manipulation helps to avoid wasting time on additional markings and creates a certain safety when holding wooden workpieces. Installed on the top of the frame with the ability to move and securely fasten.
Wood sanding machine
The design of such a machine has a cylinder on which sandpaper is placed. This unit rotates while processing the part. The assembly of a homemade machine is often performed for grinding cylindrical workpieces. A device is also made to create a flat surface of the workpiece.
When fixing the sanding paper, follow these rules:
- the width of the abrasive cloth should be approximately 250 mm;
- the sanding belt is connected without a gap exclusively end-to-end;
- The sandpaper is attached using a high-quality adhesive;
- at the edges of the shaft for the abrasive cloth there must be a side, the protrusion of which is from 2.5 to 4 mm;
- a rubber backing should be placed under the tape.
The shaft of the device is rotated by an electric motor. These two parts of the machine are connected by a belt drive. The design of the frame itself can have different designs. The option is chosen depending on the size of the workpieces being processed.
Device for polishing wooden parts Source notperfect.ru
Briefly about the main thing
Typically, craftsmen assemble machines for their workshops if the area of the room is at least 3 m2. Universal devices are manufactured or to perform a specific type of work. In addition to shelves and racks, in the workshop you can often find a workbench for carpentry work made of boards and bars, which is equipped with a vice.
Craftsmen also make a metal workbench from corrugated steel pipes, angles, and sheet metal. They also assemble a lathe on a metal frame, with a clamping spindle in the form of a drill head and an electric drive. Also popular in the workshop are a stationary circular saw based on a grinder, a drilling machine made from an electric drill, a surface planer made from an electric planer, and a CNC router.
Ratings 0
Selecting materials to create a device
Very often among home craftsmen there are those who try to make their own lathe from an electric drill.
The manufacturing process is not at all complicated, and to achieve the desired result you will need to take all the necessary materials to prepare them in advance. In the production of the machine, woodworking materials can be used, but you should be aware that with such devices you can only process small parts and workpieces, for example, make handles for knives, handles for furniture, etc. If you need a reliable sled that you plan to use very often, then it’s worth investing once and making it out of metal.