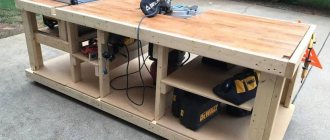
A CNC machine with different working fields can be made independently from plywood. This material is inexpensive, easy to work with, moreover, it has high strength and can withstand heavy loads. Products made from plywood are durable and practical. The work on creating a machine is carried out in several stages: first, drawings are made, then materials and tools are prepared, the necessary structural elements are cut out, assembled in the form of construction kits and the machines are set up.
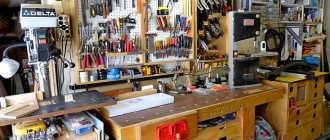
Each stage requires a careful approach. CNC machined plywood will allow you to process wood at home and create furniture from plywood. The finished machine can be seen in the photo. A plywood machine will work no worse than a factory product. The possibilities of such equipment are great.
Peculiarities
Experienced specialists have long known that homemade CNC machines made from plywood are in some cases not inferior to full-fledged factory-made metal analogues. Such structures are used, of course, only where there are no significant mechanical stresses, strong vibrations, heating and the need to remove heat with water.
The technical qualities of plywood devices may well be at a decent level. At the same time, the cost of such equipment is reasonable.
Attention: such systems are designed for private use only. A plywood machine is not useful as a full-fledged production workplace. Before doing it, you need to soberly assess your abilities and knowledge in the field of carpentry. In the absence of special skills and the ability to work with power tools, you will have to forget about making machines yourself.
In addition, you will have to carefully select the main construction material.
Grinding the disc
I attached the engine with a plywood disk to my workbench. I attach sandpaper to the block, turn on the engine and align the disc.
Design
Machines, even the least critical ones, cannot use sheets with a thickness of less than 0.6 cm. In any case, this applies to the supporting and load-bearing parts of the assembly. Sometimes an exception is made for housings and other light parts. However, even then you have to carefully weigh the pros and cons in order to give a correct assessment of the selected details. Mistakes in their selection can be fatal.
Some experts believe that a sheet with a thickness of 1 to 1.2 cm is quite enough for individual machines, for example, if we are talking about a cutting table.
Other experts proceed from the fact that parts of large thickness are always needed, even for minor sections of the structure. There is also an opinion that volumetric parts glued together from medium-thick plywood are more effective at damping harmful vibrations during occasional vibration. But real masters always give preference to considerations of reliability and safety. That is why they try to make maximum use of plywood sheets with a thickness of 19 mm or more, despite the heaviness and significant prices.
But you should not focus on just one thickness. The type of original wood must be taken into account. Coniferous wood is lighter and softer, it is used mainly for secondary nodes. Hardwood veneer is more expensive, but is still used more often.
But differences in the chemical composition of adhesives and the level of resistance to moisture practically do not matter; in most cases, FK grade plywood is quite sufficient.
What is much more significant is the veneer category. An increase in the number of knots threatens cracking and delamination. Experienced professionals try to take sheets of second grade and higher. You should not try to buy very cheap unsanded material. Bringing it to the required parameters in artisanal conditions is almost impossible.
Fully sanded workpieces are also easier to glue.
A 4-in-1 plywood machine can be considered as an optimal homemade sample. This design involves the use of a box measuring 54x32x88 cm and a table measuring 65x98 cm. The plywood for these parts is 10 and 18 mm thick, respectively. The cross-section of the disc grinding unit will normally be 18 cm.
To work on wood, you need a different apparatus, the types differ sharply, namely:
- sawing based on a hand-held circular saw;
- jigsaw;
- using a drill;
- universal model, suitable for hanging various devices.
Properties of plywood
Plywood is a very versatile material. It is sufficiently durable, easy to use, widely available and relatively inexpensive. That is why plywood is often used not only to make furniture or decorative items with your own hands, but also to make homemade machines.
Physical and mechanical characteristics and standard sizes of construction plywood of the FSF and FBS grades
Some machine parts can be perfectly replaced with parts made from plywood. For example, a plywood table is perfectly used for cutting material; casings and movable supports made of plywood have also proven themselves to be excellent in use. And these are not all the parts that can be made from plywood in order to make a machine with your own hands.
- When choosing a material, you should take into account the load the plywood and parts made from it are designed for. In most cases, when making a homemade machine, it is optimal to use medium-thick plywood.
- Thus, homemade machines are intended for use at home without changes in temperature and humidity. Thick is used if the machine or its elements, for example, a table for cutting material, require increased strength, then it is better to use a more durable one, with a thickness of 10 mm or more. However, when making any homemade machines, you should initially refuse to use thin plywood, because it is too fragile for such work and is unsuitable for use in the production of a homemade machine.
- When cutting parts up to 6 mm thick, you can use a manual or electric jigsaw. If there is a need to cut a thick sheet exceeding a thickness of 6 mm, a circular saw is used.
- When sawing plywood across the grain, special cuts are made with a knife in order to relieve tension on the wood.
How to cut out parts
Plywood parts are cut out by hand if their thickness does not exceed 4 mm. A hand jigsaw or tension saw is suitable for these purposes. Larger sheets, with a thickness of 6 mm or more, can be cut with an electric jigsaw; a circular saw will also work. Thin sheets (2 mm) can be worked with a knife.
The saw or jigsaw is moved slowly along the cut line; if it moves quickly, the edges of the product will be rough. When cutting out small parts, it is better to leave a spare space so as not to make a mistake with the size. Holes in plywood parts are made using a drill press or a drill bit; you can also use a drill.
The sawn product should be processed so that during operation the individual elements do not delaminate. Sanding is done using sandpaper. Movements begin from the corner edge of the plywood piece in the direction of the grain. The corners themselves are processed separately. The holes also require grinding, this is done with the same sandpaper. To increase the product’s resistance to temperature changes, the surfaces are treated with a primer. Upon completion of the work, the plywood is painted.
Homemade options
lathe using plywood To work, you will need, in addition to the material itself, the following elements:
- glue;
- circular saw and miter saw;
- pencil or marker, ruler (for marks);
- fixing clamps;
- bearings, paint, screws, screwdriver;
- metal plate, electric motor and pulley;
- a number of other details.
To form the base of the machine, 1.2 cm thick plywood is used. After cutting and gluing the workpieces, the edges are trimmed, and the grooves are used to install racks. The headstock is also made of plywood; it is necessary to drill a hole in it for the bearing. It is advisable to place some nuts and washers on glue.
The width of the platform and the guide part must match, and a well-made platform with clamps moves freely in two planes.
The production of tailstocks and frontstocks is no different. Both of them require special protection. The power drive must be mounted on a board connected to the base using a loop. To make a spindle, you need to weld two nuts in a washer, and then make “teeth” in the nut. The machine must be painted.
Of course, you can also make a drilling machine from plywood. Since it is usually designed for relatively small workpieces, plywood sheets 1 cm thick can be used. All parts must be fitted as tightly as possible so that there are no visually noticeable breaks.
Important: sheet material does not tolerate rough mechanical influences well, so joining parts with nails and self-tapping screws would be a bad idea; you can only use tenons and grooves, and sometimes PVA glue for maximum hardening.
If you plan to drill other plywood pieces using a plywood machine, you need to provide space for backing another sheet. Otherwise, the processed products may crack and even split. Painting drilling equipment is not very justified. They are subjected to very intense vibration, thermal and mechanical influences.
But applying a primer is very useful, especially in workshops without heating.
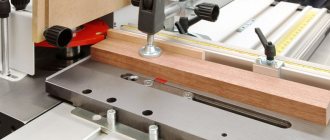
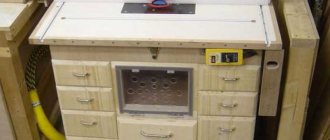
It is also possible to assemble CNC milling or woodworking machines. The trajectory of the processing part (as in other types) is calculated along three axes. If there is not enough space in the workshop, you can use universal stands designed for a wide range of tools. Typically the working field is 60x90 cm with a vertical stroke of 25 cm.
But if you do a little less, then no problems usually arise.
There are two main schemes for constructing any homemade plywood machines. In one version, the table moves, but the portal remains motionless, in the second, the roles change. The first method simplifies the design, but is only suitable for very small desktops. Therefore, in practice, the approach of moving the portal and immobilizing the table is much more often used. But in the second scheme there may be private options.
First of all, they relate to the use of a single central or two lateral drives.
The 2-drive option is suitable for relatively bulky designs. It allows you to minimize the risk of the portal warping relative to the guides. Moreover, the entire assembly has excellent rigidity. The size of the treated area is determined by the tasks to be solved.
The larger the machine, the more expensive it is, and besides, on small models it is easier to correct mistakes.
It is often believed that the geometry of the portal, the proportions of the distance between the axes and working guides, the gaps between bearings can only be calculated taking into account strength of materials and precision mechanics. This is largely true, but the basic points are accessible even to non-specialists, namely:
- reducing the gap above the table increases the rigidity of the structure;
- the axles should also be made stiffer and not too long;
- If possible, the gap between the X-axis guides should be increased to reduce abnormal twisting;
- the center of gravity of the portal must correspond to the location of the cutter and at the same time be between the Y-axis bearings (because of this, the vertical posts often bend backward);
- it is required to use only ball screw drive screws that give the least backlash;
- the screw must be equipped with a pair of independent bearings and connected to the motor through a flexible coupling (then a balance of simplicity and quality is achieved)
- All key parts can be assembled on box tenons (this is much more aesthetically pleasing than nuts sticking out in all directions).
How to do it yourself?
There is no particular need to look for ready-made drawings. You can start from the diagrams of metal machines. Still, each such product is unique and optimized for specific tasks and the personal needs of the owners. However, it is necessary to pay attention to exemplary photographs. Plywood saws can only be done properly using quality power tools. If sheets up to 1 cm thick are cut with a jigsaw, then thicker ones are usually processed with a circular or circular saw.
However, advanced jigsaws can also cope with cutting plywood sheets up to 2 cm thick.
A hand cutter will help you select grooves and holes. You need to move the tools smoothly to minimize chipping. The same can be achieved using simple tape. After final assembly, all surfaces and edges must be sanded. As a primer, you can use a mixture of water and PVA in equal parts.
Blueprints
At the initial stage of the work process, drawings are made. The drawings may differ from each other depending on what type of program-controlled equipment was selected and what working field is provided. When creating a drawing for a future machine, focus on the following factors:
- which parts will need to be made independently and which ones to buy ready-made;
- what thickness of plywood is required;
- how the details will be recorded.
Elements of simple form are made independently. Such parts include: frame, table top, holders, casing, support and some others. More complex elements are purchased ready-made. People who do not have experience in creating drawings can find ready-made drawings; they can be found in various sources, for example, on the Internet. There are also drawings of furniture and diagrams of other plywood products.
Desktop
machine layout
Creating a wood lathe for your home workshop
Technical parameters of the corresponding products along with descriptions can be found on the Internet.
The main part is the bed (1). Other parts of the product are attached to it. It ensures not only the integrity of the power frame, but also good stability on the surface. The carpentry machine is designed for processing relatively light workpieces, so this part can be made from hardwood.
In the central part there is a support with a stand for a hand cutter (2). Instead, a holder can be installed to rigidly fix the tool. The workpiece is secured between the front (3) and (4) . It rotates using an electric motor (6). To change the torque on the axis in this design, a belt drive and pulley (5) are used. The support and tailstock move horizontally along a special shaft (7), which is installed inside the frame.
IMPORTANT! THESE DRAWINGS CAN BE USED FOR THE MANUFACTURE OF AN OPERATING MACHINE. PLEASE NOTE THAT ALL DIMENSIONS HERE ARE IN INCHES.
This project can be used to make a wood lathe with your own hands. You just need to supplement it with a special device, which is designed to consistently create identical products.
To secure it in the right place, you need to make a special stand. In this example, 10 mm plywood was used, from which a platform with dimensions of 480×180 mm was cut out. The given dimensions can be changed taking into account the actual parameters of the cutter. Holes in the plywood are cut so that mounting bolts and tools can pass through them. For rigid fixation, wooden blocks are secured along the contour of the platform with screws.
This design attracts with its simplicity, availability of components, and reasonable cost. But some disadvantages should be noted:
- You will have to use two hands to move the cutter. This is necessary to create sufficient force and prevent jamming.
- The minimum radius along which bends of parts will be created is limited by the diameter of the tool (cutter).
- To process workpieces made from different types of wood, precise adjustment of the shaft rotation speed is necessary, but in this example this possibility is not provided.
- This example explains that even a design that has been tested by time and practical experience can be improved upon careful study of the equipment and technological process.
Homemade wood lathe made from plywood
A 15-year-old homemade craftsman made a machine from scrap. For production, the master used the following
Tools and materials:
- -Plywood;
- -Glue;
- -A circular saw;
- -Pencil;
- -Ruler;
- -Clamps;
- -Miter saw;
- -Drilling machine;
- -Screwdriver;
- -Band saw machine;
- -Bolts with nuts and washers;
- -Bearings;
- -Screws;
- -Metal plate;
- -Electric motor;
- -Pulley;
- -Thumb screw;
- -Electric drill rotor with chuck;
- -A loop;
- -Dye;
- -Brush;
- - Metal cone;
- -Belt;
Step one: foundation
- The base of the machine is made of 12 mm plywood. Cuts three plywood rectangles. Glues them together. The edge is trimmed.
- It makes two parallel grooves along the entire length of the base.
- Plywood posts must be inserted into these grooves along their entire length. A guide will be installed on top of them. Cuts off two posts.
- Cuts two pieces for the guide. Glues them together. The end parts are cut at an angle of 20°. Makes two grooves on the guide.
Glues the base.
Step two: headstock
The headstock is made from plywood. Cuts two rectangular pieces of plywood. Cuts out their upper part in a semicircle. Drills a hole for the bearing. Installs the bearing into the hole using glue.
Cuts three plywood squares. Glues them together. Two parts of the headstock will be attached to the sides of this square.
Step Three: Lower Headstock
Cuts two rectangular blanks (clamps). The end parts of the blanks are cut at an angle of 20°. A groove is made in the middle of the blanks. Makes two holes in the groove for installing a nut and washer and through holes for the bolt. The nut and washer are glued with glue. A metal strip is screwed into the groove of the clamps. Makes a platform according to the width of the guide. Screws clamps to the platform on both sides. the platform with clamps moves freely along the guide. To fix it, just tighten the bolts on the clamps. the metal plate is pressed against the guide and the platform is fixed.
Step Four: Headstock Assembly
- Two parts with bearings are screwed to the block.
- Screws the headstock to the platform.
- Installs the pulley.
Step five: making the tailstock and tool rest
- The principle of manufacturing the tailstock is the same as the front one. The master uses a rotor with a drill chuck as a quill.
- The handicraft is made by the craftsman from plywood with a metal corner inserted in the upper part.
- Step six: motor, headstock protection, spindle
- The engine is mounted on a plywood board connected to the base with a loop.
Installs protection on the tailstock and headstock.
The master made the spindle by welding two nuts and a washer. Then I made “teeth” in the nuts.
Step seven: coloring
Paints machine parts.
Assembling the base
I cut out a base from plywood on which I install the engine mount. I use glue and self-tapping screws, having previously drilled holes for them with a thin drill.
Features of a DIY wood sanding machine
After cutting the wood, it must be sanded and only then proceed to the construction of buildings or the construction of other objects. There are several types of grinding machines:
- Disk. The working surface is made in the form of a circle, onto which sandpaper or another sanding device is fixed on top. You can adjust the processing speed without changing the speed.
- Tape. A continuous strip of sandpaper is stretched between the two shafts. It’s not difficult to make belt sanding machines with your own hands; just prepare a detailed drawing and read the instructions. It is important that the sandpaper in the working surface does not bend under the weight of the workpiece.
- Drum sanders for wood are common among woodworkers. Used for horizontal leveling of planes using the jointer method. The principle of operation is to attach the sandpaper to one or two drums, and under them there is a table with height adjustment. You can set the required calibration and make workpieces of the same thickness.
- Calibrating and grinding machines for wood are universal machines that combine grinding and leveling of workpieces. Two types of equipment are used: disk and tape. You can make such a device yourself, with the right choice of drawings.
To correctly assemble the appropriate version of the machine for grinding and processing wood, select the appropriate drawing and all components. Below are some examples of accessible and convenient equipment schemes:
Selecting tools and materials
Tools:
- Table saw.
- Band-saw.
- Awl.
- Forstner drills in different sizes.
- Grinding wheels.
- Stationery knife.
- Drill.
- Clamps.
- Jigsaw.
- Angle grinder.
- Protractor.
- Vise.
Materials:
- Thick plywood.
- Switch.
- Melamine.
- Sandpaper.
- Nuts and bolts of different sizes.
- Aluminum can (for gaskets).
- Glue.
- Hardwood cuttings.
- Dowel pins.
- Putty.
- Metal rod.
- Aerosol paint blue.
- Rubber feet.
Features of do-it-yourself wood jointing machines
A jointing machine for working with wood is used at the final stage of working with elements. It can make the surface perfectly smooth and even. Most purchased models are equipped with a thicknesser, which allows you to make the thickness of the entire workpiece the same along its length.
A wood planing machine for the home, both homemade and purchased, includes several elements in its design:
- bed;
- planing shaft;
- table regulator;
- motor.
To assemble a jointer with your own hands, you first need to decide on the dimensions and prepare a detailed drawing. Here are some examples from “homemade” ones:
To create the simplest jointer, without additional functions, follow the following sequence of actions:
- Prepare all the parts and tools for work, as well as a drawn drawing.
- You make blanks to exact dimensions. Please note that the place for installing the bearings is prepared from several elements.
- Prepare a place for installation for the selected motor. You can attach the unit to a skid.
- Assemble the rotor with bearings and install it in place according to the diagram. In this case, you immediately connect the engine using a belt drive. The rotor should rotate freely.
- Assemble the work surface from two parts: supply and receiving. The second is slightly higher (2-5 mm). For arrangement, you can use multilayer plywood or sheets of metal.
Errors and shortcomings that you may encounter
- During the process of assembling a machine, you may encounter a number of problems, so I recommend that before you start ordering and understanding what you need to look for, decide on the dimensions of the machine and the dimensions of the products that you will process. So, mistake number one is that a drawing of the machine is not created with the smallest details, from every screw to every wire.
- The next mistake is the incorrect selection of the spindle and frequency drive, so be careful.
- And of course, errors that arise due to lack of experience, here we can advise you to think through the drawing more carefully and be guided by the proverb “The one who walks can master the road.”
Any chosen option for creating a homemade woodworking machine will be cheaper than buying ready-made equipment on a specialized market. Moreover, you can assemble a suitable model from improvised devices, improving them.
Cutting a routing slot to disconnect the disk
Using a router, I cut a slot in the faceplate to provide access to the set screw on the rim hub.