The key specificity of the scheme for drying wood in a vacuum is considered to be a reduction in the time required to complete the operation provided, while maintaining absolutely all the properties of the final lumber product, and in some cases, including increasing resistance to certain operating conditions. The formation of a rarefied atmosphere in the internal size of the working chamber, in which moisture is removed from the wood, completely changes the physical properties of the heat treatment and drying process. The typical degree of vacuum at which thermal drying of wood is carried out is 0.95 mPa, and the speed of the agent of the released steam does not exceed 0.3 m3/s. Under such forcedly developed circumstances, there is absolutely no need to assemble fans, thermometers and moisture level regulators. The progress of the drying process is controlled by special sensors that set the level of readiness for the released moisture based on its number per 1 m3.
Should I buy a drying chamber or build it myself?
Buying a wood drying chamber or building it yourself depends on your goals and, of course, your skills. If you do it for yourself and for small volumes, you can build a dryer yourself. But if we are talking about industrial scale and serious production, then here I am categorically against amateur performance. It's better to buy and not suffer.
Fire in the drying chamber
3,000,000 rub. - this is the price that the owner of the production where I worked paid for my carelessness and desire to earn extra money. And it was like this. In 2004 I got a job at a small production facility on the outskirts of Moscow, in addition to producing various products for gardeners (I worked in the production of gazebos and benches), the company tried to provide wood drying services to third-party organizations.
The lumber dryer immediately seemed strange to me, but I only found out later that it was homemade. Some Uzbek unloaded and loaded wood materials there, and no one was particularly involved in maintenance. The fans were used without reverse, but that's not so bad. Some parts of the metal elements were not grounded at all. In addition, add improper maintenance - there is a half-centimeter layer of dust on the heaters. I am generally silent about the presence of proper ventilation. So, one fine day I come to work, and my place of work is on fire, or rather not exactly it, but the drying chamber itself and the wood warehouse nearby.
Unfortunately, not only part of the company’s own property burned down, but also the customer’s wood drying material. And what was inside, and what was stored outside. I remember some strange people came to sort things out, apparently the customer was not an easy one. I didn’t interfere much in this story so as not to irritate the boss once again, I limited myself to only once saying that I warned him and pointed out the shortcomings... but the man himself is inherently impenetrable and stubborn. I think even this incident taught him little. I worked there for about another month and left.
But let's get to the point. In general, you can make a drying chamber yourself without even fearing that it will burn out, if you do everything correctly. To do this, you need to read at least the book “Drying Wood” by Peich/Tsarev, or even better by Krechetov. After all, there are actually many nuances that need to be taken into account. Even the storage of wood requires compliance with certain rules, which are set out in SNiP 03/21/2003 “Warehouses of forest materials”.
What to consider:
- Wall material.
- Gate tightness.
- Wood loading method.
- Type and location of fans.
- Coolant and humidification system.
- Humidity sensors and psychrometer.
This is the most basic thing and I haven’t mentioned it yet about automation; automatic or semi-automatic for a drying chamber is generally the topic of a separate article, we will touch on it later.
A very common mistake with homemade ones is that drops of water get on the humidity sensor when sprayed. As a result, the humidity readings suffer and incorrect data is sent to the automation.
It is also worth remembering that fan drive motors operate in an environment of high temperature and humidity, and this requires special requirements for these devices and sometimes poses a problem in terms of their trouble-free operation.
My homemade drying chamber
I have a 4 cubic meter wood dryer in my workshop for my personal needs. Its price is very low, because I made and assembled it with my own hands. I didn’t bother with automation, it’s a complex and expensive process, I just split the supply and exhaust ventilation into 8 parts and monitor the humidity and temperature, depending on the indicators I open and close them. At the design stage, it is very important to provide for the geometry of the chamber, the power of the boiler and fans; all these components depend on each other. I advise you to make the total area of the ventilation ducts less than the calculated one in order to prevent a situation when the humidity in the chamber becomes less than the required value.
I don’t see the point in giving a diagram and details of the design of my homemade drying chamber, because... and it’s not perfect, I did it many years ago, there’s a lot that can be improved, but there’s not enough time. I’m used to it, I already know what and how much to dry, when to open and close the ventilation channels, so I don’t really need automation. But for the convenience of the process, of course, it’s better with automation.
It takes about a week for me to dry summer-cut coniferous trees; birch can take two weeks to dry.
Some people wonder whether it is possible to build something independently within the brick walls of an existing building. Of course you can, why should good things go to waste? If you have a building and don’t know where to “attach” it, you can build a convective type chamber for drying wood in it. Moreover, walls made of brick are more durable than walls made of metal.
DIY vacuum dryer: for wood at home
Hello dear readers and subscribers of Andrey Noak's Blog! Do you know what is most important about wood materials? This is high quality drying. Each enterprise uses a special drying technology. But if you want to dry the material yourself, then I will tell you how to make a vacuum dryer with your own hands. But first, a little theory.
Wood is a hygroscopic material, this is due to the fact that wood absorbs water evaporation from the air. Each wood material has varying degrees of moisture content, depending on storage conditions and the environment.
Why dry wood?
Drying is the process of removing moisture from a material through evaporation. When a tree grows, its metabolism is carried out by the circulation of moisture through the trunk. When cutting, the circulation stops and the moisture begins to evaporate. In order to build a house or make any wooden product, you need to properly dry the logs.
Purchased vacuum dryer
Well-dried material is protected from fungi, damage and cracks, and its service life will significantly increase.
If the drying was of high quality, then the product will serve you for many years.
Wood is divided into categories depending on the degree of moisture:
- wet is considered to be one that has been in water and its humidity is one hundred percent;
- freshly cut, with humidity ranging from 50 to 100%;
- air-dry, in cases where the material has been exposed to air for a long time. The moisture content of such wood is approximately 15-20%;
- room-dry, with humidity 8-12%
- absolutely dry, the humidity of which is exactly 0.
Wet material will be difficult to process, but is flexible and elastic.
Properties of dry wood
Dry material has greater biological resistance. After drying, strength increases and withstands load better. It is easy to process, and the products do not crack after processing, unlike raw wood, in which the process of rotting may even begin under suitable conditions.
Ancient drying methods
A long time ago, people used only wood to build houses. In houses you can find wooden utensils. Therefore, it was necessary to come up with ways to properly dry logs as the main building material. At that time, people used several drying methods.
Wood evaporation
For this method, they took the necessary piece of wood, water and sawdust. The water was heated to 70 degrees, the workpiece was placed in it, then it was covered with sawdust and left for a certain time so that the material was steamed.
After drying, the workpiece did not crack, and the structure became denser and more flexible.
Waxing
Paraffinization is another method that has been widely used for a very long time. Here, wooden blanks were dipped into paraffin heated to 40 degrees and left for several hours. It was important to maintain the same temperature of the substance.
After the procedure, the wood must dry for several days. The properties of the material change after drying. The workpiece does not crack, does not rot, and acquires an original tinted shade.
Craftsmen used this drying method to make wooden utensils, and then skillfully painted the finished product.
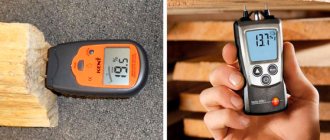
Wood moisture content, measurement methods
There are many ways to determine humidity. To accurately determine the moisture content of wood, special instruments are used. Electric moisture meters are capable of determining humidity with an accuracy of 2-3%. The basic principle of such devices is based on the fact that wood of different moisture content has different electrical resistance.
There are many more “folk” ways to determine humidity, but only professionals use them:
- By weight, weighing identical pieces of wood of the same species in hand or on scales one by one.
- Experienced specialists determine humidity “by eye”, by the presence of cracks and breaks.
- According to the shavings. When processing lumber, small shavings are compressed in a fist. If it wrinkles easily, then the material is wet. Dry wood is indicated by the fragility of the chips, but if the chips crumble, then most likely the wood has been overdried.
- By cutting. If, when processing wood with a chisel, a wet mark is noted, and the material is easily and smoothly cut, then it is not dried. It is better not to carve on such a surface, as cracks and flaws will appear when it dries.
Assembling a vacuum dryer at home
It is very profitable to dry the wood yourself, and if you do this using a vacuum dryer, the drying time will be reduced significantly. But buying vacuum drying from factories is quite expensive, and I will tell you how you can make it yourself, and also save on it.
Drying at home takes place in special chambers. To set it up, you will need a large room, a heat source, and a fan to distribute the heat inside the structure.
The floor, walls and ceiling of such drying must be very strong; reinforced concrete or an iron conveyor is best. If you take a cheap used iron conveyor, for example from a railway, then this will even be a very cheap option. Or, for example, to reduce the cost, you can weld the conveyor yourself from old iron.
To preserve heat inside the chamber, we reinforce the walls with foam plastic and line them with clapboard. Instead of polystyrene foam, you can use mineral wool or other insulation.
To reflect heat, you need to lay a special material. You can use foil, but penofol will also work, especially since its heat-reflecting and preserving qualities are much better.
We proceed to installing the heating device. The entire heating system must be installed separately from other heating circuits and must be constantly running.
You can use a heating radiator, with which the water is heated to 65-90 degrees. In order for the heat in the chamber to be equally distributed, a fan is required, otherwise there will be uneven drying of the raw materials and, accordingly, low quality.
One more point, the temperature in the chamber should change smoothly and gradually.
When building your own drying facility, you must comply with all fire safety rules.
An important point is the construction of a system for loading lumber into the chamber. You will be loading large and fairly heavy boards. Carts running on rails or a forklift work well for this.
The material inside is placed on shelves or simply on the floor. To control the drying process you must install special sensors, and these are thermocouples and vacuum (pressure) sensors.
If you do everything correctly, you can get very high-quality wood with a good presentation.
The main point in the construction of a dryer is to achieve the necessary parameters inside the chamber, and the materials and equipment that were used do not matter. In your chamber you can reduce the drying process of raw materials to 2 weeks.
How does vacuum drying work?
After you have placed the material in the drying chamber and closed the door tightly, you can begin drying. Air is extracted from the chamber to create a vacuum of about 9 - 10 bar. It is known that when pressure decreases, water boils faster.
Thanks to this technology, bound and free moisture will move evenly from the center to the periphery, thereby ensuring high-quality and uniform drying of the material, regardless of location.
Dry top wood cells will absorb moisture from those located in the core. First, thin places dry out, then moisture from thicker layers moves to the dry ones, thereby moisturizing them. If this process is interrupted, the material may collapse as thinner layers begin to shift.
Coating the ends of thick lumber to prevent the rapid release of moisture and the formation of cracks during drying...
To prevent displacement, lumber is treated with a special mixture made from chalk and drying oil. Often the end parts of workpieces need to be processed.
Drying excludes the use of humidification systems, and thermometers should not be installed in the chambers. The process can be controlled using special sensors, which are controlled externally, often in a separate vestibule.
Very often, vacuum installations are used for drying expensive species such as oak, merbau, padauk, wenge, and zebrawood. It is very convenient, since the wood is practically not destroyed when dried.
My help
I have the opportunity to provide advice on drying technology, selection of new and used equipment. You can contact me through SUPPORT.
My new book was recently published, which provides recommendations on the operation of drying systems in production. The information given in the book is simply unique, you definitely won’t find it anywhere else. More information about the book can be found in the “MY BOOKS” section.
Good luck and see you again!
vacuum dryer
Pros and cons of different types of wood drying kilns
There are many manufacturers of lumber drying kilns in Russia. There are several types of chambers produced, each with its own advantages and disadvantages, each type has its own method of drying wood. All drying methods have one principle: evaporation of moisture from inside the wood.
When talking about the quality of drying, first of all, they look at such parameters as drying time, tension and the difference in humidity inside the material.
Convection drying chambers for wood
Let's start with the most common type of camera. They are the ones that are used everywhere. Of course, I worked with them the most. The technology consists of evaporating moisture from wood by blowing hot air. The air is heated by heaters, and the required flow is created by powerful fans. The convection drying chamber allows you to steam the wood to relieve excess stress.
Environmental parameters are measured by a psychrometer, and everything is controlled automatically. Drying consists of several stages and at each of them the state of the board in terms of humidity and voltage is different. During the process of blowing hot air, the top layer of the board dries out, and closer to the core the moisture does not have time to evaporate, resulting in internal stress that threatens the appearance of cracks. This is where the moisture treatment stage comes to the rescue, after which the tension is relieved and the hot air drying process continues. If all stages are completed correctly, the result will be a board in which the moisture is evenly distributed.
But chamber is different and the quality of drying depends on the manufacturer. In properly designed convection chambers, the drying process subsequently relieves the stress in the board almost completely, as a result of which cracking of the material can be avoided.
Advantages of a convection chamber:
- large chamber capacity - up to 1000 cubic meters;
- fine-tuning and control of the entire process, the ability to change parameters at different stages of drying;
- low production costs;
Disadvantages of a convection chamber:
- requires trained personnel for maintenance;
- not the fastest drying method;
Condensation dryers for wood
Their difference from convective ones is that the moisture released from the wood into the air condenses on special coolers and then the dried air repeats its closed cycle of blowing lumber.
Freon gas is used as a coolant, and the temperature inside the chamber usually does not exceed 45 degrees. This results in a long drying cycle. The drying process in condensation chambers can take place either with or without air humidification. Humidification is carried out after the first stage of drying to relieve stress from the top layer of the board.
If the manufacturer does not provide humidification in the condensation drying chamber, then there must be an inverter on the motors that can slow down the air speed so that the moisture smoothly leaves the wood. Otherwise, cracking of the material cannot be avoided.
The condensation drying method is well suited for thick and/or dense wood species - oak, ash. But for carpentry production, this drying method is still not entirely suitable.
Pros of a condensation dryer:
- low energy consumption;
- the wood does not warp;
Cons of a condenser dryer:
- long drying process (an order of magnitude longer than in convection chambers);
- drying quality is not the best;
- additional costs due to the use of freon;
- the likelihood of wood being damaged by fungus (due to the lack of sterilization due to low temperatures in the chamber).
Aerodynamic drying chambers for wood
Such cameras are the simplest in design; they are a metal box with a fan. The air is heated by the operation of the fan itself (when the rotor rotates, mechanical energy is converted into thermal energy), the operation of which stops when the specified humidity in the chamber is reached. This lumber dryer is the easiest to assemble, but it has significant disadvantages, which is why I would not recommend using it.
But the whole point is that hot air blowing on wet lumber dries it first closer to the surface, and the inner layers remain wet, as a result of which tension arises in it due to the difference in humidity in the layers. Such a board cannot be used in carpentry in any way, because... After trying to dry it thoroughly, it begins to burst.
In general, the problem of tension inside the board concerns any board drying technology, but with the aerodynamic method it is most clearly expressed.
Advantages of an aerodynamic drying chamber:
- simplicity and low cost of installation (connected to a three-phase network and it works);
- high drying intensity;
- the cost of the dryer is low (except for the costs of subsequent operation);
Disadvantages of an aerodynamic drying chamber:
- poor drying quality;
- high energy costs;
Infrared wood drying
A distinctive feature of this method is that it is not necessary to build a special chamber. So-called IR cassettes are used. They are located between layers of lumber and are exposed to infrared rays, evaporating moisture. In summer you can dry it in the open air, hiding it from the rain.
I dealt with such dryers in my workshop, I like to test various innovations. In principle, the result was satisfactory, but in the end I gave up and use my own drying chamber, which I wrote about above. For industrial scale, of course, this option is not considered, but for special cases you can buy yourself IR cassettes.
Advantages of infrared wood drying:
- compactness and autonomy;
- ease of assembly;
- consumes little electricity;
Disadvantages of infrared wood drying:
- used for small volumes - up to 5 cubic meters;
- it is difficult to control drying parameters;
Microwave drying chambers for wood
The principle of operation is similar to a conventional microwave oven in the kitchen, only the scale is different. The effect of high-frequency radiation on wood is a very delicate thing and the drying process does not cause any particular harm to the material; the desired effect is achieved quite quickly (in terms of drying).
However, microwave drying chambers are quite rare; I have not worked with them myself. This is due to the high cost of maintenance. Failure of the magnetron generator will entail considerable costs, so few people undertake to deal with such cameras.
Advantages of a microwave drying chamber:
- high quality of drying and speed of the process;
- relatively low energy consumption.
Disadvantages of a microwave drying chamber:
- low chamber capacity - up to 7 cubic meters;
- it is difficult to control the drying process;
- high cost of magnetron generators.
Vacuum drying chambers for wood
Vacuum dryers for wood are usually completely sealed, they create a reduced pressure and the temperature inside the chamber usually does not exceed 65 degrees. Everyone knows from physics school that the lower the pressure, the lower the boiling point of water. This principle helps to influence the moisture inside the lumber at lower temperatures, achieving the desired effect.
Reducing the temperature helps reduce heat loss in the vacuum chamber and minimizes discoloration of the board. Design features depend on the specific manufacturer. For example, Italian WDE Maspell vacuum drying chambers use water heaters, while Russian manufacturers more often use electric heating elements (at least, I came across them more often).
A feature of vacuum drying of wood is that the temperature of the board is higher than the saturation temperature (boiling point) of water vapor. And this speeds up all the processes occurring inside the board and drying occurs faster. At the same time, the technology allows you not to resort to aggressive external exposure to high temperatures.
But it is worth understanding that the defect-free nature of dried wood is determined not only by the drying method and type of chamber, but also by the technological modes incorporated into a specific design by the manufacturer and the correct operation of the automation.
Despite the milder effect of vacuum drying wood, the possibility of cracking the board always exists, because wood has many different types of stress. These stresses depend on the area where the tree grows, its age and cutting method.
As for the timing, I dried a 50 mm thick pine board in a vacuum chamber from 50% to 5% humidity in about a week.
Advantages of vacuum drying chambers:
- good drying quality;
- high drying speed.
Disadvantages of vacuum drying chambers:
- small loading volume – up to 10 cubic meters;
- high cost of equipment.
How does vacuum drying of wood occur?
Injecting a vacuum inside the chamber where timber is dried significantly changes the physical nature of heat and mass transfer processes in wood. Drying is carried out by the action of a constant vacuum of 0.95 MPa and steam generated from the moisture of the timber. Since there is a natural movement of the drying agent at a speed of up to 0.3 m/sec, there is no need to use fans, lumber humidification systems, or install a dry/wet thermometer. Drying is controlled by lumber moisture sensors. For example, during the drying of oak lumber from an initial moisture level of 65% to a residual moisture level of 6%, about 450 liters of moisture are released. If you load a maximum of 12 m3 of oak with a thickness of 55 mm into the chamber, the total amount of moisture will reach 5,400 liters.
Today, all companies producing vacuum drying chambers have certificates of compliance with European standards. In such devices you can dry different types of wood at the same time.
Drying quality:
- the residual level of importance is from 6 to 0.5%
- the difference in humidity level across the stack does not exceed 1%
- The difference in humidity level along the thickness and length of the board does not exceed 0.9%.
The importance of automation in the drying chamber
Drying lumber is a technologically complex process. Modern drying chambers for wood automate the process as much as possible. But a machine cannot replace a person 100% and the latter’s participation is still required.
Any mistake made at one of the many stages of drying can lead to irreparable consequences. Usually, marriage is visible when nothing can be fixed. Therefore, the choice of drying unit and manufacturer must be approached carefully.
Automation can eliminate many problems, so this component is very important, especially when it comes to industrial scale.
What you should pay attention to when choosing a wood dryer:
- Automatic control with the ability to set board drying modes and save new templates (creating your own custom programs);
- The ability to intervene in a given drying process and change the process “on the fly”;
- The presence of a digital display on which important indicators are visible (humidity, temperature, etc.);
- Recording the chamber drying process with saving all measured parameters with subsequent output in the form of graphs, etc. (for subsequent analysis);
- Automation should exclude the adoption of “harmful” decisions: for example, humidifying the chamber when the curtains of the supply and exhaust ventilation are open;
- Possibility of remote control;
- Light indication and sound messages about equipment malfunctions.
As a result of proper operation of the automation, an optimal environment should be maintained in the chamber at all stages of drying. Depending on the instrument readings, the temperature, humidity and air conditioning level inside the chamber should change at the right time. All these points affect the quality of dried wood.
When does it make sense to install automation for the drying chamber? Of course, if the camera has a small loading volume - up to 20 cubic meters. meters there is no point in installing automation, because it just won't pay for itself. For small cameras there is an option called semi-automatic.
Mini dryer for wood – All about timber and woodworking
If you have a large volume of unprepared wood that needs to be dried soon, you need to get a special dryer to carry out the initial processing of the material.
This is a mandatory procedure during construction and finishing work, since if the material is damp, problems will arise with its installation, and other construction defects will appear in the future.
You will learn how to make a board dryer with your own hands from this article.
A little theory
Before you start making such a structure, you need to find out why you need to dry the wood. From the name it is clear that the design is designed to get rid of excess moisture from wood, however, you need to dwell on some theoretical points.
Wood moisture content
Wood moisture is divided into two groups:
- Free, that is, located in cell cavities and intercellular space. This moisture group is determined by the conditions in which a particular tree grew, as well as by how the cut wood was stored. During drying, such moisture evaporates quite quickly.
- Bound or structural moisture is the name given to the liquid that is part of the cell walls of a tree. The amount of structural moisture depends on the type of wood - this means that the length of drying can vary: trees, depending on the type, can get rid of bound liquid for several months or several years.
Important! Typically, wood is saturated with moisture by no more than 30%. Rocks with a high moisture content are called “gray” and are usually not used in construction.
Why is drying needed?
Before you make a wood drying chamber with your own hands, you need to decide what it is needed for. Let's do a little analysis and answer this question:
- When moisture is removed naturally, the configuration of the wood fibers changes, which is why the dimensions of the board are reduced.
- At the same time, the board loses excess moisture unevenly, which is why deformation occurs on completely different planes and at different speeds.
- Due to uneven “drying” inside the workpiece, so-called stress lines are formed, giving rise to cracks.
Important! Usually the board cracks along the grain, starting from the end. This happens because in these places the connections between the longitudinal fibers are somewhat weaker.
- Another problem is the transverse deformation of the board - the part takes on a completely unusual shape, bending like an arc or a “propeller”. This is due to the fact that the fibers dry unevenly and at different times, therefore their length decreases, also differing from each other.
Important! From the above facts it is clear that wood with a high moisture content may become unusable during poor drying. You can avoid this problem by preparing the raw materials and drying them on a homemade wood dryer.
Three drying modes
When you use drying chambers, you significantly save the time required to prepare the material for work. Moreover, you can control the drying modes by controlling the performance properties of the wood. At this point in time, there are three modes of wood dehydration:
- Soft. A special feature of this mode is the gradual increase in temperature in the chamber - due to this property, not only the pristine quality of the wood is preserved, but also its natural color. This drying method takes the longest.
- Standard. In this mode, the wood retains its original strength, while the shade of the material changes slightly.
- Forced. This mode is used if you need to dehydrate raw materials as quickly as possible, however, the quality of the lumber is significantly reduced. It is also worth noting that after applying this regime, the wood may darken and acquire a characteristic odor.
We make a drying chamber
So, we figured out what this structure is for. Now you can start making a wood dryer with your own hands.
Selection of premises
The first step is to wisely choose the room where the lumber will be dried. To do this, you need to follow these tips:
- The area of the room should be based on the dimensions of the boards that require processing.
- The ceiling height should be 2-2.5 meters.
- The width of the room is selected by the user, however, it is worth considering that you need to leave room for a person to pass through.
- The windows in the room must be covered with bricks.
- The doors must be such that raw materials can be loaded into them without any problems.
- There should be a window or a small vent for ventilation.
Important! If you choose a large room, it is better to make a partition for thermal insulation.
Construction of a dryer
Usually a garage or barn is chosen as a place for a dryer, but sometimes it’s not even possible to use them. For this reason, it is important to know how to make a wood dryer with your own hands, using the drawings:
- Lay the foundation for the entire structure. Since the mass of the structure will be low, the foundation does not have to be deep.
- After the concrete has dried, you need to assemble a frame from a galvanized steel profile (you can replace it with an aluminum frame). Connect the frame parts using bolts and special brackets.
Important! An aluminum frame differs in its high price from a steel one, however, it has many advantages. For example, it is much more stable and is not afraid of corrosion.
- Sheathe the walls and roof with steel sheets, fixed to the frame using special self-tapping screws. In order for the effect to be as effective as possible, you need to perform double sheathing, laying between two sheets a layer of mineral wool insulation with a thickness of approximately 150 mm.
- Lay the waterproofing membrane on the floor, then cover it with sawdust.
- Install doors. They should close as tightly as possible.
- Build ventilation ducts or vents so that air can circulate freely.
- When the work is completed, check the tightness of the room. If necessary, correct any errors made.
- Equip an infrared wood dryer with your own hands. This point should be given due attention.
Equipment
Construction equipment instructions may vary. This is due to the fact that the camera equipment and material budget are different for each user.
Let's look at the general layout of the room equipment:
- Make a support on which the stack of boards will be placed in the future. To do this, you need to fix wooden structures on the floor, which allow you to raise the material approximately 20 cm above the ground. This is necessary for the circulation of air flow from below.
- Can be used as supports for wall racks. To do this, you need to fix metal brackets on the load-bearing surfaces, which are designed for stacking stacks along the walls of the chamber.
- Install the heating device. Its role can be played by a stove, a heat fan, a fireplace, a heat gun and other structures - the choice depends on your desires and preferences. First of all, you need to pay attention to the power of the device - it is calculated from the volume of loaded lumber.
- Install drying fans for boards yourself. The devices will provide movement of thermal air. Of course, you can get by with a regular hood, but then the drying time of the raw materials increases several times, which means energy costs will increase.
- Arrange fans and air heaters so that the heated air passes across the air flow. This will reduce the aerodynamic system drag, which will make the dryer work more efficiently.
Important! Since you will need a lot of electricity, it is recommended to install a separate power cable for the structure. In addition, all the materials you use must be connected to the distribution panel via an RCD with the required power parameters. This is necessary in order to protect yourself from a possible fire.
What to look for when buying a drying chamber
A good chamber for drying boards differs from a bad one in a particular situation not only by type, but also by manufacturer. I will touch on specific manufacturers later, but for now, in general terms, what you should pay attention to when choosing a drying chamber for wood:
- Product quality. Heaters, fans and other system elements must be made of materials that are non-corrosive.
- Tightness. Fences and gates must be completely sealed. There should be no penetration of moisture and no contact of air with the external environment.
- Thermal insulation. Vapor and thermal insulation must be performed at the proper level, otherwise operating costs will increase due to unexpected heat losses. And even the most modern automation cannot cope with the disturbed drying process as a result of defects.
- Automation. An automatic control system should minimize human participation, and remote control and warning systems should simplify the drying process.
- Ventilation. Fan motors must provide uniform airflow of lumber and a stable air flow rate (if it acts as a kiln drying agent).
- Reliability. In conditions of high humidity, low-quality equipment may fail, so it is better to give preference to cameras with imported components.
An ideal board drying chamber must meet 4 main criteria:
- High quality dried wood.
- Low construction and erection costs for the chamber.
- Low drying cost per 1 cubic meter. material.
- Environmental friendliness of the entire drying process.
Ideally, before investing in wood drying and building a drying complex, careful preparatory work should be carried out. Namely:
- Analyze what volume of drying is planned per year with a future perspective;
- Is there any wood waste at the enterprise that can be beneficially used later when heating the drying agent?
- Consider the possibility of organizing atmospheric drying;
- Draw up a diagram of the project implementation and camera locations.
But don’t forget that not everything depends on the equipment. At least half of the success in the final result lies with the service personnel and the qualifications of the workers. For example, it is very important to properly stack lumber in the chamber and organize the storage of raw materials.
Board dryer: creating and using a drying chamber
All photos from the article
A do-it-yourself board dryer is made if there is a need to process a large volume of unprepared wood. Of course, you can immediately purchase blanks with optimal humidity, but in this case the costs of purchasing the material will be very high. So the construction of a special device can be quite effective from an economic point of view.
In our article we will tell you. How to dry wood, and we will give recommendations on how to independently arrange a drying chamber.
To use dry wood, you don’t have to spend money on buying it - you can bring the humidity back to normal on your own
Using the dryer
If the drying chamber was assembled according to all the rules, then using it will be quite simple. To do this, we stack the boards, placing bars up to 20 mm thick between the rows, and load the stack into the dryer.
Stacks of lumber
After this, we begin to change the temperature, gradually increasing the heat.
There are many drying schemes, but novice craftsmen should use a low-temperature mode, as it ensures maximum quality with minimal risk of defects:
- Heating - raise the temperature to 45 - 50 0C at a speed of 5 - 70 C per hour.
- Exposure – keep at 50 0C for 5 hours.
- Drying – reduce the humidity of the wood from 30 to 8%, gradually increasing the temperature to 60 0C. This stage takes about 48 hours. Supply and exhaust ventilation are turned on at half power.
- Air conditioning – maintain the temperature at 600C for another 12 hours. Ventilation must work actively.
- Cooling down to ambient temperature with heating and ventilation turned off.
As a result, we should get boards suitable for most types of carpentry and joinery work.
Processing result
What will happen to the board if the drying mode is incorrect?
It would seem that there is nothing complicated in the drying process - turn on the heat with airflow, leave the board alone for a certain time and the job is done. But if everything were so simple, then choosing a camera wouldn’t be too difficult. The devil, as they say, is in the details. For some reason, in some wood drying chambers there is little waste, while in others there is a lot. Sometimes it’s not even possible to immediately determine why. Even incorrect loading of lumber can ultimately affect the quality of the product.
The goal for which you need to carefully approach the choice of installation is not only savings in the acquisition and further operation of equipment, but also, most importantly, the preservation of the attractive appearance of the wood after the drying process, increasing its strength and stabilizing its dimensions and shape.
A wooden product will become unusable if the board from which it is made is not dried properly. Moreover, defects will appear over time. For a product made and fastened from several parts during operation, the humidity will begin to equalize throughout the entire volume and the state of the joints will become tense, in some places drying out will occur and the paintwork will crack. In these places, the wood will begin to absorb moisture from the external environment, which will lead to an imbalance in the distribution of moisture inside the product. The result is obvious.
There are almost 300 liters of water in a cubic meter of freshly cut wood, and the task of any dryer is to evaporate this water. Yes, so as not to harm the board. The main part of the moisture is contained in the capillaries, and the rest is in the cells that make up the capillaries. The problem is caused by the removal of moisture from the cells, which is why wood cracks.
It is especially difficult to dry hardwoods such as ash, oak, and beech. As a result of drying, the top layer dries out and forms a dry crust through which moisture does not penetrate well. The core of the board remains wet and microcracks appear there, leading to defects.
That is why it is important to follow the drying modes and technology, timely equalize the humidity and always control the process. And this is not easy to do, given that even if the right conditions are created, the boards dry differently depending on the density and other reasons. Even for one board, the humidity range can vary by 2% or even more. But, again, with the right approach, despite the complex processes inside the tree, the required result can be achieved.
The locations of the cracks are different and they depend on the nature of the drying of the board. In addition to external cracks, there may be internal cracks; they appear when the surface of the board dries out faster, while the inside remains wet. There are also end cracks; they arise due to more intense drying of the wood at the ends.
As a result of improper stacking of boards, there is a danger of so-called warping. This happens due to non-uniform shrinkage in the tangential and radial directions.
Mini wood dryer
All photos from the article
A do-it-yourself board dryer is made if there is a need to process a large volume of unprepared wood. Of course, you can immediately purchase blanks with optimal humidity, but in this case the costs of purchasing the material will be very high. So the construction of a special device can be quite effective from an economic point of view.
In our article we will tell you. How to dry wood, and we will give recommendations on how to independently arrange a drying chamber.
To use dry wood, you don’t have to spend money on buying it - you can bring the humidity back to normal on your own
Moisture in wood
Before we start designing a dryer, we need to understand why it is needed. As the name suggests, such devices are designed to remove excess liquid from wood, and here it is worth paying attention to the theory.
Difference Between Types of Moisture
All moisture in wood is divided into two groups:
- free - found in cell cavities and intercellular spaces. free moisture is primarily determined by the conditions in which the tree grew, as well as the storage conditions of sawn pieces. When drying, free moisture leaves the wood quite quickly;
- bound (structural) – a liquid that is part of the cell walls. Each type of wood normally has its own level of moisture content in the structure. In this case, the removal of bound liquid occurs very slowly, therefore, under natural conditions, drying can take from several months to several years.
Dependence of deformation on board type
As a rule, the limit of wood saturation with moisture is at the level of 30%. Wood with higher humidity is considered damp and is almost never used for work.
Humidity indicators for different materials differ:
| Material | moisture,% |
| Lumber transported over long distances (so-called transport moisture) | 18 — 22 |
| Molded products (floor boards, floor coverings, decking boards) | 15 — 17 |
| Products made from solid or laminated wood | 8 — 15 |
| Furniture | 6 – 10 |
| Blanks for high-precision joints (parquet, sports equipment, musical instruments) | 6 — 8 |
Why is drying necessary?
So, we’ve dealt with moisture itself, now let’s analyze why we need to reduce its content in wooden blanks.
Cracking along the grain
- When moisture is removed, the configuration of the wood fibers naturally changes, resulting in a reduction in the size of the board - it “dries out.”
- In this case, the workpiece loses moisture unevenly, so deformation can also occur in different planes at different rates.
- Due to this, stress lines are formed inside the wood, which subsequently give rise to cracks.
Please note! As a rule, the board cracks along the grain, starting from the end.
This is due to the least strong bonds between the longitudinal fibers.
Deformation of lumber by an arc and a “propeller”
- In addition to cracking, transverse deformation of the board is also possible: the part either bends in an arc, or due to uneven lifting of the edges, a so-called “propeller” is formed. This behavior is explained simply: not all fibers dry at the same time, which means their length also decreases in different ways.
As you can see, if you use wood with a high moisture content to build structures or make various structures, over time, individual parts may become unusable. There is one way to avoid this - before starting work, prepare the raw materials by drying them in one way or another.
Drying modes
The use of drying chambers can significantly reduce the time required to prepare lumber for work. At the same time, by controlling the dehydration regime, we can control the performance properties of the resulting material. Today, experts distinguish three drying modes:
Intensive drying is usually used in wood processing plants
| Mode | Peculiarities |
| Soft | The temperature in the chamber rises gradually, due to which not only the natural strength of the wood is preserved, but also its color. At the same time, the rate of dehydration of the raw material is somewhat reduced. |
| Standard | It is used to bring the material to its final moisture content with almost complete preservation of strength. In this case, a slight change in shade is possible. |
| Forced | Forced drying is used to prepare lumber for work as quickly as possible. After high-temperature treatment, the bending, compressive and tensile strength is retained, but the splitting strength may decrease slightly. The wood may also darken and a characteristic odor may appear. |
Finished premises
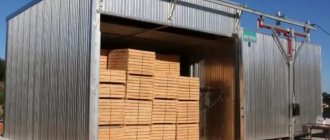
Drying chamber for industrial production
So, we have argued the thesis that lumber must be prepared for use by drying. Now let's figure out how to make a board dryer with your own hands.
First, we need to select the room in which the drying process will take place:
- Since removing moisture from wood requires significant energy expenditure, the drying area must be selected based on the planned volumes of material.
- The optimal height of the room is 2 – 2.5 m (so as not to bend over). The width should allow the placement of one or two stacks of boards of 1.8 - 2 m each with a passage between them.
- We must block the windows in the dryer with bricks. We expand the doors so that we can easily load the material being processed.
You can use an old garage or barn for processing.
Note! For ventilation, either a small window or a vent is left, into which we will later lead the air duct.
- If you plan to dry the boards in a fairly large room, then it is advisable to make a separate partition in it. We build partitions from brick or thick enough timber to provide thermal insulation.
Construction of a dryer
However, it is not always possible to find a suitable room (most often a garage or barn plays this role).
This is why it will be useful to learn how to make a drying board for boards from scratch:
Problems of modern wood drying chambers
Working in various industries, I have seen enough of everything. Even with seemingly good factory drying chambers there are problems. And pipe leaks as a result of corrosion, and constant costs due to downtime and non-operation of the chamber due to breakdowns and frequent failure of fans.
But let's talk about aerodynamics. The problem of uneven drying of stacks in thermal drying chambers is one of the main ones. Almost all cameras suffer from this problem to one degree or another. There are many reasons for this. Two examples:
- The flow of drying agent between rows of the stack may be reduced to such an extent that it will be little different from natural ventilation without blowing by fans.
- With unidirectional airflow, the wood will be under-dried at one end of the stack and over-dried at the other.
To combat the second case, reversible fans are used. But playing with their number and location does not always lead to a decent result. This is where precise calculations and proper design of the drying chamber come into play, which not everyone can do. No one has yet managed to solve the problem of quality and uniformity of drying 100%, and it is unlikely that they will succeed. The principle of any manufacturer is to reduce the defect rate as much as possible and get as close to ideal indicators as possible.
Fans in the chamber should not be remote; due to the long shaft, they are more likely to fail, require more careful maintenance and have lower efficiency. The moisture and thermal protection of the engine must be F (up to 85 °C) or class H (up to 130 °C), and have a reverse with an efficiency of up to 90%.
In the walls of the drying chamber, a frequent spacing of slats should be used to prevent subsidence of the mineral wool. And the ventilated gaps should dry the insulation in case of accidental ingress of moisture.
To avoid problems, in addition to meeting such an important condition as uniform blowing across the stack with mandatory reverse, it is necessary to remember about the tightness of the chamber, maintaining the desired temperature and humidity conditions, as well as the correct laying of lumber.
Tips from me or how to dry a board without defects
To obtain high quality dried material, it is necessary to strictly follow the process and maintain the necessary drying conditions. And in order to withstand and control this process, you need to know all the necessary parameters for temperature and humidity inside the chamber. Based on this data, automation or a person makes decisions that affect the final result. Therefore, some of my advice concerns specifically the problem of measuring humidity, but not in the chamber, but in the wood itself.
- It is best to use psychrometers as temperature and humidity sensors;
- When measuring wood moisture, the electrodes must be at least half the thickness of the board in length, because The maximum moisture content is in the core of the lumber.
- To measure humidity, I recommend using 1 sensor per 10 cubic meters. meters of wood.
- Often, even from one batch of boards, the variation in humidity can be quite large. And in this case, the sensors must be placed on boards with the highest humidity, for example, sapwood and resinous ones.
- When stacking boards, it is necessary to use planed spacers and place them strictly one above the other vertically. The thickness of the boards should be the same horizontally in one row. According to my observations, the surface roughness of the inter-row spacers directly affects the formation of both internal and external cracks on the boards. If the inter-row spacers are uneven, then its protrusions prevent displacement during drying and, as a result, stresses form in the board.
- In your cell, the sealing of the gate must be done very well; the rubber seals must be resistant to extreme temperatures and not fail over years of use. To avoid loss of thermal insulation qualities, the insulation must be laid out in cells so that it does not sag over time (the pitch of the cells must be frequent, and the insulation is not cheap Chinese).
- After drying, remove sawdust and sweep the floor in the chamber. Otherwise, over time, your radiators will become clogged with dust and small wood waste, which will then affect their heat transfer and lead to an increase in drying time, and will also affect its quality.
- For better circulation of the spacers, the dimensions of the lumber should be approximately the same.
- By drying coniferous wood, turpentine can be obtained. Its evaporation temperature is 34 °C, but to obtain it you need a condenser. In the resulting condensate, more precisely in water, it will be on the surface. The water is eventually drained, and the turpentine is pumped through a tube from above into the container. The turpentine turns out to be of high quality, from 1 cubic meter. meter you can get more than 1 liter. This is a reduction in the cost of operating the dryer.
- If you are the owner of a woodworking enterprise, then it is economically feasible to use the heat from burning wood waste in order to save on electricity and, taking this into account, you need to choose a drying chamber.
- The chamber enclosures include well-thought-out heat and vapor insulation. As the latter, it is better to use roofing felt; bitumen is better not to use.
- You need to know that the atmosphere of the drying agent is harmful and dangerous; it is not recommended to enter the working chamber. During the drying process, organic acids and alkalis, turpentine, and methanol are released.
DIY wood dryer: drawings
Drying is a mandatory stage in preparing wood before processing. To prevent logs from becoming deformed, they are dried under certain conditions, which are created in drying chambers. For your home workshop, you can make a wood dryer with your own hands.
The importance of drying
compact drying chamber
Since ancient times, wood that was cut down several years ago was used to make wood products. Furniture made from damp or improperly dried boards will warp or dry out and crack.
When drying, the material shrinks, raw wooden beams will begin to move over time, and cracks the width of a palm will appear in the walls of the log house. Mold grows in damp wood.
But overdried boards are also bad - the material begins to absorb moisture and swells.
Drying is carried out with hot air or steam, the process is long and expensive, but it gives the wood additional strength, prevents changes in shape and size, and the lumber is stored longer.
Types of drying chambers
Drying of wood on an industrial scale is carried out in special chambers. Moisture is removed from the lumber by heated air and carried outside. The device carries out a full wood drying cycle. The room can be:
- prefabricated metal;
- constructed from building materials.
The latter are installed directly in carpentry shops or as free-standing buildings. The walls are made of reinforced concrete or brick.
At large enterprises, several cameras are installed, combined into a module with a common control system and communications connections. Air circulates in the dryer horizontally or vertically-transversely.
Wood can be transported to industrial dryers on rails on carts or laid out using forklifts.
Heat sources in the dryer:
- hot steam;
- smoke;
- radiant heat from special devices;
- heated shelves;
- electric current that passes well through wet logs;
- high frequency electromagnetic field.
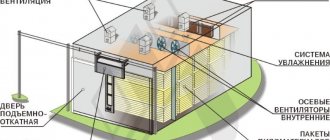
The camera is equipped with basic and additional equipment. The main consists of systems:
- supply and exhaust ventilation;
- heat supply;
- hydration.
Additional equipment includes insulation of walls and doors, trolleys for laying material, psychometric equipment, and electric drive.
Industrial dryers are controlled automatically, small homemade dryers are controlled manually. Humidity is regulated by supply and exhaust ventilation and humidifiers. To measure the humidity in a room, a moisture meter is installed that collects data simultaneously in several places.
The following energy sources can be used to heat air: electricity, wood processing waste, liquid and solid fuel.
Types of dryers
According to the method of air movement, chambers are divided into:
- with natural;
- with forced air exchange.
Chambers with natural air exchange are low-performing and the process in them cannot be controlled. Therefore, they are used less and less.
According to the principle of action, the following are distinguished:
- convective;
- condensation dryers.
Convection dryer Condensation dryer
In convection chambers, the wood is blown with streams of hot air, and heat is transferred by convection. They can be deep tunnel or chamber. Logs are loaded into tunnel chambers from one end and unloaded from the other, moving through the chamber, the material is gradually dried.
The cycle duration ranges from 4 to 12 hours. Such cameras are installed in large sawmills. Chamber dryers are more compact; a single microclimate is maintained throughout the entire volume. Allows you to prepare any type of wood to the required condition.
Therefore, most industrial dryers are chamber type.
Using condensation drying technology, moisture released from the material is deposited on coolers, accumulates in containers and is drained outside. The efficiency of such a device is very high, but the process is long and accompanied by high heat losses. The technology is good for preparing hard lumber in small batches. The price of equipment and the cost of condensation drying are lower than convective drying.
Setting up a homemade dryer
solar wood drying chamber
In order to make a dryer with your own hands, you can do without drawings. It is necessary to provide:
- camera room;
- insulation;
- heat source;
- fan.
The area of a dryer built by yourself usually does not exceed 9 square meters. meters. In a square-shaped room it is easier to ensure optimal movement of warm air.
It is desirable that one wall of the chamber be made of concrete slabs, the others made of wood. All walls are insulated from the inside in two layers: polystyrene foam and foil board. An excellent and free insulation material is wood shavings.
And the foil can be replaced with penofol, which perfectly reflects heat.
You can build a separate drying room with your own hands from aluminum; such a structure will last a long time. The frame is made of profile, it is sheathed with sheet metal, which is insulated from the outside. The thickness of the insulation is at least 15 cm. The floor is covered with roofing felt, and a thick layer of shavings is poured on top as thermal insulation.
Care must be taken to thoroughly seal the front door!
The heat emitter can be made in the form of pipes or heating radiators. The water temperature should be 65-95 degrees. It is heated by an electric boiler, wood stove, or gas boiler. For a small chamber, even a two-burner electric stove is sufficient.
If the stove is located directly in the room, you need to line it with bricks. The brick will accumulate heat and gradually radiate it into the dryer.
It’s easy to equip a convection chamber with your own hands by installing a fan heater as a heat source.
When setting up a dryer for your home woodworking workshop with your own hands, it is important to follow fire safety measures. There should always be a fire extinguisher near the building.
Constant circulation of warm water, which is provided by the pump, is important. To ensure that heat is evenly distributed throughout the room, a fan is installed. The workroom is equipped with a wet and dry thermometer.
To make it easier to load the board into the chamber, you can use a trolley on rails. And to increase the usable area, shelving is built on the walls.
The step-by-step instructions are as follows:
- We are building the foundation.
- We are building the frame.
- We cover the frame with sheets of metal.
- Installation of thermal insulation.
- Cover the floor with film and sawdust.
- Installation of supports from bars.
- Installation of heaters and fans.
The design of a homemade chamber for drying lumber in the video:
Example drawings
Which drying chamber manufacturer to choose
I deliberately did not touch on the names of specific enterprises in the article, so that the review would not focus on any specific company. But at the same time, without mentioning the manufacturers of wood drying chambers, the review would be incomplete and not so useful. Moreover, the most common question that I get asked on the Internet and in real life is who exactly can I recommend.
It is important not to forget that in addition to the camera’s characteristics and its price, good service support is also needed. I remember how in one production we had a glitch in the program and the drying process stopped not only in one chamber, but in the entire complex, because... control was unified and came from one computer. We couldn’t restore anything on our own; we needed a company representative, who, by the way, arrived only after 2 (two!) months. I won’t say what happened to the lumber and how many losses the company suffered - it’s clear. But I never recommend this manufacturer in private conversations. By the way, they are still working and their website functions well and attracts customers.
I won’t write the name of this production here; now and then we hear lawsuits for libel on the Internet and so on. Then I don’t want to run around to the courts and prove that I didn’t slander, but that I told my experience. Among the worthy options presented on the market today I can highlight:
- Kovrovskie Kotly is an old, reliable company that has been on the market for 20 years. Drying chambers are supplied complete with self-produced boilers that operate on wood chips and sawdust. There are two types of convection chambers: periodic front-loading and continuous drying chambers. It can be noted that the quality of drying is quite good.
- Mülbock-Wanicek is an Austrian company that has been operating on the market since 1952. It has managed to establish itself throughout the world. It is worth keeping in mind that the equipment is not cheap.
In principle, from these you can choose what you need, depending on your budget.
Drying stages
Automated cameras allow you to implement a standard set of technological steps without user intervention, which looks like this:
- Warming up the material. Primary heat treatment, during which the wood structure is prepared for subsequent stages.
- Direct drying. At this stage, a combined moistening-drying operation is performed, which allows the material to be softened as much as possible for further drying.
- Cooling. In essence, this is the stage of crystallization of the structure, thanks to which the wood, which has become pliable due to heat treatment, regains its optimal hardness characteristics.
As noted above, all stages of the drying process are controlled automatically, and the operator monitors the safety indicators. But even before the start of the event, the user is required to set the optimal drying mode. In particular, it sets pressure and temperature based on the characteristics of the material. For example, for coniferous blanks with a thickness of 2.5 cm, a pressure of 500 kg/m2 is required. As for the temperature, in this case it can be 80 °C.