In summer cottages, fences made from chain-link mesh are very popular. This material is widely used due to its qualities: low cost, transmission of light rays, and the possibility of self-assembly. Read on to find out how to attach the chain-link mesh.
Chainlink fencing
Attaching the chain-link mesh to fences can be done in two ways:
- production of individual sections;
- tension and subsequent fixation.
Fastening in sections
Sectional fencing is distinguished by a more aesthetic appearance and at the same time the complexity of self-production.
Section ready for fencing manufacturing
To make one section of the fence you will need:
- metal guides, which can be profile pipes, round pipes of small diameter, corners. The guides are welded together, forming a frame of a section of given dimensions;
- net;
- welding machine;
- pliers;
- roulette.
To fix the chain-link mesh to the guides, the following fastening methods are used:
- fixation with a metal rod;
- fixation with metal hooks.
Fastening with a rod
The most popular and reliable method of fastening to the guides is fixation with a metal rod, which is done in the following order:
- a section is separated from the mesh roll, its overall dimensions fully corresponding to the similar parameters of the finished section frame;
Preparing the mesh for fixation
- then a metal rod is passed through the mesh cells along the entire perimeter;
- the rod is welded to the guides.
Fixing the mesh chain-link by welding through rods
Fastening with hooks
The metal mesh is attached to the guides with hooks using the following technology:
- in the manner indicated earlier, the mesh is prepared for fixation, that is, individual sections are prepared in accordance with the overall dimensions;
- special metal hooks are welded around the perimeter of the frame, which can be in the form of rectangular or rounded plates;
- The mesh is pulled over the hooks and secured by clamping.
Hook fixation technology
Sections prepared by any of the above methods are easily secured to poles (usually using a welding method), forming a finished fence (fence). Gates and wickets can be made using similar methods.
Methods of tension and fixation
The chain-link mesh can be fastened using the tension method:
- without the use of any additional elements;
Installation without fixing elements
- using a metal rod, which is passed through the mesh and subsequently fixed to the posts. You can use either one rod, which will be located at the top of the fence, or two rods at the top and bottom of the fence;
Stretching using a metal rod
- using metal plates that replace the rod. This method of tensioning is considered the most acceptable, as it allows you to firmly fix the mesh on the fence and get a pleasant appearance.
Fastening with plates
Attaching the chain-link mesh to the posts without the use of additional elements is done:
- metal clamps, which are installed on poles by welding or fixed using fastening plates;
Fastening with a threaded clamp
- ordinary wire. This method is less reliable, since with any load on the mesh the wire will weaken;
Using metal wire for fixation
- hooks that can be welded to posts or installed using self-tapping screws.
Welded hooks for fixation
Tension metal plates can be fixed to poles in the following ways:
- welding The most durable method, which is available only to persons who have a welding machine and know how to use it;
- threaded fixation. In terms of strength, this method is not inferior to welding, but its implementation does not require special equipment or skills.
The technology for threaded plate fixation is simple:
- a hole is drilled in the post through the tension plate;
- a bolt or self-tapping screw is screwed in, securing the plate.
The metal rod, which is used to tension the Chainlink mesh, can be fixed on the post in any of the following ways, but the technology most often used is the installation of tension couplings:
- Tension couplings are installed on the poles using bolts, wire or special fasteners, which can be made in the form of sliding hooks or special housing mechanisms;
What can be made from PET bottles
For people with creative imagination, plastic bottles are an inexhaustible source of inspiration.
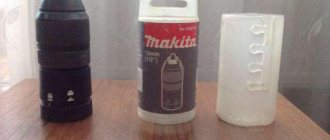
You can also make strong ropes from plastic bottles. To do this you will need a “bottle cutter”. Craftsmen make this simple device from a blade, several washers, mounted on a wooden base.
When assembled, the bottle cutter looks like this.
Reels on which threads obtained from PET bottles are wound can also be made from bottle necks. First, cut off the necks of two bottles and the tops of two caps. The cut caps are fastened onto the rod, onto which the cut necks are then screwed; holes are made in the necks with a hot nail through which the beginning of the thread is passed and, after tying a knot, it is fixed.
The resulting tapes can be used not only to make ropes, but also to make tubes from them. To do this, a strip cut from a plastic bottle is passed through a hole of the required diameter for the tube and, when heated, begins to be pulled through it. The principle of operation is clear from the photo.
It is quite possible that such a mini-business would be suitable for someone, the equipment requiring only a bottle cutter with reels and premises, such as the production of brooms and brooms from plastic tapes. How such products are made can be easily understood from the picture.
Perhaps many people will think that the bottle ribbon business is very small and not worth attention. However, in India it is serious business. Several vertically placed bottle cutters are used, the cut strips are wound on reels that rotate from a mechanical drive. One worker installs bottles on bottle cutters and ties the resulting strips, the second worker controls the speed of rotation of the reels on which the strips are wound, from which ropes are subsequently produced.
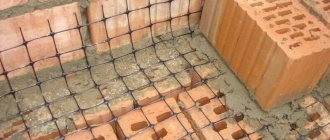
Recently, tiles made from PET bottles have become increasingly popular in southern countries. The molten flex is mixed with a mineral filler (fine sand fractions) and filled into molds through an extruder. In the countries of the former USSR, such business is just beginning, so the field for the activities of craftsmen is quite wide.
Paving slabs, chain-link mesh, greenhouse walls and much, much more are also made from plastic bottles.
But no matter what the entrepreneur decides to manufacture from such recyclable materials, success, as in any business, will depend on the literacy of drawing up a business plan. Such a document will not only allow you to organize knowledge and build a system of actions, but can be useful if you need to attract investment money.
Methods for arranging a fence
There are two ways:
Attaching chain-link mesh to corner sections looks much more aesthetically pleasing than screwing it to poles.
- pull the chain link between the posts;
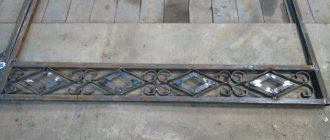
- fasten the mesh fragments into sections made from angle iron.
The first method is noticeably simpler and cheaper, although it is somewhat inferior in aesthetics. To manufacture the sections, you will need a corner, the cost of which is comparable or even slightly more than the cost of galvanized mesh material.
Poles will be needed for both methods; the galvanized wire fence will be directly attached to them. The question of how to build a chain-link fence remains open.
Choosing fence posts
In the case of swampy soil, complete concreting of fence posts is used.
The first option is wooden supports. Wood is an affordable lightweight material, but relatively short-lived. You can use hand-made wooden poles or beams that are left over from the construction of country houses. It's more economical. Wooden beams must be cleared of bark. Next they are cut to the required length. As a rule, deepening is carried out 15-20 cm below the freezing level of the soil in the area. Fencing elements and a gate can be attached to wooden posts, including the possibility of attaching a chain link.
The pillars are installed at a distance of no more than three meters from each other.
Taking into account all the estimates, the length of the beam under the post will be 3 m. Treatment with waterproofing mastic is required, which is sold ready-made and is not particularly difficult when applied with your own hands to all pre-prepared wooden blanks. The upper part of the beam should be well dried and coated with oil paint. Otherwise, within a year the tree will begin to rot and such a stand will have to be replaced soon due to its disrepair.
Bottom line
The press is not a complex and knowledge-intensive piece of equipment , so simple materials that are affordable are quite sufficient for its manufacture.
A lot of schemes for its manufacture have been proposed and can be found in the public domain. Therefore, making a press with your own hands is truly a way to save material resources. The benefits of installing it are quite obvious.
You may also be interested in information about recycling PET bottles at home.
Fastening the chain-link to the poles
Tools and accessories:
Electric welding is the most reliable connection between mesh and supports.
- Shovel;
- Scrap;
- Welding machine;
- Electric drill with a set of drills;
- Electric screwdriver;
- Devices for tensioning the mesh on a pole;
- Nails 70-100 mm (2 kg);
- Screws 70-100 mm (1.5 kg);
- Wire rod 6-8 mm (taking into account approximate measurements);
- Steel bar (reinforcement) with a diameter of 10 mm and hooks for fixing the mesh.
Options for installing a fence using the tension method:
- Stretch fence without pulling wire or reinforcement;
- Pull fence with the passage of one bar of steel reinforcement (wire, cable);
- Fence by tension method with pulling two rods of reinforcement (cable, wire).
We begin the work with a corner post using proven technology. To avoid sagging, we stretch a steel cable or reinforcement with a mesh attached to it. Raise the mesh 10 cm above the ground.
Instead of corner frames, wooden frames can be used.
Remember that the installation of galvanized wire mesh begins with a corner post. Two people lift the chain link and straighten it along the post. Using nails and screws, the mesh is pre-attached to the support and then securely fixed with a bracket. Next, using uniform tension, the chain-link is attached to the next post and is also fixed with staples. It is necessary to monitor the tension over the entire area of the material cells. The distortion will subsequently be impossible to correct. After securing, a cable is passed around the entire perimeter to prevent the surface of the mesh spans from tilting in one direction or another.
How to attach a chain-link mesh to a metal post with your own hands?
Drilling iron posts must be done at reduced drill speeds.
Using an electric drill, drill holes in the pipe and cut the threads. From a prepared steel strip measuring 4x20 mm, we prepare sections of 150-200 mm by hand using a hacksaw or a grinder. They will attach the mesh. We drill two holes in them, corresponding to the diameters in the pillars. We cut threads for the existing bolts. We unfold the chain-link and press the mesh plates against the posts from above and below. We tighten the nuts of the bolts until they stop and rivet them so that the mesh cannot be pulled away during the owner’s absence. If the option of cutting threads seems labor-intensive, then you can make through holes in the racks and attach the chain-link to them with long pins. Again, securely secure the nuts against thieves. The work is carried out by three people.
Welding may be used. The plates are attached to the pipes at the corners, but you must be careful not to burn through the mesh wire. We fasten the galvanization, always ensuring its tension along the racks (along the entire perimeter).
The mesh sags over time. To eliminate this problem, we drill through holes in the posts along the grid. A rod is pulled through them, a 6 mm cable is simpler, we fix it in the corner posts, tensioning it well with the help of bolts. The cable will prevent the mesh from sagging to the sides. This is clearly visible in winter when there is snow on the mesh.
How to build a chain-link fence if there are no wooden or metal posts?
Asbestos-cement or concrete supports can be used. They are available in specialized stores and can be custom-made according to your drawings. They are not particularly popular among summer residents. The main drawback in practical terms with such poles is the fastening of the chain-link. This is done using clamps and cables. Moreover, the cable is woven into the mesh and entwines the support on which it is attached. Inconvenient and very impractical for a summer resident. By cutting the cable, it is easy to remove the net.
When is an industrial press needed?
If we are talking about small volumes of PET bottles that need to be compressed, then a self-made machine is quite sufficient.
For large industrial enterprises and plastic bottle collection points, such a machine is unlikely to be suitable, since they are characterized by low productivity and a high degree of labor involvement.
It simply cannot cope with a large flow of material, since here a favorable ratio between the speed of work and the amount of compressed material is already necessary.
Another factor that can sway the choice in favor of industrial equipment is the safety margin. Undoubtedly, the quality of the welds and the strength of the metal directly determine the service life of the machine.
You can read about presses for industrial plastic waste here.
Some tips and tricks when installing a chain link with your own hands:
It is advisable to install additional spacers in the corners of the fence.
- It is not possible to “go around” the corner post if you simply pull the mesh tighter. The weakness will still remain. At this point, you should separate the mesh fabric and make a joint;
- the upper and lower belt of the mesh must be twisted in a “pigtail” by 2-3 turns, the edges must be folded;
- do not attach the net close to the ground;
- We recess the fastening hooks with a hammer, pass through the top and bottom of the mesh wires or 6 mm wire rod, which is attached to the posts by welding.
A do-it-yourself chain-link fence has won the hearts of summer residents, and for good reason. Durability, versatility, transparency, price and ease of construction are its main characteristics. If built correctly, it will serve the owner of the dacha for decades. Galvanized mesh will last a very long time, it does not corrode, and does not lose its decent appearance for many years.
How to secure a chain-link mesh so as to avoid sagging, arbitrary dismantling, or protect against theft?
Several mounting methods have been developed by users and professionals. And the choice of the optimal option depends on what material the support post for the fence is made of. Let's look at popular methods for attaching chain-link mesh to poles with your own hands.
What is the purpose and functions of the press in everyday life and its varieties
Such devices have a very wide range of applications.
This can be not only squeezing out various parts, but also a device for a walk-behind tractor that collects hay and lays it in even rolls. Perhaps the manufacture of some durable concrete products is required, or perhaps a lot of sawdust has accumulated, from which good fuel can be made. Let's look at the main jobs that the press can perform in everyday life. This equipment can be divided into several types. The design of some types is similar, while others have fundamental design differences.
The simplest table press
Press for extruding parts from any base or shell
Such equipment will come in handy in garage conditions. It is not profitable for an ordinary motorist to purchase it, because... the cost is quite high, and they rarely perform the work. But making a press for the garage with your own hands at minimal cost is quite acceptable.
You can use a similar press for silent blocks or bearings, i.e. for those parts whose installation and dismantling cannot be done manually. Having spent a little time, you can design and assemble a device, the cost of which in a store can exceed 50,000 rubles.
Wooden press for making fuel briquettes
Device for compacting various materials into dense briquettes
Such a device will help put old newspapers into use, which will make good fuel for the stove. A waste paper press will help you save on purchasing coal or firewood. In addition, the need to dispose of unnecessary correspondence, of which many have accumulated a huge amount, disappears.
Approximately the same principle can be used to make a sawdust press. The excellent fuel that will be obtained when using it has proven itself well not only in stove heating, but even on vacation. Long burning, intense heat and lack of smoke – these are the advantages that helped fuel briquettes made using a press gain popularity. Shish kebab, barbecue or a hot fire with minimal flame - what else is needed for a good rest?
And this is a schematic representation of it
There is another option to compress coal chips instead of sawdust. In this case, it will be a fuel that burns for a very long time and produces a huge amount of heat. And there is usually a lot of such crumble in the coal sheds of houses that are heated with it. So why not put him into action?
Press for recycling plastic and cardboard
Surely many have seen cardboard boxes that are tightly compressed into a tight stack. This is also the work of the press. After all, it is much more convenient to export such material when it is compactly packaged. A cardboard press is one of the easiest to make with your own hands. Other solid materials can be disposed of using approximately the same principle. For example, with the help of a press, plastic bottles are transformed into neat layers that are convenient for transportation.
A mechanical cardboard press is a very convenient device.
But still, pressing plants bring the greatest help in agriculture.
Mechanized harvest assistant
To collect the straw remaining on the field after harvesting, or forage hay, it is optimal to use a homemade pick-up press. Moreover, it will not only make work easier. Straw will be rolled into neat, dense rolls that are convenient to transport and store.
In the drawings of a do-it-yourself hay press, it is necessary to indicate the dimensions - this will help in the end to assemble everything correctly. Although there are options for very simple units, more on that below.
The simplest wooden hay press - minimum material and manufacturing time
Well, for starters, before you start making such a unit yourself, it is important to understand the designs of its various types, understand their differences and decide on the necessary material
How to attach chain-link mesh to wooden posts
Wooden posts are rarely used when installing a chain-link fence. The exception is cases of temporary fencing. This is due to the fact that wood is the least durable of all types of materials that can be used to build a fence. Wood is prone to destruction at drilling sites. That is why it is advisable to attach the mesh to a wooden post using wire.
How to attach chain-link mesh to metal posts
The most common type of support posts for a fence is made of metal (profile pipe, corner). Consequently, there are several approaches to how to attach a chain-link mesh to an iron support by welding and without it.
- fastening with hooks. This is a welding method. The easiest and most reliable way to fix the mesh on the supports is to hook it onto holders welded to the metal.
How to attach chain-link mesh to metal posts with hooks
The method of fastening with hooks is indispensable when installing sectional fences. A plate is welded onto the frame from the angle, to which the fence section is then welded. Instead of welding, a bolted connection can be used in the fastening unit.
Among the ways to attach a chain-link to posts without welding are:
- with fixing pad. This approach involves making a metal lining. Holes for hardware are drilled in the cover. The same holes are made in the support pillar. After the chain-link mesh is tensioned, the workpiece is applied to the support post, the hardware is screwed into the prepared holes, and their caps are riveted. This is the most reliable method, which significantly complicates the dismantling process.
- mounting on pipe clamps. Due to the fact that the clamp matches the dimensions of the pipe, it rests more securely on the support and holds the mesh well.
- wire fastening. In this case, the mesh is stretched around the post and secured with wire. This is a simple method, but a significant drawback is that due to the even and smooth surface of the support, the wire moves out over time. And if it still bears the load in the form of the weight of weaving plants, the deformation process occurs even faster. Fastening to a wire through a plate does not improve the situation much.
- on special clamps - pipe spans, which are attached to the profile or to the corner with a self-tapping screw or using a special latch with a hook.
- through holes. In this case, the mesh is stretched over a support post and fixed to it by inserting long pins into the holes. It is important to tighten the nuts correctly here.
In each specific case, the manufacturer decides how to attach the chain-link to the profile pipe, depending on desire, abilities, labor intensity and material costs.
Selection of mold material
When making molds for plastic injection, it is very important to understand what steel the forming parts, forming plates, guides and pushers will be made of. The quality of steel significantly affects the life of the mold, as well as the restrictions on the materials used
Sometimes mold manufacturers, realizing that the client’s need in the future will not exceed the number of closures and 100,000, are a little disingenuous by declaring that they supply equipment with a service life of more than a million, although in fact they sell molds made of softer metal with a service life of only 300,000 In Russia they especially like to sell molds made of duralumin, convincing potential customers about the long service life of this material.
How to pull a chain-link mesh to the ground
Quite often, chain-link mesh finds its application as a fencing material for animals or enclosures. To prevent small animals from leaving the fence, you need to ensure that the lower edge of the mesh is located as close to the soil surface as possible. To avoid raising the lower edge of the mesh, it is enough to tie it to a metal profile. Wooden will not work in this case, because... It will quickly collapse due to moisture. The profile can be attached to support posts or to the wall of an outbuilding.
In addition to the fact that it is important to securely fasten the mesh to the support posts, do not forget that it is advisable to fix it on the guide wire or reinforcement. To do this, the mesh must be pulled to the supporting wire in 3-4 places between the posts. If the height of the fence requires the use of a guide wire at the bottom and in the middle, the mesh should also be screwed to it with wire.
Having made fastenings in key places, users will not have any complaints about the quality of the chain-link fence.
PET collection and recycling business
Visionary entrepreneurs have long seen the advantages of a PET waste recycling business. By purchasing equipment for processing plastic bottles and opening their own mini-factory, they receive sufficient profit.
The recycling business niche currently remains quite empty. The volume of discarded PET waste is only growing from year to year, which means starting a business would be a smart decision.
We should not forget about the authorities who are interested in the cleanliness of the territory under their trust. An entrepreneur can receive various benefits when organizing a business for recycling plastic bottles.
Preferential conditions and subsidies are generally a feature of any business related to recycling.
Sources of raw materials
Even before completing the documents, it is worth solving the problem of finding raw materials.
PET waste collection is carried out in several ways:
- Concluding an agreement with landfills.
- Organization of collection points for PET bottles from citizens for a symbolic fee.
- Installation of containers for plastic bottles within the city.
It would also be a good idea to think through the process of transporting raw materials to the place of storage and processing.
Preparing for the opening
Before registering, you need to choose a form of business based on the planned production volumes: individual entrepreneur or LLC. The type of activity is called processing of non-metallic waste.
The next step is to find premises for the workshop
Here it is worth paying attention to the inexpensive quadrature of the industrial zone. Help from the administration may be useful, as it can help provide a place for recycling.
Necessary equipment
Having decided on the place of production and a convenient form of business, you should worry about purchasing equipment for processing PET containers.
Complete PET bottle recycling line includes:
- A machine that removes caps and labels.
- Conveyor for transportation.
- Shredding apparatus - shredder or crusher.
- Steam installation.
- Automatic polishing machine.
- Washing equipment.
- Dryer.
Recycling cycle
The path that PET bottles take from the moment they arrive at the storage warehouse to the final raw material is as follows:
- Manual sorting of waste by color and pre-cleaning.
- Delivery to the processing line, removal of stickers and covers on the machine.
- Grinding and separation in a crushing plant.
- Placing intermediate raw materials into a steam boiler to remove residual debris.
- Washing and drying of raw materials.
- Package.
The output is purified and ready for sale or subsequent processing.
Starting capital and payback
A business plan for recycling plastic bottles should include the main goal of the business, a detailed structure of the enterprise, ways to approach the goal and possible risks.
In practice, the strategy must take into account all elements of production. There is no need to start the process if the supply channels for raw materials or product sales are not established.
Starting capital largely depends on the region and rental prices.
On average, a business plan and profitability calculation have the following figures:
- Middle segment equipment - 3 million rubles.
- Purchase of raw materials and transportation costs - 35 thousand rubles.
- Payment of wages to employees - 115 thousand rubles/month
- Contributions to pension and other funds, as well as utility costs - about 50 thousand rubles / month
The profit received starts at around 150 thousand. The investment pays off in 18-24 months.