Electric hand tools have gained great popularity in recent years. One of the most popular is the hammer drill. It is used in any production and in domestic conditions.
Proper use of this tool will not only extend its service life, but also save on consumables. Hammer drills are different from those used in drills, which means their fastening method will be different. How to correctly insert a drill into a hammer drill, we will consider below.
How to place and secure a drill in a hammer drill
A hammer drill is a fairly simple tool, both in operation and maintenance. However, you need to know the nuances of its maintenance. Working with the tool begins with installing a drill, with which you can make holes in various surfaces. The article will describe in detail how to insert a drill into a hammer drill correctly.
Additional purchases for inserting a drill into a hammer drill
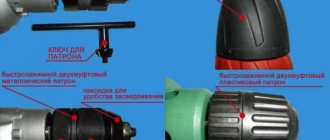
Several types of cartridges can be purchased for modern rotary hammers:
THE DRILL WILL STOP LOLLING OUT if YOU DO THIS
- quick-clamping;
- key.
The second type is a classic design, which is also found on a conventional drill. The attachments in the chuck must be secured with a key. The fixation will be as strong and reliable as possible, but using this unit is not particularly convenient.
To avoid inconvenience, it is allowed to use quick-release chucks, with which you can place the drill in the device without the use of additional devices.
Which cartridge to choose for the job will be decided by the master himself, depending on his experience in carrying out construction work using a rotary hammer (for example, from Makita).
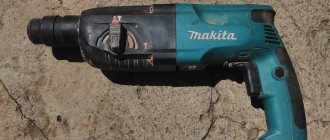
This is interesting! Many Makita rotary hammers have become almost legendary among Russian craftsmen. The HR 2440, 2450, 2470 and 2610 models deserve particular trust.
Types of attachments used
Depending on the type of work, the following types of attachments are used with a hammer drill:
- drills - for accurately making small-diameter holes;
- construction drills - for work on concrete, including iron structures;
- drill bits - punching large-diameter holes in high-strength surfaces, for example, under sockets;
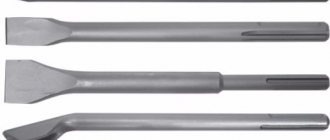
- chisels – metal work;
- shovels, peaks - for chiseling concrete and brick.
Types of attachments
The most commonly used are drills and drills. The mounting patterns for the cartridge are similar, the difference is in the subtleties.
Chucks used by the tool
It is advisable to talk about the cartridges in more detail so that the user can better understand the principle of their operation - this will make it easier for him in the process of replacing the drill.
The devices first began to be used back in the 30s of the last century. As a result of developments, manufacturers came to the conclusion that the simpler the design, the more reliable the fixation.
The main advantage of the key sample is that it securely secures the gimlet in the hammer drill.
Keyless chucks are tightened using the operator's hands. Depending on the design features, they are divided into samples with one and two couplings. The operating principles of the devices vary.
It is easiest to deal with a single-sleeve clamp, but it is used only in conjunction with drills and rotary hammers that have automatic locking of the working shaft. You can use just one hand to secure the attachment, making work easier.
To use a double clutch clamp, you need to hold the rear clutch with one hand and rotate the front shaft with the other.
Is it possible to insert a drill bit from a conventional drill into a hammer drill?
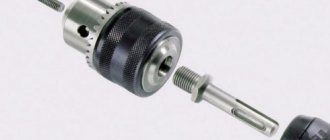
If you need to place a drill from a conventional drill (for example, the Interskol model) into the hammer drill , you will have to use a special adapter. This is a common chuck that is used on an electric drill. They are also divided into quick-clamping or key. into the cartridge (hereinafter - securely clamped), on one side of which there is a thread, and on the other - a shank like a standard drill.
Chucks can have different types of threads. In most cases, 1/2 inch is used, and the metric type is M12. The adapters must have similar threaded fittings. The adapter must be screwed into the cartridge , and for fixation use a special screw, which is included in the kit. It has a left-hand thread.
The assembled structure can be placed in a hammer drill in the same way as when installing a drill. As a result, the operator receives a standard electric drill, but there is a caveat: the chuck may have a little play. Do not forget to turn off the shock mode, since the assembled adapter may not withstand the load.
For reference! Some models of rotary hammers (for example, Zubr) are supplied with similar adapters. In addition, there are certain devices that have several cartridges that replace each other: one for installing a drill, the second for a drill.
The advantage of this configuration is that there will be no backlash during operation, since the adapter is adapted specifically for a specific type of hammer drill. Of course, you will have to pay extra for such a model.
Peculiarities
Using a hammer drill you can make a hole in almost any material. This device is most often used when working with concrete, brick and metal, and less often with wood.
The variety of materials requires several operating modes and a large number of attachments:
- Boers;
- drill;
- crowns;
- chisel
The main difference is their purpose.
Drill bits involve performing drilling and punching work with high-strength materials. In this case, the hammer drill performs not only drilling, but also impacts or vibrating actions. Using drills, neat holes of the required depth and diameter are made in the surfaces. Crowns are used for drilling large diameter holes. For example, under a socket. Installing a chisel or blade involves working the tool like a jackhammer.
A significant difference is the type of fastening, which for all attachments, except for drills, is suitable exclusively for a hammer drill, since it has a mounting tail and fastenings in the form of grooves for this tool.
But you can also attach a regular drill bit from a drill to a hammer drill. This requires an adapter called a removable cartridge. This device comes in two types:
- cam;
- quick-clamping
The name of the type itself determines the type of drill clamping mechanism. The cam clamp is operated by a special key, which is inserted into the thread on the outer perimeter and turned. In this case, the collet mechanism installed inside the chuck is compressed or unclenched, depending on the direction of movement of the key.
Possible cartridge malfunctions and their elimination
During operation, the operator may encounter some difficulties that need to be corrected immediately to prevent more serious problems from arising. To repair a rotary hammer (for example, Hammer brand) yourself, you need to know the external manifestations of malfunctions.
The most common problem is that the drill does not fix well and flies out of the socket during operation. This usually happens when the tool is used for a long time.
The only reason that causes such a malfunction is wear of the cartridge. To fix the problem, it must be disassembled. In most cases, the balls that are installed inside are subject to deformation and wear appears on them. The problem may also be a retaining spring that has sagged significantly.
Important! These components cannot be repaired, so you should replace them and install the cartridge back.
Sometimes there is a situation when the cartridge is not attached to the device itself. In this case, it is necessary to check the fastening of the cartridge body, which is most likely worn out due to long-term operation. The unit is located at the end of the raster sleeve and is a locking ring. If it breaks, the fixation will be broken, and if shocks occur, the ring will fly off.
To eliminate the damage, it is necessary to replace the retaining ring. This is done as quickly as possible, and there is no need to use additional devices. The technician will only need a regular flathead screwdriver.
Removing the stuck nozzle
If the drill gets stuck in the socket of the locking mechanism, you need to partially disassemble the chuck. Using any flat screwdriver, carefully pry up the edges of the boot and remove it. Underneath there is a socket with a hole, along the edges there is a retaining ring. We press on the edges of the chuck to release the drill, while simultaneously prying up the stopper with a screwdriver and remove it.
After such disassembly, the free movement of the mechanism increases, the damaged drill is freed and can be easily pulled out. We assemble the tool in reverse order.
Sequence of removing a drill from a hammer drill
To remove a drill from a hammer drill (Dexter or another company), you need to follow the following guidelines:
- First, look at what cartridge is on the device. If you need to attach a drill to a hammer drill, which is held on a double-coupling element, you simply need to switch the device to reverse mode. You need to hold the lower coupling with one hand and unscrew the upper coupling with the other.
- If a single-socket fastening is used, the nozzle can be unscrewed with one hand. The drill is held by an auto-locking device.
READ What does a hammer drill consist of?
The operation is not complicated and with any type of fastening it will take less than a minute. But problems with jamming may arise, in which case more effort will have to be made.
You don't need instructions on how to secure the drill bit in the hammer drill - you just need to do everything in reverse order.
If the nozzle gets stuck
Like any tool, even the highest quality hammer drill can jam. When performing work, this becomes a problem that has several options and reasons.
Firstly, when the drill is stuck in a removable chuck, and secondly, if the nozzle is jammed in the hammer drill itself.
When the problem is in the tool clamp itself or the removable head, then simply pour a little liquid like WD-40 into the chuck and wait a little. The composition will relax the grip of the clamping device and the drill can be removed without problems.
There are times when there are no special mixtures or auto stores at hand. The solution may be ordinary kerosene. It is also filled in, and after waiting 10 minutes, they try to release the nozzle. In this case, light tapping on the clamp and slight shaking of the drill are acceptable. After completing the procedure, the clamp must be thoroughly cleaned and lubricated.
Used hammer drill bits
A rotary hammer (from DeWALT or other manufacturers) is a multifunctional device. But its multitasking depends on the selected attachments, of which there are quite a few on sale:
- Construction drills for drilling concrete (large caliber).
- Drill bits (creating wells).
- Chisels (for working with metals).
- Shovels (for chipping uneven parts of concrete).
- Peaks (creating holes in concrete or brick).
From this list, drills are especially popular among builders because they are extremely useful in their work. Other types of attachments are used much less frequently, but can still be very useful during construction. Changing the “bits” is not difficult - everything is done according to the same scheme.
Important! Many DIYers try to convert the factory attachments they already have in order to adapt them for specific needs. Experts do not advise carrying out such operations at home, since the integrity of the drill will be compromised, and if it breaks, the technician may be seriously injured.
The tool gets very hot
This happens when the tool is used intensively. It is recommended to take breaks from work and turn off the power to the hammer drill, and then let the engine idle.
If the “gentle” operating mode does not help, the tool is disassembled and possible problems in the engine are diagnosed using a multimeter.
If the drill breaks
When using low-quality bits, they sometimes break, leaving the tail part of the drill in the socket. Usually it is not pulled out, remaining inside the well of the nest. In this case, a welding machine, thin electrodes, or a thin plastic tube selected according to the diameter of the cartridge well will help remove the fragment. We insert the tube into the socket and rest it against a piece of the drill.
We connect the welding machine, connect the ground to the tool, press the chuck lock to the nozzle release position, and carefully insert the electrode into the plastic tube. We quickly touch the fragment with the electrode. The task is to weld the electrode to the shank for its subsequent removal from the fixation mechanism.
When the shank is crumpled, sometimes the fragment cannot be pulled out due to welding of the electrode; in this case, we will use the partial disassembly of the cartridge described above.
Use drills that are known to be of high quality, and try to avoid the stage of drill jamming. If you purchased a drill of unknown quality, do not lean on it, make three holes in the wall, usually this is enough to find out whether the shank is wrinkled or whether you are purchasing a high-quality one. Try to remove it, and it will immediately become clear what quality the purchase is.
Any power tool must undergo regular maintenance. First of all, this applies to those devices that directly interact with dust. This is a drill and a hammer drill. Changing the lubricant in moving parts significantly increases service life and prevents overheating during operation.
Do the replaceable attachments of these tools need lubrication?
There is only one answer - yes, it is necessary. Their design provides for minimizing the influence of dust and various abrasives on the working surface, but in some cases this is not enough. This is precisely why manufacturers offer various lubricants with different functionality.
Unlike a conventional drill, a rotary hammer has a different method of attaching the attachment, which has the abbreviation SDS. Some mobility of the nozzle in the mount is provided in order to reduce the load on the hammer drill. This mobility causes heating and sometimes overheating of the working surface of the fastening, thereby increasing wear. Therefore, lubrication in this unit is necessary.
In addition to heating, the accumulation of dust in this place is dangerous. Therefore, during work it is recommended to remove the nozzle and clean the grooves. With good lubrication, an anti-friction coating is created that protects the surface even in the presence of cement and brick dust. The rules for using such a lubricant are described in detail in the instructions for it. It is important to remember one more point. The tip of the nozzle, the one that chisels and drills, is under no circumstances lubricated by anything.
The composition of the lubricant is usually kept secret by the manufacturer. But by examining the conditions in which the device operates, we can draw some conclusions that are close to the truth.
- Groove longitudinal loads. They can strip the surface of the oil film;
- Multidirectional loads on a ball-and-groove coupler. In the interior of this unit, the oil is squeezed out almost completely;
- End load on the base of the chuck;
- Continuous exposure to abrasives and dust.
These conditions allow the lubricant to work effectively only for a short period of time before the next complete replacement. It follows that the lubricant must have the following properties:
- Viscosity must be maintained over a wide temperature range;
- The temperature of transition to the liquid state should exceed the operating temperature by several tens of degrees;
- Lack of reaction to interaction with rubber or plastic;
These conditions are the same as oils used in automobile transmissions. Knowing these little things, you can choose a lubricant suitable for working conditions.
Owners of power tools who use them quite intensively sooner or later have a question: why does the drill fly out of the chuck of a Black & Decker, Bosch, DeWalt or other brand of hammer drill? This phenomenon not only makes it difficult or impossible to continue working, but is also unsafe for the user and others.
Practice confirms that in almost 100% of cases, malfunctions associated with equipment incontinence can be promptly eliminated in a professional workshop. The cost of the service depends on the complexity of the problem and the brand of the tool.
Disassembly and assembly procedure
Having cleared and freed a place in the workshop for repair work on electrical equipment, and prepared the necessary set of tools, the hammer drill begins to be sequentially disassembled to determine the malfunction, carefully inspecting each component and part. The tool is disassembled according to the following scheme.
Removing the cartridge
After making sure that the hammer drill is de-energized, the installed nozzle is removed from the chuck head, after which the chuck . For this:
- Use a flat-head screwdriver to remove the rubber boot.
- Using pliers, open and remove the locking ring.
- Carefully separate the plastic anti-invasive tube-casing, making sure that the bearing balls, washer and spring do not fall out.
- The parts are laid out and cleaned of grease, after which they are inspected for damage.
Reference. In a situation where the installed nozzle is jammed in the cam mechanism of the chuck, it is recommended to tap it around with a rubber hammer, then pour in 5-7 drops of liquid lubricant. The operation is carried out 2-3 times with a break of 3 minutes, after which the attachment (chisel or spatula) is removed with pliers.
Doesn't hold a cartridge
If the raster bushing stops holding the chuck while the hammer drill is running, the reason is most likely in the locking ring. It may open or become unusable due to intense load - it can be replaced using pliers and a screwdriver.
The drill is stuck in the wall: how to get it out?
In some cases, the drill may become permanently stuck in a wall or any other surface of reinforced concrete structures. In most cases, such a nuisance occurs if a hole is drilled at a slight angle of 6 centimeters. There are several ways to remove the tool.
Instructions
The first step is to check whether the hammer drill has a reverse rotation function. If there is one, you need to turn it on and, swinging the instrument from side to side, remove it from the wall.
In addition, you can arm yourself with a drill and make another hole not far from the existing one, and by loosening the hammer drill, remove it from the structure.
If the above steps do not help, you will have to use a gas wrench. If its size is too large, you can use a steel plate as a spacer. The key should be screwed onto the drill and hit its handle with a hammer from the wall. These movements are not the most convenient, but the method is quite effective.
To remove the drill, you can also use a reverse hammer, which is easy to find in any auto repair shop. If this tool is not available, you can connect the hammer drill to the SDS connector of the attachment and pull it away from the surface being processed. This method is effective when the drill is stuck at a depth of no more than 10 centimeters.
If the drill gets stuck in the wall while drilling through and there is very little left until the end of the process, you can break through the stuck tool using sledgehammers. It is necessary to hit in the direction of drilling. It is important to remember that you cannot strike the nozzle itself - you must use a board or any other spacer to soften the impact on the drill.
To avoid these problems, it is enough to remove the drill and the hole being drilled as often as possible and clean it of dust, concrete fragments and other contaminants. In addition, a drill or other accessory can jam in the surface if too much pressure is applied to it, so the tool must be held lightly. If the structure is reinforced concrete, that is, it has metal reinforcement, then there is a risk that the drill will get stuck in it. Therefore, before starting this work, you should check the location of these metal elements with a special device.
In some cases, it happens that the hammer drill jams. Typically, this is due to the use of cheap, low quality tools. In such products, the fastenings cannot withstand the load and become deformed. In some cases, it is enough to hold the tool in a vice and try to unscrew it. In the most difficult cases, you will have to disassemble the cartridge. To do this, the first step is to dismantle the upper rubber product, as well as the retaining ring located under it.
Return to content
The design of a hammer drill chuck - what is hidden inside?
The history of the evolution of the hammer drill chuck dates back to the 30s of the last century, when the famous equipment manufacturer Bosch developed and put into production the first hammer drill . The combination of torque and pulse chiselling predictably appealed to consumers, and since then the tool has not left the shelves. However, at first, consumers were forced to put up with certain shortcomings.
In particular, the weak link was the chuck , since impact drilling had a destructive effect on this . Manufacturers have taken the path of simplification - the simpler the design of the hammer drill chuck, the stronger the part will be. Today, on rotary hammers you can find three types of cartridges, which in turn are divided into subtypes.
- Key chuck (geared, cam) - the nozzle is clamped using a special key, which brings and spreads the “fingers” inside the chuck that clamp the rod. The advantage of such a cartridge is its high reliability of fastening. But you need to spend much more time changing the nozzle than when using other types.
- Quick-release chuck (KZP) – the attachment is clamped using the force of the hands alone. There are two subtypes of such devices - double-coupling and single-coupling. In the first case, the rear clutch is held with one hand, and the front clutch is unscrewed with the other. In a single-socket chuck, everything is even simpler - the effort of one hand is enough. However, it only applies to drills with automatic shaft locking.
SDS cartridges - types and applications
In turn, SDS fasteners are divided into five different types, which differ from each other in different diameters of the landing rods. In addition to SDS nozzles, there are also SDS-plus and SDS-max. Intermediate options are SDS-top and SDS-quick. The most common type is SDS-plus, which is designed for drill bits with a shank diameter of 10 mm. The shank enters the fastener 40 mm, after which the working area begins, the diameter of which can be from 4 mm to 26 mm.
The maximum permissible length of a chisel for a rotary hammer with an SDS-plus shank type is 1 m. The most common diameters of nozzles range from 6 mm to 12 mm. This type of fastener is available on light and medium category hammer drills, which are in high demand in everyday life and are sold annually in the millions of units. For reference, the light category contains tools weighing up to 3 kg, while the medium category ranges from 3 kg to 5 kg, not counting the weight of the attachments. They are designed for an impact load of up to 5 J. Professional heavy hammer drills from 5 kg can produce an impact force of up to 30 J! Accordingly, the productivity of professional units is many times higher.
In this case, only SDS-max type fasteners can hold the nozzle. It is distinguished by a large shank diameter - 18 mm, as well as the presence of another guide groove. Accordingly, the diameter of the working part of the nozzle increases to 60 mm. You should buy such construction equipment only if you plan to use it constantly. True, get ready for the fact that the cost of the unit will significantly reduce the volume of your wallet, but such costs will pay for themselves - the hammer drill will work for a very long time and with high quality. It is better to purchase proven brands.
The hammer drill does not hold the drill in the chuck
A universal chipping tool with a rotary impact mechanism, also known as a hammer drill, is used by construction crews, electricians and repairmen. They also use it in the home workshop.
READ How to Choose a Drill for Home Use
Like other electrical appliances, a rotary hammer sometimes breaks down. Take it to a service center and leave a certain amount there, or take advice and repair the instrument yourself - everyone decides for themselves. If the decision to repair a rotary hammer at home has been made, you should first study the features of its design and the advice of experts on diagnostics and repair.
The brushes sparkle
When the brushes sparkle, the first thing it is recommended to do is clean the tool from dust. If the effect of sparks does not stop, the device is disassembled and the integrity of the brushes themselves is checked. If necessary, one or both brushes are replaced to avoid shorting.
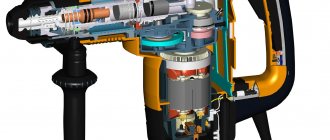
Hammer hammer impact mechanism
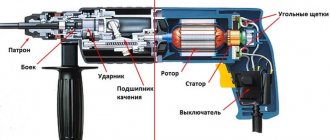
Most modern rotary hammers have an electro-pneumatic impact mechanism. “Electric” means that the mechanics are driven by an electric motor, and “pneumatic” means that the striker hitting the drill shank is driven by air.
- Engine rotation transmission gear
- "Drunk" bearing
- Piston
- Drummer (“flying piston”)
- Trunk
- Striker
- SDS cartridge
When you press the button, the engine transmits rotation to a shaft with a “drunk” bearing, which in turn drives the piston inside the barrel. As the piston moves forward, air pressure increases between it and the striker. The striker moves towards the striker and hits it. The striker transfers the impact energy to the drill. Then the piston moves in the opposite direction, creating a vacuum area in the barrel. Due to this, the striker returns to its original position, after which the entire cycle is repeated.
Most rotary hammers have two or three operating modes:
- combined mode: impact and rotation of the drill;
- Rotation lock mode: only the impact mechanism works;
- impact blocking mode: the hammer drill can be used as a drill or a mixer for preparing building mixtures.
"Drunk" bearing
It is mounted on the shaft at an angle and drives the piston. If there is wear or damage, the bearing must be replaced.
Striker and striker
These parts are made of high-strength steel. The firing pin rarely fails, but the bushing in which it moves absorbs some of the impact energy and breaks down over time. The fragments jam the firing pin and the hammer stops hitting.
The firing pin (“flying piston”) has a compression ring. When it wears out, part of the air passes into the gap between the cylinder in the barrel and the firing pin. The more wear, the weaker the impact. The problem is solved by replacing the ring with a new one.
Sometimes the striking part of the “flying piston” breaks on the firing pin. This is usually the result of pressure on the hammer when drilling holes. The drilling speed does not increase, but the load on the mechanism increases, which accelerates wear. Repair consists of chamfering on an emery machine or replacing a part.
How to insert a drill bit into a hammer drill
Installing a native drilling element is much simpler, since it does not require an additional adapter. You just need to follow a simple algorithm of actions step by step:
- Place the back of the hammer drill on a hard, stable surface - the floor or table, with the chuck facing up.
- Take the cartridge body with one hand and gently pull it down towards the unit shaft.
- With your other hand, insert the drill bit into the hammer drill chuck at a right angle until you hear a click. If, after the sound, the drilling equipment fits securely into the groove, then everything was a success.
- Release the nozzle to its original position.
The shank of the new drilling attachment must be thoroughly lubricated before the installation procedure. To do this, purchase a special lubricant for drills.
Lubrication
Causes and possible solutions to the problem when there is no hammer blow
When drilling holes with a hammer drill, the main factor is not the rotation of the drill, but the impact. Both the drilling speed and the ability of the tool to cope with particularly hard building materials (concrete, granite and others) depend on its strength.
Dust and constant loads on the tool negatively affect its performance. During operation, the impact force may noticeably decrease or disappear completely.
How does a hammer drill and why does it “refuse” to hammer?
Lubrication
Untimely replacement of lubricant can also be the reason for the lack of shock. Working with a hammer drill involves the presence of dust, which does not have the best effect on the properties of lubricants. Dust can clog the holes in the cylinder that allow air to circulate when the impact mechanism operates. The same effect cannot be ruled out when using too thick a lubricant not intended for hammer drills.
Mode switch
Mechanism parts may come out of the guide grooves. This may be a consequence of deformation, wear, or frequent use of the tool with the mode not fully engaged. The malfunction is eliminated by installing the parts in their places or replacing them with new ones.
How to disassemble a cartridge and remove stuck equipment
Start by disassembling the cartridge so that it does not interfere with the removal of the gearbox housing.
- Remove rubber boot 1, retaining ring 2 and plastic boot 3.
If a drill or other equipment cannot be pulled out of the chuck, there are two options for solving this problem:
- Clamp the tool in a vice. Slightly shaking the hammer drill , pull it towards you;
- Clamp the hammer drill in a vice through the rubber gaskets so as not to damage the plastic housing. Clamp the end of the equipment with a gas wrench. Tap the key with a hammer in the direction of the axis of the tool.
The second option is used as a last resort. If after several blows the drill or chisel cannot be pulled out, stop. You may damage the hammer drill . Disassemble the cartridge and gearbox. Try to knock out the equipment with a drift. After this procedure, the raster sleeve will most likely need to be replaced. To avoid this problem in the future, lubricate the end of the equipment.
Tools
0 votes
+
Vote for!
—
Vote against!
It is difficult to imagine carrying out construction or repair work without the use of a specialized tool - a hammer drill. Rotary hammers are produced in three classes: light, medium and heavy. All of them are equipped with a chuck with the ability to quickly change tools using the SDS system. The Germans say Steck-Dreh-Sitzt in the English version - Special Direct System - whichever is more convenient for you. A standard developed by Bosch in the mid-70s of the last century.
Table of contents
- SDS shank - what, how, where
- Classification of equipment for rotary hammers video, video
- Selection and installation of drills for a rotary hammer
- Choosing a drill bit manufacturer for a rotary hammer
- Sludge removal rate
- How to insert a drill bit into an SDS chuck video
- Hammer chuck malfunctions video
SDS shank - what, how, where
For convenient work, quick change of working tools, as well as to increase the contact area of the drill shank with the chuck, the SDS standard was introduced.
Bosch has developed 5 types of shank:
- SDS - the first representative of its class, shank with two grooves;
- SDS-plus - developed on the basis of SDS and is fully compatible with it, supplemented with 2 grooves. The diameter of the shank is 10mm. Used in light hammer drills. Maximum drilling diameter – up to 26mm;
- SDS-top – reinforced SDS-plus, shank diameter – 14mm. Designed to eliminate drill breakage when drilling large diameters 16-26mm. Requires installation of another chuck on the hammer drill.
- SDS-max is the standard for heavy professional rotary hammers. The diameter of the shank is 18mm. Hole diameter – from 20mm.
- SDS-quick is a system developed in 2008. Used only on specialized equipment (several models of Bosch rotary hammers). Compatible with ¼" holder
Two standards have become widespread and popular: SDS-plus - for light rotary hammers and SDS-max - for heavy ones, as they are the most popular in the construction market.
Classification of equipment for rotary hammers
A modern hammer drill is a multi-purpose tool. It is enough to choose the right equipment and you will have the opportunity to perform a wide range of construction work, from removing tiles in the bathroom to expanding a door or window opening.
Most rotary hammers on the market operate in three modes:
- chiselling;
- drilling;
- drilling
Yes, that’s right, drilling with impact is called drilling. Each operating mode has its own equipment. Modern drill sets for rotary hammers provide for most basic operations.
Impact mode is the main mode of operation of the instrument. Depending on the hammer drill model, the translational movement of the piston transfers energy to the impact mechanism and to the equipment (pneumatics). In some lightweight hammer drills, they are driven by a mechanical system - springs.
Bosch rotary hammers are also equipped with an additional function for rotating the chisel at a given angle (46 positions) - vario lock.
Impact mode uses:
- shoulder blades;
- peaks;
- channel chisels;
- semicircular chisels;
- serrated incisors;
- mortar cutters;
- tamping plates;
- core boards;
- sledgehammers.
The drilling mode is used when drilling holes in concrete, brick and masonry. The simultaneous use of impact and rotational motion ensures rapid destruction of the material in the cutting zone due to crushing and subsequent removal of material. The drills used for this type of work are called drills or hammer drill bits. Also, in hammer drilling mode, core drills are used to select material for future installation of socket groups and switches. The length of the drill bit for a hammer drill ranges from 100mm to 1m.
Drilling mode is used for drilling wood, plastic and other soft materials. Also, a lightweight hammer drill (up to 3 kg) can be used as a screwdriver.
Important. The non-impact drilling mode must be used under certain technical conditions. When operating only in rotation mode, the hammer drill must be switched to rotation mode with impact and rotated at idle speed to distribute the lubricant inside the tool.
Selection and installation of drills for a rotary hammer
As was said earlier, among the 5 Bosch standards, two have become widespread: SDS-plus - with a shank diameter of 10 mm and SDS-max - with a shank diameter of 18 mm.
Accordingly, most equipment is made to these standards. Of course, it is possible to use equipment with an SDS-max shank on light rotary hammers, but this is not advisable due to their low power, which will lead to a decrease in tool life.
Choosing a drill bit manufacturer for a rotary hammer
There are only one and a half dozen (to be more precise, 14 companies) manufacturers of drills for rotary hammers registered in the world. At the same time, several brands can be produced at one plant. Thus, in Germany, the DreBo Werkzengfabrik plant produces products for Hitachi, AEG, Milwaukee, and Wurth.
In this case, there is no doubt about the quality of the drill. Moreover, these brands are also successfully produced in China.
If you want to purchase a product made in Europe, then you need to turn your attention to the products of ALPEN-MAYKESTAG, one of the leading manufacturers in Europe. Complaints for products amount to 2 pieces. per 1 million. The company's factories are located in Austria and Italy; there are no company factories in China.
But not all China is of bad quality. So, the same Bosch has its factories in China. Products manufactured under the Bosch brand are no worse than their European counterparts, and in some cases even better. The main thing is to get to an industrial manufacturer, not a handicraft manufacturer.
Sludge removal rate
Sludge removal is one of the most important properties of drills. The quality of drilling directly depends on the rate of chip removal. For shallow holes (up to 60mm), drills with a slight steepness of helical grooves are well suited. For more intensive drilling, it is necessary to use a drill with a steep spiral. The disadvantage of this equipment is that it reduces the strength of the drill body.
Auger drills remove sludge as quickly and efficiently as possible. They are the most effective for drilling deep holes.
How to insert a drill into an SDS chuck
Installing a drill into an SDS chuck is not difficult.
Before installing the working tool, you should make sure that the tool is in good working order, make sure that there are no chips or cracks on it, and check that there are no breaks in the rubber boot. It must be cleaned of dust. After this, you need to apply a specialized lubricant to the splines of the equipment and forcefully insert it into the hammer drill chuck.
You need to press until you hear a click. Pull the drill towards you; if it does not come out, the installation was successful. To replace the drill, you need to press the chuck ring along the axis towards the tool and remove the drill.
Important: During operation, the drill heats up; change equipment only with gloves to avoid burns.
To increase the service life and prevent accelerated wear, the tool, like the equipment, must always be kept clean, removing excess lubricant and dust adhering to it.
Hammer chuck malfunctions
Since the hammer drill operates under very difficult operating conditions, breakdowns cannot be avoided. Most often, hammer drill cartridges fail. Sometimes the drill bit may fly out of the hammer drill, which indicates wear on the ball or washer of the chuck. In this case, they must be replaced in accordance with the manufacturer's instructions.
If used incorrectly, the drill bit in the hammer drill chuck can break. In this case, two scenarios will arise.
First, remove the sealing washer, plastic clip and stopper. Remove the bushing and retaining ball. The drill shank should come out freely from the hammer drill barrel.
Another option is to flatten the back of the shank. In this case, it will be necessary to disassemble the entire hammer drill in order to “sink” the drill shank into the tool barrel. This procedure can be carried out independently if you have experience or at least a detailed diagram of disassembling the tool. But it is better to entrust this work to professionals.
Important: in order not to break the drill bit in the hammer drill, it is necessary to regularly remove it, inspect the shank, remove dust and grease, and apply new lubricant.
Operating the tool in accordance with the manufacturer's requirements will ensure the tool's service for many years.
How to disassemble a hammer drill
Disassemble the hammer drill sequentially. Inspect all details carefully. Even if you are looking for a problem in one unit, you may find damaged parts in other units. When disassembling the tool, the body should be cleaned of dust and dirty grease.
Repair of raster bushing and impact bolt
To disassemble the raster bushing, you need to compress the spring, remove the retaining ring and gear.
Raster bushing assembled and without gear
Raster bushing assembled and without gear
The impact bolt is repaired by replacing parts or replaced completely if it has fallen apart.
- The raster bushing has holes on both sides in which the retaining ring is clearly visible. Use a small flathead screwdriver to pry and slide the ring on both sides.
Yamobur
Owners of dachas or private houses are often faced with the need to dig holes for fence posts or pile supports. To drill the earth, both manual tools and those equipped with an electric or fuel drive (for example, gasoline) are used. In the first case, the work will take longer and also require greater labor costs. Buying or renting powerful devices is expensive, so craftsmen have figured out how to make a homemade hole drill from a hammer drill.
READ Grinder won't unscrew What to do
But homemade devices, compared to factory-made analogues, have the following disadvantages:
- they can only drill relatively shallow holes of small diameter;
- They are not suitable for working on hard soils.
Structurally, homemade devices consist of three parts:
- hammer drill;
- conventional earthen auger;
- adapter or gearbox.
The last 2 parts of the device can be made with your own hands. They even sell a special attachment (auger) for drilling, which is attached to a powerful hammer drill or drill. A working tool made in this way is shown in the photo below.
An important point is the amount of power and the number of revolutions of the hammer drill, which will be used in conjunction with the drilling device. The optimal value of the first parameter for a manual model of a homemade pit drill is 2 kW. It should be taken into account that, depending on the number of revolutions, the drill can be connected directly to the hammer drill chuck or through a gearbox. For 2 kW models the latter is not needed.
The optimal number of revolutions of the working nozzle for drilling is from 60 to 300 per minute. This value depends on the properties of the soil in the area.
- continuous;
- with periodic removal of soil.
In the first case, you will need a more powerful tool (with more torque).
Algorithm for making a homemade drill
To make a hole drill with your own hands, you will need, in addition to a hammer drill, the following tools and materials:
- angle grinder;
- a welding machine with the appropriate grade of electrodes for the metal used;
- electric drill;
- unnecessary hammer drill;
- metal fittings or rod for making a rod;
- material for the cutting part;
- cable and sockets to make a simple extension cord.
The work of converting a hammer drill into a device that can be used to drill holes in the ground lies directly in creating the nozzle. All work is performed in the following sequence:
- cut a piece of the required length from a rod or tube using a grinder (about a meter is enough if the power of the tool is 2 kW);
- knives are attached to the lower end (connection methods and design features of the cutting part are discussed below);
- cut off its base from the drill, intended for installing this attachment in the hammer drill chuck ;
- weld the cut piece to the tube.
The simplest version is ready for use in work. If you do not use the base from an old hammer drill, you will need to grind a seat from a rod for chuck or for the adapter you are using.
In addition to the manual model, you can make something like a stationary drilling rig, a possible version of which is shown in the photo below.
To provide power to a homemade pit drill, you will need to purchase or make your own extension cord.
The operation of the created device is shown in the video.
Vibrator from a hammer drill
To put the project into practice, you will need the following materials and tools:
- metal (steel) plate of the required dimensions, thickness from 50 to 70 mm;
- an iron rod or reinforcement (rectangular or round) of such length that it is possible to reach the bottom of the exposed formwork structure when pouring concrete;
- perforator;
- an old drill or a pick, a shovel, a chisel, even a crown;
- grinder with metal discs;
- welding machine with electrodes;
- ruler or tape measure;
- marker.
The minimum power of the hammer drill should be 1.5 kW - only such a tool will provide the required performance without overheating.
One side of the rod with a cross-section of 15-20 mm is processed so that it can be inserted into a punch chuck . A stainless steel plate is welded to the second side. For this you will need special electrodes.
Why do drill bits fly out of a rotary hammer \ SDS \ SDS chuck does not hold the equipment
It is better that the rod is also made of stainless steel. Concrete is an aggressive environment. Ordinary metal is highly susceptible to chemical attack and also wears out faster mechanically.
The sequence of manufacturing the tamping nozzle is as follows:
- Using a grinder, cut a rectangle of the required size from a steel sheet, and a piece of the required length from a round or rectangular rod;
- weld the plate to either end of the rod;
- cut off the drill seat with a small margin;
If you do not use an old drill, you will need to make a special adapter for the hammer drill chuck, or use machine tools to grind out a seat at the free end of the rod. The easiest way is to immediately use a drill of the required length. On the basis of a hammer drill, you can make more complex devices, for example, with a flexible shaft, which will additionally mix the working solution.
A homemade tamper for small-sized concrete (the simplest manufacturing option) is presented in the video.
Ways to get a drill out of a hammer drill
As soon as the drill jams in a concrete wall, floor or any other similar structure, you must immediately turn off the rotation mode, if enabled, and leave only the impact. After this, you need to pull the tool towards you, while tugging it in the other direction from the surface in which it is stuck. These movements will cause the drill to break part of the concrete layer holding it, after which it should simply and effortlessly come out. This method will help both when the drill gets jammed in a wall structure due to a large fraction, and in case the product gets into the reinforcement.
Another easy way to remove the drill bit from the surface is to use the reverse rotation function. This function is not available on all instruments; in addition, its use leads to the licking of the drum assembly of the mechanism. If the device has a warranty, then you can try to remove the drill using this method.
By clicking on the link, you will learn how to make your own concrete vibrator from a hammer drill. Read about how to choose the right hammer drill in this article. You may also be wondering what types of crowns are available for drilling concrete.
There is also a rather extravagant way of extracting the drill. To do this you will need a gas key. It must be screwed onto the nozzle, and then unscrewed in the opposite direction. This method works because the gas wrench has a fairly long lever that can be used to apply a lot of force. But if this method still doesn’t work, you can try knocking on the handle of the key with a hammer. At the same time, the hammer drill should be loosened from side to side. The combination of these movements will cause the drill to come out fairly quickly.
In some cases, before removing the drill from the hammer drill, you will have to make several additional holes with another tool. As a result, a large hole should form around the drill, the diameter of which should be about 10 centimeters. The drill will come out along with a fragment of the wall; the resulting hole can later be repaired. This method is suitable in cases where it is impossible to either close the drill in the wall or cut it off.
If none of the above methods work, then the nozzle will simply have to be cut off with a grinder, beaten with a sledgehammer, or covered with something.
Now let's talk about what to do if the drill gets stuck in the hammer drill. Most often this occurs due to the fact that the shank material cannot withstand the loads and is deformed. To remove the tool, it must be firmly clamped in a vice. After this, you need to turn on the reverse on the instrument, it is advisable to set it to maximum power. The start button must be pressed with some breaks, since prolonged operation in this mode will lead to damage to the power unit of the device.
After the product is wedged, the hammer drill should be sharply pulled out of the vice. They will contain a drill that is no longer suitable for use. If there are no vices nearby, you can limit yourself to a thick wooden board. The hammer drill must be configured for drilling, but at the same time turn on reverse. You need to drill until the tool “bites”.
Return to content
Homemade hammer drill: concrete vibrator and hole drill
When pouring concrete, each layer is compacted. This is done manually by punching the mixture laid in layers with rods made of different materials (metal, wood). All work can be done much faster with the help of special devices - vibrators. But a factory-made vibrating plate purchased for home use is not always an economically viable option because it is expensive. It doesn’t make any sense to work on it several times and then leave it to just lie there. In this case, you can make a vibrator for concrete from a hammer drill with your own hands. A homemade product will speed up the compaction process and improve the quality of the work.
Manufacturing of the cutting part
- circular saw blades of suitable diameter;
- ready-made augers from factory motorized drills or agricultural machinery;
- a metal sheet from which circles of the required diameter are cut, sharpening them and bending them as required.
The cutting part can be made removable (with a bolted connection) or non-removable (welded to the rod). Both options are shown in the photos below.
The design of the cutting part must meet the following parameters:
- be larger in diameter (5 mm is enough) than this parameter for the holes being created;
- the angle between the blades needs to be 25-30 degrees;
- The front (cutting) part of the knives should be sharpened at an angle of 45°-60°.
It is advisable to make the tip of the drill from a drill designed for drilling metal, so that the tool penetrates the soil mass more easily.
At its core, converting a hammer drill into a vibrator or earth drill consists of manufacturing an attachment that is appropriate in functionality and size. Difficulties can only arise if you independently prepare a seat for a cartridge or adapter on the rods. In general, the production of the considered options will not require much time and effort.
Sources:
https://psydesign.net/perforator-ne-derzhit-bur-v-patrone/ https://pro-instrument.com/ruchnoj/prichinyi-i-vozmozhnosti-ustraneniya-problemyi-kogda-perforator-ne-dolbit. html https://grounde.ru/remont-perforatora-svoimi-rukami.html https://tehnika.expert/dlya-remonta/perforator/samodelki.html
Recommendations for preventing such cases
In most cases, the use of drills that are made by well-known manufacturers is a reinforced concrete guarantee that the tool will not get stuck in the hammer drill. Unfortunately, the modern market is flooded with low-quality products, so you should check the purchased product immediately. To do this, you just need to make several holes in the concrete product.
If after these operations the drill can pass through the shank without any extra effort, then this tool is truly of high quality. If deformation has begun, then at this stage the product will simply be removed from the clamping mechanism. It is important not to miss the moment when these changes begin in order to prevent serious jamming of the drill in the hammer drill.
A similar problem can also arise from the decision to use fairly powerful equipment for solid objects, but leave the drills as usual. Even the highest quality products that are not designed to process any material will quickly fail and become deformed. Therefore, special attachments should be used for each type of material.
It is important to remember that it is not always possible to remove the attachment from the hammer drill yourself. Therefore, you simply cannot do without visiting a service center, which will lead to loss of warranty. The fact is that using low-quality or inappropriate equipment is a user error.
Return to content