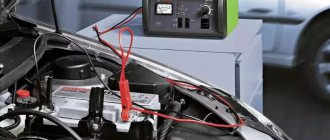
When the key is turned in the ignition, it is the battery that provides the impulse to start the engine. If the battery is completely discharged, the car is unlikely to move. It is for this reason that it is important to check the car battery in a timely manner (with a multimeter, for example), because problems noticed in time will not only allow you to avoid searching for someone to light a cigarette, but will also save you from much larger problems. Checking a car battery should be comprehensive and thorough and include both an external inspection and a check of the “inner world”, as well as electrical indicators.
Visual inspection
First of all, carefully inspect the battery: normally it is dry, clean and without signs of damage. It's bad when:
- the surface of the battery is heavily contaminated;
- terminals are oxidized;
- the battery case is damaged;
- There are traces of electrolyte.
Any of the items listed will lead to rapid discharge of the battery, and therefore increase the risk of getting into unpleasant situations. What to do?
External contamination of the battery can be easily removed with a rag soaked in a 6% soda solution (about a tablespoon per glass). You should avoid getting contacts, wires and heavy flooding with water.
The same solution will help deal with terminal oxidation - apply the mixture to contaminated areas, wait a couple of minutes and thoroughly clean with a brush (not a metal one!). After the procedure, rinse the cleaned surfaces with distilled water.
If the oxidation is extensive, then the first step is to resort to mechanical cleaning, the main thing is not to damage the wires.
Remember that such work must be carried out with the engine turned off and the terminals removed from the battery! Also, do not flood the wires and be sure to wait time for any remaining moisture to evaporate.
Final tips
Now you know how to check the health of a car battery yourself and what tools you will need for this. And in conclusion, a few simple tips that will help you when using a car battery:
- keep the battery clean. Regularly wipe off traces of oil and electrolyte leaks, dust, and dirt. Clean terminals and terminals from oxidation. It is better to coat them with a special lubricant for electrical contacts;
- periodically charge the battery from a network device. Recharging can be done once a quarter, and even more often in winter;
- Periodically check the electrolyte level in the battery banks and do not allow it to fall below the minimum level. In the summer, when the heat boils the battery, the check needs to be done more often;
- check the electrolyte density on a charged battery. The standard value is 1.27 g/cm3. In winter, it is recommended to raise this value to 1.29 g/cm3;
- Make sure that the vehicle's on-board network is in good condition (alternator, voltage regulator, wiring).
Exploring the inner world
The battery check should continue with electrolyte measurements. It is he who is responsible for most of what happens to the car. The electrolyte is checked according to the following parameters: density and level.
To check the level you will need a glass graduated tube. Unscrew the washers covering the so-called banks - sections in the battery. Lower one end of the tube all the way down and close the upper end with your finger. Pick up the tube.
It is optimal if the solution covers the upper edge of the plates by 10–15 mm. The total liquid content should be 30–40 mm. So check each section.
The next step is to check the density of the electrolyte using a hydrometer. The normal value is 1.26–1.28 g/cc. see at above-zero temperatures. The indicator will be lower if measurements are taken at zero temperature, but this indicates a low battery charge.
In extremely cold weather, the density should not fall below 1.27 g/m3. see, otherwise there is a risk of electrolyte freezing.
If the density of the electrolyte is higher than the required values, and its level is lower, then it is worth adding distilled water. It is important that it is not any other water, since only the distillate does not contain impurities of salts and metals that can damage the battery.
If the density is slightly lower (1.24–1.25 g/cc), then the electrolyte is added. You can either make it yourself or purchase it in specialized stores. Excess liquid is removed using a “pear”. Any leaks of electrolyte must be removed from the housing!
Checking the density of the electrolyte in the battery (for serviced batteries)
A device for checking the density of electrolyte in a battery is called a hydrometer .
To measure the density of the electrolyte in the battery, it is necessary to place the hydrometer in the filler hole of the battery, use a bulb to draw the electrolyte into the flask so that the float floats freely and take the density reading on the hydrometer scale in accordance with the upper level of the electrolyte.
The density value for a 100% charged battery will depend on the temperature operating conditions of the battery.
Table 1. Determination of electrolyte density for various climatic zones.
Moreover, you should know that a decrease in density by 0.01 g/cm3 from the nominal value corresponds to a battery discharge of 5-6%.
Table 2. Degree of battery discharge at different electrolyte densities.
However, the values given in the table will be correct if you checked the density at an electrolyte temperature of 20-30 ° C. If the temperature differs from this range, then a correction should be added (subtracted) to the measured density value according to the table.
Table 3. Correction to the hydrometer reading when measuring density at different temperatures.
Typically, in car batteries that you can buy in a store, the electrolyte density is 1.27 g/cm3. Let’s say that when checking the density of the electrolyte in the battery, the hydrometer showed a value of 1.22 g/cm3 (that is, the density dropped by 0.05 g/cm3), this means that the battery was discharged by 30% of the nominal value.
In this case, the battery must be charged. After this, if the battery is in good condition, the electrolyte density will be restored to the nominal value. The most important thing is not to let the battery discharge by more than 50%.
It should be noted that its freezing temperature depends on the density of the electrolyte.
Table 4. Freezing point of electrolyte of different densities.
Therefore, the low density of the electrolyte in winter leads to its freezing, rapid loss of battery capacity, and sometimes even to physical deformation and the appearance of cracks.
Making electrolyte at home
For this recipe you will need a well-ventilated area, personal protective equipment (at least gloves), non-metallic utensils, distilled water and 360 ml battery (sulfuric) acid.
First, water is poured into the container, then acid is poured in small portions and carefully. The mixture is thoroughly mixed at all stages. Then the resulting mixture is left to stand for several hours, and the electrolyte is considered ready.
It is very important to pour the acid into the water, and not vice versa. Due to the difference in densities, unpleasant consequences of a chemical reaction can occur.
After the completed manipulations, but before repeated measurements, the battery must be charged using a low current. This is the moment when longer is better. After charging, the measurements are repeated.
If during measurements the readings differ in only one section, this indicates damage to the plates. Maintaining life in such a battery will cost much more than purchasing a new one.
What is the best way to test a car battery?
We have described several ways to check the condition, voltage and current of a car battery. Which one is the most accurate? We would recommend using a load plug or a cold crank current tester. If you don’t have any of these devices at hand, then you can get by with a multimeter by artificially creating a load on the battery by turning on the car’s headlights. This is not the most accurate method, but it is close to the measurement using a load fork, and therefore is quite informative.
In general, when checking a battery (including a completely new one), it is better to use several methods, including a close external inspection. In reliable auto stores, when purchasing a new battery, sellers usually check it in front of the client. If your request for inspection is refused, this is a reason to think about the performance of the batteries on sale.
Using a Multimeter
A common question is: “How to test a car battery for performance with a multimeter?” First, it’s worth understanding what is measured using this device:
- voltage;
- capacity;
- resistance;
- leakage current.
Even the simplest multimeters will help in measuring air temperature and other indicators. Hence the name: “multi” translated as “many”, which means that the device can measure a lot of things. However, when it comes to the battery, it is the first three indicators that will tell you about its health. Let's take a closer look.
How to test a car battery without a multimeter?
The simplest, but least informative method is a visual inspection. Cracks and dents on the battery case, electrolyte leaks, oxidized terminals - all these are signs that the battery is not reliable enough. True, the absence of all these signs does not guarantee that the battery is fully functional. But if they are present, it is still better to change the battery. Alternatively, you can remove dirt and traces of electrolyte from the case (this can be easily done with a soda solution) and clean the terminals with sandpaper. If, after a short period of operation, drips and oxides appear again, it means that the battery must be replaced with a new one.
Voltage check
This manipulation will allow you to assess the current state of battery charge. To carry out the measurement, the multimeter is switched to the voltage measurement mode at around 20 units. Connect the red wire of the device (also known as “plus”) to the positive terminal of the battery, and the black (sometimes blue) wire to the negative terminal.
If the car is not started, then the optimal indicators will be numbers in the range from 12.4 to 13 V. In this case, a higher value indicates a 100% charge, and a lower value indicates an incomplete charge. It is better to carry out such a check when the car has been parked for a long time (at least several hours), in which case the measurement will be the most informative.
If the numbers are slightly less than 12, then the situation is bad - the battery is close to natural death. There is a chance to try charging it with a low current. Numbers close to 11 mean the death of the battery, and it is better to take care of purchasing a new one.
When checking with the car running, the readings will be different: from 13.5 to 14 V, the readings are good. If the figure is greater than 14.2 V, then we can judge that the battery is being recharged by the generator. However, if measurements are taken in winter, you should wait 15 minutes and repeat the procedure - perhaps the generator was intensively recharging the dead battery.
If the number is less than 13.5 V, then it’s time to look for a new battery.
How to check the starting current of a car battery without instruments?
Of course, this method will not be absolutely accurate, but it is more reliable than the previous one. Start the car "cold" - if you succeeded, which in itself is not bad, - turn on the low beam. Observe the brightness of the headlights for a few minutes. If it does not change, then everything is fine with the battery. If the power of the luminous flux gradually decreases, then it is better to replace the battery. Another option is to press the horn several times 1–1.5 minutes after a cold start. A loud and steady signal is a good sign.
Capacity check
The battery capacity is usually indicated on the accompanying sheet. Another thing is that over time the capacity decreases, and it is important to keep track of this point. In this case, checking the car battery with a multimeter will be a good help.
To check, you will need:
- disconnect the car battery from the generator;
- connect an energy consumer with fixed consumption to the circuit (for example, a 12 V light bulb);
- The operation of the circuit is observed for several minutes (here it is important to see whether the light of the light bulb becomes noticeably dimmer, whether there are any interruptions in its operation, etc.);
- the consumer is switched off, battery readings are measured in voltage mode.
If the measurement result is 12.4, then this indicates that the battery is fully operational. If the readings are in the range from 12 to 12.3 V, then soon the battery may “forget how to work”.
Another method is the control discharge method. The steps are similar to the previous method, however, before starting the test, charge the battery to 100%, then connect a light bulb to the circuit, noting the exact time of switching on, and, under the control of an ammeter, wait until the battery charge is reduced by exactly half.
Next is the question of calculations: the time spent discharging the battery is multiplied by the current in the circuit. The result should be the same as in the technical passport or close to it. If this does not happen, then the battery capacity has already suffered greatly.
Measurements using special devices, battery analyzer testers
Devices Pendant
A fundamental development of the idea of a load fork can be considered the family of digital testers Kulon (Kulon-12/6f, Kulon-12m, Kulon-12n and others) for checking the condition of lead-acid batteries, as well as other similar devices. They allow you to quickly measure voltage, approximately determine the battery capacity without a test discharge, and store several hundred and sometimes thousands of measurements in memory.
Pendant devices are powered by a battery, which is used for measurements. The included wires with alligator clips have parts insulated from each other, which provides a four-clamp connection to the battery and eliminates the influence of resistance at the terminal connection points on the readings of the device. According to the developer, the device analyzes the battery's response to a test signal of a special shape, while the measured parameter is approximately proportional to the active surface area of the battery plates and, thus, characterizes its capacity. In fact, the accuracy of the readings depends on the reliability of the methodology developed by the manufacturer.
Battery capacity - the electrical charge delivered by a fully charged battery - is measured in ampere-hours and is the product of the discharge current and time. To accurately determine the capacity, it is necessary to discharge the battery (a long process, many hours), constantly recording the amount of charge given by the battery. In this case, the relative capacity of the battery varies nonlinearly depending on time. For example, for a battery type LCL-12V33AP, the relative capacity changes over time as follows:
| Discharge time, hours | Relative capacity, % |
| 0,1 | 37 |
| 1,3 | 48 |
| 0,7 | 53 |
| 1,9 | 76 |
| 4,2 | 84 |
| 9,2 | 92 |
| 20 | 100 |
The Coulomb device uses a quick measurement to approximately determine the capacity of a fully charged battery . It is not intended to assess the state of charge of the battery; all measurements must be carried out on a fully charged battery. The device briefly emits a test signal, records the response from the battery, and after a few seconds gives the approximate battery capacity in ampere-hours. At the same time, the measured voltage is displayed on the screen. The obtained values can be stored in the device’s memory.
The manufacturer emphasizes that the device is not a precision meter, but allows you to estimate the capacity of a lead acid battery, especially if the user has independently calibrated the device using a battery of the same type as the one being tested, but with a known capacity. The calibration procedure is described in detail in the instructions for the device.
PITE testers
The next type of device for testing batteries is PITE testers: Kongter BT-3915 model for measuring the internal resistance of batteries.
Control is carried out using a color touch screen, but the main control buttons are located on the keyboard at the bottom of the case. The device can test batteries with a capacity of 5 to 6000 Ah, with battery cells of 1.2 V, 2 V, 6 V and 12 V. The voltage measurement range is from 0.000 V to 16 V, resistance is from 0.00 to 100 mOhm. The device allows you to set the type of batteries being tested, measure voltage and resistance (model 3915) or voltage and conductivity (model 3918), and based on them, judge whether the battery capacity corresponds to that declared by the manufacturer or not. In this case, the Capacity parameter (battery capacity) is displayed as a percentage.
The device interface allows you to carry out both single and sequential measurements (up to 254 measurements in each sequence, the total number of results is more than 3000), which is convenient when testing a large number of batteries of the same type (in the latter case, the results are saved automatically, in addition to the data, a serial number is also recorded in them measurements). Depending on the settings, the device can use its own criteria or user-specified values to produce a result (Good, Pass, Warning or Failed status). Test results can be transferred to a computer via USB port for viewing and subsequent preparation of reports.
Fluke Analyzers
A deeper development of the same idea is the Fluke Battery Analyzer 500 series (BT 510, BT 520, BT 521), which allows you to measure and store voltage, internal resistance of a stationary battery, negative terminal temperature, and discharge voltage. With additional accessories, other parameters can be measured and stored in memory. Tests can be carried out both in individual measurement mode and in sequential mode; using custom profiles. It is possible to set threshold values for various parameters. The built-in USB port allows you to transfer collected records (up to 999 records of each type) to a computer for reporting using the included Analyze Software.
The probes of the device have a special design: the internal spring-loaded contact is designed to measure current, the external one is designed to measure voltage. When pressure is applied to the stylus, the inner tip moves inward so that both contacts of each stylus touch the surface at the same time. As a result, the same probes allow you to organize both 2-wire and 4-wire connections to the battery poles (the latter is necessary for Kelvin measurements).
- The device allows you to measure the following parameters:
- Internal battery resistance (measurement takes less than 3 s).
- Battery voltage (performed simultaneously with internal resistance measurement)
- Negative terminal temperature (there is an IR sensor next to the black tip on the BTL21 Interactive Test Probe)
- Discharge voltage (determined several times during discharge or during load test)
It is also possible to measure ripple voltage, measure AC and DC current (if current clamps and an adapter are available), and perform the functions of a multimeter. Fluke analyzers can use the BTL21 Interactive Test Probe with a built-in temperature sensor. A wide variety of additional accessories are compatible with the devices (current clamps, extension cords of different sizes, removable flashlight, etc.).
Although the device has rich functionality, the key stage in determining the condition of the battery remains the comparison of the measured indicators with those calculated or specified by the manufacturer for this specific type of battery. The Fluke Battery Analyzer 500 Series is convenient for bulk battery inspection. The sequential mode and profile system allow you to perform the necessary measurements one after another, the results are memorized by the device and stored in an ordered form, sequentially numbered and divided into groups. But the device does not have the function of directly or indirectly measuring the battery capacity in ampere-hours - if only because for batteries of different types today it is hardly possible to develop a single accurate method for such determination.
All of the devices listed above, although they differ from each other in size, belong to the portable class. A separate group includes stationary complexes for testing batteries, which can conduct quick tests with determination of internal resistance, monitor all parameters, including active and reactive components of resistance, control the discharge/charge process, etc. Such complexes are more likely addressed to research laboratories, industrial battery manufacturers and developers of new equipment than end users.
Resistance check
To understand what is happening, you can also check the internal resistance of the battery. To do this, you will need the same 12 V light bulb. It is connected to the battery terminals, and the voltage at the terminals is immediately measured. After the measurement, the light turns off and the measurement is repeated. If the difference in measurements is within 0.05 V, then the battery is working. If the difference is greater, then the battery has problems.
Checking the electrolyte level in the battery.
The next step, after checking and eliminating the self-discharge of the car battery, is to check the electrolyte level in it. Of course, this only applies to serviceable batteries.
The electrolyte level is checked using a special glass level tube, and the electrolyte level should be within 10-12 mm above the battery plates.
A level tube is an ordinary glass tube with divisions in millimeters marked on it. In order to measure the electrolyte level, you need to place the tube in the battery filler hole until it comes into contact with the separator mesh, pinch the upper end of the tube with your finger and pull out the tube. The upper electrolyte level in the level tube will correspond to the electrolyte level in the battery.
Basically, a low level is a consequence of the electrolyte “boiling away”; in this case, the electrolyte level is adjusted by adding distilled water.
Topping up the battery directly with electrolyte is done only when you are sure that the drop in level was due to a spill of electrolyte from the battery.
Before proceeding with further testing of the battery, it is necessary to assess the degree of its charge and carry out further testing of the battery after it is fully charged.
The degree of charge can be determined in two ways: either measure the density of the electrolyte in the battery, or measure the voltage on the battery.
Checking with a load fork
To obtain the most accurate measurement results, a load fork is used. Of course, this equipment is rarely seen in private hands, much more often in professional workshops or at technical diagnostic stations. However, if it does exist, then why not use it.
The load plug is a device that, like a multimeter, is connected to the battery terminals. It then supplies a short circuit current to the battery, which simulates the operation of the starter. As you know, without load the readings are about 13 V.
At the moment of turning the ignition key, which is simulated by the load fork, the readings normally “drop” down. The maximum normal drop can be up to 9 V and return to the initial reading after the voltage is removed. In this case, the battery can be considered serviceable.
If the readings drop below 9 V, then even if they return to their original state, such a battery is unlikely to start the car. It is important to remember that testing with a load fork should be carried out only in the warm season (optimally at a temperature of +20... +25 degrees), otherwise it is possible to drain the battery charge during testing.
How to test a car battery with a cold cranking current tester?
As we now understand, measuring the battery voltage is not enough, and checking with a load fork is not always possible, and not every battery can be checked correctly with it.
What to do? About 35 years ago, the technology for measuring the internal resistance (conductivity) of a battery was born in the depths of Motorola. And the first device was released by Midtronics, whose founder acquired and successfully applied a patent for this technology. Battery testers use internal resistance data to analyze the state of the battery plates and infer the battery's cranking current (CCA). The higher the CCA - cold cranking current, the greater the chance of starting the car engine in winter.
This type of battery test is practically free of the problems of load forks and a conventional multimeter. Here are the main advantages of battery cold cranking current testers:
Battery testing can be carried out in a discharged state
There is an algorithm for checking and removing surface charge - no need to wait
The test does not drain the battery - no need to charge it after the test
It is completely safe - there is no risk of short circuit
Quantitative battery analysis, not just qualitative
Why are auto shops afraid of such testers?
Quantitative analysis of batteries gives a specific figure for the measured starting current - the main characteristic of a car battery, i.e. What is the maximum current this battery can produce to start a car engine. The load plug gives an understanding of how the battery behaves under load, but not how much current it can deliver.
The testing process is similar to the previous methods - connect to the battery terminals, then select the base value of the starting current (written on the battery) - so that the tester compares the resulting value and follow the tester's instructions.
Such testers are now widespread. There are special dealer devices, as well as household models. Each has its own advantages and disadvantages. The market is also flooded with low-quality Chinese crafts.
By measuring the starting current of the battery and comparing it with the base - reference value indicated on the battery, the tester will draw a conclusion about the quality of the battery and warn you about the need to replace it. For example, in the photo, a new battery with a base value of 540 CCA, but the measured value is only 427 CCA. Such a battery will definitely let down a car enthusiast in winter.
It is worth noting that there is one last option for testing the battery and this method of testing the battery is the most correct, but long and expensive.
A little theoretical knowledge
Knowledge of how to test a car battery should also be combined with knowledge of normal values and readings and why they change.
The density of the electrolyte can change due to temperature fluctuations - overheating or hypothermia. In this case, in case of overheating, the electrolyte may boil, in which case the distilled water will partially boil away, and the electrolyte will become more dense.
In the case of cold, the electrolyte, on the contrary, often begins to have a reduced density. In both cases, the conductivity becomes worse, and therefore there are problems with the establishment, rapid “landing” and work on its last legs.
But why is any liquid so important? The thing is that the battery only looks like a small box. In fact, it consists of many parts, the main of which are conductive plates, positive and negative, which make up 6 elements connected in series. They are in contact with the electrolyte, so the electrical impulses move with the necessary force.
For what other reasons could a battery suddenly stop working? For example, just from time to time. On average, batteries work stably for 3–4 years. Of course, many work longer, but their capacity and ability to hold a charge still decreases.
Another reason is frequent battery overcharging, undercharging, or complete discharge. It is very important for a car battery to maintain some kind of average state, without strong changes.
The next reason is hidden in the generator, or rather, in its breakdown. In this case, it may either constantly recharge the battery, giving too much current, or, conversely, may not even be able to maintain the existing charge. Both options indicate the need for urgent replacement of the generator.
The last on the list of unpleasant situations is current leakage: something in the car consumes too much energy even when the car is turned off and parked. This can be determined using the same multimeter. To do this, you will need to turn off the car and remove the negative terminal of the car from the battery. Turn the multimeter into current measurement mode, set the switch to 10 or 20 units. Connect one wire to the negative terminal of the car, and the other to the negative terminal of the battery.
If the readings are other than zero, it is necessary to remove and insert all fuses and relays one by one. The readings will definitely be given by the node that drains the battery.
How to check the battery charge in a car using light bulbs?
There is another “old-fashioned” method - visual, although also not the most informative. It consists of loading the battery and seeing how it behaves. You need to know the battery capacity and create a parallel circuit of light bulbs with a total load of half the battery capacity. After connecting the circuit to the battery for 5 minutes, we observe the brightness of the light bulbs. If they dim quickly, it means the battery is either not fully charged or has already lost some of its capacity.
Checking with the engine off
The remaining indicators are checked with the motor inactive. If the battery is severely discharged, the car will be difficult or impossible to start without alternative methods . Charge level standards were mentioned at the beginning of the article.
There is one subtlety that needs to be taken into account when taking measurements. If you perform the procedure immediately after the engine has been turned off, the voltage level will be higher than after the machine has been idle. In view of this, you should check in the second case. This way the motorist will determine how efficiently energy is retained in the power source.
And finally, a small but important piece of advice from an auto electrician regarding battery drain while the car is parked:
Never do this and there will be no problems. And if it's already done, here's how you can detect it.