Main characteristics and use of thicknesser
Many builders and carpenters use a surface planer to create blanks when marking lines on wooden planes and surfaces. Using this tool will reduce the time of many works several times, especially if in your arsenal you previously only had a pencil and a measuring ruler. This is where the main advantage lies. Although you can draw lines on wood surfaces with a pencil both along and across the grain, the lines you draw will have different thicknesses at different stages of the work as the lead becomes dull.
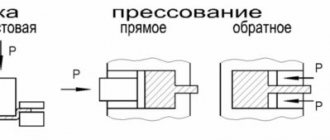
Thickness pins or blades leave a thin line along the entire path of the device, eliminating any possible vibrations. However, there is a drawback here. For example, if you use pins rather than a stylus as a tool for drawing lines, traces will remain on the material being processed, albeit barely visible, but cannot be removed. However, they are quite easy to hide under other parts and parts of the workpieces. Thicknesser can be used for:
- Marking the middle of the board for jointing and dissolving;
- Marking various connections.
To learn how to make a woodworking benchtop machine (thicknesser), even of the simplest design, first of all, familiarize yourself with the design of the tool. The device consists of four elements: a rod, clamps, pads and pins. Using a block that moves along the rod, the distance from it to the studs will be measured, and fixation is carried out using a screw clamp. The rod, most often, has a measuring scale, thanks to which you can easily adjust the tool to the required size without resorting to any additional adjustment maneuvers.
Step-by-step manufacturing instructions
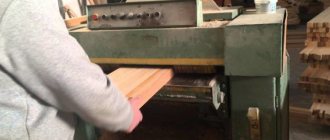
To make a household thicknessing machine, you need to prepare a workplace and perform the following steps:
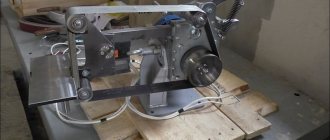
- Attach a sheet of plywood to the side edges of the plane. Mark along the contour of the protective casing and cut out a template. It should go around the electric motor casing without gaps.
- Make a template of another shape in the same way.
- Transfer the contours of the templates onto 10 mm thick plywood sheets and cut them out. Then you need to make two strips 10x10 mm thick, which will subsequently serve as guides.
- Make holding crossbars from a block. They should fit as tightly as possible to the front and back parts of the electric planer handle.
- Using a milling machine or jigsaw, cut out longitudinal grooves according to the previously applied markings. In the future, they will be necessary to adjust the thickness of the planing.
- By passing the crossbar under the back of the electric planer handle, connect the cut out parts. To fix the jumper, it is better to use screws with a countersunk head.
- Attach the slats prepared in advance to the back side of the workpiece and apply markings on them. Then you need to trim them according to the applied markings.
- For further fastening of the workpieces to each other, a through hole for bolts is drilled in the upper part. In the same place, using a cutter, a hole 4 mm deep is made. Then the fastening nuts are hammered into it with a hammer.
- Having combined both blanks, they must be fastened using bolts with pressed wooden washers. As an alternative, wing bolts can be used.
- Make a hole in a wooden block to install a guide pin into it. For secure fixation, it is better to use a lock nut.
- Install a block with a guide pin in the front part of the future machine. Secure it with countersunk screws.
- Assemble the outer frame in the same way as the inner one. Place a wing nut on the guide pin to adjust the position.
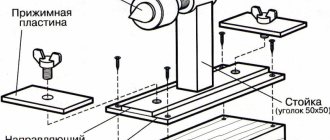
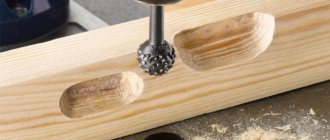
- Make a guide sheet. To do this, use a chisel or milling machine to make rounded grooves in wooden blocks, the diameter of which will correspond to the diameter of the guide pipes, and install them as shown in the picture below.
- Prepare your desktop. It consists of a sheet of plywood 10 mm thick. Stoppers are installed along the edges, on which the guide rails will subsequently be fixed.
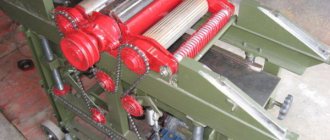
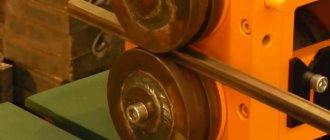
- The guide pipes must be connected to each other using plywood strips and the vacuum cleaner pipe must be connected. After this you can start working.
After watching the video, you can get acquainted with the nuances of manufacturing a thickness planer, as well as see its practical application.
Making a simple thicknesser for wood with your own hands
Many people think that making a surface planer on their own is not so profitable, since they will have to spend money on purchasing parts, materials, and spend time creating the device. However, everything is not so obvious, since economy-class tools are much worse in quality and are not as reliable as devices that are made at home.
Moreover, a thicknesser can be used in many construction areas: when working with wooden products, metal, for transferring drawings to future workpieces, in a variety of carpentry works.
To do this, we will need brass solder, 4 mm taps, various screws, and a T-shaped metal blank. Tools that will be useful are a soldering iron, an electric drill to speed up work, and dies. We also attach a drawing of the thicknesser for clarity.
Milling cutter
Finishing the workpiece and giving it a finished look is the main element of a hand router. Round the end or give it a complex profile - all you need is a little imagination and a cutter of the desired configuration.
For work of this type, edge milling cutters with low power are suitable:
If we are talking about the artistic design of solid wood products (door panels or furniture facades), then in this case it is impossible to do without a submersible model. This type of hand router is capable of working along the plane of a workpiece, decorating it with a three-dimensional pattern.
To perform such work, medium and high-power milling cutters that support large-diameter cutters are suitable:
How to make a simple thicknesser for wood with your own hands - step-by-step diagram
Step 1: Creating the Thicknesser Base
In the center of a T-shaped metal part measuring 3.5 * 7 cm, use a drill to carefully drill a hole with a diameter of 0.8 cm, then solder a tube into it, the outer diameter of which should be 1.6 cm, and the inner diameter, respectively , 0.8 cm. Thus, we will create a through channel for sliding the rod.
Step 2: Hairpin or Pencil Clip
We attach a ring clamp to one ring of the tube, which will serve as a mount for a pencil - for applying markings. At the other end we make a hole with a diameter of 0.6 cm with a thread for installing a thumbscrew. Its main task is to fix the rod in the required position. At the end of the rod where the clamp is attached, we install a soldered ring, which we equip with a clamping screw.
Step 3: Working on the Replacement Rod and Base
Our next step is to create a replacement rod in which we create several holes. One of them will be through - a hole with a diameter of 0.3 cm is drilled in it, the second hole is intended for installing locking screws 0.6 cm (M4 thread). In two places we drill a T-shaped part with an M4 thread. We will install a corrugated screw here, which will allow the tool to be used as a compass.
The many faces of a milling cutter. What tools can a router replace?
When it comes to equipping a small carpentry workshop with the minimum necessary equipment, the first things that come to mind are various machines (drilling, planing, thicknessing), electric planes, miter saws, jigsaws, etc. But a hand router is far from the first on the list priorities. But in vain! After all, this tool can replace most of what is already listed! It’s just that not every novice master knows about his hidden abilities, the images in which he can appear in his hands.
So what talents does a hand router hide?
Preparing for work - setting up and using the tool
It doesn’t matter whether you purchased the tool or whether you made the thicknesser yourself, you need to know how to properly prepare the device for work. The effectiveness of the tool itself and your safety when working with a thickness planer will depend on this. Despite the fact that the external and practical difference between expensive and cheap models is significant, their work is carried out according to the same principle. A block with a pin, a pencil or several knives for marking grooves slides inside the block. It, in turn, is equipped with a special mechanism for holding the bar or metal in the required position.
In order to get narrow and at the same time uniform lines, the pins or thicknesser knives must be very sharp. Most factory models are usually equipped with conical parts that leave an uneven mark when marking across the wood grain. That is why work should be carried out not across, but along the fibers. To achieve the best results, it is necessary to sharpen the studs sharply and equally before each marking step.
Milling cutter
Assembly without a single nail or screw is a favorite feature of self-respecting carpenters. To create such products, you cannot do without grooves and groove connections (simple groove, dovetail, lamellar connection, etc.). All of the above can be done without any problems using a plunge router in combination with a groove cutter of the desired configuration. If you do not change the settings of the milling cutter itself when producing identical or similar parts, you will achieve amazing accuracy that would be the envy of CNC machines used in mass production.
Cutting grooves places certain demands on the tool. Firstly, the milling cutter must be submersible, i.e., be able to penetrate deep into the thickness of the material, and secondly, its power must be above 1300 W:
Operating instructions: do not put yourself in danger
If you decide to build a homemade surface planer from an electric planer or other devices, be sure to take care to protect yourself during operations. The following few rules will help you not only make your work more efficient, but also eliminate possible injuries, which often happens when the tool is used incorrectly.
- When working, use eye protection;
- When working with rough material, use gloves;
- Before you begin, you need to check that all parts are installed correctly and secure them;
- Handle the thicknesser knives and pins very carefully; before work, check them for cracks;
- Check the workpieces: they must be clean, free of nails and debris that could damage the working part of the device.
- Author: Mikhail Malofeev
Rate this article:
- 5
- 4
- 3
- 2
- 1
(2 votes, average: 1 out of 5)
Share with your friends!
Milling machine
After working a little with a hand router and gaining experience, the master begins to understand that holding the router suspended is not very convenient, his hands constantly get tired, and the accuracy of the processing suffers from this. A good option is to install a router in a table. The output is a wood milling machine. In addition to the tabletop, you will need to install a parallel stop, and, as an option, install a system for removing chips from the material removal area.
As a result, the craftsman’s hands hold the workpiece, not the router, so they get tired less and can do more.
To install it on a milling table, you need a high-power tool and preferably one with a speed stabilization system under load: