Gate hinges are a simple device that serves to attach gates to posts, as well as for easy opening and closing. The reliability of the design and ease of operation depend on the choice of this mechanism.
Hinges are mainly equipped with swing structures, which can be quite heavy. Therefore, special attention must be paid to the quality of installation, namely the fastening of hinges. A person who knows how to handle electric welding can weld hinges on the gate themselves, but those who do not have such skills are recommended to turn to professionals.
Types of loops and properties they should have
In order for the gate to last as long as possible and show a high level of protection, metal hinges must have several useful properties:
- Quiet operation.
- Movement on demand.
- Resistance to attackers' weapons.
- Possibility of turning in both directions without effort.
These criteria determine the quality of the fastening device and the permissible load, exceeding which quickly makes the product inoperable. To connect heavy leaves with the frame of the gate structure, you will need 6 hinges, while 4 pieces are enough for a lightweight leaf.
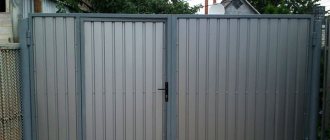
A popular type of garage entrance today is swing gates. Fastening devices for them differ in the method of fixation, shape and number of sections. The most reliable way to make fasteners is by welding.
Let's look at the varieties in which manufacturers produce hinges for swing gates.
- Cylindrical with support bearing. Maximum load – up to 400 kg. Inside the housing there is a bearing crown. Such hinges are secured by welding.
- Cylindrical with reinforcement. Their design also includes a support bearing, but in addition to it there are also plates that distribute the load between the supports and the doors. Permissible load – 600 kg. The hinges are welded or screwed.
- Through loops. The devices are used in cases where screw connections and welding cannot be used. The loops can withstand fabric weighing up to 200 kg. To fix them, they are drilled through and connected to the sash with nuts.
- Three-section overhead hinges. Able to withstand massive doors and resist burglary attempts. The hinges prevent the gate from squeaking and sagging, and also ensure smooth operation.
- Forged hinges (hinges). They are not only a holder for the doors, but also a decoration for the entire structure. The hinges look beautiful on wooden gates.
- The boom hinge is articulated or semi-articulated. The steel product is designed for thick and heavy entrances. Its range is represented by removable, regular and figured hinges.
- Adjustable hinges. Metal devices allow the owner to change the position of the sashes in height. Their use is advisable if there is a suspicion of possible displacement of the support posts in the future. Permissible load – about 200 kg.
How to properly weld gate hinges
In order for the welding of loops to be successful, you must have experience in handling welding equipment and a small set of tools:
- The loops themselves.
- Hammer.
- Bulgarian.
- Electrodes.
- Metal mounting plates.
- Protective equipment – gloves, mask, shoes, suit.
Mounting plates-gravity distributors are welded to the hinges. The size and shape are selected taking into account the dimensions of the canvas. The plates are ordinary and decorative.
The process of welding hinges onto gates is carried out in stages.
- The gate is given a vertical position, controlling the evenness with a plumb line.
- The hinges are placed on the attachment points and do not allow movement. In relation to the edge line of the sash, the parts should lie parallel.
- The loops are first welded onto the canvas, then connected to the posts.
- As welding work is completed, the seams are ground with a grinder.
If the hinges were purchased for gates made of corrugated sheets, they are fastened in a different way. Two jumpers are placed on the canvas so that it is divided into 3 equal parts. The hinges are welded to the lintels, and the corrugated sheets are mounted on top of the hinges.
Useful tips for welding gate hinges
Incorrect fastening of iron hinges to gates leads to poor operation of the gates. Over time, they will have difficulty moving or may not be able to function at all.
To prevent such troubles, experienced professionals give several useful recommendations.
- When working with straight hinges, it is better to weld on a horizontally lying gate (the leaf can be placed on the ground).
- Before welding, it is recommended to make a backing 1/2 loop long. The part should be placed under the bottom of the loop, and the top should be grabbed from the end side.
- When attaching hinges to a round post, make an external allowance of 5 mm. When working with a rectangular support, fixation is carried out flush.
- Before final fastening, a rectangular block is placed along the hinges and the devices are corrected if they are crooked.
- It is better to weld with small tacks. Actions are performed twice and from all sides.
- Before fixing the hinges from the inside, it is necessary to check the ease of movement of the gate in weight. Incorrect operation is corrected by welding, soldering several points on the outside.
- To avoid sagging of the sashes, before the final welding of the hinges of the fabric, the stand should be closed and placed in the center.
While the hinges are hot, the gate does not open. The structure can be used as soon as the devices have cooled down.
Process technology
Installing plates
Many inexperienced welders have certain doubts about the possibility of welding cylindrical hinges to a flat surface. There is no doubt that this procedure with round loops is much easier to perform than with square and hexagonal ones.
In order to properly weld round hinges, you need to take care of installing the plates - they are welded to the hinges themselves using a welding machine. It is necessary to do this with an even seam. By welding the plates to the hinges, a convenient platform is created for installing the hinges on the gate itself. These irreplaceable elements are selected in accordance with the weight of the gate and the strength of the material from which the plates are made.
Reinforcing loops with plaits
Some craftsmen weld hinges without using plates. This option is also possible, but thanks to their use the fastening is more reliable.
Installing gates
Before welding the hinges on the gate, the gate leaves must be correctly positioned in the opening of the garage or fence. The complexity of the procedure lies in the fact that the gate should be placed in the opening before the hinges are welded, that is, virtually by eye. To position the gate as accurately as possible, you need to use a building level and a lot of patience. Adjustment of the gate position should be carried out as many times as necessary until the gates are in a level position. Only after precise placement can welding be carried out.
Gate hinges with welded plates
We weld the hinges to the gate
Now let's figure out how to properly weld the hinges on the gate. Despite the apparent complexity of this procedure, it is quite possible to perform it with the proper skill and patience. Welding hinges on garage doors is carried out in several sequential steps listed below:
- Lubricate garage hinges with welded plates with grease to ensure their smooth movement after installation. Also prepare thin linings for the hinges - their thickness should not exceed 5 mm. They are necessary primarily for round hinges.
- Make the correct markings of the fabric for the loops. So, it is necessary to mark indentations from the edges of 25-30 cm. The markings are applied with a construction pencil.
- Weld the hinges to the door leaf. To do this, first weld the bayonet parts of the hinges, at first only slightly grabbing them by welding, then weld the metal from the bottom to the top, while ensuring the most even seam.
- After welding the first seam on all hinges, you need to use a level (it is better to use a construction level for these purposes) to check the correct opening and closing of the gate. If no defects are found, you can continue.
Iron loop welded to the gate
- After the installation of hinges on the gate by welding is completed, you need to carefully process all welds with a grinding machine. The last stage is painting the gates and hinges in any color you like. That's all!
As you can see, attaching the gate hinges yourself is not such a difficult task, impossible to do at home. It is enough to have the necessary equipment at hand and strictly follow the recommendations for action specified in this manual.
If you are installing garage door hinges, weld them in such a way that the doors open outward. Otherwise, big problems will arise after the snowfall.
What not to do during welding
In order for welding work to proceed without incident, it is necessary to adhere to certain rules:
- Be sure to use protective equipment to avoid harm to your health. This kit includes a protective mask, gloves for welding, a thick jacket or shirt, and pants.
- Never touch a hot welding seam with oil-soaked rags, as they may catch fire.
- It is strictly forbidden to carry out work by eye, even if you are confident in your eye and skill, double-check everything with special tools, then the result is guaranteed to be of high quality and durable.
Now you know how to weld hinges yourself and you can share this information with your neighbors or friends who are still wondering how to weld hinges on their gates without any problems.
Watch the video: Tips and tricks
General useful recommendations
Welding hinges on gates is a rather multifaceted process, to facilitate the implementation of which it is recommended to follow the following useful recommendations:
- Study the drawing in advance - the gate hinges are installed in a certain order. Then during the welding process there will be no unpleasant situations and no need to redo work already done.
- Straight hinges need to be welded only on gates laid on the ground.
- If you are installing a hinge on a round post, you should make a 5 mm relief.
- The first opening of the gate should only be done after the seams have completely cooled.
- Before welding the hinges, make a step under the lower hinge - it’s more convenient.
Drawing of a gate with hinges
The technology indicated in this manual for welding hinges has been used for many decades; it is actively used not only by artisans, but also by professional companies that specialize in installing gates.
Rest assured that strict adherence to the instructions provided will provide you with positive results that will last for many decades. Be careful and careful when welding hinges, as working with welding equipment is potentially hazardous to health.
Types of gate hinges
The garage door leaf can be made of different materials - metal, wood, profiled sheets, decorative vinyl panels. The weight of the sashes and the material from which they are made dictate the characteristics of the required hinges.
Hinge installation options:
- welding - the hinges are welded to the door leaf and garage door frame;
- installation with bolts - necessary for working with wood;
- fastening with metal screws – for gates made of profiled sheets.
The weight of the doors is critical when choosing garage hinges. If the loads are incorrectly calculated, the sash will warp very quickly. Craftsmen advise installing reinforced garage hinges for thick sheet steel.
Based on placement, garage hinges are divided into internal and hidden. The optimal design of garage hinges is ball bearing hinges, which guarantees maximum durability.
Shape and characteristics of garage door hinges
Shape and design of garage door hinges:
- overhead – operate silently, easy installation, suitable for garage doors made of any materials;
- through hinges – for gates weighing no more than 200 kg, mounted on nuts. Such hinges are installed if it is not possible to weld the fasteners. Low resistance to burglary, such hinges are suitable for garages in protected areas;
- cylindrical - it is necessary to weld the ears for reliable fastening; cylindrical with bearing support - for garage doors weighing less than 400 kg;
- cylindrical with reinforcement - for fabric weighing up to 600 kg;
- boom hinge - hinged type, an excellent solution for heavy garage doors;
- forged hinges - for wooden gates or when finishing the door with wooden lining.
The shape of the loop can be:
- cylindrical - fastened only by welding;
- hexagonal - also requires welding of the ears;
- square - provide maximum area of contact of the hinge to the sash and frame;
- in the form of a drop - a convenient hinge mechanism, can be attached to any gate structure.
The best solution for metal garage doors is cylindrical hinges with ball bearings.
Ball bearing hinges are the best choice
The best solution for garage doors is hinges. The number of hinges per sash depends on the weight of the leaf:
- for lightweight corrugated sheeting, hinges on one hinge, diameter 25 mm, are suitable;
- standard metal gates require a 35 mm hinge;
- heavy garage doors - from two to three hinges per leaf, diameter 35 mm and above.
When you need to choose adjustable hinges for garage doors that allow you to align the doors even if the geometry of the gate opening is incorrect:
- old garages with sagging or deformed foundations;
- incorrect geometry of the gate opening;
- Frequent rearrangement of the metal garage box.
How to install hinges with your own hands, what should you consider during installation?
Sash designs
Even such a simple design as a gate leaf or wicket can be made in different ways, and there are many options. First of all, the location of the jumpers differs:
Each method is tested and works, providing a sufficient degree of rigidity. Here you choose what seems more correct or reliable to you.
Gate design made of metal profiles with jibs
There is a difference in the design of the gate itself - with or without a stationary frame (top crossbar). With a frame, the gate is more stable, but then there are height restrictions: tall vehicles - trucks or special equipment - will not be able to enter the yard. With proper reinforcement of the racks (pillars) and properly made doors (with reinforcement in the corners), gates without a frame will also be reliable.
Gate design with top crossbar and crossbars
When installing a gate with a frame, the metal consumption is greater - per the length of the lintel, but the pillars can not be additionally reinforced: the load on them is less.
Cross-shaped lintels on metal profile gates
To make it more convenient to attach the profiled sheet, a thin-walled metal profile 1 cm wide is welded along the outer (sometimes internal, as in the figure above) perimeter of the sashes. This must be taken into account when determining the dimensions of the blanks for the sashes.
To make the structure as rigid as possible, so that it does not “walk” or make noise in the wind, reinforcements are made in the corners. And again there are two ways. The first is to weld the corners cut from sheet metal.
Reinforcement of sashes with metal plates
The second is to install short corner jibs from the same pipe that was used to weld the sash frame.
The second method of strengthening gate leaves
There is also a difference during assembly: at the joints, the pipes are connected at an angle of 45° or simply end-to-end. More professional - at 45°, easier - end-to-end. Some assembly methods do not provide for the possibility of connecting at an angle at all (if both doors are assembled in one piece, and only those hung on poles are sawn into two parts).
Different methods of joining pipes
Another subtlety that depends on the amount of snow in winter. As you can see in the photo, the bottom bar of the sashes is raised to different heights from the ground - somewhere a few centimeters, somewhere 20 cm and higher. Depends on the height of the snow cover in winter: if snow piles up and the gates are as high as the ground, you won’t open them. To prevent any living creatures from climbing into this gap in the summer, after the snow has melted, a plank is screwed onto the screws, and in late autumn it is removed again.
You can install automation on swing gates. Then you can control them from the remote control and there is no need to go out into the snow and rain.
Instructions for installing hinges on garage doors
Let's look at the installation using the example of the most common cylindrical hinge on a ball bearing. First we need to weld the ears to the hinges, on which we will attach them to the door leaf and frame:
- Using a grinder, we cut out the metal plates of the ears to the size of the loops, which will increase the rigidity of the fastening;
- We place two mounting plates horizontally, the gap between them is 2 - 3 mm;
- Place a loop in the center between the plates;
- We attach the loop to the plates on both sides by welding;
- We prepare all the other gate loops in the same way;
- Now you need to set the gate strictly to the level and secure it with supports.
It is very important to set the hinges strictly level when installing, so the best option is a laser level rather than a regular water level.
- attach the hinges and mark the attachment points on the door leaf and on the gate frame;
- We start welding the hinges from the bottom hinge; we don’t weld the seam right away, but only tack it so that we can level it;
- the order of spot welding on tack welding is top, bottom, center;
- First, we weld the fasteners to the door leaf, and then to the gate frame;
- Once again we set the gate and check for free opening and closing.
If everything is fine, then you can finally weld the hinges with a horizontal and vertical continuous seam. Vertical seam - movement is always from bottom to top.
It’s easier, but not more reliable, to first weld the hinges to the gate frame, and then expose the leaves and weld the top part of the hinge. It’s easier and clearer to watch the process on video instructions and listen to important recommendations from professionals.
Materials
The pillars are made from profile pipes with shelf sizes of 80 or 100 mm. Taking into account its lowering into the ground by 800 mm, the length of the pillars should be 3 m. Plugs are welded to the upper ends to prevent water from entering.
For greater rigidity and securing the rack, you can weld small pieces of reinforcement or other rolled steel, 1 m long, on the section extending into the ground.
For standing ones, take a 40/40 or 40/60 profile, cut off two parts with a length of 2100 mm using a grinder. The edges of the pipes are cut at an angle of 450 for a larger welding area and reliable fastening.
The upper and lower lintels are prepared from the main profile, with a gate width of 1000 mm. parts are cut to size 980 mm. This will provide a gap of 10 mm between the loot and the gate on each side. Cut the edges at an angle of 450.
For the middle lintel you can take a 25/40 profile, its length should be 900 mm, it will be inserted inside the frame, so the width of 2 profile shelves is subtracted from the total length of the workpiece, in this case it is 80 mm.
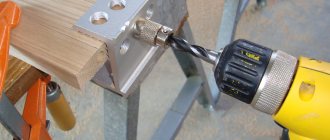
You will need 2 hinges with an outer diameter of 30 mm and 4 steel plates with a thickness of 5 mm and a width of 40 mm. The hinges must be disassembled and the internal surfaces well lubricated with grease or other thick lubricant, then assembled. It is better to purchase loops with balls.
The plates are laid out on a flat surface and loops are attached to each part from different sides. That is, if a plate is attached to the part of the loop with a hole from the outside, then on the mating part the plate is placed towards the inside.
Welding is mandatory on both sides to ensure welding of the root of the seam. After the first pass, you need to beat off the slag and weld the second pass. At the root, welding is performed in one pass.
How to weld hinges on garage doors
The basis of the garage door fastening mechanism is the support loops, through which the door is hung on the frame base. At the same time, only competently carried out welding operations allow for high-quality hanging of the door leaf and ensure the safety of their operation. In this article we will look at how to weld hinges on garage doors.
Garage hinges
Gate hinges can come in a wide variety of shapes. In the practice of garage construction, hinges of various shapes are most often used:
- cylindrical;
- square;
- hexagonal.
Cylindrical hinges, despite their unusual appearance, are welded to the base much easier than any other. That is why we will choose them as the subject of consideration in our article. To make it easier to work with such hinges, metal “ears” are first welded to them, the size and shape of which are selected based on the dimensions and total weight of the gate, as well as taking into account their decorative qualities.
Loops with ball
Note! To increase the service life (due to improved sliding), it is advisable to choose hinges supported by a ball inserted inside, used as a bearing.
First, it is necessary to carefully check all the installation dimensions of the structure, ensuring that the canvas is placed in the frame frame with a gap of no more than two mm. Only after this can you begin to mark the places where the hinges will be welded on the canvas itself and the frame. In this case, it is necessary to ensure accurate alignment of the hinge seats, which, after welding, must be located strictly on the same center line.
To prevent unauthorized removal of the gate, the hinges must be welded towards each other or equipped with a special stop to prevent this.
Welding rules
In order to prevent the gate from sagging and to avoid problems with its operation in the future, all work must be carried out taking into account certain features. Therefore, first of all, special attention should be paid to:
- The integrity of the weld, which must be continuous, that is, without gaps.
- Welding depth - the loop must be welded along the entire plane adjacent to the support.
- Axial location - all hinges on the sash must be in one straight line so that the load on the seams is distributed evenly.
- When determining the number of hinges, if the gate is massive, it is recommended to supplement the design with another pair.
- Dimensions - all measurements are made using tools designed for this purpose, and not “by eye”.
Installation procedure
Garage door installation completed
Before starting installation work, you will need the following working tools:
- electric welding machine with a set of electrodes;
- a special grinding machine with a disc for metal processing;
- level with a plumb line, tape measure and hammer.
And only after all installation dimensions have been verified and the necessary tools have been prepared, you can proceed to the main operations.
Note! The location of the hinges in the vertical plane must be controlled by a plumb line, after which it will be possible to tack it by welding at several points. The same should be done with the mating parts of the hinges mounted on the gate frame.
In this case, you should start with the lower hinges, after welding them you need to check them again for alignment (preferably using a laser level). Immediately after this, the upper hinges are grabbed, after which the gate can be checked. During this hanging process, the gate is checked for ease of movement, as well as for the presence of the required clearances.
If the result is satisfactory, the hinges are finally welded in the same sequence (first the lower fastening, and then the upper). When installing hinges, due attention should be paid to the verticality of their installation line, as well as the aesthetics of welded joints. To make the seams beautiful, they can be processed using an angle grinder.
Precautionary measures
To install garage doors, you will definitely need to use a welding machine. Working with this device involves a number of procedures that can ensure safety during welding.
If you do not have experience in welding, then it is better to contact specialists who can carry out the necessary welding work, for example, the Metal-VRN company has proven itself well in Voronezh.
Their implementation is mandatory, because otherwise, the person working with the welding machine may lose his sight, get burned, or start a fire. The basic rule is to have special equipment in the form of a shield that can protect your face and eyes, as well as gloves that protect your hands.
Types of garage hinges.
You should also prepare the room in which the work will be carried out. It is important to take care of normal air circulation and a large work space. If possible, it is better to weld in the fresh air.
Article on the topic: Garage 3 by 6 how many square meters
There should be no flammable mixtures or objects nearby, as they are potential sources of fire.
Some subtleties of installation procedures
Tack loops
When carrying out installation work, the following features of welding procedures should not be overlooked:
- When welding gate hinges, it is desirable that the welding current does not flow through the support hinges. This is necessary so that welding tacks do not form in the loop itself. For this purpose, when welding the hinge, the contact clamp with the “ground” must be fixed on the sash itself. In the case of welding a loop to a strapping element (to a stand, for example), the clamp with “ground” can be transferred to this stand.
- To eliminate possible welding deformations, the hinges must be welded to the canvas and the box “crosswise”.
- When hanging gates on vertical metal posts, be careful to leave a gap that allows the gate to open completely. (In the case of supports with a square cross-section, this need does not arise).
- If the gate has a significant mass, you can organize lubrication of the hinges by installing a special grease nipple in them, which ensures oil supply to the area of maximum support load.
Product drawings and diagrams
Many car enthusiasts prefer to install hinges in the garage opening themselves. But before such an event, it is important to draw a design diagram in advance, taking into account its following characteristics:
- Strength. When determining this parameter, it is necessary to take into account the weight of the sashes. If a thick metal sheet is used for their manufacture, it is necessary to plan internal hinges for garage doors that have a diameter of at least 2 cm.
- Length. When the doors weigh more than two centners, the hinges must have a length of at least 20 cm. Then each welding seam will have a length of about 9 cm.
- Gap. Often the gate jams when opening. To eliminate the problem, it is necessary to provide a millimeter gap between the hinge axis and the counter hole.
Types of loops
Cylindrical with bearing
To extend the service life of the gate and increase its reliability, such an important element of the door leaf as hinges must be selected with the following characteristics:
- easy to turn;
- operate silently;
- do not move voluntarily.
For this purpose, select appropriate hinges that can withstand the weight of a particular gate and provide all of the above qualities. Among the market offers, the main types of hinges are popular:
- Cylindrical, with bearing supports. These hinges are intended for light gate leaves (up to 400 kg).
- Cylindrical with amplifiers. They will hold weights up to 600 kg.
- Through. They are chosen when it is impossible to strengthen the gate with either welding or a screw; they will hold a small gate.
- Overhead, with three sections. Designed for large gate halves that have a large mass.
- Forged hinge option. More suitable for gates made of wooden materials.
- In the form of an arrow. These are hinges of a hinged or semi-hinged type. They are usually chosen for very massive gates.
- Adjustable. They allow you to change the height of the canvas, but the weight can be kept quite small, no more than 200 kg.
More modern and expensive ones include those equipped with a bearing. The bearing redistributes the load. Thanks to this, the gate structure lasts much longer. Moreover, such gates open completely silently.
How to cook loops
Welding process
When working with a welding machine, it is extremely important to observe safety precautions. That’s why you need rubber gloves, as well as a mask to protect your eyes from damage. It is better to start cooking by laying the gate cloth on the surface of the ground. Welding steps include:
- The very first step is to take a lining 2-5 mm thick, then slip it under the bottom of the canopy.
- The upper part of the canopy can be lightly secured by welding at the end.
- Further, the technology differs depending on the shape of the pillar.
Operating procedure
- Install the door leaf vertically.
- Check using a plumb line.
- Place the hinges on the gate and check whether they are on the same line or not, even or not.
- The awnings are first welded towards the canvas, and then towards the pillars. It is necessary that the seam is even.
- At the end of welding, the seams are cleaned using a grinder.
Plates for welding parts
The importance of editing records
Quite often, to simplify the welder’s work and at the same time redistribute the load, metal plates are first attached to the hinges by welding.
Such plates depend on the mass and thickness of the metal gate leaf. The plates can also play a decorative role.
Hidden internal hinges
If there is a need to weld internal hinges to the sashes, it is easier to ask a professional to do it. Welding such hinges yourself is quite a labor-intensive task and requires an experienced welder. Therefore, it will not be possible to weld them with inexperienced hands.
Tools for work
Welding tools
It should be noted that even specialists, let alone inexperienced welders, cannot always perform this work correctly. They may encounter many difficulties. A beginner will read these lines and may give up. Well, is it possible to do it yourself? It turns out that it’s quite possible, even for people who have no experience. All you need to do is know how to cook at least a little and be attentive. Worth a try. To work you will need the following tools:
- hammer;
- tape measure or other measuring tool;
- level for leveling the door leaf;
- selected loops;
- mounting plates;
- electrodes;
- Bulgarian;
- welding machine;
- protective mask and gloves.
What is the difference between the loops?
The teardrop-shaped canopies seem to be elongated - there is vertical thinning. If you look at such a loop from above, its shape will resemble a drop. It is easier to handle such canopies - there is no need for additional work, which consists of welding metal plates to ordinary hinges - one is attached to the upper part of the mechanism, the other to the bottom. Otherwise, there is no difference between the two types of awnings.
It is easier to weld the hinges to the gate due to the light weight of the structure.
Welding rules
For work you will need the following tools and materials:
- construction level, preferably laser;
- roulette;
- welding machine with electrodes with a diameter of 3 mm and protective equipment;
- overalls – clean, free of oil and other stains from flammable liquids;
- Bulgarian;
- hammer;
- lubricant (solid oil will do);
- brush or roller for painting;
- dye.
The welding process is usually carried out in a vertical position of the sash. If there is a need to strengthen an existing weld, the structures must be removed from their hinges. You cannot cook without removing the gate.
Photos on the rules for welding garage hinges
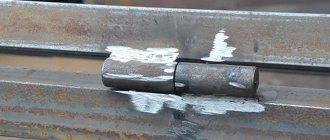
| Let's assume that the corner on the left is the frame of the garage door, and the profile on the right is the sash. | We attach our loop to the frame and scald it on both sides. | To connect the frame to the sash, we weld the upper part of the hinge from below and from above using a sheet of metal. The reliability of fastening is low due to the fact that the metal often leads during welding. |
| A more reliable way is to weld loops through flags. The lower part of the flag is welded to the frame on both sides. | To connect, we weld the upper part of the flag to the sash. | We place a sheet of metal on top (on the flag) so that it “fits” onto the frame. This way, welding hinges on garage doors is much more convenient, much simpler and much more practical. |
Welding technology
- Make markings. Using a tape measure and a pencil or chalk, mark the places where the loops will be placed. It is recommended to retreat from above and below by about a quarter of a meter. In production, after certain calculations, which help to avoid skewing of the door leaf during operation (if you weld the hinges too close to the edges, the upper part will pull the block forward and down too much due to the large weight).
- Lubricate the hinges with grease to avoid caking, then grab them in several places: first the lower half, then put the upper half on it and check whether you are moving in the right direction. Now disconnect the loop and weld its upper part - just a little so that it just holds. Next, you need to check with an assistant how the gate behaves, whether it is warped.
- If everything is fine, they weld thoroughly. Drop-shaped loops - along the entire thinning, simple - along the long side of the additionally attached plate.
- Check how the curtains close. If everything is fine, the simple loops are finally welded - around the perimeter of the additional plate.
Don't forget to set the technological distance between the sashes and the frame.
Clean the welding areas using a grinder, then completely prime the door leaf and frame. Once the primer has dried, paint with your chosen paint.
Always mark, do not cook by eye. Before work, check whether the equipment is in good condition. Only by following the rules can you get a high-quality weld and a normally functioning metal structure.
is engaged in the production of custom garage doors. To clarify details, contact the manager by phone listed on the website, or request a call back.
Video description
To understand what we are talking about, watch the video
The nuances of installation on supports of different sections
The supporting posts on which the sashes are hung can be round, square or, less commonly, rectangular in cross-section. There is a difference between how to properly weld gate hinges to round posts or supports made of profile pipes.
If the profile pipe has smooth edges without bends or distortions, then it will be easy to cope with the task of how to properly weld gate hinges to square posts. They are installed on the outer plane of the support.
Canopy with plates on a square postSource distroy.ru
In the case of a round support, you must first decide in which direction the doors will open. Then they find the most protruding line (the middle of the pillar relative to the opening) and step back from it a few millimeters outward - in the direction of plowing. 5-6 mm is enough for the wicket or gate leaf to move smoothly and without jerking around the axis of the canopy. Since it is more difficult to weld hinges on gates to round posts than to square ones, here you need to be especially careful and attentive, maintaining the same indentation size for all hinges.
Installation and welding work
Experienced welders recommend first welding the canopies to the sashes, laying them on a flat horizontal surface. A half in the form of a hollow cylinder is welded to them, and a mating part with a pin (pin up) is subsequently welded to the supports. They retreat approximately 15 cm from the top and bottom edges.
Wicket frame with welded hingesSource www.chipmaker.ru
Then the sash with welded canopies is installed in the opening on stands that provide the required distance to the ground, and is rigidly fixed with clamps, pliers and other devices. They do this so that it stands strictly vertically, and there is a gap of 5 mm or so between it and the support. To do this, use a laser level or a plumb line, and spacers of the required thickness are inserted between the elements.
Other craftsmen prefer to first install the gate, and then weld the hinges to both it and the post. There is no big difference, everyone does what is convenient for them.
Another option is to make the upper and lower ribs of the frame whole when making the sashes and cut them after hanging them on the hinges. Source sqezo.ru
Now let’s talk about how to properly weld canopies on gates. The sequence of work looks like this:
- 1.5-2.5 mm thick wire is wrapped and twisted around the loops at the top and bottom to form a gap between it and the welding plane. You can place matches or other objects of suitable thickness, but they fall out, move or break, which is very inconvenient;
- The places where the canopies are attached are marked on the supports and an even long block or profile pipe is applied to them. Fix it level, ensuring a vertical position.