Variety of models
On the market for agricultural products you can find a manual hiller “Druzhba”. It is equipped with adjustable wings that allow you to change the working width, and the addition of a front iron support wheel. The equipment is controlled by two operators. The dimensions of the product are 55 cm width and 48 cm height. The weight of the unit is 17 kg. It is produced in the city of Cheboksary, and its cost varies from 3,000 to 4,000 rubles.
Another version of the hiller is “Pull-Push”, which is popularly called a hand plow. It is unregulated. The design of the tool allows it to cut furrows, weed weeds, and hill up planted potatoes. The width of the product is 45 cm, and the height is 90 cm (including the handle). The unit weighs 7 kg. It is lightweight due to rubberized handles. The price of the tool is from 1500 rubles. It was produced in Kyiv.
A popular hand-held tool is the “Phenom”. The design provides the ability to work with both two and one operator. The hiller is adjustable both in the height of the handles and in the width of the processed ridge. As an additional tool for the hiller, a flat cutter is offered, which is connected with a handle using ordinary bolts. The dimensions of the product are 16x40x40 cm, and the weight is 10 kg.
Modern manufacturers offer flat cutters. This tool is a bent plate with sharpened edges. Using the equipment, you can remove weeds and loosen the soil. To weed several rows at the same time, several flat cutters are combined on a special hitch. On sale it is called a wide-row weeder.
Among the hand tools for loosening, the Tornado cultivator became famous. It has a simple design, which consists of curved teeth connected to the handle. In relation to the base they are turned counterclockwise. To work with the tool, it is enough to rotate it around its axis in a vertical position.
Hilling process
The process itself is a treatment between rows of potatoes, when soil is raked onto the stem on both sides, forming a mound. The higher the bush is hilled, the greater the harvest will be. For this process, many devices are used, ranging from a hoe to a tractor. For small home garden beds, a hand tiller will be sufficient. Another option is an electric hiller, namely a walk-behind tractor, but only if the bed is large.
There is no need to rush right away; first you need to understand how the hiller works. Having reached the end of the row, they turn the hiller and return along the new row spacing. All potatoes are processed this way.
Important! The hiller must pass clearly in the center of the row, otherwise there is a risk of damaging the potato stems.
How to make a manual plow-type hiller
The list of tools for making a manual potato hiller with your own hands does not differ from the previous one. Materials are also purchased in advance.
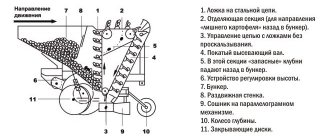
Table 4. List of blanks for making a disk hiller.
| Materials | Size, mm | Quantity, pcs. | |
| Electric-welded steel pipe by standard size | 21 x 2.2 | 400 | 1 |
| 1000 | 1 | ||
| 1700 | 1 | ||
| 32 x 2.5 | 700 | 1 | |
| 1000 | 1 | ||
| 45 x 6.5 | 1000 | 1 | |
| Steel sheet 3 mm thick | 400 x 1000 | 1 | |
| Electrodes E46-ANO | 3 (diameter) | 1 kg | |
| M10 bolts | 25 | 4 | |
| Nuts M10 | — | 4 | |
| Fabric belt | 2000 | 1 | |
| Lanyard | 250 | 1 |
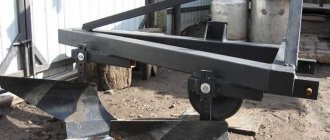
The lister device for tillage consists of the following components: a two-blade working body, a stand, front and rear handles. Preparation stages:
- The stand is made of pipe 45 x 1000 mm. It is bent in the middle at an angle of 30°. On one side, five holes with a diameter of 12 mm are drilled in increments of 50. On the other, two ears are welded for attaching the front handle and lanyard.
- The rear handle is made from a 21 x 1000 mm pipe. On both sides it is bent at an angle of 90° at a distance of 150 mm from the edge. A 32 x 700 mm pipe is welded to it in the middle with its end and five holes are drilled. The spacing of the latter is 50 mm.
- The front handle is made of pipes 21 x 1700 mm. They are bent in the middle at an angle of 45°. They weld together. A 21 x 500 mm pipe is attached to the joint. An eye for the lanyard is welded in the upper part, and at the end - for fastening to the rack. Brackets for the traction belt are attached to the side handles.
- The working body is cut out of sheet iron. To do this, the outline of the workpiece is drawn on the metal and cut with a grinder. The parts are given a smooth bend in the vertical plane and welded together. The front cutting edge is sharpened at an angle of 45°. Welded to the stand.
After finishing the work, the welds are cleaned with a grinder or a file, scale and rust are removed, and covered with paint. For convenience, the handles are wrapped with electrical tape; you can put on rubber bicycle grips. Perform final assembly:
- Insert the front handle into the eyelet on the stand. They are fastened with a bolt and nut.
- Attach the lanyard.
- Attach the rear handle.
- Thread the belt into the brackets and adjust its length.
Let's look at the features of each of them.
Lister with fixed and adjustable angle
They have a fixed soil width and are used on very light motor cultivators with a power of up to 4 horsepower. Capable of cultivating beds measuring 25-30 centimeters in width, they are equipped with two side wings and a thin stand. The stand protects the equipment from overloads and mechanical damage. This tool can only be used on dry soils, since adhered soil will interfere with the operation of moving structural elements. There are lister devices with adjustable tillage width. They are installed on motorcycles with higher power – from 4 horsepower. Such units can be safely used on wet soil.
Propeller
The principle of operation is the activity of the propeller parts. Under their influence, the soil is first dug up and weeds are removed, and only then the beds are loosened. These modifications are mainly practiced for motor cultivators with front-wheel drive and two speeds. This is due to the fact that at second speed the power increases to 180 rpm. Once the power level reaches its maximum, this implement can be used not only for hilling soil, but also for throwing soil into furrows from the space between rows of plantings.
Double (2-row)
It cuts two furrows before planting crops, and is also used for hilling and loosening the soil. Includes a frame on which 2 hillers are fixed. When cultivating land, it significantly saves time, since it has two working elements. Mounted on a walk-behind tractor using a hitch. Due to the fact that such a device requires a lot of resistance to operate, it is used in conjunction with lugs.
Rotary active
Instead of wheels, this implement is equipped with rotors with screw-type teeth. Demonstrates high performance when creating, loosening and hilling potatoes. Suitable for use with 3-speed units (two forward and one reverse). In the first gear, the implement hills up the plantings, and in the second gear it also removes the soil from the space between the rows of plantings.
Single row
The most common type. Suitable for use with light soil types. Cutting ditches is carried out after completion of the preparatory loosening of the soil using a cultivator.
Operating principle
The device is attached to the motor vehicle on the bracket of the coupling device (hitch), which does not have a bed. This is accomplished by means of a locking component - two screws and a flat washer. More comfortable and high-quality work is performed at the first reduced speed. This will make it possible to increase traction by reducing the forward speed.
The principle of operation of a disc implement for hilling is simple: the discs, when moving, grab the ground and form a roller during the hilling process, covering the vegetation with soil. The movement of the discs makes it possible to further crush the soil and loosen it.
The disk device for hilling has some advantages over its relatives: it builds ridges higher and more level, it is simpler and more interesting to operate, and energy costs are significantly lower. It is easier for an employee with such a device to work.
Of course, not everything is so wonderful. You always have to pay for convenience. And the cost of the disc hiller is proof of this. The cost of using a comfortable and easy-to-use disk device is approximately 3–4 times higher than other types.
The cost of agricultural implements depends on the following characteristics:
- thickness and transverse size of the disks;
- material of manufacture: ordinary metal or alloy steel;
- use of roller bearings or sliding bushings in the structure;
- setting device.
When purchasing a disc implement for hilling, all these points must be taken into account.
Taking into account that this equipment is not cheap, a natural question arises as to whether it is possible to make a homemade disk device for hilling a walk-behind tractor
Master class: potato hiller
In stores you will find hillers that are designed for agricultural machinery. You will have to make manual models yourself if you want to make it easier to grow vegetables in the country. Hillers are divided into two types:
Drawing with dimensions of a disc hiller for potatoes
The plow is designed in the form of a small plow with long handles, and the disk one is in the form of two disks, narrowed downwards, also with two long handles. The design of such a hiller is pushed forward, and the discs or plow turn out the layer of earth. It is better to work with these devices together. Experienced gardeners advise using a disc hiller, because... it forms better and more accurate land swaths.
Technical characteristics of equipment
Advantages of this equipment:
- ease of operation - the device is mounted on a walk-behind tractor or a metal handbrake;
- strength - the structure is securely fastened with bolts and washers;
- durability – equipment service life is more than 10 years (with proper care);
- versatility - the equipment can be used for hilling any vegetable crops.
You can’t do without such a device in the garden. You can purchase it ready-made or make it yourself. Hillers, which are sold in specialized stores, are endowed with excellent technical characteristics. They have one drawback - high cost. Homemade products can be made from scrap materials. This will save you a lot of money.
Why do you need a tiny pocket on jeans? Everyone knows that there is a tiny pocket on jeans, but few have thought about why it might be needed. Interestingly, it was originally a place for storage.
How to look younger: the best haircuts for those over 30, 40, 50, 60 Girls in their 20s don’t worry about the shape and length of their hair. It seems that youth is created for experiments with appearance and daring curls. However, already last.
20 photos of cats taken at the right moment Cats are amazing creatures, and perhaps everyone knows this. They are also incredibly photogenic and always know how to be in the right place at the right time.
What does your nose shape say about your personality? Many experts believe that you can tell a lot about a person's personality by looking at their nose.
Therefore, when you first meet, pay attention to the stranger’s nose
7 Body Parts You Shouldn't Touch with Your Hands Think of your body as a temple: you can use it, but there are some sacred places that you shouldn't touch with your hands. Research showing.
Surprise: Husbands Want Their Wives to Do These 17 Things More Often If you want your relationship to be happier, you should do the things on this simple list more often.
Convenient tool for the garden (video)
Cunning and convenient garden tools are not only our inventions, but also the inventions of professional summer residents. Therefore, if you have something similar, you can safely share your thoughts in the comments to this article, for which we will be grateful to you. We promise not to stop with this set, and in the near future we will definitely present you with additional material, where we will describe another whole set of interesting tools for working in the garden, garden and flower beds.
Source
Manual hiller for potatoes: diagrams and recommendations for self-assembly
Potatoes have always been and are an important crop that many summer residents grow on their property. Of course, potatoes grown on our own are always very tasty and of high quality.
However, do not forget that in order to get tubers of excellent quality, you need to hill them during the growing process. This is due to the fact that in loosened soil the roots of the plant grow, and due to this, a large number of potato tubers are formed.
Hilling is usually done using hoes. If the area is large, then this process takes a lot of time and effort. Therefore, it is worth thinking about a more convenient device for hilling.
A manual potato hiller is the most optimal device for loosening the soil. In addition, with the help of this simple device you can loosen a large plot of land measuring almost 10 acres in a matter of time.
So what is this interesting tool and how can you make it yourself? In order to understand this issue, it is worth considering all the properties and advantages of this device.
Reviews
Vladimir, 63 years old
I found an old magazine that contained drawings and a diagram of a manual disk hiller for potatoes. The device turned out to be very simple, it was easy to make. But first it was necessary to purchase the necessary material at a hardware store. The result is excellent: the potato yield has almost doubled.
Dmitry, 51 years old
According to the drawings, I made a lister hiller by hand. It turned out to be not very convenient to use: we constantly had to adjust the angles of the blades. However, work productivity has increased noticeably. Now I am using a disk model, which I also made myself.
Making a homemade manual potato hiller is quite simple. It is better to spend a little time and effort preparing this necessary device than to process the potato plot manually using improvised means.
How to install a hiller on a walk-behind tractor?
Installing and setting up a potato hiller for a walk-behind tractor is not a very complicated procedure. It is attached to the hitch using bolts and washers. When working with a simple hiller, you need to adjust its operating angle and depth of immersion into the ground. The plowing depth of the hiller is less than that of a plow, so for adjustment you do not need to place the walk-behind tractor on a hill. Simply adjust the hiller stand vertically. The required angle of attack is determined by how deep the hiller enters the ground in the working position. This depth should be about 15 cm.
If during the work you notice that the hiller is digging deep into the ground, tilt the stand forward. Otherwise, if the hiller does not deepen enough, the stand, on the contrary, is tilted back.
Setting up and installing a disc hiller is a little more complicated. First you need to set the distance between the lower points of the hiller disks. It will be 40-70 cm, depending on the upcoming work. Next, the angle of inclination of the disks relative to the horizontal axis is set.
The settings of both disks must be identical, otherwise the walk-behind tractor may skid to the side.
Choice
A correctly made choice will help in maximizing the mechanization of agricultural labor.
For less effort when planting potatoes, cutting furrows will be easier with adjustable wings. To hill up plants, it is better to choose a disk option. To get the job done faster, rather than pulling the tool along each row, you need to consider a two-row classification of hillers. If the walk-behind tractor has sufficient power, you can choose four-row equipment. To choose the right hiller, you also need to compare factors such as:
- soil type;
- type of walk-behind tractor;
- dimensions of the site;
- amount possible to spend.
For example, if you plan to process heavy soils, the quality of the steel will be an important parameter. However, a cultivator with low power is unlikely to pull a heavy tool. If you don’t have enough money to buy a quality tool, and you need to cultivate heavy soils, you can turn to craftsmen for help or make the necessary parts yourself. For homemade products, the characteristics of some popular models will be useful.
For example, a two-row hiller has the following parameters:
- dimensions – 450x130x45 mm;
- working width – 300 mm;
- weight – 4.4 kg.
The disc hiller with adjustable width, height and depth has the following maximum parameters:
- width – 70 cm;
- height – 62 cm;
- disc diameter – 37 cm;
- processing depth – 30 cm.
Tips for use
Before loosening the soil in the beds, it is necessary to remove weeds. It can be left on the site to prevent moisture evaporation under the sun's rays, using it as mulch. After clearing the weeds, they begin to work. To properly hill up potatoes, you need to adjust the device to the desired size of the bed. To do this, the distance between the cutters is set on the disk device, and the penetration angle is set on the plow device. The latter is changed by rotating the lanyard.
For your information! A properly adjusted tool will not damage plant roots. The effort required to move it will be minimal.
When the hiller is set up, they make a test run in a place where there are no plants. After obtaining satisfactory results, you can begin to work. It is better to carry out cultivation in cloudy weather or in the evening: moisture loss from the soil will be minimal, and exposed tubers will not get sunburned. If after the first hilling a ridge of insufficient height has formed, make a second pass. The hard earthen crust that remains after processing is broken up with a hoe or hoe.
You may be interested in: How to hill potatoes with a cultivator, walk-behind tractor, disk hiller: tips Hilling potatoes is a mandatory procedure for proper cultivation of a vegetable crop. This procedure…Read more…
Meaning and working principle
Potatoes, which are commonly called the second bread, are considered one of the most important agricultural crops in Russia. Potato tubers are widely used in cooking, and potato starch is used in the textile, food and paper industries.
Growing this crop requires a lot of time, effort and energy. During the growing season, potatoes are hilled several times. Loosening the soil helps improve the air exchange process. Oxygen entering the soil has a beneficial effect on the growth and development of cultivated crops. According to reviews from experienced farmers, yields can increase by 40–60%.
The first hilling is carried out with the appearance of the first shoots. The average height of sprouts is 5–7 cm. The procedure must be repeated when the potato bushes grow to 20–23 cm. After each rain and watering, you need to loosen the soil. The earthen crust formed by water prevents oxygen from reaching root crops growing in the soil.
Many gardeners operate the old fashioned way, using a hoe to hill up potato bushes. In order to speed up the process of loosening the soil, it is recommended to use a manual hiller.
What types of hillers are there?
Depending on the design features, hilling attachments are divided into several types.
Listerny
Externally it resembles the wings of a butterfly. Features a fixed working width. Due to the sharp ends, it sinks to the set depth.
Advantages of the mechanism:
- simplicity of design;
- low energy intensity;
- light weight - does not require powerful units;
- the price is lower compared to other types of hillers.
It is important to plant potatoes evenly, strictly observing the same row spacing. The device does not work well on wet and heavy soil
Twin
This is a double-row or swing mechanism for cutting even parallel furrows over large areas and hilling them up. The height of the ridge varies from 10 to 20 cm and is limited by the rise of the gearbox relative to the soil level.
Advantages of the unit:
- versatility of use;
- ease of building even furrows over large areas;
- adjustable distance between plowshares;
- the ability to make ridges simultaneously on both sides of the planting.
The nozzle requires regular cleaning and treatment with an anti-corrosion compound. The device is designed for light, pre-prepared soils.
Dutch
The design of the potato hiller allows the blades to rotate in horizontal and vertical planes. The lower edge of the wings resembles a comb.
Advantages of the mechanism:
- improving the quality of work;
- use of low-power walk-behind tractors;
- profitability (the device has a low price).
The attachment operates in tandem with a machine weighing over 30 kg and is recommended for use on all types of soil.
plow-shaped
This is a streamlined mechanism. Its advantages:
- low intensity of soil inversion;
- preservation of moisture in the soil due to less aeration;
- ease of tilt angle adjustment;
- processing a large area.
Using this model, farmers reduce the time and effort spent on cultivation. It is better to use a plow-shaped attachment with a powerful walk-behind tractor.
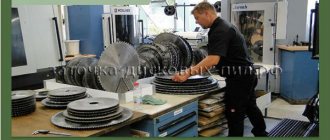
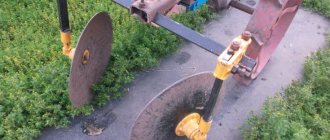
Disk
The working elements of the hiller are circles that penetrate the soil to an adjusted depth.
The mechanism is popular for the following reasons:
- high reliability and durability;
- ease of use;
- compatibility with all types of cultivators and increasing their power;
- Convenience of rolling down root crops.
The attachment is mainly used for processing potato plantings.
Propeller
Mechanisms of this type are also called active, or rotary, and are similar to fan blades. The operating principle involves 2 rotational forces and translational movement.
Positive aspects of the unit:
- the nozzle not only hills the plants, but also transfers the soil from place to place;
- the device effectively fights weeds;
- the beds are covered with loosened soil - the growth of plantings improves.
The model is not compatible with all types of cultivators. Use the propeller attachment only on walk-behind tractors with two forward gears.
Principle of operation
Gardeners know that hilling potatoes should be carried out several times a season. If the soil on the site is well-cultivated and loose, this contributes to a better process of oxygen exchange. The air entering the soil has a positive effect on the development and growth of plants. Timely loosening increases yield by 30–60%. Thanks to the design of the working body of the hiller, furrows with the required depth are obtained. The loosened soil falls off on both sides of the resulting ditch. Tubers are placed in it, and then the grooves are filled with earth. As the potatoes grow, you need to add a thick layer on top. This contributes to the formation of a large number of tubers. This addition is again ensured by loosening with the formation of a groove along the planted seedlings. This is achieved by the fact that the working parts of the hiller, when moving between the rows, cut off the top layer of soil.
In addition to potatoes, other crops that are planted in rows and require hilling, for example, tomatoes, eggplants, and peppers, can be processed with a hiller. Tool designs differ in grip width, manual or mechanized operating principle. The first option is quite primitive, requiring two operators, one of whom takes the front handle, and the other presses on the rear link. As a result of the efforts, the device goes deep into the ground, cuts the soil, and when moving inside the formation, leaves a noticeable trail of earth. The automated version is attached to a tractor or walk-behind tractor and is controlled by one operator.
Manual and automated hillers can be divided into the following types:
disc is a simple tool suitable for one person;
garden plow is a universal plow that requires the presence of two operators.
It is clear that disc options are easier to use; they are also often automated by coupling with motor vehicles. The ridges of the earth after the disc hillers are higher. There is also a negative point in these devices - the price. Compared to a plow hiller, it is four times higher. Externally, the tool looks like a frame with wheels on which disks are suspended. The distance between them can be changed in accordance with the width of the rows. The discs are set at a certain angle, which is not recommended to be adjusted relative to the vertical. Without a constant equal distance between the circles, the tool will pull sideways.
The simplest type of hand plow has a predetermined working width, wings (ploughs) shifted relative to each other, which are motionless. This is convenient if the row spacing has already been determined and the tool fits them. Another advantage of hillers with a fixed working width is the ability to use them with light cultivators weighing up to 30 kg. The advantage lies in its compactness, and the negative side lies in the limited work in wet areas. Here the tool will stick in the soil.
A hiller with variable working width is the most common option. The adjustment mechanism is simple, but it allows you to move or extend the wings, adjusting them to the desired width to the row spacing. The tool can also be automated, but only with heavy walk-behind tractors. The wings of such a hiller push the earth in both directions at once. After the tool passes, the part falls back into the line that it cuts. For a more efficient harrowing process, a more powerful walk-behind tractor is required, otherwise pulling the hiller will seem harder than working with a hoe or hoe.
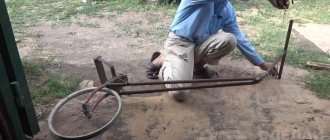
Do-it-yourself hiller for walk-behind tractor
To make a hiller for a walk-behind tractor with your own hands, you will need the following tools:
- Iron welding machine, preferably arc.
- Bulgarian, with additional accessories.
- Drill with different attachments.
- Electric emery.
- Gas burner for hardening and heating metal.
- Workbench or vice.
- Consumables (bolts, nuts) and files.
You will need parts that will make up a homemade hiller for a walk-behind tractor.
In order to get started, you need to acquire drawings and diagrams of the hiller.
Manufacturing diagrams and drawings of a hiller for a walk-behind tractor can be found in specialized literature or in the operating instructions for the walk-behind cultivator.
The diagram indicates the tool dimensions that will best suit the device. Deviations of 1-2 cm are acceptable.
Disk devices are good helpers for performing heavy work on a plot of land.
A do-it-yourself disk hiller for a walk-behind tractor is the easiest to make.
You will need the following tools and materials:
- metal layers 2 mm thick;
- bearings and seals;
- screw lanyards;
- T-shaped leash;
- rack.
The discs are installed at an angle to each other, the top of the resulting triangle is directed forward. The other 2 angles must be equal. If this condition is not met, the walk-behind tractor will constantly skid, which is not very convenient during operation and additional adjustments will be required.
The sheets of the disk hiller for the walk-behind tractor are connected to each other by welding or bolts. Lanyards are attached to them, which perform the function of adjustment during double rotation. It is better to assemble a homemade disk hiller by following the instructions in the drawings.
There is a second way to make homemade disk products: the plow is connected to a motor cultivator using a bracket. The leash is attached to the hitch with a stopper, connected with bolts. The stopper is inserted into the square pipe and then tightened.
Equipment setup
Before planting potatoes or hilling them, it is necessary to carry out trial work in order to eliminate shortcomings if necessary. After attaching the disc hiller to the OKA walk-behind tractor, you need to check the tightness of the connection by inspecting every detail. Next, select the area where the trial work will be carried out.
Make any necessary adjustments to the coupling assembly in advance. While the unit is operating, you should listen to the sound produced by the equipment. There should be no creaking or other suspicious sounds.
Check the stroke profile, grip quality and the distance between the working elements immersed in the ground. Set the angles of attack on the disks. It is important to take into account the speed of tillage, which will correspond to the power of the OKA and the mounted mechanism itself.
Do-it-yourself hillers for a walk-behind tractor
Vertical stand
Multifunctionality is a mandatory feature of any device, and therefore you need to pay attention to adjusting the device. The height can be adjusted using the telescopic device of the central part
The pipe needs to be inserted into a tube that is smaller in cross-section than the other, it goes into the rear link. If you use this method, you can easily adjust the hiller to the gardener’s height level
The height can be adjusted using the telescopic device of the central part. The pipe needs to be inserted into a tube that is smaller in cross-section than the other, it goes into the rear link. If you use this method, you can easily adjust the hiller to the gardener’s height level.
Adjustment
Adjustment of the angle of inclination is carried out using a lanyard
The tool bed must be movable. To fulfill this condition, the front link is attached to the main post with a hinge; adjustment is made using a lanyard, which allows you to change the angle of inclination. In the case where there is no lanyard, a metal plate is used, it is fixed in the desired position and secured with bolts.
Welding
The rear link and blades need to be welded to the rack, then the front link is attached. The rear link width is 0.5 meters. Handles - 0.2 meters. A pipe 0.3 meters long is welded to the center of the fork; with this end the structure is inserted into the cavity of the vertical rod.
To adjust the height of the rack, you need to drill out the openings that are located at its upper end. Exactly the same manipulations must be done with a vertical fork. The front and rear links should be identical in width.
Manufacturing of a double moldboard plow
To make a double moldboard plow, you will need plates, each two millimeters thick. They need to be given semicircular bends. Then the process of welding the two halves to the stand is carried out.
Two important aspects of the work: the seam in the place where the parts are joined must be smooth, the plates must be sanded using a grinder.
Double shaft plow
Making a scoring knife
To make a pruning knife, you need to get steel with a high carbon concentration.
Then you should cut out a knife, which should be shaped like an arrowhead, and sharpen it carefully (the angle between the surface and the knife should be 45 degrees)
Why 45? If you grind a knife at this angle, it will not lose its sharpness for a long time. Next, you need to weld the trimming knife to the bottom of the post and grind it.
What is required for production
Every gardener can make a manual hiller with his own hands. In the process of work you will need a certain set of tools and materials:
- welding machine;
- pipe bender, blowtorch or gas torch;
- cutting torch;
- gas welding station;
- grinder or angle grinder;
- drill with a set of carbide drills for working with metal;
- hollow water pipe with a diameter of 1 inch;
- sheet steel 2–3 mm thick;
- hollow pipe with a section size of 0.37 inches.
Prepare a set of plumbing and construction tools that may be useful for making a homemade hiller.