Wet and dry wood
Wet wood usually processes better. The advantage is not only the simple and quick capture of material, but also the minimal dust formation during operation.
However, the resulting product will undergo major changes over time. Gradual drying can change the shape and size of the object. Rapid drying may even cause cracking.
Unlike fresh wood, when processing dry wood, you can count on stability of shape and final color. However, such turning work is more labor-intensive, but a number of modern devices solve this problem.
The lower availability and higher price of dried wood are also important.
Turning technology
Depending on the intention or the product to be produced, it is necessary to select a turning technique. The most common and simplest form is spindle turning, which is based on a cylindrical shape.
The firmly fixed material rotates smoothly around its axis, and special knives or planks shape the wood. In this way you make legs for chairs and tables, separate partitions for railings or fences.
Longitudinal or transverse turning will be used in the production of decorative elements or bowls, containers and toys. Here you can interestingly combine mechanical processing of the material from the outside with modification of the cavity inside the tree.
Other types of turning include, for example, annular, multi-axis or segment turning. However, for normal wood processing, knowledge of classical techniques and their combinations is sufficient.
- When working, pay attention to high-quality equipment. It’s definitely not worth saving on knives.
- High-quality, well-sharpened steel guarantees ease of use.
- The material under the blade will change smoothly and there will be no unevenness or unwanted edge abrasion.
- Choose knives, lathes, chisels only from high-quality manufacturers with the possibility of repeated grinding.
Quality knives are an investment, but it will come back to you soon. This will save your time, complex repairs of finished products and damaged material.
Working methods on a lathe
Using an angular center finder, draw 2-3 lines on both sides of the workpiece with a simple pencil, the center cross of which will become the center of the end.
By hitting the marking core firmly with a hammer, make grooves and an axial depression at the ends of the workpiece.
Place the workpiece on the driving center, bring the tailstock closer to the opposite end and use it to press the workpiece so that the drivers optimally cut into the recesses on the end, and then remove the center of the tailstock. After this, the workpiece will be able to hold on its own.
Once again bring the center of the tailstock closer to the workpiece in order to fix it along the axis of the centers. If the wood is soft, then turn the tailstock flywheel ¼ turn; if it is hard, half a turn will be enough. The workpiece must be fixed in such a way that it can be turned by hand without resistance.
Bring the tool rest as close to the workpiece as possible. Rotate it by hand, make sure that it turns without obstacles, without hitting anything. The supporting plane of the hand rest should be approximately 5 mm below the point of rotation.
Roughing
Wood turning on a lathe involves rough processing. To rough turn a cylinder using a rake, it is necessary to set the rotation frequency (or speed) to 1000, maximum 1500 rpm. The more precise the shape of the cylinder must be, the higher the speed should be set. Workpieces with a small machining allowance can be machined in one stroke along the entire length; if the allowance is larger, then you need to act progressively, moving towards the spindle from the tailstock.
Start the work gradually, resting the cutter shaft on the tool rest and holding the blade so that the heel of the cutter touches the wood. After this, lift the handle of the chisel until the edge of the point begins to cut into the wood, while removing even and well-twisted chips.
Guide the cutter in the direction of twisting the chips like this: the hand that holds the handle sets the movement, and the other only supports the blade, preventing pressure on it.
When roughing a square piece of material, carefully start cutting off the corners with a chisel, without pressing too hard on it. Wait until the workpiece is ground to a cylindrical shape of the highest diameter, moving towards the axis of rotation as the stock is turned.
Based on the shape you want to give the parts, draw the basic lines for marking the concave and convex parts with a simple pencil, turning the workpiece by hand. Mark it in such a way that the wider parts of the part are located at the edge of the headstock each time.
Start grinding both edges of the workpiece with a chisel. When supported by a tool rest, it should enter the tree smoothly (without rough movements), being perpendicular to the axis of movement.
Checking the size
Check the size systematically using a caliper. Professional carpenters typically press the cutter against their thigh with their elbow to free up their hand for the measuring tool. When the caliper starts to shake, reduce the chip depth. Grind the maximum diameters in this way first, and then proceed to turning the remaining parts:
- shoulders,
- necks,
- tori,
- balls and so on.
To carve the one and a half, use a grooved chisel. It is useful for shaped surface treatment. It must be held perpendicular to the axis. “Lower” the cutting edge from the outside into the depth of the workpiece. The handle of the machine needs to be lifted and turned slightly. In order to get a whole torus, you should perform the same manipulation on each side.
The arch (neck) is turned with the same cutter that was used for the torus.
After finishing the rough finish of the bottom in the center of the neck, grind the right half-neck, only this time moving the tool up from the bottom and to the right. Under no circumstances move the cutter in one step from one side of the neck to the other - they must be turned one by one.
Turning sheets
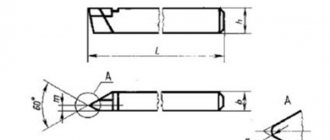
The leaves (small rims often left on each side of the neck) are turned using a meisel cutter. It does not have back angles on the side edges of the rod, which is how it differs from a chisel, but instead there is a thin track for removing chips.
You can use the “fillet” technique in your work: this is a soft transition from one surface to the second. It is essentially a combination of a neck and a torus. In this regard, first sharpen the neck, and then the torus that is adjacent to it.
Place a wedge between the lid and the box and tap it a little with a mallet, then remove it. Using a drill bit attached to the tailstock, drill a hole in the workpiece, which will subsequently set the depth. Hold the scraper or other cutting tool along the axis of rotation, lifting the handle until you find the best cutting angle. The scraper can be manipulated by moving it towards the edge of the workpiece from the center or vice versa. You need to check the depth periodically. Once the inside is chiselled, line the seating hole for the tire with fine-grained sandpaper, and then you can start cutting the box using a Meisel cutter.
Decorating the details
A part fixed on both sides is never completely cut off. Grind it out from both edges of the track, keeping the jumpers of small diameter, and, after stopping the machine, disconnect the ends with a hacksaw.
To complete finishing of the part, remove the tool holder and process the part from below with fine sandpaper (grit M16-M63). While working, the sandpaper should be turned crosswise to avoid circular scratches.
For a beautiful appearance of the product on a wood lathe, you can rub it with a piece of wax or paraffin while rotating, and then polish it with cork or thick cloth.
Structure of a lathe
The universal center lathe is the most common lathe. The name of a lathe comes from two points between which the workpiece is clamped in the center.
The structural elements of a lathe can be divided into 5 main groups:
- Bed in the form of a massive cast base;
- Headstock and tailstock;
- Feeding device;
- Longitudinal or transverse support;
- Set of replacement gears;
- Transmission.
Some lathes are additionally equipped with an apron to drive the mechanisms.
Lathe bed
This is the main part of the lathe, it is shaped like a beam and is usually made of gray cast iron. The bed must be rigid and strong enough to support the weight of other parts of the lathe, not bend, and withstand the forces encountered during turning.
- The lathe bed is usually mounted on two frame legs.
- The left leg mainly hides the engine and gearbox, the right one serves as a toolbox.
- At the top of the bed there is a guide for the support and tailstock.
- The feeder slides on outer guide surfaces and the tailstock slides on inner guide surfaces.
Due to possible damage, tools and semi-finished products are not placed on it; storage compartments are provided for this purpose.
Lathe headstock
It is a hollow shaft mounted in bearings designed to prevent bending of the spindle and maintain the pressure generated during machining.
- The front and rear main bearings (sliding) perceive pressure perpendicular to the spindle axis.
- These pressures are also called radial pressures.
- The pressure in the direction of the spindle axis (axial pressure) is absorbed by the rolling bearing.
- The spindle and headstock should not vibrate during operation.
Most lathes have a box-shaped headstock (in exceptional cases they are cylindrical).
The right end of the spindle protrudes from the headstock and has a thread on the outer end to which a clamp is screwed for clamping the workpiece. The main part of the headstock is the spindle.
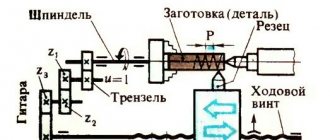
Spindle
The spindle is driven by a motor, which, as already mentioned, is installed in the left rack of the lathe. The motor shaft has a drive pulley with grooves for drive belts that transmit motion to the driven pulley and the gearbox.
- A gearbox has multiple gears, and the movement of the sliding gears changes the gears and therefore the speed of the drive pulley.
- The movement from the drive pulley is transmitted by a wide flat belt to a pulley in the headstock.
- The pulley is mounted on a housing mounted on two ball bearings.
The spindle passes freely through the housing and can be connected to it using a coupling or gear template.
Feeder
During turning, the knife is moved manually or mechanically, radially and axially relative to the workpiece. The feeder is driven by a shaft and replaceable gears. The movement is transmitted to gears in the feed reducer.
Shifting gears changes the speed at which the blade feeds when turning.
- In the feed mechanism, the gears are divided into three groups I, II, III. In Part I, the gears are changed by moving the sliding gears using a flywheel.
- Part II introduces the Norton gear, which is driven by an intermediate shaft on which is mounted a wide pinion, with which the pinion is constantly in mesh, mounted on a swing arm.
Wood turning is a beautiful and creative activity. It takes some skill, but with quality equipment and a powerful lathe, you can master the basic techniques relatively quickly.
In addition, treated wood is widely used. You can equip or complement it with conventional furniture production, it will also serve as a practical accessory in the interior and exterior.
Master class: making a segment vase “Greek motif”
The whole process of segmental turning on a lathe has long been known to those who are interested in it, and has been worked out. But nevertheless, I want to talk about it.
Having seen enough on foreign sites how the local craftsmen create all sorts of turning-segmentary miracles, I decided to create something similar. To tell the truth, we have enough of the same craftsmen, but unfortunately, not all of them share their skills. there is not enough time, or desire, or desire, or maybe they are embarrassed. But I (even though I am a shy person by nature) decided to show how I did it.
To manufacture this type of product, and indeed for segmental turning, you need tree species that are contrasting in color. In our northern regions, the choice of such trees is not rich. Birch, bird cherry, aspen, alder, conifers. But I had dry birch suvel, as well as one block of overseas chocolate Che tree, and supplies of veneer of various types of wood. I immediately excluded spruce, pine and larch from the list due to the coarseness of the layers and inexpressive color. Alder, due to its softness too. What remains are bird cherry, birch, souvel, veneer and Che wood. Well, this Che has very hard and heavy wood! But how beautiful! Just like chocolate.
And so, I decided to make a vase with Greek ornaments from all this “wealth”. Having drawn a project for the future vase and using one wonderful program, which on one of the sites, one wonderful Moldavian master Mihai Apostol kindly provided for free use, calculating the sizes of the segments of the future vases, I got down to business.
First, I cut out the round bottom of the future vase and glued it to a piece of round wood left over from previous turning works. This was so that there would be something to clamp the future product into the lathe chuck.
Having run the material to the size, thickness, on a surface planer and setting the desired angle, using a simple device for a circular saw, I sawed the segments
There were 240 of them!
And many hours of painstaking work began to assemble these “puzzles.”
For the ornament I used birch souvel and the same chocolate tree
Then he began assembling larger segments. To do this, it was necessary to polish the edges of each segment. The appearance of the future product depends on the accuracy of the corners. By the way, when assembling the Greek ornament, each glued pair had to be sanded.
Then all the rings were glued together in positions tightened with clamps. Although Titebond is a strong glue, to be on the safe side I left it to dry for a day so that these rings would not fly apart during turning on the machine.
The next stage is sanding again, but this time on planes. Oh, my poor fingers. They got it from the impact of sandpaper (((
Then half of the future “pie” was glued together, clamped in a clamp. And again for a day.
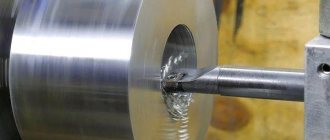
And into the machine, for preliminary processing on the outside, and most importantly on the inside, because then it will be difficult to get to the inside. The narrow neck was supposed to be made for the vase.
The next step was to glue the ring with the ornament, right on the machine, pressing it with the tailstock. And again boring inside, using a homemade lunette. (For those who don’t know, this is a large metal ring, with wheels from rollers inside). A very necessary device for turning internal cavities, protecting the part rotating in the lathe from flying out of the chuck, and your own body from all sorts of unpleasant and accidents.
Having turned the ring with the ornament, we glue the second part of the “pie”, previously glued from the remaining rings, and also grind it first on the outside, and then on the inside.
It’s with internal sampling that the most intense torment begins. You sharpen, after all, almost blindly! It often happened that this final work, sampling the insides of vases, ruined the whole thing. Ruining all the work, materials and time to nothing. But here it comes to the rescue a laser pointer aligned with the incisor. In the photo you can see a red glowing spot on the left side of the neck. This is just from the pointer. Although this does not always save you from failure. My devices are all completely homemade and imperfect
And here it is, this long-awaited miracle!
And the other day, this beauty found its owner, which cannot but make me happy.
There were other works before this, but not with such a large number of details, and they also found their connoisseurs.