Each of us went to school. There a person receives a huge amount of knowledge that may later be needed in life. Not everyone, of course, can fully appreciate the significance of the knowledge acquired at school, but this is not the point now.
Mathematics. This is a scary word for many , which frightened quite a number of schoolchildren at one time. Numbers, formulas and calculations were amenable to only the most inquisitive. And every year this complex subject became more and more difficult.
In high school, geometry appears and everything becomes even more complicated and incomprehensible. Perhaps many at least once in their lives, but in their hearts, cursed a science they did not understand and wondered why it was needed at all, and whether it would be needed in life.
Perhaps it was not possible to apply the knowledge acquired at school in everyday life. It was hardly necessary to calculate logarithms and quadratic equations in broad daylight or prove that two parallel ones would never converge. But where knowledge of geometry and mathematics may certainly be needed is in construction and when carrying out repairs.
This article will focus on calculating the right angle, which is required during the construction of buildings. Accuracy in the construction of buildings must be observed without fail , because only accurate calculations can eliminate distortions and instability in the organization of the entire building. Calculating a right angle during construction is not such a difficult process, which will require knowledge and application of some simple rules of mathematics and geometry. This will be discussed in more detail below.
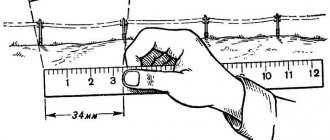
Accurate 90 degree angle using tape measure
During finishing work and construction, clear geometry is sometimes needed: perpendicular walls and other structures that require a right angle of 90 degrees. An ordinary square cannot check or mark corners with sides of several meters. The described method is excellent for marking or checking any angles - the length of the sides is not limited. The main tool for measurements is a tape measure.
We will look at accurately marking right angles, as well as a method for checking already marked angles on walls and other objects.
How to measure angles correctly
Measuring angles is similar to measuring segments: you need to compare them with the angle taken as the unit of measurement. In geometry, the unit of measurement is usually taken to be a degree - an angle equal to 1/180 of a turned angle. It is designated as follows: °.
The degree measure of an angle is a positive number that shows how many times a degree and its parts fit into a given angle.
There are two other possible measures of angle: minutes and seconds. They allow more accurate calculations, especially when the value is not a whole degree designation.
A minute is 1/60th of a degree. Denoted by ´.
A second is 1/60th of a minute. Denoted by ´´.
A degree consists of 3600 seconds, that is: 1° = 60´ = 3600´´.
How an angle is measured: first, the sides of the angle are measured, and then its internal area. You always need to count the number of angles laid, since they predetermine the measure of the angle being measured.
When a ray divides an angle into two or more angles, the degree measure of the entire angle is equal to the sum of the degree measures of these angles.
The figure shows angle AOB; it consists of angles AOC, COD and DOB. It can be written like this: ∠AOB = ∠AOC + ∠COD + ∠DOB = 45° + 30° + 60° = 135°.
Equal angles have equal degrees.
Pythagorean theorem
The theorem is based on the statement that in a right triangle, the sum of the squares of the lengths of the legs is equal to the square of the length of the hypotenuse
. This is written as a formula:
Sides a and b are legs, between which the angle is exactly 90 degrees. Therefore, side c is the hypotenuse. By substituting two known quantities into this formula, we can calculate the third, unknown one. Therefore, we can mark right angles and also check them.
The Pythagorean theorem is also known as the “Egyptian triangle”. This is a triangle with sides 3, 4 and 5, and it does not matter in what units the lengths are. Between sides 3 and 4 is exactly ninety degrees. Let's check this statement with the above formula: a²+b²=c² = (3×3)+(4×4) = 9+16 = (5×5) = 25 - everything converges!
Now let's put the theorem into practice.
Checking right angle
Let's start with the simplest thing - checking a right angle using the Pythagorean theorem. The most common example in finishing and construction is checking perpendicularity
walls Perpendicular walls are walls located at right angles of 90° to each other.
So, we take any tested internal angle. On the walls (at the same height) or on the floor, mark segments of arbitrary lengths on both walls. The length of these segments is arbitrary; if possible, you need to mark as many as possible, but so that it is convenient to measure the diagonal between the marks on the walls. For example, we marked 2.5 meters (or 250 cm) on one wall and 3 meters (or 300 cm) on the other. Now we square the length of the segment of each wall (multiply by itself) and add the resulting products. It looks like this: (2.5 × 2.5) + (3 × 3) = 15.25 - this is the diagonal squared. Now we need to take the square root of this number √15.25≈3.90 - 3.9 meters should be the diagonal between our marks. If the measurement with a tape measure shows a different diagonal length, the angle being checked is rotated and has a deviation from 90°.
Right angle diagonal calculator
Diagonal c
Extracting the square root has never attracted me - an ordinary person cannot do without a calculator, and besides, not all mobile devices have calculators that can extract it. Therefore, you can use a simplified method. You just need to remember: a right angle with sides of exactly 100 centimeters has a diagonal of 141.4 cm.
Thus, a right angle with sides of 2 m has a diagonal of 282.8 cm. That is, for every meter of the plane there are 141.4 cm. This method has one drawback: from the measured angle it is necessary to set off equal distances on both walls and these segments must be multiples of a meter. I won’t claim it, but in my humble experience, it’s much more convenient. Although you should not forget about the original method completely - in some cases it is very relevant.
The question immediately arises: which deviation from the calculated length of the diagonal is considered normal (error), and which is not? If the angle being tested with marked sides of 1 m is 89°, then the diagonal will decrease to 140 cm. From understanding this dependence, we can draw an objective conclusion that an error of a few millimeters in the diagonal of 141.4 cm will not give a deviation of one whole degree.
How to check the outer corner?
Checking the outer corner is essentially no different, you just need to extend the lines of each wall on the floor (or ground, using a cord) and measure the resulting inner corner in the usual way.
Do-it-yourself foundation markings
The quality of construction depends to a large extent on how correctly the markings for the foundation were done.
When doing this work, it is important to maintain all right angles with maximum precision. Do-it-yourself foundation marking for a private house can be done in several ways. The most commonly used method is the “Egyptian” triangle and the two-curve method.
Therefore, in this article we will consider them.
The most commonly used methods are the Egyptian triangle method and the two curve method. Therefore, in this article we will consider them.
What tools will you need?
You can mark the foundation yourself using the following tools:
- Roulettes;
- Cord;
- Hydraulic level and plumb line;
- In addition, you will need wooden pegs.
Where to start marking?
So, how to mark the foundation? First, you need to determine two starting points by driving pegs into the corners of the future building, located on the same straight line from the side of its longest wall. Next, you will need to draw perpendiculars from them, thus marking the outer contour of the adjacent walls.
"Egyptian Triangle". The simplest method
Marking the foundation with your own hands can most quickly be done using the “golden” triangle method, which has a side length ratio of 5 * 3 * 4. The event is carried out in several stages:
1. First you need to find a long rope and tie four knots on it. The first is at the end, the second is at a distance of 3 m, the third is four meters from the second and the last is five meters from the third; 2. After this, the very first and very last nodes are connected with a nail. A nail should be driven into each of the intermediate nodes; 3. In this case, the long side of the resulting triangle must be positioned along the line between two already driven pegs; 4. The required perpendicular is drawn along the short side; 5. On the resulting straight line, drive in the third peg at a distance equal to the width of the building.
How to mark a right angle with a tape measure
The marking can be based both on the general Pythagorean theorem and on the principle of the “Egyptian triangle”. However, this is only in theory, lines are simply drawn on paper, but “catching” all selected sizes with stretched cords or lines on the floor is a more difficult task.
Therefore, I propose a simplified method based on the diagonal of 141.4 cm for a triangle with sides of 100 cm. The entire marking sequence is shown in the pictures below. It is important not to forget: the diagonal of 141.4 cm must be multiplied by the number of meters in segment A-B. Segments A-B and A-C must be equal and correspond to a whole number in meters. Pictures enlarge by clicking!
Angle comparison
To compare angles, you can use the simplest method from the 4th grade program - the overlay method. To do this, you need to combine two vertices and the side of one corner with the side of the other. If the sides of the given angles coincide, then the angles are equal. If not, then the angle that lies inside the other will be smaller. Here are two clear examples with equal and unequal angles:
In this case, the rotated angles are always equal.
Corner alignment ∠