The tool is fixed on a workbench or table, pressed with a clamp, and is completely safe and easy to use. In this article we will look at how to use a miter box, how to make a tool with your own hands and its types.
Types of miter box
The tool used for sawing wooden, polyurethane and plastic skirting boards at an angle has a simple design.
It consists of a tray with through slots made at an angle into which a hacksaw fits.
Classification:
- a simple design for sawing material at an angle of 45 and 90 degrees, made in production or with your own hands, has several slots on the sides;
- the rotary miter box has a device for securing parts; a hacksaw is installed on it, which can be rotated manually at an angle of 15-135 degrees;
- The electric tool is an electric saw mounted on a rotating base.
The last two types are professional tools capable of sawing materials in two planes.
Classification and design
The design of this tool is quite simple; it is used for sawing skirting boards at an angle based on materials such as:
- tree;
- plastic;
- polyurethane.
The miter box has the shape of a tray with through slots at an angle, a hacksaw fits into them.
According to the design features, miter boxes are as follows:
- simple - used for cutting materials at angles of 90 and 45 degrees;
- rotary - equipped with devices for fastening parts and a hacksaw that can be turned manually by 15-135 degrees;
- electric - they look like electric saws that are installed on a rotating base.
Based on the material used, the instruments are divided into the following:
- made of wood - this is a classic version of a miter box that you can make with your own hands;
- made of plastic - they are inexpensive, weigh little, but are short-lived, since the slots quickly expand;
- metal - usually these are expensive professional tools, durable and easy to use.
Features of a wooden miter box
Finding a ready-made wooden miter box for cutting skirting boards on sale now is not easy. However, not so long ago, such types of work were performed exclusively with wooden tools.
The structure is based on a board; a plank and two boards are placed on it, acting as sidewalls, in which there are cuts.
When using such a miter box for cutting ends, you should be especially vigilant, since careless handling can lead to its damage. To prevent this from happening, instead of a simple hacksaw, use a special saw that cuts exclusively the baseboard.
Plastic and metal tools
Tools for cutting skirting boards based on polyvinyl chloride can be called a worthy alternative to wooden products. Their advantages are the following:
- low cost;
- a large number of standard sizes on sale;
- light weight.
However, there is also a drawback - rapid wear. The cuts are developed and expanded beyond the permissible norm. As a result, the hacksaw blade becomes unstable, and the cut will be inaccurate because of this.
But metal products are distinguished by their durability. But such equipment is very expensive and professional. It also has a long service life, so the high cost is justified. Using such equipment, you can develop cuts made in steel or aluminum housing.
Terms of use
Anyone can cut material using a miter box. However, before starting work, you need to study the rules for using the tool and prepare materials that will help you in your work.
You will need:
- a hacksaw with a tooth spacing suitable for the specific type of material being cut;
- to cut foam baseboards you will need a mounting knife;
- to mark the material you will need a pencil and a ruler;
- After sawing, you need to smooth out any rough edges and burrs with sandpaper.
Basic rule of work:
- the plinth can be fixed in the tool on the right, and the corner can be cut off on the left side of the product;
- We fix the left product on the left side, and cut off the corner on the right side of the product.
To prevent damage to the product when cutting, you need to purchase a hacksaw suitable for the material used.
Expanded polystyrene
By and large, expanded polystyrene is a type of foam that has an increased safety margin. The cost of products made from extruded polystyrene foam is slightly higher compared to polystyrene foam, but the reliability of such skirting boards is much higher. Breaking such a part is already problematic.
To cut polystyrene foam skirting boards, you need any sharp tool, such as a construction knife or a hacksaw. Due to their high strength, it is much easier to work with such products - they practically do not break or deform during operation. There will be less waste in the long run.
Sawing material
When sawing, it is important not to confuse the sides.
Let's look at how to properly use a miter box for sawing skirting boards. If you need to cut the material at an angle of 45 or 90 degrees, you need to secure it in the body and rest it against the end wall.
Then we cut the material with a hacksaw. Using a professional tool, you can adjust the size down to the millimeter.
Templates must be made for each section, leaving a margin of 50 mm. The walls in the room are not always smooth, so before cutting the material, you need to check how they fit together.
Cutting rules:
- Mark the cut line with a pencil.
- We place the product face down in the miter box body so that the cut line mark is a continuation of the slot in the tool.
- We press the workpiece from the end of the body wall, insert a hacksaw into the slot, and cut off the material along the mark.
- We insert the second blank into the slot with the other side.
- We clean the unevenness with fine sandpaper.
Before installing the plinth, you need to attach it to the wall, align both parts with each other and check that the cut angle matches so that there is no gap between the parts.
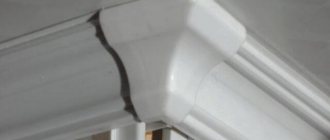
Trimming outside corners
External corners are less common than internal corners, and they are much easier to trim. Now we will do everything the opposite way than when we trimmed the internal ones. Initially, we need to mark where our corner will begin, and for this we apply the ceiling plinth to the wall with markings: now the point of intersection of the ceiling plinths will be the top point of their abutment, mark it with a simple pencil and we can begin preparing the plinth: to prepare the left-sided one, we place the plinth in miter box so that the top of the baguette is pressed against the wall, the bottom against the bottom, and the long edge is on the right. Again we cut along the slot with the 45 degree mark. The right-hand corner is prepared according to the same principle, only the long edge of the canvas will be on the left.
In the case of rounded corners, no devices will help us and we will have to do everything “by eye”. The easiest way to create such a corner is as follows: the ceiling plinth is cut into several parts of about 5 cm each, we cut all the parts on both sides and check the joint in place, correct it if necessary, and glue it one by one. Leave the pieces that will join the main plinth at the beginning and end of the curve flat on one side
It is important not to confuse the fragments, so you can number them with a simple pencil
Cutting an arbitrary angle
Often the walls are not connected to each other at right angles, and the sawing has to be adjusted.
You can do this in two ways:
- using a homemade template made of cardboard or thick paper. If the baseboard is hollow inside, it is difficult to keep it upright. In this case, you need to make a corner in which you can place the product, like in a wort. We lay the corner on a pre-made stencil so that it matches the template, cut the product according to the mark;
- We make marks on the material with a pencil. To do this, we cut both products at an angle of 90 degrees, apply them to the wall and mark the abutment line. We find the point of contact of the skirting boards and transfer the markings to the material and cut them off.
The quality of the junction of the skirting boards to each other depends on the correct marking of the product. It is recommended to cut the corner first and then adjust the product to length, this will make it possible to redo the discrepancy if the material was cut incorrectly.
Best kits
Most often, professional miter boxes made of steel are purchased; there are simple sets with horizontally rotating platforms, and there are devices in which you can also change the angle of inclination of the hacksaw blade relative to the vertical plane. This allows you to create complex dovetail joints.
STAYER "PROFI"
Angular metal rotary device with a saw, blade length – 550 mm.
Peculiarities:
- Strong and stable base.
- There are clamps for fixing the workpiece.
- Convenient rotating platform for a hacksaw.
- The set includes a powerful saw with a plastic handle.
How to saw off the inside corner of a floor plinth
To saw off an internal corner you need to follow the rules:
- we install the miter box for baseboards on the table parallel to the master;
- We press the product to the side opposite from the master;
- We place the right plinth on the right, install the left one on the left, and cut it off from the opposite side.
We combine both parts of the plinth, we get an internal corner with the apex away from us.
Sawing off the outer corner of the floor plinth
Rules for sawing the outer corner of the product:
- We place the miter box on the table parallel to the master;
- We press the baseboard from the master's side;
- we place the right product on the right, the left one on the left, bring it to a line that is located diagonally, saw off from the bottom up;
We connect the parts, we get an outer corner with the vertex towards us. We take into account that the ceiling plinth is cut according to a different pattern.
In what cases is it used?
It is a mistake to think that the device was invented solely for cutting corners on a baguette. The must, on the contrary, came from other areas of carpentry in the decoration of walls and ceilings. This construction tool is actively used for:
- production of door frames;
- installation of door and window frames;
- production of glazing beads for fastening window glass;
- preparing strips for frames for photographs and paintings;
- cutting cable ducts;
- cutting corners at floor and ceiling plinths.
Using a miter box as a device for working with fillets allows you to file down the ends so that they touch at the corners without gaps.
We make a miter box with our own hands
Use a 20cm board to make the tool.
Making a tool for forming an angle with your own hands is quite simple.
When manufacturing technology is carried out, the miter box will not be inferior in quality to store-bought models.
To carry out manufacturing work, you need to prepare materials and tools:
- board, when using pine wood its thickness should be 20 mm, if we use oak or ash material, a thickness of 10-15 mm is sufficient;
- hacksaw for wood and metal;
- vice or clamps;
- sanding paper or narrow needle file;
- confirmants and hexagon;
- drill and drill bits for confirmations and wood;
- Using a protractor, ruler and pencil, we will make markings before sawing. To learn how to make a miter box with your own hands, watch this video:
After preparing everything necessary, we begin manufacturing the product.
Box manufacturing process
The height of the side should be from 30 to 50 mm.
First, you need to make the side walls and bottom of the miter box. To do this, we first prepare boards of certain sizes:
- the height of the sides will depend on the width of the product being cut, varies from 30 to 50 mm;
- the optimal length of the side walls is 15-30 cm.
Manufacturing sequence:
- We cut out two parts of the same size, they will serve as sides, and the bottom is 150 mm wide.
- We sand the workpieces and align the corners at 90 degrees.
- Place the pieces next to each other and check that they are the same size.
Let's start marking the cuts on the side parts. For more detailed instructions on how to make a miter box with your own hands, watch this video:
Marking the cutting locations
To avoid errors when working with a miter box, you need to correctly mark the location of the slots:
- At the end of the sides we draw two lines, perpendicular to each other.
- We measure the width and thickness of the box, step back from the drawn lines by the size of the width of the box and make two marks to make a square.
- On two opposite sides we measure an angle of 45 and 90 degrees.
- Once again we check the correctness of the markings, only after that we cut the diagonal cuts. To make the cut perfectly even, we start sawing with a hacksaw for metal with fine teeth, then connect a hand saw for wood. The depth of the cut should be up to the top level of the bottom of the tool.
- Then we make a second cut perpendicular to the first cut, which is needed for even cutting of the baseboards.
- We clean the sawing areas with sandpaper.
- We connect the blanks together with glue and fix them with confirmants. We clamp the box with a vice, remove excess glue and leave for 24 hours until completely dry.
If you want the tool to be dismountable, then we fix it with screws without using glue.
We looked at what a miter box is and how to use it. This tool is an indispensable assistant in carrying out repair work; it does not take up much space, but you cannot do without it if you need to cut a product at an angle.
Comments3 comments
- Michael:
02/06/2017 at 19:43Is there a metal blade for a 55mm precision miter box?
- Nikolaevich:
02/09/2017 at 20:39
For all types of precision miter boxes sold in Russia, there is a fairly wide range of saws for various materials, including metal. Obviously you made a typo - their length is 550 mm. They are made of high-quality tool steel and have hardened teeth. You can look at saws BIBER 85211, Stayer Master 1549-2S or “PROFI”, article number 42-4-002.
- Ilmir:
09/05/2018 at 10:09
Yesterday I bought a Merlin in Leroy. I wanted to ask how to install the frame of an interior door to cut off 46 degrees. If possible, a photo, or even better, a video.