How to properly join a ceiling plinth?
We are ready to share with you some practical tips for joining ceiling skirting boards. In general, the width of your baseboard is not at all important. For a high-quality arrangement of all parts, you need to place one piece of plinth on the diameter of the wall and draw a line to the other corner using a simple pencil. This way you will measure the junction of the baseboard and the corner joint. Then the fillet is applied not to the mark, but to the corner itself. The incision can be made with a simple stationery knife. Blocks with sandpaper contribute to a reliable and strong connection. The corners are assembled into a common design with color selection.
Using decorative corners
This refers to special corner adapters, which are usually equipped with polyurethane and polystyrene friezes. Decorative corners are glued to the very corner, and baguettes are adjacent to them on both sides. In this case, adjustment is either not required at all, or is carried out with a simple stationery knife.
Color Mixing Chart
| Red Burgundy | Red add brown, black and yellow |
| Red | Red White for brightening, yellow for orange-red |
| Royal red | Red add blue |
| Crimson | Blue add white, red and brown |
| Tomato red | Red add yellow and brown |
| Reddish chestnut | Red add brown and black |
| Chestnut | Red add black or brown |
| Pink | White add a little red |
| Grass green | Yellow add blue and green |
| Coniferous | Green add yellow and black |
| Bottle green | Yellow add blue |
| Fern green color | White add green, black and white |
| Forest green color | Green add black |
| Emerald green | Yellow add green and white |
| Light green | Yellow add white and green |
| Pale green | Yellow add blue/black for depth |
| Light green | Green add white/yellow |
| Turquoise green | Green add blue |
| Green-gray | White Add light gray plus a drop of green |
| Avocado | Yellow add brown and black |
| Olive | Green add yellow |
| Khaki | Brown Green |
| Pistachio | Pistachio paint is made by mixing yellow paint with a small amount of blue. |
| Yellow | Yellow white to lighten, red or brown to darken |
| Lemon yellow | Yellow add white, a little green |
| Mustard | Yellow Add red, black and a little green |
| Mandarin, orange | Yellow add red and brown |
| Gold | Yellow drop of red or brown |
| Orange | White add orange and brown |
| Orange | Yellow add red |
| Dark brown | Yellow red, black and white |
| Red-brown | Red yellow Add blue and white to brighten |
| Medium brown | Yellow Add red and blue, white for lightening, black for dark. |
| Golden brown | Yellow Add red, blue, white. More yellow for contrast |
| Copper gray | Black add white and red |
| Light brown | Yellow add white, black, brown |
| Royal blue | Blue add black and a drop of green |
| Dark blue | Blue add black and a drop of green |
| Gray-blue | White Add light gray plus a drop of blue |
| Aquamarine | White add green and black |
| Turquoise blue | Blue add a little green |
| White-blue | White add blue |
| Wedgwood blue | White add blue and a drop of black |
| Plum/Purple | Red add white, blue and black |
| Dark purple | Red add blue and black |
| Royal purple | Red add blue and yellow |
| Grey | White Add a little black |
| Pink gray | White A drop of red or black |
| Gray coal | White add black |
| Pearl gray | White Add black, a little blue |
| Almost white | White Add brown or black |
| Beige | Take brown and gradually add white until you get a beige color. Add yellow for brightness. |
| Honey color | White, yellow and dark brown |
| Eggshell color | White yellow, a little brown |
| Black | red blue green |
How to get the desired color when mixing colors to get the desired color or shade is shown in the color mixing table. You can select a color to mix in the color palette on the online color selection page.
How to trim ceiling plinth?
When finishing finishing work in a house, many homeowners are faced with the problem of cutting ceiling skirting boards, especially their corners. After all, the attractiveness of the interior depends on them. Without these decorative elements, the rooms look unfinished. to figure out how to cut a ceiling plinth using a square, a metal ruler or a straight strip, since here you only need to maintain a right angle.
But finishing work requires trimming skirting boards at other angles, for example, 40 degrees. Therefore, the installation of these plastic elements is fraught with certain difficulties. To get the appropriate angle, you need to be extremely careful. One of the problems is cutting the ceiling plinth in the corners with further joining.
The following materials are used in the production of skirting boards:
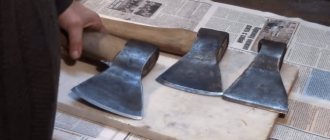
- Wood. Wood is considered the most labor-intensive material to process. Wooden skirting boards are cut with a carpenter's hacksaw.
- Extruded polystyrene foam. High density finishing material. Does not absorb moisture. When burning, it does not emit toxic substances. It is quite difficult to process, but to cut . To do this, you only need a carpenter's knife.
- Styrofoam. It is fragile, the cheapest and easiest to process material. Its fragility is not a drawback, since the skirting boards are located right under the ceiling and are not afraid of mechanical stress. ceiling from polystyrene foam without any effort.
- Polyurethane. It is characterized by plasticity and flexibility. Thanks to these qualities, it is used on uneven surfaces. It has water-repellent properties and is resistant to temperature changes.
- Polyvinyl chloride. Difficult to fit material due to increased rigidity. Manufacturers offer different types of finishes from it: imitation stone, metal, wood and uniform coloring. In the cold it becomes brittle.
READ How to Cut Tiles Without Tools
Decorative elements made of aluminum look no less attractive under the ceiling. True, processing and cutting metal is much more difficult than the materials from the proposed list. The increased demand for aluminum skirting boards is due to the fact that they are cable channels in which it is convenient to hide wiring and cables
Equally important is aesthetics, non-reaction to aggressive environments and chemical detergents.
Cut ceiling plinth with a hacksaw. To avoid breaking the canvas, reciprocating movements must be smooth and uniform.
Regardless of the material used, ceiling skirting boards can be considered the best solution for creating a unique interior. They are installed in the most difficult area, which is the junction of the wall and ceiling. Anyone who knows how to correctly cut a corner on a ceiling plinth will quickly complete the interior of the room, which will give it more attractiveness. Using these elements you can partially hide minor defects.
The cutting tool is selected depending on the material and the required angles. In rooms of standard shapes with perfectly smooth walls and ceilings, a miter box is used to cut off the corners of the ceiling plinth. The wood is cut with a regular carpenter's hacksaw, but for other materials you should purchase a jigsaw. You can also use a hacksaw. To adjust the angles manually, you will need additional tools: ruler, square, protractor, pencil.
External
The outer corner is cut a little differently. Experts recommend marking and cutting the internal corners first, and then preparing the external corners. The cornice is pressed against the ceiling and a place for cutting the corner is marked. Next, the cornice strip is placed in the miter box and it is trimmed. The second workpiece is prepared in the same order of execution of the algorithm. When both corners of the cornice are cut, check the quality of their joining. If irregularities are detected, the two parts are adjusted more tightly.
The considered pruning options can be conveniently performed using a miter box.
However, in practice, perfectly smooth walls are rare; in this case, other methods will have to be used to prepare the ceiling cornice.
Methods for cutting and joining baguettes
In the picture above you see the process of cutting the cornice along the slots with a miter box, but how to trim the ceiling plinth without a miter box? We offer you several options with descriptions, as well as making your own template for a simple miter box. Let's consider all the methods in order:
- An example of a cornice to a ceiling surface. Draw a marker line along the ceiling surface;
- The point is the selected angle. Press the product against the ceiling, draw another straight line;
- At the intersection of straight lines, mark the plinth itself with a dot, then draw a line from the marking on the bug in its lower corner. Using it you will cut the required angle on the fillet;
- The left corner is marked in the same way;
- After cutting both skirting boards, press them into the corner and check for accuracy of the cut. If there are gaps, trim the corners again. Remember - so that the bar does not become shorter than the required length, do not shorten the unmarked part of the day until you achieve an exact connection;
- After adjustment, the fillet is glued or screwed. The ceiling plinth for suspended ceilings cannot be attached to the surface of the ceiling material - it is glued only to the plane of the wall.
READ How to Cut Corners of Ceiling Skirting Boards
Attention: do not put too much pressure on the foam or polystyrene foam cornice when cutting it - it may lose its shape, and after gluing, dents and other irregularities will be visible.
The method is as follows: how to cut a ceiling plinth without a miter box along the outer corner of the ceiling:
- Press the plinth at the corner and draw a line 200-300 mm long along the ceiling with a pencil or marker;
- Press the cornice into the left corner, make a mark in the first mowing line so that the markers intersect;
- On the plank, mark points at the intersection of markers and in the corner of the room;
- Connect the marked points to the cornice, cut the plinth according to the markings with the angle of inclination of the plank inward;
- Check the accuracy of the joint in place and trim again if necessary.
Classic baguettes are wooden, but they are difficult to join accurately without the use of a factory miter box and appropriate cutting tools. Wooden baguettes are formed with a miter saw, and in its absence, with a carpenter's hacksaw with a fine tooth, an electric jigsaw or a hacksaw for cutting metal.
Important: A cornice made of polyurethane or aluminum is considered reliable in terms of moisture resistance. But polyurethane cornices cannot be exposed to temperature changes, so it is not recommended to install them in the kitchen or bathroom.
Whatever the baseboard, if the angle in the room is not 90 0, then it will be difficult to make an accurate cut for joining the planks. In old buildings (Stalinka, Khrushchev, and even Brezhnevka), the corner in the room can be formed as 88 0 or 93 0 (for a piermer), and cutting off such an end according to a template is problematic. Then how to correctly cut the corner of the plinth without a miter box, without allowing large discrepancies and WITHOUT using a complex and expensive tool? Use the methods presented.
The picture shows cornices made from materials such as:
- Polyurethane (PPU)
- Foam plastic (PE)
- Polyvinyl chloride (PVC)
- Wood.
To form an accurate internal corner from planks, perform the following operations sequentially:
- An example of a baguette to the corner of a room, for example, is a case;
- Draw a line along the baseboard with a pencil;
- On the left side, do the same operation with the cornice;
- The point where the marker lines intersect will be the top mark, and the cut must be made from it;
- Place the cornice in the corner and transfer the crossing point to the bar;
- Use a pencil to connect the top and bottom marks on the cornice;
- Cut the ends according to the markings;
- For the second bar, the points are repeated in the same sequence.
Important: Before gluing the planks, check the accuracy of the cut: place the cornices in the corner, and if there are no gaps between the fillets, fasten them. If there are unevenness at the end of the joining surfaces, trim the baseboards more precisely.
The following solution is how to accurately cut and how to glue the ceiling plinth without a miter box to the inner corner of the ceiling:
- Find out the width of the fillet;
- At the bottom, mark a point at a distance of the width of the plank;
- Connect the point of the upper corner with the point of the lower mowing line with a diagonal line, cut the product along this mowing line;
- For the second cornice, all points are repeated in the same sequence.
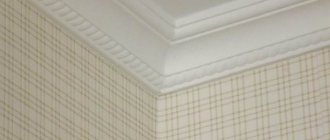
Ceiling plinth: how to cut and glue it
Ceiling plinth is used to hide irregularities that form at the border between the wall and the ceiling in order to give the interior aesthetic completeness.
How to glue a ceiling plinth, how to cut it using a miter box or in the absence of a device - such questions are asked by many beginners who prefer to do their own renovations in the apartment. This article is devoted to these issues.
Features of cutting and joining baguette elements
Before starting work, you should watch the video.
- It is necessary to cut the baseboard from the front side and along the outer edges.
- When cutting the inner corner, it is therefore necessary to process both sides of the baguette.
- When performing work, it is better to use a miter saw, but at home you can get by with simple miter boxes.
- For a foam baguette, its edges must be cut at an angle of 45°.
- The cut on the right is made on the plinth glued to the left. And vice versa.
- The bottom of the baguette should protrude above the top to obtain the optimal internal angle.
Cutting skirting boards using a miter box
A miter box is a device that can be made from:
- Tree.
- Plastic.
- Aluminum.
In appearance, it is a tray, on the sides of which there are grooves at different angles.
- To cut a corner on a ceiling plinth, the element is mounted in the position in which it will be located on the plane of the ceiling.
- The part should be placed correctly and pressed tightly to the base.
- Carefully aligned to the plane on the ceiling.
Tip: The plinth should be tried dry before installation, and then marked with a pencil. This will prevent you from confusing the direction of the cut.
- The desired groove is selected and done with a free hand, preferably a hacksaw for metal, cutting the element along the groove.
- For plinths made of hard material, it may be necessary to adjust the element with a file.
- Do not use a lot of force when making the cut. Otherwise, soft materials may deform and crumble.
How to make a miter box yourself?
If desired, a miter box can be made at home. It can be made of wood or iron. The dimensions of the workpiece do not play a special role, but the wider it is, the more accurate your cuts will be. However, if the width is greater than the length of the hacksaw with which you will cut the baseboards or boards, then sawing will be extremely inconvenient, so you do not need to take a workpiece that is too wide.
First, a transverse straight line is marked in the center of the workpiece. Then, at a distance of 1/2 the width of the workpiece from the intersection of the straight line with the edges of the workpiece, marks are made. Then these marks are connected crosswise, as shown in the figure.
Wooden miter box, fastened with self-tapping screws
Next, the process of marking the side walls of the miter box begins. Attach them to the already marked base and make marks, focusing on the markings of the base. Then draw straight lines from these marks across the entire wall.
Scheme for making a wooden miter box
After this, the process of installing the miter box begins. The walls must be attached to the base using self-tapping screws if the device is made of wood or chipboard, or corners with bolts if it is made of steel. Only after installation, the slots for the saw are cut in the miter box.
Tools for cutting skirting boards
A high-quality and correctly selected tool will allow you to perfectly join the plinth at all angles. To cut a baguette for the ceiling, various tools are used, which have their own characteristics of use.
This is a special box with several holes. When performing the operation, a workpiece is inserted into the device, and then the baguette is cut with a hacksaw. The work is quite simple, but the edge of the part turns out to be quite rough, sometimes the product, especially made of foam, even deteriorates from the influence of an ordinary hacksaw.
Tip: After cutting plastic or wooden baguettes in a miter box, the cut areas should be treated with sandpaper or a file.
With this tool, the cut is of the highest quality. When cutting, the electric tool is lowered with the blade onto the baguette and the desired result is obtained.
This tool is very convenient for cutting plinths made of wood, as seen in the photo, plastic and other products at an angle. The peculiarity of cutting is the precise application of markings on the workpiece, and then the smooth lowering of the working saw onto the plinth.
An electric jigsaw creates cuts in different directions at the desired angle. The advantage of the tool is the efficiency and accuracy of the work.
This tool makes it easy to cut foam products. After preliminary marking of the part, the plinth is carefully cut with a knife at the desired angle.
Despite the simplicity of cutting, in order not to spoil the brand new plinth, it is better to use scraps of material and determine the technology for performing the process until the desired result is obtained.
What tools can you use?
The need to introduce certain tools is related to the materials from which the plinth will be made.
Table 1. Types of materials and features of their use.
| Polyvinyl chloride (PVC) | PVC skirting boards are distinguished by the fact that they are easily damaged when pressed and no longer restore their former appearance, since they lack elasticity. Therefore, you cannot press on such skirting boards when cutting. | Cut with a construction knife or a hacksaw. A blade or sharpened kitchen knife will also work. |
| Styrofoam | Foam plinth is also not very durable, but it is better than its polyvinyl chloride counterparts. Easily crumbles. | You can use the same tools as for PVC |
| Tree | Stronger and more aesthetically pleasing than their polymer counterparts, but more expensive. | It is best to cut wood with a hacksaw; you can cut it with metal, although this way you risk clogging the teeth of the blade with sawdust. A wood saw with fine teeth is best. |
Tips to simplify the installation of ceiling plinths
A few recommendations on how to cut a ceiling plinth and then how to install it:
- To take correct measurements, the plank is measured between two corners. In this case, for internal corners, the length is measured from the internal elements, and the distance from external corners is measured from a point that is distant from the internal one at a distance equal to the width of the plinth deep into the room.
- When installing foam skirting boards at the junction between the wall and the suspended ceiling, the glue is applied to the part of the skirting board in contact with the wall, and not with the canvas.
- The final fixation of the plinth is carried out after adjusting the angle of the adjacent plank to it.
- If there is a right angle at the wall, ceiling and floor, it is easier to adjust the planks at the bottom, laying out the parts on the floor or on a prepared table.
- Small cracks remaining in the corners are filled with putty.
- Particular attention should be paid to the installation of ceiling plinths made of rare wood. In this case, puttying the gaps will most likely not give the expected result. A bright spot will appear against the texture background.
- High-quality ceiling plinths, in addition to the main strips, have special inserts for right angles. Such inserts will significantly simplify installation and improve the quality of the work performed.
READ Repair of Charging Screwdriver Interskol 14 4
How to file the corners of a wooden baseboard.
Gluing skirting boards to the ceiling
As a rule, there are no difficulties with this work, but when performing it, it is also necessary to comply with a number of requirements:
gluing foam baseboards can be done either with standard adhesives or with liquid nails. Alternatively, you can use acrylic-based sealant or putty; there is no need to apply glue along the entire length of the plank; it will only be enough to coat individual sections of the plinth at a certain interval;
if there is such an opportunity, then it is better to attach the skirting boards not to the wallpaper, but to the surface treated with plaster
It must be primed using a primer, which will increase the reliability of the installed plinth; The plinth elements must be glued together; When using synthetic-based glue, it is important to ensure that the baseboard does not slip or fall before the glue hardens.
At this point, fixing the plinth can be considered complete. Questions regarding installation can always be answered by specialists in interior decoration, who can also provide photo and video materials on the installation of plinths on the ceiling surface.
Technology for cutting ceiling plinths
To carry out the work quickly and efficiently, you need to select a tool in accordance with the material of the plinth and choose a cutting method. If you have a miter box, then there won’t be any particular difficulties in the process. If it is not there, then two options are possible: cut according to a template and measurements on the ceiling, or make this tool yourself.
Method for cutting ceiling plinths without a miter box
To neatly join the fillets in the inner corners, you can do without a miter box.
- We apply the end part of the baguette to a sheet of paper and trace the outline of the convex side. It is more convenient to use a small piece of plinth (if you have one).
We transfer the outline to the surface of the baguette with a simple pencil.
For fitting, we apply one plinth tightly with the end part to the wall, and then the second.
- If there are small cracks, they can be processed with a stationery knife or subsequently sealed with sealant.
Technique for cutting ceiling plinths using a template
This method can be used if your corners are even and you need to cut the baguette exactly 45 degrees. To do this, before cutting the ceiling plinth in the corners, you need to draw a miter box on thick paper. We draw two parallel mowing lines and mark the angles at the required degrees using a protractor.
In this case, we place the fillet in the same way as on a traditional miter box. Please note that you need to cut the baseboard while holding the tool in a strictly vertical position.
How to correctly cut a wooden plinth
Useful tips
Some useful recommendations from experienced craftsmen who will quickly help you cut the baseboard in the corners without a miter box:
- ceiling strips are installed after preparing all the parts;
- If there is an error on the foam baseboard, it can be corrected with a regular knife. If it is made of another material, it is better to use a file;
- you need to cut the skirting boards from the side, and then try them on at the desired angle in order to immediately detect errors;
- Before finishing cuts, it is advisable to perform several tests on fillet scraps to avoid mistakes;
- It is advisable to treat the joints at the corners of already glued skirting boards with silicone sealant or finishing putty;
- to cut the fillet on a straight and solid plane with the markings facing up;
- to mark the outer corner, the plinth must extend its entire width beyond the corner;
- to mark the internal corner, the length of the plinth is measured from the corner;
- The template for a home miter box may well be a table pressed against the wall. It forms a perfectly right angle.
Selection of tools for cutting ceiling plinths
To correctly and accurately cut the ceiling plinth, you need to use a tool suitable for cutting. It is selected depending on the material from which the fillets are made:
Styrofoam.
It is characterized by low strength and is relatively inexpensive, and therefore foam models are becoming increasingly popular. Their strength does not particularly affect performance characteristics, since usually the ceiling plinth is not subject to mechanical stress.
A regular stationery knife is suitable for cutting. Extruded polystyrene foam. A cheap material whose density is several times higher than that of foam plastic. Because of this, cutting
In addition to the tool for directly cutting the baguette, you will need a miter box. This is a special device made of wood, plastic or metal in the form of a box with notches on the sides. A hacksaw or knife can be inserted into it at the desired angle. This way the cutting angle is as precise as possible.
- We knock together three 5015 cm planks with a long edge into the shape of a three-sided, rectangular box. Please note that an angle of 90 degrees must be maintained between the side bars and the transverse plank.
Using a protractor, mark a 45 degree angle on the bars. Instead of a protractor, you can use a school square. In it, one angle is 90 degrees, and the other two are 45 degrees.
Miter box cutting method
The most popular fastening option is using household tools. The miter box is a well-known carpenter's assistant, helping to make cuts at the desired angle. This is usually a tray, wooden or plastic, with vertical slots for the blade at 45 and 90 degree angles. How to cut the corners of a ceiling plinth with a miter box?
First, you should attach the material to the ceiling and install its strip in the miter box. In this case, the tool must coincide with the position of the product. Holding the plinth with your left hand, select the position for the cutting tool (hacksaw) at an angle of 45 degrees. They cut the material without unnecessary pressure. After this, cut the counter strip and install it to the far wall of the wort.
Holding the working material with your right hand, select the position of the hacksaw at 45 degrees and cut.
How to cut ceiling plinth
articles:
- Selection of tools
- Cutting technology
- In a miter box
- By template
- By marking
- Without miter box
- Useful tips
One of the most difficult stages when installing ceiling skirting boards is cutting them correctly. Only by correctly joining the individual elements at the outer and inner corners will you get the desired result. The fillets will look aesthetically pleasing and neat if they are cut at the right angle and the cracks are sealed. To perform this task, a special tool (miter box) is used. And if it is not there, then other devices will help.
Features of cutting ceiling plinths in a miter box
You must work with this device with extreme caution so as not to dull the tool or leave cuts in unnecessary places. During the process, we adhere to the following instructions:
- We fix the baguette in the miter box in the same way as we plan to place it on the wall. The side that will be pressed against the ceiling on the miter box should be adjacent to the side.
We insert a cutting tool (hacksaw or knife) into the required gap and cut the fillet.
Rules for cutting ceiling plinths according to markings
This method is used for cutting plinths in cases where there is neither a miter box nor the parts from which it can be made.
To do this, you need to make markings on the wall in this order:
- Place the baguette in the corner to the fastening point.
Along one of its edges we draw a base line on the ceiling for the level of fastening.
We apply the fillet in the same way to the perpendicularly drawn mowing line on the ceiling and again draw a straight line along one side. We should get two segments that intersect at one point.
We again apply two skirting boards in turn and mark this point on them.
We repeat the same procedure now on the wall to mark the cutting location from below on the products.
Connect two points with a line. It can take place at an angle of 38-45 degrees, since walls and corners in living rooms are often uneven.
READ What is the best way to cut polystyrene foam?
Docking on straight sections
The most difficult areas when decorating the ceiling perimeter with a frieze are the corner areas. Having passed the first corner, they usually begin to move in both directions at once, gluing plank after plank one by one. If the entire frieze fits when joined directly, no problems arise: using a miter box, cutting both edges at an angle of 90 degrees, they are connected with assembly glue. The main thing is to achieve maximum invisibility of the joint.
A slight difficulty arises when the installation work approaches the next corner and the frieze needs to be cut to length. This must be done with a certain margin for cutting the corner. Experienced craftsmen recommend leaving a margin of at least 10-15 cm, taking into account possible errors during design (sometimes it doesn’t work out the first time). After the corner of the frieze is trimmed and checked, the plank is applied dry to the area remaining from the corner with a straight cut towards the nearest baguette. Having marked the required length with a simple pencil, cut off the excess at an angle of 90 degrees, and glue the manufactured and adjusted section.
How to calculate the line connecting parts on their sides
On the back upper side of the plinth, a distance equal to its width is set aside. It is measured from the edge and a line is drawn parallel to the end. On the top face it forms a square with it, on the side, if its dimensions are different, an elongated figure.
When finishing a column or free opening, markings are applied as follows: from the corner of the plank facing the room, a hypotenuse is drawn from above, dividing the square in half. Its projection is transferred to the edge facing the wall. To do this, the space measured on the edge is also divided in half diagonally, drawing a line from the hypotenuse. The excess piece is cut along the two resulting diagonals.
If the joint is facing inward, the diagonals are drawn in the opposite direction.
How to cut corners of ceiling plinths: tips and detailed plan
During renovation, everyone has encountered the problem of how to cut a corner on a ceiling plinth. Even if the markings are applied correctly, it is not possible to saw off the fillet strictly along the mowing line - it bends, crumples and crumbles. It is not possible to fix it evenly in the hand at the desired degree. Vices and other devices leave noticeable dents. Even if you cut perfectly straight pieces by hand or on a machine, there will be a large gap between them when installed. This is despite the fact that when adjusted on the floor, the parts form a perfect connection. The conclusion arises that it is impossible to carry out the adjustment yourself at home and the help of professional builders is required. Fortunately, things aren't that bad. You can handle the task yourself.
Polyurethane
Polyurethane skirting boards are the most expensive products. The high cost is due to a large number of advantages, including excellent resistance to moisture, high mechanical strength, reliability and elasticity. For most situations, this option will be optimal.
However, there are exceptions - polyurethane does not withstand temperature changes well. If you place such skirting boards in the kitchen near the stove, then over time the polyurethane will deform and crack. The cutting of such fillets is carried out with a special knife, and no complications arise during the work.
Choosing a tool for cutting different materials
External joint
In this case, the parts are also secured. To cut the slats pressed against the left side, the saw is inserted from the right side.
In the case where the lath is an integral part of the external and internal joint, the internal one is made first. Then the rail is applied to the installation site to make markings for the external one. Doing it right away is very risky. You can cut off the excess, and then the length of the prefabricated element will not be enough. There will be a noticeable gap. It’s easier and faster to perform actions in the correct sequence. For step-by-step instructions on how to cut the corner of a ceiling plinth with your own hands, watch the video.
All about cutting corners of ceiling plinths
In a workshop engaged in woodworking or repairing metal parts, such an operation does not cause difficulties. The plank is placed on the machine, fixed in the desired position, then the excess is removed with a circular saw. The machine has a device that allows you to rotate the baguette at a given degree and measure the required distance on each side. Without precision instruments it is much more difficult to work. After applying the markings, you need to hold the blade in the correct position. Making a diagonal cut is much more difficult than making a straight cut. Such operations should not be performed on the eye. Everything needs to be measured carefully. There are several ways to simplify the task and avoid mistakes. First you need to choose the right tool and understand what scheme to follow.
How to trim ceiling plinths in corners using a miter box
A square is drawn in the middle of the workpiece and furrows are made along it in the sides to the very bottom. By placing the saw in the furrows that are furthest apart from each other, we get the 45 degrees we need. The sides should not bend or wobble when cutting, otherwise the blade will get stuck in them and the cut will be uneven. You can only work with products made of hard materials that hold their shape well. You need to make sure that the product is absolutely reliable, and its sides will not fall off at the most crucial moment. Holding a sharp object in your hands can cause injury.
Internal joint
Before gluing the ceiling plinth and cutting out the corner, it is applied to the installation site. This is necessary not only to check how level the base is. This makes it easier to understand what position the part will be in and correctly place it in the miter box. Let's imagine that its bottom is the ceiling. Let's place a rail in it. Let's turn the tool towards us with the open side, from which the main part of the baguette, intended for installation, looks out. Now we press the baguette with its perpendicular back edges to the bottom and left wall. We insert the saw into the holes so that its handle is on the left and closer to us. When working, do not press the handle, otherwise dents will remain on the edges. The blade should be moved smoothly, trying to avoid the appearance of burrs and chips.
If the holes in the sidewalls are too wide, you have to watch out for saw distortions. When making a miter box, it is advisable to take into account the thickness of the canvas. The product should be cut easily and freely. A gap with the walls is necessary, but it is better to keep it to a minimum - this will simplify the task and help avoid mistakes.
One of the most crucial moments is the final stage, when the cutting is almost completed. The hanging part of the workpiece must be fixed in the hand. Plastic and polystyrene foam often bend under their own weight, creating dents. Wood may crack along the grain. As a rule, the lower part of the face suffers. Dents cannot be repaired. It will be easy to glue the array, returning the torn piece to its place. It will need to be cut off and secured back to where it came off. You can use PVA glue, “Moment”, or any other composition. The fragment is pressed tightly against the smeared surface. Excess glue is carefully removed with a rag or napkin.
The second bar is a mirror image of the first, so we apply it to the right side of the miter box. Otherwise, the technology is no different from the manufacture of the first plank. It is cut at the same angle, but from the other sidewall.
Sources:
https://abisgroup.ru/articles/potolochnyj-plintus-kak-ego-narezat-i-prikleit.htm https://tutknow.ru/building/potolok/2581-kak-rezat-potolochnyy-plintus.html https: //www.ivd.ru/stroitelstvo-i-remont/potolok/kak-rezat-ugly-potolochnogo-plintusa-sovety-i-podrobnyj-plan-60021
Working solutions for preparing baguettes without a miter box
Another option for cutting the plank is to create some kind of structure from thick cardboard and a wooden block. First step: you need to bend the cardboard at the angle you measured in the corner of the room. Then press the cardboard onto the wooden block intended for cutting the corner and draw a line along which you need to cut the block - this will be your template. To cut the fillet, place a wooden template on top of the plank, and cut the required angle along the block.
Current offer on the construction market. plinth made of foamed polystyrene, made using extrusion technology. Therefore, Russian ceiling strips do not have the disadvantages of polyurethane foam cornices. The cost of curtain rods is much lower than foam or other analogues.
But in old houses with “floating” angles, such sets are unlikely to be useful - in the set you will only find angles at 45 0 60 0 and 90 0 How to correct the situation? You need to approximately trim the end of the baguette. an angle of approximately 45 0 and then, over the course of several fittings, cut the angle locally to the required value.
When cutting the baguette and forming the outer corner, use this method:
- Press the plinth to the right side of the corner so that the strip protrudes beyond the corner by at least its width;
- Use a pencil to mark the fishing line on the ceiling;
- Press the plinth to the left side of the corner so that the strip protrudes beyond the corner by at least its width;
- Use a pencil to mark the line on the ceiling, mark the point where THESE two lines intersect;
- Copy the markings onto the plank, connect the dots with a line, cut the baguette along this mowing line;
- Check the evenness of the cuts by applying the prepared baguettes to the outer corner;
- Before gluing the ceiling plinth without a miter box, eliminate errors (irregularities, chips, gaps, inconsistencies) on the surfaces of the fillets.