Articles
All photos from the article
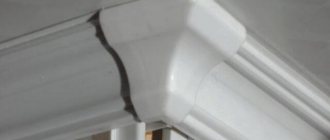
The question of how to cut a baseboard at 45 degrees may seem quite simple to an experienced person. However, for many young families who decide to make repairs on their own, such a seemingly trifle turns into a real problem. While small inaccuracies and installation errors on the floor can often be covered up with furniture, the ceiling frame is always visible, so next we will pay more attention to how to properly cut ceiling plinths in the corners.
Photo of joining fillets.
By and large, the floor and ceiling frames differ only in size and materials, and the cutting technology is absolutely the same. At the moment, plastic reigns in this direction and, if you understand the ceiling work, then the question of how and with what to cut the plastic baseboard for the floor will be resolved by itself.
How to cut a plinth at any angle and without gaps - 3 working methods from a practitioner
There are now more than enough tips on how to cut a baseboard at 45 degrees on the Internet, the only bad thing is that most of them are given by people who have never done this. Next, from a practical point of view, I will tell you how to cut skirting boards at the corners with your own hands in 3 options, and you will learn about both traditional methods and folk universal recipes.
The science of how to properly trim ceiling moldings in corners is not as complicated as it may seem.
Basic Rules
To cut the ceiling plinth at an angle of 45 degrees, you need to decide on the sides. The main mistake is precisely the incorrect determination of the sides of the fillet. A proven way to determine the correct side is to apply the material in place. This makes it clear how to cut the baseboard. This operation, despite its apparent simplicity, is very labor-intensive, since after trying on the baseboard you have to go down to the place where sawing will be done. Most often, in order to avoid deformation or damage to the baseboard, especially if it is made of foam plastic or similar material, it is necessary to cut it on the floor.
Then all this must be lifted back to the ceiling for final fitting and installation, the same actions are done with the other section.
The joints of two skirting boards in the corners should look aesthetically pleasing, so they need to be cut or sawed off as carefully as possible. A hacksaw works well for this. In some cases, a sharp knife. If the cut was done correctly, small flaws can be eliminated with putty or sealant.
A few words about tools and materials
Floor skirting boards are now made of wood or polyvinyl chloride (PVC), in other words, plastic. For ceiling fillets, the list is a little longer:
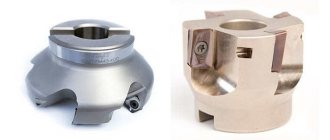
The range of ceiling plinths is much wider than that of the floor type.
Since it is impossible to correctly cut the ceiling plinth and its floor counterpart without a good tool, we will dwell on this issue in a little more detail.
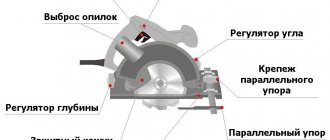
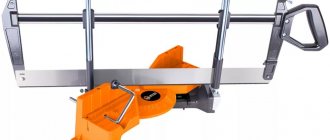
The best, almost ideal tool for trimming any skirting boards and more is a miter saw with a rotating bed. The high-speed disc makes smooth and precise cuts, and the bed in these units rotates to any angle. The only problem is the serious cost of this tool.
A miter saw is an almost ideal tool for cutting baseboards and more.
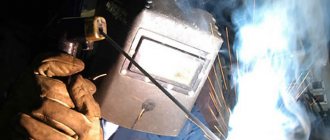
It is believed that one of the best hand tools for precision cutting of small blocks is a back saw. In principle, this is true, but I’ll tell you honestly, it’s not easy to find a really high-quality saw, even with the current assortment. If you decide to buy such a tool, then take a saw with a fine tooth.
An abrasive saw is convenient when working with a miter box.
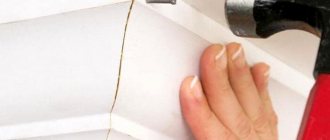
Theoretically, foam and polyurethane can be cut with any sharp and durable knife. But at the same time you need to have a steady hand and at least a little experience in cutting foam. Plus, cutting wide fillets with a knife is very problematic.
Without experience, making a clear cut with a knife is very problematic.
Personally, if I don’t have a crosscut tool, I only use a hacksaw. It is suitable for cutting absolutely any material, from foam to wood. By the way, people often ask the question of how to cut a plastic baseboard for the floor, so take a hacksaw for metal and you definitely can’t go wrong.
For cutting skirting boards, a hacksaw is considered one of the best tools.
Materials for making ceiling plinths
What options are possible?
To begin with, a few words about what ceiling plinths can be made from.
The classic material for the manufacture of such elements of interior decor has long been gypsum. It was from it that various stucco details were cast, decorating the halls of rich houses and palaces. Gypsum skirting boards, as a rule, had intricate reliefs and different sizes.
Gypsum plinth is still produced today, but due to its considerable cost, heaviness and fragility, it has begun to lose popularity to products made from other materials.
Today, real gypsum products for this purpose are usually produced to order, as they have a fairly high cost both in production and installation. Most often they are cast in small batches for restoration work when restoring architectural monuments.
However, the appearance of gypsum fillets still remains attractive, as they are an excellent finishing touch for rooms made in various styles. Therefore, in our time, customers are offered a wide variety of analogues from other modern, cheaper and lighter materials - polystyrene foam and polyurethane. They perfectly imitate natural gypsum fillets.
Ceiling plinths made of polystyrene foam - by visual perception after finishing is completed, it is almost impossible to distinguish them from plaster ones
Such fillets have a number of undeniable advantages - they are light weight, which greatly facilitates their installation, a wide range of relief patterns and widths of the strips. They fit perfectly into different design solutions of both classic and modern interior design styles.
Making wooden skirting boards decorated with carvings is a very labor-intensive process, and this affects the cost of such products
We can’t help but mention wooden skirting boards, as they are quite popular for rooms lined with natural lining, which never goes out of fashion.
Skirting boards made from this natural wood or from composites based on it have their own advantages - durability, the possibility of repeated repainting in various shades and colors, as well as high reliability of fastening to surfaces.
Wooden skirting boards with various relief patterns are made to order. The disadvantage of wooden fillets is their high cost, since very often they require manual work by a craftsman.
Cutting a plinth made of any material, as well as adjusting its corners, is carried out using the same method. The difference may be in the use of tools for marking and cutting, in the methods of attaching fillets to the surface of the wall and/or ceiling.
Features of cutting skirting boards from different materials
Due to the fact that the materials from which fillets are made react differently to the impact of cutting tools on them, before you start cutting the plinth, you should familiarize yourself with some of the features of the process. This information will help avoid accidental damage to products.
Wooden ceiling plinth made using milling technology
- Wood can be called the most durable of all the listed materials used in our time for the manufacture of decorative ceiling strips. Therefore, when cutting it, greater resistance arises, due to which burrs and chips can easily form on the cut. Wooden baseboards, especially those that are small in width, must be sawed with a fine-toothed wood saw or an electric jigsaw, also with a “gentle” file.
The structure of the material is clearly visible on the cut of the foam baguette
- Expanded polystyrene (foam) is the most fragile of all these materials, so it can easily begin to crumble. It is best to cut it with a sharp stationery or construction knife. When carrying out the cutting process, it is not recommended to press the blade hard on the fillet, as the cut area can be pressed through, which will ruin the appearance of the plank. The work must be done extremely carefully, slowly, without allowing any deformation or crumbling on the cut.
Installation of these products must also be done carefully. Expanded polystyrene strips are not devoid of elasticity, but it is not so pronounced that it would allow the skirting boards to completely follow the shape of a clearly uneven surface. And if you press hard on the baseboard, it may simply break.
Considering the disadvantages of polystyrene foam, it is best to purchase planks with a reserve in case they are damaged. The low cost of such fillets allows this to be done.
Products made from extruded polystyrene foam, along with low density, are distinguished by much higher strength indicators
- Extruded polystyrene foam is more durable and reliable, it is easy to cut and does not crumble. Cutting a plinth from this material is much easier, since burrs or cavities rarely form on it. However, just like foam plastic ones, they do not have sufficient flexibility, so it is problematic to stay on a curved section of the surface.
Cutting products from this material can be done using a sharp knife or a hacksaw for metal, with a blade with fine teeth.
Flexible polyurethane skirting board
- Polyurethane. Both rigid and flexible plinths are made from it, so they can be attached to a not very smooth wall or a curved section of finishing (for example, when framing an arched vault, column, etc.).
Flexible products made from this material can only be cut with a sharp knife, while rigid products can be cut in the same way as extruded polystyrene foam. The cost of polyurethane skirting boards is quite high, so negligence or mistakes can cause considerable unnecessary costs.
Three working methods for trimming skirting boards
For floor and ceiling skirting boards, the cutting instructions are almost the same. But if on the floor a crooked corner can be covered with something, then on the ceiling this is already a problem, so we will pay more attention to how to cut the ceiling plinths.
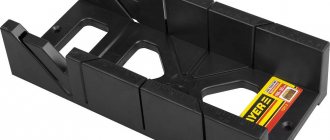
Method number 1. Classic miter box
The classic miter box is a U-shaped box with slots in the opposite sides. A piece of suitable size is inserted into this stock and sawed off with a hacksaw through the slots in the sides. The idea is not new, the tool is already several hundred years old, but despite its simplicity, not everyone knows how to correctly cut the corner of a ceiling plinth using such a miter box.
Not everyone knows how to cut a ceiling plinth in a corner using a classic miter box.
Tip: when trimming, ceiling plinths are applied to the side of the miter box that is closest to you, and floor plinths, on the contrary, should be applied to the side of the tool farthest from you. This is not a dogma, but it is much easier to work this way.
It is easier to work with floor plinths, since the miter box lies on a horizontal plane, it is easier for you to orient yourself in the position of the plinth. People most often make mistakes when cutting ceiling fillets; they simply insert them into the tool incorrectly. There is a simple but important rule here.
Important: the side of the ceiling fillet that touches the wall should be directed to the upper edge of the side of the miter box, and that part of the plinth that borders the ceiling should be placed on the bottom of the miter box.
Scheme for trimming skirting boards.
As you know, a corner has 2 sides, so in order to make fewer mistakes, train yourself to place the bar that will be mounted on the right side of the corner in the miter box on the right, and the bar that is attached to the left in the miter box on the left. The intricacies of using a classic miter box are described in detail in the video in this article.
How to properly trim the inner and outer corners of a ceiling fillet.
In addition to the classic U-shaped miter box, there are two more types of similar designs - a professional and a rotary tool. As for the professional option, only masters use it. The device is quite bulky, but it rotates at any angle and has a hacksaw that can be locked in the desired position.
Professional miter box with the ability to fix a hacksaw and workpiece.
The rotating device can easily be called a “pocket” miter box. The only advantage here is the ability to clearly fix the angle of rotation of the bar. On the one hand, it’s easy to work with - set the corner, apply it to the baseboard and cut it off. But on the other hand, you need to get used to such a tool; if you do not have experience working with a hacksaw, then you should not take a rotary miter box.
how to connect a cable to a TV on the wall
How to work with a rotary miter box.
Advice: when choosing a classic U-shaped miter box, first of all, do not buy Chinese products. And secondly, try to buy models with the ability to rigidly fix the part inside; one of these models is shown in the photo below.
A miter box with the ability to fix the part inside is much more convenient to work with.
Method number 2. Trimming according to a template
Most often, both ceiling and floor skirting boards need to be cut at 45º. If there is no specialized tool nearby, then an improvised miter box can be drawn on a piece of notebook paper. From the school geometry course we know that the diagonal of any square in relation to the base has an inclination angle of 45º.
You can set the 45º angle by attaching the plinth to the diagonal of the square.
Next you need to draw a square and draw 2 diagonals in it - this will be the required 45º. All you have to do is correctly attach the plinth to the leaf and mark. True, in order to cut the plinth smoothly without guides, you need a good eye and a steady hand.
Method No. 3. Applied universal
Trimming at 45º is a common option, but what if you need a different angle and only have a hacksaw and a pencil? It turns out that there is a very simple way out of this situation. Plus, this method is universal, it is suitable for both external and internal corners.
Moreover, I can assure you that those angles that visually seem straight, in fact have deviations of a couple of degrees. As a result, you buy a good tool, cut at exactly 45º, and when joining, a gap appears between the baseboards. Here this problem disappears. And then, using an example, we will look at how to cut the ceiling plinth in the inner corner.
| Illustrations | Recommendations |
| Stage 1. Take a fillet, place it on one side of the corner and use it to draw 2 lines, along the wall and along the ceiling.
| |
| Stage 2 . Do the same on the adjacent side of the corner. | |
| Stage 3 . If you draw a diagonal from the intersection of the lines on the ceiling to the inner corner, you will get the desired cutting line. | |
| Stage 4 . Next, take the tool and cut along the finished markings. If you are comfortable with a hacksaw, then the baseboards should fit together perfectly. | |
| Outer corner . As I already mentioned, you can trim the outer corner using exactly the same technology. |
Important nuances
If you tried your best, but a small gap at the joint still “came out,” do not be discouraged. In wooden fillets, such a gap can be easily covered with furniture wax. To fill a gap on baseboards made of polyurethane, foam, plastic or plaster, putty is perfect. Naturally, the color of the composition must match the color of the baseboard.
All cracks in the area of the ceiling fillets are sealed with putty.
Wide ceiling fillets are certainly beautiful, but they can only be mounted on perfectly flat walls. If the plane of the wall in relation to the ceiling is wavy, then it is better to buy narrow polyurethane fillets, they are elastic and will smooth out this drawback.
A wide fillet requires perfectly smooth walls.
The most questions arise about how to cut wallpaper to fit the ceiling plinth. There is nothing complicated here: the wallpaper is glued with a slight overlap on the baseboards and when the wall is completely glued, take a large spatula, place it in the corner and cut off the excess along the blade with a knife.
How to cut wallpaper to fit a ceiling plinth with your own hands.
Instructions for cutting skirting boards
Let's look at how to trim a plinth using a miter box and a hacksaw.
Step 1. After all measurements have been taken, the plinth is placed in the inside of the miter box and pressed against one of its walls.
The plinth is placed in the inside of the miter box
Step 2. Using a hacksaw, trim the baseboard. The cutting (sawing) tool is inserted into the selected groove and a cut is made.
The plinth is cut
Cutting the floor plinth
However, sometimes it is enough to cut plastic skirting boards at a right angle - now a large number of various additional products for them have appeared on sale. For example, there are corners that will allow you to hide even cuts and decorate everything beautifully. For your attention - instructions for installing plastic skirting boards.
How to fix the baseboard? The answer is here!
In general, all existing methods for attaching skirting boards can be divided into two categories - installation by fastening to the floor and installation to walls. You will have to choose depending on the type of baseboard and the design features of the living space. Read more in this article.
Step 1. All measurements are taken - the required length for the plinth sections is determined. These values are deposited on two products from which the corners will be formed.
The required length of the plinth sections is measured
Another photo of the process
Step 2. The skirting boards are cut using a miter box and any cutting tool and applied to the walls - this is necessary to make sure that the products are cut correctly and have the required length.
Plinth pieces are attached
Step 3. If everything is done correctly, the baseboards are screwed to the wall using self-tapping screws and dowels. But before that, plugs or corners are put on their ends.
Drilling holes
A corner is placed on the baseboard
Step 4. At the outer corners of the plinth, they are connected to each other with special plastic devices.
Connection device for external corners
Connection of skirting boards for external corner
Step 5. The plinth is installed in its designated place and screwed to the wall with self-tapping screws.
External corner
Screwing a plastic skirting board
Step 6. Next, the cable is laid in cable channels. It extends under all the corners and caps.
Cable laying procedure
Step 7. The cable channel with the laid wires is closed with a decorative plug.
Installing a decorative plug
Step 8. External corners are closed with special corner plugs, which are simply placed on the edges of the baseboards forming the corner.
Decorative corner for outside corner
Prices for plastic floor skirting boards
plastic floor plinth
Video - How to cut skirting boards
Conclusion
All three methods I described work; the choice depends on what tool you have and what your professional skills are. If after watching the video you still have questions, welcome to the comments, I’ll help in any way I can.
If you are not confident in your abilities, then for both floor and ceiling plinths there are joining elements that allow you to do without trimming.
Source
Post navigation
No comments yet!
How to properly brew anti-parasitic monastery tea
How to properly brew anti-parasitic monastery tea High quality How to properly brew anti-parasitic monastery tea At a good price Eco-friendly how to properly brew anti-parasitic monastery tea
How to brew white tea correctly
How to brew white tea correctly Let's assume you managed to buy high-quality white tea. Let's assume - because buy it in ours,
How to properly brew ground coffee in a cup
How to brew coffee in a cup correctly A cup of well-brewed coffee for breakfast increases energy throughout the day. Of course, everyone knows that coffee
Types of corners in rooms
When installing skirting boards, you need to somehow design the corners. By their appearance, corners can be external (which protrude forward) and internal (for example, corners in a room). In rooms with normal geometry, the angles are right, i.e. 90°. When joining two pieces of plinth strips in a corner, they are cut so that each has an angle of 45°.
To form the outer and inner corners, the plinth must be cut
But how to make an angle on the baseboard so that it is exactly forty-five degrees? To do this, use a special carpentry tool - a miter box.
Required Tools
When starting to decorate a room with ceiling skirting boards, you need to prepare the appropriate tools:
- stationery knife for foam baseboards;
- hacksaw for metal;
- roulette;
- carpenter's square or simple school square;
- miter box;
- pencil;
- a stepladder that is stable and of sufficient height.
It is necessary to free up space on the floor in order to make cutting skirting boards convenient. It is on the floor that it is best to place a miter box; the length of a table or portable workbench is sometimes not enough to securely place the sawn plinth.
Miter box for skirting boards
A carpenter's miter box is a device for making cuts at a certain angle. It is used with a hacksaw. In principle, you can make a miter box yourself by assembling a guide from boards and making cuts in the walls. There are various models on sale ranging from $15 to several hundred dollars. They differ in capabilities and materials, although they are all called “miter box”. Professional models are made on the basis of a good hacksaw and have a scale that allows you to set the saw as needed. With such a tool, it is not a problem to set any desired cutting angle in order to correctly cut the plinth for a perfect fit.
Professional carpenter's miter box - a tool with a wide range
The simplest miter box is a plastic U-shaped profile with slots in the walls. These slots are used as a guide for the hacksaw. They do not allow the canvas to deviate. In any version there are two cuts - straight and at 45 degrees. Some may have a couple more options.
How to cut a baseboard at 45 degrees? One way is to use a miter box
Sometimes a hacksaw is included, sometimes not. Usually the ones included are not very good. You can use any hacksaw, selecting a blade for the material you plan to cut. It is important that the canvas moves freely in the slots.
Cutting off the inner corner of the left skirting board
Subsequent operations are no different from how we made the inner corner using a miter box. Only in this case we press the plinth not against the side (which simply does not exist), but against the drawn line. To make it easier for you to level the baseboard, place a box against the line. This will give you a surface on which to rest the baseboard. Remember that the baseboard should not lie directly on the line. This is why the box is used.
When cutting, the bottom of the baseboard will be facing away from you. For an external corner, the upper corner of the profile will be protruding, and for an internal corner, the lower corner will be.
How to cut skirting boards at inner corners: step-by-step action plan
Begin installing the skirting boards in one of the corners. If this is your first experience, choose the part of the room in which something will stand. Not always, of course, the first pancake is lumpy, but still it’s better to play it safe. To make a neat corner on the baseboard, work slowly. One was sawed off, checked, adjusted. Let's move on to the next one. It is better to fasten after two adjacent corners have been assembled. But you shouldn’t delay the assembly too much either.
Trimming skirting boards in corners requires certain skills. But by making a few joints yourself, you can beautifully design complex angles
How to use a miter box to cut baseboards? Place the device in front of you, preferably on a table, but it can also be on the floor. It doesn’t matter which way you turn it, it’s symmetrical. Insert the bar into the profile and turn it so that it will stand against the wall. When cutting down a floor plinth in a miter box, the “wall” is the wall that is farthest from you. Once again: firmly press the baseboard strip against the back wall in the position in which it will be installed. Insert a hacksaw into the required slots. You can start sawing.
First joint in the room
The first strip of the baseboard should be cut as close to the edge as possible. Carpenters have their own jargon and they say to "cut" a corner. It doesn’t matter what you call it, it’s important that we set the bar in the miter box so that we can make the cut at the very beginning. We push the bar a short distance beyond the cutting line, for starters maybe 1-2 cm. Cutting off a smaller piece is more difficult, so save the savings “for later,” when you have at least some skill.
In the miter box, we place the floor plinth against the far wall “facing” ourselves. This makes it easier to check whether you are cutting/sawing correctly
Next, you need to make a corner on the baseboard like this:
We received two sections sawn down for joining in the inner corner. To make the joint perfect, we try on the parts in place. Most likely, there are some flaws. Take medium-grit sandpaper and remove everything that interferes with joining. Then using fine grain we achieve a tight joint without cracks or gaps.
When connecting skirting boards in a corner, use transparent silicone sealant. Before installing the fasteners, a layer of silicone is applied to the cut. Immediately after the plinth is fixed, we remove the excess that appears on the outside. Clean until the surface is completely clean. This method of connecting skirting boards in the corners looks more neat and does not get clogged with dirt and dust.
How to file a corner of a plinth at the required distance
The second and all other corners of the baseboards must be done at a certain distance. If the next corner is again an internal one and the distance to it is less than the length of the plank, we use the same fragment that already has a notch on it. We measure the distance using a tape measure - strictly from corner to corner. Then this distance is laid out on the bar using the same tape measure. We align the beginning of the measuring tape with the protrusion, measure the required distance, and make a mark with a pencil. This will be the starting point for the cutting.
You need to know at what distance to cut
The plinth with the mark is placed in a miter box, and the desired cutting direction is selected. The dash can be combined with a hacksaw blade or with a slot in a miter box. Whichever is convenient for you. Cut off. This segment must be “tried on” in place. If both corners rest against opposite walls or the gap is only 1 mm, everything is fine. You can cut a second strip from a new piece to form a joint. And again we remove the flaws with sandpaper.
If the length of the wall is greater than the length of the baseboard strip, take a new strip. We will cut the second corner on it. It is important not to make a mistake in which direction to cut. Having installed both planks along the wall, mark the junction on one of them and make a straight cut. There are also slots in the miter box for straight cutting. So there won't be any problems.
How to connect two skirting boards in a straight line
But a straight joint does not always look perfect, and during operation it often diverges, forming a visible gap. If you wish, you can cut two strips at an angle (any angle).
To do this, first cut off the edge of one plank at an angle and mark the joint on the second one. The mark is placed on the side of the plinth that is pressed against the wall. Using this mark, we saw off another section, without changing the position of the saw relative to the miter box, but inserting the bar on the other side. The joint is made obliquely. He's more careful. The difference is especially visible on wooden skirting boards and MDF. Once again, polish the cut using sandpaper.
Making an external joint
In apartments or houses there are not only internal corners, but also external ones. In this case, first cut the nearest inner corner and finish it. When it is ready, you can make an outer corner on the baseboard. We put the bar in the corner as it should be. In the place of the outer corner, use a pencil to make a mark exactly at the point of rotation.
How to make an outer corner of a skirting board
Next, we transfer the bar to the miter box and select the appropriate position. To avoid mistakes, always imagine how the plinth stands against the wall and what you should get.
We cut the second section at 45 degrees so that it joins the already finished one. To do this, change the position of the saw to the opposite and insert the plinth on the other side.
Methods
In addition to cutting using a miter box, in which the angles are clearly defined (90, 45, sometimes 60 degrees), there are other methods. More expensive is to use a rotary miter box or rotary circular saw. Cutting an angle with a tool like this, where it can be adjusted and is fairly easy to install, is not difficult. Cutting is done either manually or using a circular saw.
Purchasing such equipment for finishing one room, bathroom or even an apartment is hardly justified; professional activity is another matter, in this case, of course, it is better not to save.
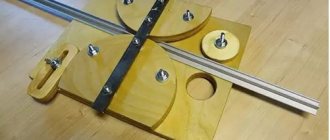
In order to file a fillet at home, you can get by with a more budget-friendly option by preparing a homemade miter box from plywood. It is important to clearly measure the corners and make cuts along which the plinth will be sawn off in the future.
In order not to confuse the sides of the plinth and to cut correctly, at first it is better to apply it together with the miter box to the ceiling; gradually the skill will be developed and you will be able to do without repeated movements up and down.
You can also prepare a kind of mock-up of the miter box on cardboard; the sawn-off plinth will have to be placed on the mock-up and marked with a pencil. In order to cut the required angle, it is better to move it to a more convenient place; in addition, it is important not to spoil the layout.
There are ways to saw off corners without a miter box. This is especially true since the angles are not always ideal, and the standard angle of 45 degrees may be incorrect. In order to make a corner in this way, you need to place a piece of plinth directly on the ceiling exactly as it will be mounted. Use a pencil to mark the width of the fillet on the ceiling. Having placed the baseboard on the other side of the corner, you also need to mark its width on the ceiling.
You will get two intersecting segments. Then you need to again attach the pieces of plinth to the ceiling and mark the same point on them.
It is necessary to cut from the edge to the marked point; it is important to remember the sides with which the plinth will be adjacent to the wall and ceiling; under no circumstances should they be confused. Small flaws can be corrected during the installation process, trimmed with a stationery knife, if the baseboard material allows this. With wooden fillets everything is much more complicated; a knife will not help there.
“On-the-spot” measurements make it possible to cut both internal and external corners without large losses, although the latter are not common, yet their finish is significantly different.
How to cut the ceiling plinth at 45 degrees, see below.
How to make an angle on a plinth more or less than 90°
Not all angles are exactly 90 degrees. If the deviation is small, the cracks can be removed using sandpaper. In other cases, you will have to mark and cut taking into account the real degree. The main task in this case is to find the point on the floor where the two skirting boards will join.
Let's start by explaining how to properly cut an outside corner if it is not 90 degrees. We take the plank, place it against the corner on one of the sides, press it tightly against the wall - as it should stand. Draw a line on the floor along the bottom edge of the baseboard with a pencil. We apply the bar to the other side of the corner and do the same. The intersection of the two lines will be the joining point of the two baseboards.
How to join a plinth if the angle is less or more than 90 degrees
Now we attach the baseboard strip again and set it the way it will be attached. We make two marks: at the top at the very turn, at the bottom at the place where the straight lines we drew intersect. Now the important task: we need to make a cut along these marks. If you have a miter saw or a miter box with an adjustable saw angle, set it up and cut it. If not, carefully cut with a hacksaw. To avoid confusion, you can use a pencil to draw a line along which you need to cut. Similarly, mark and cut off the second part. We finalize the connection of the baseboards with sandpaper.
Few professionals process joints with sandpaper - this requires time and additional labor. But if you join skirting boards in the corners of your own home, with your own hands, you definitely want everything to be beautiful. This is why this manual finishing is required.
With an internal corner of a non-standard size, everything is exactly the same. Place the plinth in the corner and draw a straight line on the floor. Let's do it on the other side. We transfer the intersection point to the planks.
Types of angles
Corner joining and trimming of the plinth differs depending on the type of corner; they are distinguished: internal, external and non-standard.
An internal angle, in other words, an angle of a room less than 180°, is usually 90°. When trimming an internal corner, the lower part of the ceiling plinth always protrudes above the upper. The first step is to measure the angle between the walls; if it is standard and equal to 90°, then the planks are cut at an angle of 45°. The baguette that is glued on the right side should be cut on the left, and the left strip on the right.
The external or external angle is less common, it is more than 180°, usually around 270°. When working with such angles, everything is exactly the opposite. The edge of the plinth that will press against the ceiling should be larger than the bottom.
Non-standard angles. These most often mean angles with a degree greater or less than the standard of 90° and 270°, as well as various types of rounding. In this case, pruning is carried out “by eye” or with markings in place. Areas with curves are assembled from several small elements, each of which is adjusted in turn.
How and with what to cut plastic skirting boards
All of the above applies to MDF and wood skirting boards. Cutting them with a regular hacksaw is not a problem. It is advisable to use a blade for metal, since it has a smaller tooth and the cut is smoother; you will have to work less with sandpaper. With plastic the situation is different - when you try to cut a piece, some thin-walled skirting boards crumble and break.
Cutting plastic is not very convenient due to the thin walls
To cut normal quality plastic skirting boards you can use:
Accessories for decorating corners and joints of PVC skirting boards
In plastic skirting boards, you can design corners and joints using special fittings. There are external and internal corners, plugs and connectors. In principle, they allow you to assemble the desired configuration. Each manufacturer makes its own fittings - according to its own profile, colors. But the principle of their use is the same.
How to decorate the corners of a plastic plinth
The first rule is that all cuts are made straight. Strictly perpendicular. Marks in the corners are placed 1-1.5 mm away from the corner. The fact is that the fittings for rigidity have their own jumpers. So for them you need to retreat a couple of millimeters, but no more. Otherwise, a gap will appear or the baseboards will pop out of these corners.
This is what comes out of the assembly:
I must say that not everyone likes the look of plastic corners. You can make a corner on a PVC plinth in the same way as described for wooden or MDF. The only difficulty is that you have to be careful with plastic - it breaks from excessive force. There is one trick - before cutting the plastic baseboard, add a little polyurethane foam on the back side and wait for polymerization to begin. It will be tougher, easier to cut, less deformation. If the foam subsequently gets in the way, it’s not a problem to remove it, but it’s actually easier to cut it.
Adviсe
Some useful tips to help you with your work:
- Before you start making final cuts, it is worth practicing on a small section.
- The baguette should be cut from the front side, then the unevenness of the cut will remain on the back side.
- The cut can be carefully trimmed with a knife or sandpaper.
- The plinth should be cut on a hard, flat surface.
- If you use a miter box, for convenience it can be secured to the work surface with self-tapping screws.
- If the result is unsatisfactory and gaps at the joints are still visible, they can be carefully puttied.
If the corners in the room being renovated are even, you can buy ready-made corners for the chosen type of baguette and completely avoid the stage of cutting corners.
Did you like the article? Subscribe to the channel to stay up to date with the most interesting materials
How to connect to a door frame
You know how to carefully make a corner on a plinth, but that’s not all. Most often, the room has doors. By the way, they must be installed before attaching the baseboards. So, you still need to correctly connect the skirting boards with the trim on the door. If you just cut straight, it turns out rough. There are plugs for plastic - not the most elegant way, but quite acceptable. Wooden ones can also be trimmed by cutting off the “face” diagonally. Also “not ice”, but already something. What to do with MDF skirting boards, since their timber is unpresentable? There is a way to create a beautiful connection to the jambs. You will need to make two cuts at an angle of 45 degrees (see photo below).
How to properly design the joint between the baseboard and the door jamb
If the edge is not even, first cut it strictly perpendicular. We make a cut at 45 degrees relative to the aligned edge. A small cut piece will be useful to us for decorating the junction. We make the second cut at 90 degrees relative to the first, but if we lower the perpendicular from the corner, we also get 45°.
How to make a neat connection to a door jamb
Now we take the first cut piece and apply it to the cut we just made with the long side. This creates a beautiful rounded cut. If there are chamfers or recesses on the baseboard, they match perfectly. In the case of a wood pattern, you cannot be sure that the lines match. All the same, such a junction of the plinth and door trim is much more aesthetically pleasing.
Source
Some useful tips that will make the work and preparation easier
Next we will talk about the tool with which you can make trimming. This section also contains useful information on joining pieces of plinth at the corners.
Selecting a tool for forming an angle
The most economical option is to buy a simple plastic miter box. It is a plastic block with eight working slots. This device is designed for only two operations: trimming at 45, 90 and 22.5 degrees. An angle of 90 degrees is useful, for example, if you need to embed a socket box into the middle of the molding.
Some devices come with eccentric locks included. They are preferable because it is easier to work with - the plinth is clamped in the desired position and does not move during the cutting process. Accordingly, if any errors occur, they will be minimal and adjusting the angle will not be difficult.
How to cut a plastic baseboard: a simple plastic miter box
If you have to make repairs in your own home, then perhaps it makes sense to purchase a more serious tool - a rotary single-plane miter box. It is designed for cutting at angles of 15, 22.5, 30, 36, 45 and 90 degrees. The design of this miter box includes 2 clamps - for clamping in horizontal and vertical planes, as well as a limiter that will allow you to cut workpieces to the same length. The hacksaw will be built-in here. If it is not clear how to cut a ceiling plinth, the video review below will help you.
How to trim a baseboard in a corner: a rotary miter box
How to saw down a ceiling plinth: the video contains a detailed description of a rotary miter box and information on how to use this tool.
https://youtube.com/watch?v=FS8TaEuGeNQ
This will be useful to you at work
As you noticed, the text mentioned marking using electrical tape. This is the most convenient way to mark blanks, since the pencil is not always visible on the floor plinth, and it is sometimes difficult to trace its lines from the ceiling. The bright pieces of electrical tape are very clearly visible, and when they are no longer needed, they are removed literally with one movement of the hand. There are no traces of glue left after removing such marks.
Sometimes you have to trim moldings with a very large pattern. How to connect corners to make them beautiful:
- From one long fillet we cut pieces according to the number of corners, each of which should contain an element of the pattern. On both sides of the pattern there should be 5 cm of the length of the plinth.
- We measure the resulting blanks and find their middle, cut along the center line.
- We make corner trims as usual, but taking into account the fact that the centers of the patterns on the workpieces should fall on the tops of the corners.
How to join the corners of a ceiling plinth if there is a large pattern on its surface
How to saw off a 45 degree angle: step by step instructions.
preparing a template for a corner cut
This tool is a profile in the form of an inverted letter U. Along the edges there are slots for sawing at an angle of 45, 60 and 90 degrees. More complex corner templates or miter boxes have devices for setting different cutting angles.
sawing at the right angle
The hacksaw needs to be inserted into the appropriate grooves of the corner template and sawed through the workpiece. The grooves will limit the movements of the saw and the cut will be made in the appropriate direction.