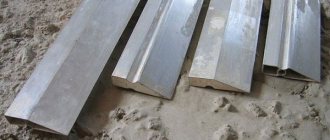
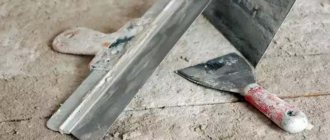
During the construction of structures, when finishing and repairing premises, in most cases the walls and ceilings must be plastered. This is done so that with the help of a layer of plaster it is possible to level a certain surface for its subsequent decoration or finishing. This process is labor-intensive and time-consuming, so the need to facilitate it is well justified. Since ancient times, plasterers had special tools for these purposes, for example, spatulas and trowels - but they are effective only in small areas and where the layer of plaster should be thinner. To throw a large amount of plaster mass, more capacious tools are used - for example, an Ilyukhin scoop or a Shaulsky plaster ladle. If the first one is quite difficult to find today, the second one has never lost its relevance.
A Shaulsky ladle is essentially a bowl with thin metal walls (from 0.4 to 1 mm) with a volume of 0.75 to 1 liter. A plastic or wooden handle is also attached to it.
The shape of the bowl could vary:
- Truncated funnel;
- Hemisphere with a truncated bottom;
- Standard hemisphere;
- With the funnel mixed towards the handle.
Modern plaster ladles are not far removed from their ancestors and have several options for handle holders. They can be:
- Ergonomic;
- Oval;
- Cylindrical.
The process of applying plaster is quite simple, however, certain skills are required. Using a ladle, the mixture is scooped out of the container and splashed in a semicircular motion over the surface, which was moistened or primed before starting. In this case, the impact of the mixture on the surface should be light in order to ensure the best adhesion. Then, using a special rule or an elongated spatula, the plaster layer is leveled. However, any plasterer who performs large volumes of work on an ongoing basis is interested in mechanizing his activities. In this case, a pneumatic plastering ladle operating on a compressor will come to his aid. It can also be called a plaster shovel or hopper (from the English “hopper” - “jumper”). Thus, the plaster will automatically easily “jump” out of the container onto the desired surface.
DIY hopper bucket. How to quickly and efficiently plaster walls
Plastering is a quick and inexpensive way to finish walls and ceilings. This method has countless advantages, however, applying the solution manually is quite difficult, especially when it comes to finishing work over a large area. A simple device called a hopper bucket (pneumatic bucket or plastering shovel) allows you to reduce time, save material, and at the same time significantly increase productivity. Being, in fact, a textured gun, the device applies plaster to walls by spraying, which gives many advantages over a traditional trowel and spatula. The retail chain offers factory-made models of plastering shovels of various sizes and purposes. We, taking into account the simple design of the device, suggest making it yourself, especially since the materials for the pneumatic bucket are most often right at hand.
What is a hopper bucket and how does it work?
Applying plaster using a hopper bucket greatly increases the speed of finishing work
Before making a hopper bucket, it would be useful to familiarize yourself with its design and operating principle. This will allow you not only to assemble the device according to the provided drawings, but also, if necessary, to make your own adjustments depending on the availability of materials and operating features.
The operating principle of a pneumatic bucket is similar to the operation of a spray gun. When starting finishing activities, turn on the compressor, connect the hose to the gun, fill the hopper with plaster mixture and open the pneumatic valve. Air under high pressure is supplied to the working cavity through the inlet fitting located on the rear wall of the device. Carrying along the particles of the plaster solution, the air flow exits through special nozzles located in the front part of the device. In this case, the plaster is quickly and evenly sprayed onto the wall. The advantage of the bucket-shaped design is that during operation you can scoop the liquid mixture from another container, rather than pouring it from a bucket.
Video: Working with a pneumatic bucket
Bucket design
The diagram of a pneumatic hopper bucket (plaster shovel), presented in the figures, will make it possible to understand all the advantages of the design. Thanks to the slope of the front wall, the plaster can be applied not only to vertical wall surfaces, but also to the ceiling and inclined planes in any direction.
It is not recommended to use ordinary sand-cement mixture for plastering ceilings. It is better to use lighter gypsum-based finishing compounds.
The top of the container has a closed part on the compressor connection side. This allows you to avoid spilling the solution when tilting the bucket while plastering the ceilings. When making a device, it is important to keep certain design parameters within certain limits. Thus, it is not recommended to increase the diameter of the inlet more than 4–5 mm. The distance between the rear and front walls at the bottom of the bucket should be no more than 20 - 25 mm, and the diameter of the outlet nozzle should be from 10 to 15 mm. In this case, the operability of the structure will be ensured by an ordinary household compressor, designed for a pressure of up to 8 atmospheres and an air flow of about 220 - 250 liters per minute. If you increase the distance between the inlet hole and the nozzle, then the power of the air flow will not be enough to push out the mixture under pressure sufficient to spray the solution onto the wall.
The hopper bucket is equipped with a pneumatic valve for ease of operation.
To turn on the air supply to the hopper bucket, a manually operated valve is installed, similar to those used in air guns for pumping air into car tires. For these purposes, you can use the most ordinary ball valve installed on the air supply hose, however, the first option is more convenient and allows you to instantly stop the supply of the mixture, and this provides additional savings on the solution.
Advantages and disadvantages
Being a simple and effective device for finishing walls and ceilings, the hopper bucket has many advantages:
- high speed of finishing work;
- the possibility of using unskilled labor;
- versatility (the device allows you to work with building mixtures of any type);
- the use of fibrous impurities and other decorative additives;
- strengthening the adhesion of the solution to the wall due to the high spraying speed;
- efficiency;
- low cost.
The only drawback is the need to use a compressor, which reduces mobility and gives certain inconveniences when working at heights.
Requirements for building mixtures
A plaster shovel can be used to work with any finishing materials
The hopper bucket is a universal plasterer's assistant and allows you to work with finishing mortars of any type:
- textured paints with increased fluidity;
- cement-sand mortars;
- cork plaster mixtures;
- liquid wallpaper;
- concrete mixtures;
- gypsum plasters.
Modified impurities that are added to plaster mixtures can improve their working properties, increase labor productivity and reduce the cost of finishing materials.
Types of pneumatic buckets, what are there
The classification of pneumatic plastering buckets is based on design features. So, the wall one has a handle and nozzles located at right angles to the tank. For convenience, an additional handle is attached to the latter.
Sprayer for painting walls cement mortar sprayer paint sprayer sprayer hopper bucket gypsum…
Sprayer for painting walls cement mortar sprayer paint sprayer sprayer hopper bucket gypsum…
aliexpress.ru
Buy Now
New Cement Mortar Spray Gun with Hopper Bucket Wall Sprayer Plaster Plaster Cement Sprayer...
New Cement Mortar Spray Gun with Hopper Bucket Wall Sprayer Plaster Plaster Cement Sprayer...
aliexpress.ru
Buy Now
Spray gun for painting walls, cement mortar, spray gun, Hopper gun, spray gun, bucket...
Spray gun for painting walls, cement mortar, spray gun, Hopper gun, spray gun, bucket...
aliexpress.ru
Buy Now
The second type of bucket is intended for finishing the ceiling, the upper part of vertical structures. Here, the key elements are fixed at an angle relative to the container so that the solution does not fall out. The handle is thoughtfully elongated. This makes it easier and more convenient to carry out plastering without tables, scaffolding and stepladders.
The third option of a universal nature is considered separately. Its difference lies in the presence of seats for removable nozzles. Here you can work with different mixtures of relative solid filler fractions. It is also possible to adjust the position of the handle to finish either walls or ceilings.
Design features of hopper buckets
Even such a simple design as a plaster ladle has several modifications related to the need to work in different planes:
- pneumatic buckets designed for plastering vertical surfaces;
- structures with which plaster is applied on reverse horizontal and inclined planes (ceilings, wall slopes, etc.).
The wall hopper bucket has nozzles oriented in the horizontal plane
The design of both pneumatic equipment differs only in the lower part. Thus, for a device that is used for wall finishing, the outlet nozzles (or nozzle) are located directly opposite the air duct opening and are oriented perpendicular to the mass of the solution. As for plastering shovels intended for ceiling work, their output of the working mixture is directed at a slight upward angle. This allows you to finish the surface without practically tilting the device towards you. In addition, in this type of bucket, the upper opening on the operator's side is partially closed. This prevents the mixture from spilling out, while the actual absence of a lid will allow you to freely scoop the solution from the container during operation.
The outlet holes of the ceiling plaster shovel are directed at an upward angle
The hopper of factory textured guns is most often made of galvanized or stainless steel sheet. The small thickness makes it possible to lighten the structure, and the use of riveted connections makes it less susceptible to variable loads. In homemade buckets, the container was previously made mainly from thin sheet steel, welding the parts of the hopper together. With the advent of riveting devices, it became possible to make a hopper bucket at home that is completely identical to the factory product.
Instead of an epilogue
Having analyzed the domestic market for the equipment in question, we can safely say that the domestic manufacturer confidently occupies an “above average” niche in this segment, and its products are quoted at a fairly high level. However, this again can only be attributed to “Professional” level products. Otherwise, household consumer demand is clearly not focused on purchasing high-quality equipment and is limited only to the budget or mid-price segment. This circumstance is largely due to the reluctance of the average consumer to do such work on their own.
Technology for applying finishing materials using a plaster shovel
As with manual plastering, before starting to apply the solution, beacons are set, and the surface of the walls or ceiling is cleaned of dust and moistened. If necessary, the surface layer is strengthened with composite primers or reinforced with a special mesh.
When using a hopper, the working mixture is consumed very quickly (in 3–4 minutes more than 50 kg of plaster is sprayed from its nozzle), therefore, before starting to apply the finishing layer, make the necessary supply of solution.
For plastering large surfaces, a conventional mixer will not be enough - it is better to stock up on a mortar mixer or concrete mixer. The preparation of working mixtures is carried out in full accordance with the manufacturer's recommendations indicated on the packaging.
The application of plaster begins without delay, especially if the issue concerns gypsum compositions. Hopper is held with his right hand by the pistol handle, and with his left hand by the bracket on the hopper. Using a ladle as a scoop, scoop the solution from the container and shake off the excess from the outer walls of the hopper. The gun is brought to the wall and the spray trigger is pulled. Smoothly moving the device from bottom to top, from one lighthouse to another, evenly fill the gap with the building mixture. After this, using a long rule (you can use a flat lath), they move along the beacons, removing excess plaster. Using a rigid mixture has the advantage that it lies perfectly on a vertical wall, does not slip and does not stretch. In addition, a small amount of liquid reduces shrinkage, which makes it possible to plaster in one layer.
Video: Plastering beacons using a hopper bucket
The distance to the walls is determined based on what effect they want to achieve - textured plaster or a smooth surface. In the first case, by selecting the mixture, the required size of “shagreen” is obtained. Additionally, experiment with inlet and nozzle diameters, using multiple nozzles for different finishing effects.
After setting, the plaster is rubbed down and the ladle is washed. The remaining solution is removed manually, and the nozzles are purged with a compressor, placing the hopper in a container with water. If the work is not finished, but simply requires a short break, then you still cannot do without washing. Only after this the instrument is not dried, but left in water.
Recommendations from specialists for working with the hopper:
- plaster applies best to pre-leveled walls, regardless of what material they are made of - brick, concrete, cinder blocks or thermal insulation boards;
- for operation, a pressure of up to 4 atmospheres is sufficient, which can be increased to a value of 6 atmospheres to compensate for the drop in performance at the moment of switching on;
- if it is necessary to apply a thick layer of plaster, the pneumatic bucket is kept at a distance of 2 - 3 cm from the wall. A gap of 6–10 cm is considered optimal;
- if the solution is applied as a finishing layer, then the textured gun is kept as far away from the surface as possible;
Sometimes it becomes necessary to plaster hard-to-reach places. In such cases, additional attachments are installed that expand the range of use of the tool.
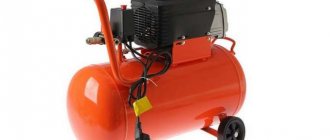
Required Compressor Specifications
The main element of the working design of the entire tool under consideration is the compressor. The quality and speed of processing will directly depend on its characteristics. In many situations, the hopper places increased demands on the volume and pressure of the supplied air, which is incomparable with a conventional cartouche gun. It is worth noting that the compressor must be selected based on the characteristics of the remaining elements of the device in order to create an optimal variation of the tool that will be fully operational. Thus, the average statistical characteristics can be called:
- Working pressure 6 atmospheres;
- Exhaust flow (minimum) is 350 liters per minute;
- The number of active cylinders is two;
- Receiver volume (minimum) – 50 liters.
For a cartouche pistol, these requirements will be slightly lower:
- Working pressure 4 atmospheres;
- Exhaust capacity (minimum) – 160 liters per minute;
- Number of working cylinders – 2 pieces;
- Receiver volume (minimum) – 25 liters.
Manufacturing a hopper bucket of the simplest design
A plaster gun is such a basic design that it can be made in a few hours. All that is required for this is to decide on the size of the device, prepare the necessary materials and tools, after which all that remains is to assemble the bucket and test it in action.
Drawings and dimensions
Despite its apparent simplicity, when making a textured air gun, it is better to use drawings of assembled and tested structures. Of course, the configuration of the bunker can be developed independently, however, the advantage of the drawings presented below is that they take into account the errors of several previous models and the wishes of plasterers. Of course, the dimensions of the device can be changed at your discretion. It is only important to observe the proportions and slopes, and also not to forget about the limiting parameters of the spray part of the device.
Source
Leading equipment manufacturers and their products
PFT. A German manufacturer of plastering stations, whose products have proven themselves well on the market. The most successful models include PFT G4 Smart and RITMO XL (a new series of equipment). Despite the fact that the performance of comparable models of both series is practically the same, the PFT series stations are almost twice as large. The equipment operates from both single-phase and three-phase networks; there are also multi-voltage models (220V/380V). Almost all reviews of this manufacturer’s products are positive, so if the high price doesn’t bother you, then it’s better to buy them. Price range 250-300 thousand rubles.
PFT G4 Smart PHOTO: c.allegroimg.com
Putzmeister. Another German manufacturer that has been producing construction equipment, including plastering stations, since 1958. In terms of functionality and cost, its models are practically no different from the PFT series.
Putzmeister plastering station model MP 25 PHOTO: solatrade.ru
NOVO. The company's headquarters are registered in Germany, production facilities are in China. Despite this, the products are distinguished by their reliability and high performance. Price range 200-250 thousand rubles. In addition, there are additional advantages in the design:
- Possibility to connect an external compressor with a receiver;
- Water cooling of equipment.
Complete set of NOVO Gen3 PHOTO: novo.com.ru
Typhoon. Plastering station from the domestic manufacturer of the same name from Stavropol. The equipment is an extremely simplified and extremely unsuccessful replica of the PFT Ritmo L-L4-2. Among the main disadvantages, users name:
- Lack of electric motor power - it costs 1.5 kW, you need at least 2.2 kW;
- A compressor without a receiver fails after a week of operation;
- Leaky bunker welds - constantly leaking;
- Low-performance screw pair - in fact, this unit is not produced independently, but is purchased from the PFT company from the Ritmo L-L4-2 model.
Plaster station Typhoon PHOTO: i.ytimg.com
Other domestically produced plastering stations that can be found on the equipment market: Meteor, VEK, TSM 2, Hermes are even less successful copies of Typhoon.
Gallery: manual means of small-scale mechanization for applying plaster mixtures:
PHOTO: myshtukaturka.ru
PHOTO: i.ytimg.com
PHOTO: otdelka-expert.ru
PHOTO: couo.ru
How to increase productivity and quality of plastering work using a hopper
Plastering is a widespread method of finishing external and internal walls, ceilings, and slopes.
The popularity of this processing method is explained by its availability, low cost and versatility.
The essence of plastering is to apply a layer of special plaster mortar to the walls, which can be:
The mortar is applied in a layer of a certain thickness according to the design and taking into account the properties of the selected type of plaster mortar.
Plaster application, in turn, can be done manually or mechanized.
There are special plastering stations that allow you to plaster quickly and efficiently, but they are not available to everyone.
In private construction and renovation, plaster is usually applied by hand, spreading it with a trowel.
The manual method has a number of serious disadvantages:
- labor intensity of the process;
- low productivity;
- high influence of the human factor.
At the same time, purchasing a plastering station is not affordable for everyone, and for one-time work it is not advisable.
The optimal solution is to purchase a special hopper bucket for plaster, which is also called a plaster hopper, ladle, pneumatic bucket or plaster shovel.
What is a hopper
A pneumatic bucket is a container in the shape of a truncated tetrahedral pyramid, usually made of metal. The base of the pyramid is open, and in the narrow part is the bottom of the bucket. In the front wall there are nozzles with a diameter of 10-15 mm for spraying the solution, in the rear there is a connector for connecting a hose through which the plaster is loaded into the ladle. The device is equipped with a handle and a trigger.
Benefits of using a hopper
The use of this useful device provides many advantages:
- Prices for hoppers are lower than for plastering stations; Hopper buckets are available in private construction and renovation.
- Hoppers are small in size.
- The productivity of plastering work increases significantly compared to the manual method. The bucket is emptied in a few seconds, the speed of work increases approximately 3 times.
- The hopper requires less physical effort and the plasterer is less fatigued because he does not have to make the flapping motions of his hands as with manual application.
- Any type of plaster can be applied.
- The consumption of plastering materials is reduced. This occurs due to less loss of plaster mortar. The cut mortar can be loaded back into the ladle and sprayed onto the wall.
- Due to the fact that the solution is applied in drops under pressure, the plaster is distributed more evenly than when applied with a trowel, adheres better to the surface of the base, and fills all voids well, which improves the quality of finishing work. Application under pressure increases the density of the plaster layer, and hence its strength.
- Sometimes plaster applied with a hopper is used as a decorative coating, because it forms an interesting “pimply” structure. If a smooth surface is needed, it can be leveled and trimmed.
- Hopper plasters both vertical and horizontal surfaces (ceilings).
Video: Plasterer's assistant - hopper bucket
Requirements for the plaster mixture when using a hopper
Using a hopper, you can apply any type of plaster.
According to the requirements of SNiP 7.1.7, the strength of the base on which the plaster is applied must be higher than the strength of the plaster. Therefore, for example, lightweight plasters are applied to aerated concrete bases - gypsum or cement-sand with the addition of polystyrene granules.
The choice of plaster also depends on the type of premises:
- For wet rooms, as well as for external walls that are exposed to temperature changes and the formation of condensation, cement-based plaster solutions are used.
- For dry rooms, if it is important for the walls to “breathe,” lime and gypsum plasters are used.
- Cement-sand plasters are applied as a base under the tiles.
To impart additional properties to the plaster mortar, various additives are added to its composition:
- Fiber fiber is added to cement compositions to increase strength, which eliminates the need for the labor-intensive use of mesh. Fiber fiber minimizes shrinkage deformations and prevents cracks.
- To increase the plasticity of cement-sand mortars, PVA, lime, detergents or ready-made plasticizers are added. Plasticizing additives allow you to prevent delamination of the solution, extend its life and be able to work with it longer. Mixtures with plasticizing additives, such as CemStone and CemAqua, allow you to save cement, increase the strength of the coating and its water resistance, reduce shrinkage, and help avoid the appearance of cracks. The CemStone additive completely replaces lime in the mortar, as it has plasticizing properties and extends the life of the plaster mortar to 5 hours. It is very easy to introduce CemStone into the plaster mortar, unlike lime, which must first be extinguished, spending time and effort, observing certain safety precautions. And the additive from Cemmix just needs to be added to the solution and mixed. In addition to increasing plasticity, the additive prevents mortar delamination and accelerates strength gain.
- To obtain waterproof plaster, water-repellent additives for cement mortars are used.
- To increase strength, PVA is introduced into lime plaster or lime is combined with cement.
- To increase the strength and hiding power of gypsum plaster compositions, plasticizers are used, for example, CemStone, which make it possible to more fully involve gypsum in hydration reactions and obtain self-compacting plaster.
You should not replace the plasticizer with liquid soap, given that there are special additives - plasticizers and superplasticizers. Their action has been tested in laboratories, the exact working dosages and effects are known, unlike detergents, which may have different compositions, different concentrations of surfactants, and may also contain sodium chloride, which promotes corrosion. The cost of plasticizers is more than compensated by the subsequent savings in cement, and “saving” on plasticizers and replacing them with detergent can lead to losses and wasted time and effort when the plaster turns out to be fragile or becomes covered with cracks after drying.
An important difference between any plaster solutions for application with a hopper is consistency. The hopper requires more “hard” solutions, that is, thicker than for a trowel.
Thanks to the thick consistency of the solution and application under pressure, the plaster adheres well to the wall and does not slip; You can apply it in a fairly thick layer without fear that it will come off. Thick plaster with a reduced water content has less shrinkage when drying.
Rating of the best plastering ladles for 2022
Budget models
2nd place: “Zitrek SN-01”
A good example of an Eastern European brand, although considered a budget option. It is more positioned as a model for wall work. The volume of the bunker is sufficient, but it is difficult to call it very large. There are 4 output nozzles, and the solution can be applied to the surface in a layer of 5 millimeters. It has a long and ergonomic handle, a high-quality body with anti-corrosion coating.
| Name | Index |
| Manufacturer country | Czech Republic |
| Bowl volume, liters | 3.5 |
| Number of nozzles, pieces | 4 |
| Required pressure, atmospheres | 2021-05-04 00:00:00 |
| Price, rubles | 2800 |
Zitrek SN-01
Advantages:
- Bowl of sufficient capacity;
- Low price;
- Long handle.
Flaws:
- Anti-corrosion is provided only by the coating.
1st place: “Zitrek SN-02”
This model is designed specifically for ceiling work. The case is made of stainless steel. Using this tool, it is quite possible to achieve uniform distribution of the entire solution over the surface to be treated with a minimum layer of 5 millimeters. The hose kit includes a “European adapter”; with its help, the ceiling surface is perfectly processed with an average performance of 4 atmospheres with an exhaust of 320 liters per minute. The device is capable of working with fine-grained mixtures of 6 millimeters.
| Name | Index |
| Manufacturer country | Czech Republic |
| Bowl volume, liters | 3.5 |
| Number of nozzles, pieces | 4 |
| Required pressure, atmospheres | 2021-06-04 00:00:00 |
| Price, rubles | 2900 |
Zitrek SN-02
Advantages:
- Cast stainless steel housing;
- Efficient compressor;
- Hose with a diameter of 18 millimeters.
Flaws:
- The handle is somewhat loose - will have to be strengthened additionally (with rivets).
Mid price segment
2nd place: “PROFMASH KSH-4”
An excellent device for processing vertical surfaces. It requires slightly increased pressure with a limit of 8 atmospheres, however, it has four nozzles with an increased width of up to 18 millimeters. It is characterized by a high application speed - approximately 60 square meters per hour. Although it is considered a semi-professional model, it has become popular due to its ease of use and affordable price. It requires a good mix of the solution, especially with granules (i.e., it makes sense to strictly observe the consistency). Similarly, we can talk about the need for quality maintenance - nozzles need to be cleaned with special care.
| Name | Index |
| Manufacturer country | Russian Federation |
| Bowl volume, liters | 3.6 |
| Number of nozzles, pieces | 4 |
| Required pressure, atmospheres | 2021-08-06 00:00:00 |
| Price, rubles | 4100 |
PROFMASH KSH-4
Advantages:
- High processing speed;
- Increased nozzle diameter;
- The best ratio in terms of price-quality.
Flaws:
- Requires careful and thorough maintenance.
1st place: “HYVST 07-OMG-II”
This pneumatic bucket is made of full stainless steel, which indicates an increased operational service life of the device. Positioned by the manufacturer as the best device for applying the composition to vertical surfaces. Experienced experts recommend using this model for applying liquid wallpaper. The kit comes with several attachments, providing versatility of use and excellent performance. The hopper does not have a large volume, however, this affects the ease of use. Plastering should be done from a distance of approximately 5 centimeters.
| Name | Index |
| Manufacturer country | People's Republic of China |
| Bowl volume, liters | 3.5 |
| Number of nozzles, pieces | 4 |
| Required pressure, atmospheres | 2021-08-06 00:00:00 |
| Price, rubles | 4500 |
HYVST 07-OMG-II
Advantages:
- Increased length of the complete hose – 15 meters;
- Productivity – about 40 kilograms of dry mixture per hour;
- The holes are optimized at an angle of 90 degrees.
Flaws:
- Need to work at close range.
Professional samples
2nd place: “TeaM K350”
This wall hopper is specifically designed for working on wall surfaces. Produced by the world famous Italian brand “Team-M”. The body is entirely made of the strongest stainless steel. The device itself is a compact device that is not difficult to use. Productivity is quite high. The connection to the compressor is of the “Heka” standard, which means it can even be connected to a car compressor. In general, most elements can be completely replaceable, although this is not stated by the manufacturer. The diameter of the nozzles has been increased to 20 millimeters.
| Name | Index |
| Manufacturer country | People's Republic of China |
| Bowl volume, liters | 3.5 |
| Number of nozzles, pieces | 4 |
| Required pressure, atmospheres | 2021-08-06 00:00:00 |
| Price, rubles | 4500 |
TeaM K350
Advantages:
- Extremely light weight - only 2.6 kilograms;
- Increased nozzle diameter;
- The handles do not have a common defect - there is no play and no additional reinforcement is required.
Flaws:
- Not detected (for its segment).
1st place: “Pegas 2721”
Hopper bucket from Russia - it specializes exclusively in automatic equipment in the field of construction. The connection to the compressor is made according to the universal “Heka ½” scheme. The manufacturer insists that the equipment is adapted for the use of AT ALL (!) all known building mixtures, including compositions with whole sand. General reviews say that the device is of very high quality and is suitable for all types of finishing and construction work. At the same time, excellent work with adhesive mixtures is claimed. The working distance can vary from 5 to 25 centimeters.
| Name | Index |
| Manufacturer country | Russian Federation |
| Bowl volume, liters | 3.5 |
| Number of nozzles, pieces | 4 |
| Required pressure, atmospheres | 6 |
| Price, rubles | 7200 |
Pegas 2721
Advantages:
- Versatility;
- Increased productivity;
- Ability to work with fractions of 1 centimeter.
Flaws:
- Not found.
How to use a hopper correctly and what to consider when working with it
The hopper is powered by a compressor, so it is important to choose a device with suitable characteristics.
It is recommended to use a compressor with a cylinder volume of at least 100 liters, the output volume is optimally from 350-400 liters.
Pressure should be limited to 4-6 atmospheres.
The hopper should be kept at a distance of 10-15 cm from the surface; if a thin preliminary layer is applied, you need to move the plaster shovel further, and if a thick layer is needed, on the contrary, move it almost close to the wall (a gap of up to 6 cm).
Technology of applying finishing materials using a hopper
In general, the technology differs little from the manual method.
Step 1: Clean the base
It is necessary to thoroughly remove dust and clean the surface to be plastered.
Step 2: Primer
Surface primer in order to reduce water absorption from the mixture and increase the adhesion of the plaster to the base. Primers suitable for the selected surface are used, for example, PVA or concrete contact.
Step 3. Installation of beacons
Beacons are set according to levels and secured with gypsum plaster mixture or special fasteners.
Step 4. Mesh reinforcement
Labor-intensive mesh reinforcement can be avoided by adding polypropylene fiber to the solution.
Step 5. Mixing the solution.
A construction mixer or concrete mixer is used to mix the solution.
Step 6. Applying the solution
The solution is applied starting from the bottom of the walls. The hopper, unlike a trowel, applies the plaster straight away and evenly.
Step 7. Trimming
Until the solution has set, it is trimmed using the rule.
How to make a hopper with your own hands
Despite the relatively low cost of the hopper, some craftsmen make this useful tool on their own.
- sheet steel, galvanized sheet or aluminum 1 mm thick or a suitable metal canister;
- air gun;
- nozzle;
- metal scissors;
- washers with a diameter of 10-12 mm according to the number of nozzles;
- "Bulgarian";
- drill.
The bucket is manufactured by welding or rivets according to the drawing. The capacity of the container should not exceed 2-3 liters, since it will have to be held by hand when filled.
Holes for the nozzles are drilled in the lower part of the bucket and secured with washers. Opposite them, holes are drilled for supplying the solution. A gun is attached that will act as a handle.
Video: DIY hopper bucket - it's easy
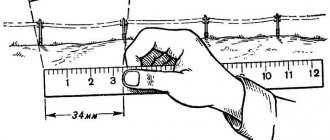
Features of the technology of use
Before starting, you need to install “beacons” at a distance of 150 - 300 centimeters from the end to the beginning of the wall. For ease of marking, you can attach additional ones between them. The distance between them is filled with solution from a pneumatic bucket in such a way that it minimally extends beyond the boundaries of the “beacons”. At the same time, the solution should not be too liquid so as not to spread over the surface, and not too thick so that the compressor can cope with splashing. Then, usually one and a half meters with gentle movements, the mixture is distributed from bottom to top along the wall, removing excess solution and without touching the “beacons”.
IMPORTANT! During operation, the bucket must be kept at a distance of 5-6 centimeters from the surface! If you remove the tool at a distance of 10 centimeters, you can already get an unnecessary “fur coat” effect.
Making your own hopper bucket
Making this device yourself is quite easy, although its retail price is relatively low. If you have a pneumatic gun and a compressor, then you only need to make a bunker container. “Everything about everything” will take no more than 2-3 hours, and “any” finances will still be saved.
Necessary materials:
- Tin (steel, aluminum) sheet is thin, from 0.4 to 1 millimeter thick;
- Directly air gun;
- 6 washers for 3 nozzles size M10-14;
- Welding machine or riveter;
- Drills (10-14 mm) and drill;
- A grinder with a cutting wheel or metal scissors.
Step-by-step manufacturing process:
- You must first make allowances of 20-30 millimeters if you intend to connect with rivets;
- Transfer the cut-out diagram drawn on whatman paper or thick cardboard to a metal sheet;
- Cut, bend at the seams, rivet or weld the resulting template;
- It is necessary to drill three holes in the front part and strengthen them on both sides with washers of the required diameter using rivets.
- On the back wall, on the contrary, make a hole for the nozzle of the air gun;
- Mount the air gun;
- Attach the handle to the top of the hopper container using rivets;
- Using the Heka coupling, connect the entire structure to the compressor.
How not to make a mistake when buying a hopper
A large selection of hoppers from different manufacturers is available for sale. But some models are convenient and durable, others work worse and quickly fail. To avoid making a mistake with your choice, pay attention to the details:
- Evaluate the quality of the material from which the bucket is made. What is the thickness of the walls, how is the surface made - is it smooth or loose, with shells and burrs.
- Check if the nozzles are reinforced. Under the influence of abrasives (sand, cement), unstrengthened nozzles will quickly wear out.
- Check the number of rivets. If there are few of them, the bucket will quickly become holey.
- Check to see if the rivets are rolled to ensure a tight seal.
- Evaluate the symmetry, quality and smoothness of the trigger mechanism.
- Hold the hopper in your hand and evaluate its ergonomics. The handle should be designed so as not to twist your wrist when working.
- Pay attention to the rubber coating of the handle.
The hopper is a convenient tool that allows you to increase productivity when carrying out finishing work, save finishing materials and improve the quality of plastering. And special additives will help improve the quality of plaster solutions.
Source
Questions of wise choice
First of all, you need to decide how often and for what purposes the device will be used. It is advisable for a professional plasterer to purchase expensive and reliable equipment, the service life of which is significantly extended. Of particular importance is the productivity of the cartouche gun in liters per minute - for domestic use, 170 liters is enough, but for professional workshops this value is too small.
It is extremely important to pay attention in advance to various defects, chips and cracks on the case. Also, replaceable attachments should be screwed in without much effort, the trigger in the gun should be pressed smoothly, and there should be no play. In cases where the gun is equipped with an air valve, this is a positive point that allows you to adjust the pressure and improve the quality of work.
From this it can be seen that the main points when buying a hopper will be:
- Its purpose is ceiling, wall, or universal with different attachments;
- Ease of use – material of the hopper container, size of the nozzles, ergonomics of the handle;
- Container volume - you do not need to choose too large, since, accordingly, the volume of the mixture that can fit and the weight of the device will increase. However, the small hopper will have to be refilled more often;
- Availability of replaceable nozzles - most buckets are equipped with nozzles for spraying the solution at different angles (and this already indicates the versatility of the device);
- Quality of manufacturing materials - optimally the device should be made of stainless steel. However, there are also budget models on the market that will not last long - the surface coating will quickly peel off, and the metal will easily corrode. This is especially true for tin ladles.